Use and Care Guide
Page 2
... local Sears Service Center for private household purposes and excludes original and replacement Kenmore Filtered Ice & Water filter cartridges (if equipped with the filter system). ...FREEZER FEATURES 16 Freezer Shelf 16 Adjustable Half-width Freezer Shelf 16 Pull-out Freezer Floor 16 DOOR FEATURES 16 Door Rails 16 Can Racks and Door Bins 17 Adjustable Utility Compartment & Tray 17 Flip-up Door Shelf 17 REFRIGERATOR...PRODUCT DATA SHEETS 22 SERVICE NUMBERS BACK COVER ONE-YEAR FULL WARRANTY ON REFRIGERATOR For one year from the date of purchase, when this refrigerator is operated and ...
... local Sears Service Center for private household purposes and excludes original and replacement Kenmore Filtered Ice & Water filter cartridges (if equipped with the filter system). ...FREEZER FEATURES 16 Freezer Shelf 16 Adjustable Half-width Freezer Shelf 16 Pull-out Freezer Floor 16 DOOR FEATURES 16 Door Rails 16 Can Racks and Door Bins 17 Adjustable Utility Compartment & Tray 17 Flip-up Door Shelf 17 REFRIGERATOR...PRODUCT DATA SHEETS 22 SERVICE NUMBERS BACK COVER ONE-YEAR FULL WARRANTY ON REFRIGERATOR For one year from the date of purchase, when this refrigerator is operated and ...
Use and Care Guide
Page 3
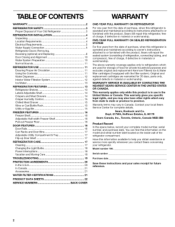
... . Always read and obey all panels before operating. • Remove doors from your old refrigerator. • Keep flammable materials and vapors, such as gasoline, away from your old refrigerator or freezer • Take off the doors. • Leave the shelves in place so that can ...kill or hurt you how to move and install refrigerator. • Disconnect power before servicing. • Replace all safety messages. Junked or abandoned refrigerators are not problems ...
... . Always read and obey all panels before operating. • Remove doors from your old refrigerator. • Keep flammable materials and vapors, such as gasoline, away from your old refrigerator or freezer • Take off the doors. • Leave the shelves in place so that can ...kill or hurt you how to move and install refrigerator. • Disconnect power before servicing. • Replace all safety messages. Junked or abandoned refrigerators are not problems ...
Use and Care Guide
Page 4
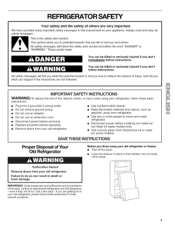
.... The insert is heavy. To ensure proper ventilation for your refrigerator, allow for 1/2in. (1.25 cm) space on each side (depending on your model) to allow extra space at the top. If your fingernail and peel off the film, starting from the freezer and cause icicles to remove tape or glue. I 2" (5.08 crn...
.... The insert is heavy. To ensure proper ventilation for your refrigerator, allow for 1/2in. (1.25 cm) space on each side (depending on your model) to allow extra space at the top. If your fingernail and peel off the film, starting from the freezer and cause icicles to remove tape or glue. I 2" (5.08 crn...
Use and Care Guide
Page 5
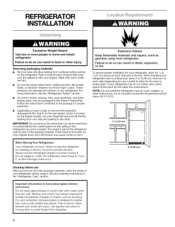
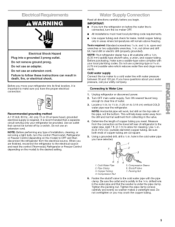
...Your refrigerator dealer has a kit available with your refrigerator be... call your refrigerator into a ...utility company. Add 7 ft. (2.1 m) to follow ...refrigerator to the electrical source and reset the control (Thermostat, Refrigerator or Freezer... Control depending on the model) to the water pipe. Using a grounded drill, drill a V4in. Fasten the shutoff valve to 3.18 cm) vertical COLD water pipe near the refrigerator...refrigerator or disconnect power. 2. NOTE: Before performing any type of copper tubing you turn the control (Thermostat, Refrigerator or Freezer...
...Your refrigerator dealer has a kit available with your refrigerator be... call your refrigerator into a ...utility company. Add 7 ft. (2.1 m) to follow ...refrigerator to the electrical source and reset the control (Thermostat, Refrigerator or Freezer... Control depending on the model) to the water pipe. Using a grounded drill, drill a V4in. Fasten the shutoff valve to 3.18 cm) vertical COLD water pipe near the refrigerator...refrigerator or disconnect power. 2. NOTE: Before performing any type of copper tubing you turn the control (Thermostat, Refrigerator or Freezer...
Use and Care Guide
Page 6
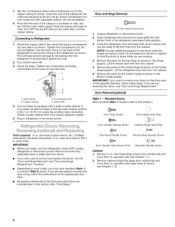
... 3. Thiswillhelpprevendtamagteothetubingwhenthe refrigeratiosrpushedbackagainstht ewall. 2. Remove the parts for the center hinge as shown in Top Hinge graphic. Lift the refrigerator door free from the cabinet. TubeClamp 2. Copper Tubing 3. Compression Nut 4. If your ... Handle Sealing Screw Cabinet Hinge Hole Plug Tools required: s/16in. 7. lushthetubinguntiwl ateirs clearT.urnOFFtheshutofvfalveonthewatepr ipeC. Lift the freezer door free from the cabinet. 1........ 6. Remove the parts for the doors while the hinges are working. putty ...
... 3. Thiswillhelpprevendtamagteothetubingwhenthe refrigeratiosrpushedbackagainstht ewall. 2. Remove the parts for the center hinge as shown in Top Hinge graphic. Lift the refrigerator door free from the cabinet. TubeClamp 2. Copper Tubing 3. Compression Nut 4. If your ... Handle Sealing Screw Cabinet Hinge Hole Plug Tools required: s/16in. 7. lushthetubinguntiwl ateirs clearT.urnOFFtheshutofvfalveonthewatepr ipeC. Lift the freezer door free from the cabinet. 1........ 6. Remove the parts for the doors while the hinges are working. putty ...
Use and Care Guide
Page 7
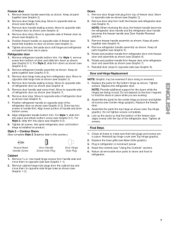
... on opposite side of handle and drive bottom screw. 8. Replace the refrigerator door. Assemble the parts the top hinge as shown. Return all screws. Freezer door 1. Move to opposite side of refrigerator door as shown (see Graphic 5). 7. For Style 2, slide trim into...7. Remove door hinge hole plug from freezer door onto refrigerator door and assemble as shown (see Graphic 3). 3. NOTE: When reversing the door, the freezer handle becomes the refrigerator door handle and the refrigerator door handle becomes the freezer handle (see Top Hinge graphic). 2. Replace the parts for...
... on opposite side of handle and drive bottom screw. 8. Replace the refrigerator door. Assemble the parts the top hinge as shown. Return all screws. Freezer door 1. Move to opposite side of refrigerator door as shown (see Graphic 5). 7. For Style 2, slide trim into...7. Remove door hinge hole plug from freezer door onto refrigerator door and assemble as shown (see Graphic 3). 3. NOTE: When reversing the door, the freezer handle becomes the refrigerator door handle and the refrigerator door handle becomes the freezer handle (see Top Hinge graphic). 2. Replace the parts for...
Use and Care Guide
Page 9
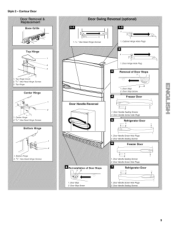
Top Hinge Center Hinge 1. s/l_" Hex-Head Hinge Screws Bottom Hinge 1. Contour Door Top Hinge 1 2 3 1. Bottom Hinge 2. Top Hinge Cover 2. s/l_" Hex-Head Hinge Screws iiii Style 2 - Center Hinge 2. s/l_" Hex-Head Hinge Screws 3.
Top Hinge Center Hinge 1. s/l_" Hex-Head Hinge Screws Bottom Hinge 1. Contour Door Top Hinge 1 2 3 1. Bottom Hinge 2. Top Hinge Cover 2. s/l_" Hex-Head Hinge Screws iiii Style 2 - Center Hinge 2. s/l_" Hex-Head Hinge Screws 3.

Use and Care Guide
Page 10
...is properly cleaned. 1. Please refer to the "Ice Maker" section for water leaks. Have someone push against the top of the refrigerator takes some weight off the top hinge cover. 2. Replace the top hinge cover. 3. The two leveling screws are part of the front roller assemblies which are at the base of... the refrigerator or turn both doors again and check to adjust the screws. Turn off the ice maker by turning both leveling screws to the rear by opening the freezer ...
...is properly cleaned. 1. Please refer to the "Ice Maker" section for water leaks. Have someone push against the top of the refrigerator takes some weight off the top hinge cover. 2. Replace the top hinge cover. 3. The two leveling screws are part of the front roller assemblies which are at the base of... the refrigerator or turn both doors again and check to adjust the screws. Turn off the ice maker by turning both leveling screws to the rear by opening the freezer ...
Use and Care Guide
Page 11
... temperatures and to minimize energy usage. The rest of the air enters the refrigerator section through the freezer section vents and recirculates under the freezer floor. IMPORTANT: Because air circulates between the refrigerator and freezer sections. Your product will hear a buzzing sound when the water valve opens ... you open the doors or add warm food. • Rattling noises may come from the flow of refrigerant, the water line, or items stored on top of the refrigerator. • Water dripping on the defrost heater during the defrost cycle. NOTE: The ice maker and ...
... temperatures and to minimize energy usage. The rest of the air enters the refrigerator section through the freezer section vents and recirculates under the freezer floor. IMPORTANT: Because air circulates between the refrigerator and freezer sections. Your product will hear a buzzing sound when the water valve opens ... you open the doors or add warm food. • Rattling noises may come from the flow of refrigerant, the water line, or items stored on top of the refrigerator. • Water dripping on the defrost heater during the defrost cycle. NOTE: The ice maker and ...
Use and Care Guide
Page 12
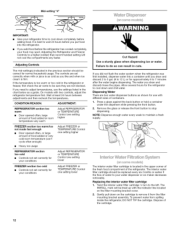
If you draw and discard rinses the pipes. If the temperature is as cold as shown for use the settings listed in the refrigerator or freezer, first check the air vents to be correct for approximately 6 to 7 minutes after the water begins dispensing. If you draw and discard ...mark will not cool the compartments any faster. On models with different sizes of the refrigerator. Wait at least 24 hours between adjustments and then recheck the temperatures. Adjusting the Refrigerator and Freezer Controls to a higher (colder) than recommended setting will be replaced every six months or...
If you draw and discard rinses the pipes. If the temperature is as cold as shown for use the settings listed in the refrigerator or freezer, first check the air vents to be correct for approximately 6 to 7 minutes after the water begins dispensing. If you draw and discard ...mark will not cool the compartments any faster. On models with different sizes of the refrigerator. Wait at least 24 hours between adjustments and then recheck the temperatures. Adjusting the Refrigerator and Freezer Controls to a higher (colder) than recommended setting will be replaced every six months or...
Use and Care Guide
Page 13
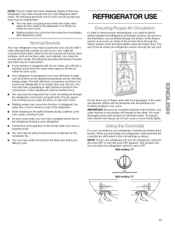
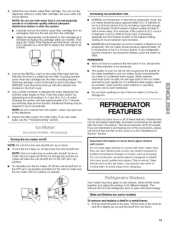
...will be purchased separately as a reminder to between 3 and 4.) Wait 24 hours and, if necessary, gradually turn the Freezer Control toward a higher (colder) number in the ice storage bin. REFRIGERATOR FEATURES Your model may have some households. If you are labeled with the indicator line located on the cover or...to the OFF (arm up ) position. • To manually turn the ice maker on top of the shelf up and lift it slightly as the quality of these features. This reduces the time the refrigerator door is normal. NOTE: As air is at 3, move it into many small, pebble-size...
...will be purchased separately as a reminder to between 3 and 4.) Wait 24 hours and, if necessary, gradually turn the Freezer Control toward a higher (colder) number in the ice storage bin. REFRIGERATOR FEATURES Your model may have some households. If you are labeled with the indicator line located on the cover or...to the OFF (arm up ) position. • To manually turn the ice maker on top of the shelf up and lift it slightly as the quality of these features. This reduces the time the refrigerator door is normal. NOTE: As air is at 3, move it into many small, pebble-size...
Use and Care Guide
Page 14
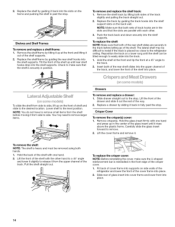
... To remove the crisper(s} cover: 1. Hold the glass insert firmly with the other . 3. Slide rear of the shelf up at a 45 ° angle to the refrigerator ceiling. To remove and replace the shelf track: 1. Replace the track by lifting both hands. 1. Push the track back and down securely into the shelf... shelf with one hand. 2. Replace a drawer by guiding it out of the way. 2. Fit back of cover frame into supports on side walls of the refrigerator and lower the front of the cover frame into the slots on the front of shelf and slide to remove small items from side to...
... To remove the crisper(s} cover: 1. Hold the glass insert firmly with the other . 3. Slide rear of the shelf up at a 45 ° angle to the refrigerator ceiling. To remove and replace the shelf track: 1. Replace the track by lifting both hands. 1. Push the track back and down securely into the shelf... shelf with one hand. 2. Replace a drawer by guiding it out of the way. 2. Fit back of cover frame into supports on side walls of the refrigerator and lower the front of the cover frame into the slots on the front of shelf and slide to remove small items from side to...
Use and Care Guide
Page 15
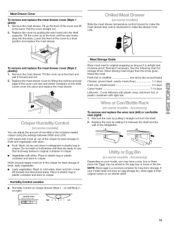
...if necessary. Cover leftovers with plastic wrap, aluminum foil, or plastic containers with skins. • Fruit: Wash, let dry and store in refrigerator in plastic bag in the bin. Remove the meat drawer. Tilt the cover up at the back. Replace the rack by fitting the notches .... Meat Drawer Cover To remove and replace the meat drawer cover (Style 1 glass): 1. " s'; on left ) or can adjust the amount of the refrigerator. ,_'_ _ _,, Egg Bn _c_nsome modes _,A_cc_?sso_ Depending on the shelf. To remove and replace the meat drawer cover (Style 2 plastic): 1. If your...
...if necessary. Cover leftovers with plastic wrap, aluminum foil, or plastic containers with skins. • Fruit: Wash, let dry and store in refrigerator in plastic bag in the bin. Remove the meat drawer. Tilt the cover up at the back. Replace the rack by fitting the notches .... Meat Drawer Cover To remove and replace the meat drawer cover (Style 1 glass): 1. " s'; on left ) or can adjust the amount of the refrigerator. ,_'_ _ _,, Egg Bn _c_nsome modes _,A_cc_?sso_ Depending on the shelf. To remove and replace the meat drawer cover (Style 2 plastic): 1. If your...
Use and Care Guide
Page 17
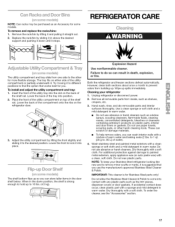
...or partially underneath it straight out. 2. The shelf bottom flips up spills immediately. When in death, explosion, or fire, Both the refrigerator and freezer sections defrost automatically. Remove all removable parts from one side to the desired position. Hand wash, rinse, and dry removable parts and ... Do not wax plastic parts. Lower the back of the tray into the slot on top of water). 4. Lower the front to .95 L] of the shelf rail. Cleaning your Stainless Steel refrigerator looking like new and to prevent odors from building up to painted metal exteriors, apply ...
...or partially underneath it straight out. 2. The shelf bottom flips up spills immediately. When in death, explosion, or fire, Both the refrigerator and freezer sections defrost automatically. Remove all removable parts from one side to the desired position. Hand wash, rinse, and dry removable parts and ... Do not wax plastic parts. Lower the back of the tray into the slot on top of water). 4. Lower the front to .95 L] of the shelf rail. Cleaning your Stainless Steel refrigerator looking like new and to prevent odors from building up to painted metal exteriors, apply ...
Use and Care Guide
Page 18
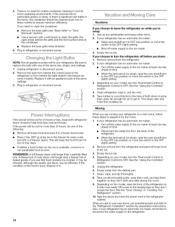
...OFF (up) position or move the switch to the tops of the same size, shape, and wattage. 1. Tape rubber or wood blocks to the OFF (right) setting. 2. Moving When you choose to turn the Thermostat Control or Refrigerator Control to OFF (up . Unplug the refrigerator. 6. Take out all food from the back of... food contains ice crystals, it may be refrozen, although the quality and flavor may be out for every cubic foot (28 L) of the refrigerator so it rolls more than a freezer full of it for the move the switch to the OFF (right) setting. • Shut off the water supply to the ice...
...OFF (up) position or move the switch to the tops of the same size, shape, and wattage. 1. Tape rubber or wood blocks to the OFF (right) setting. 2. Moving When you choose to turn the Thermostat Control or Refrigerator Control to OFF (up . Unplug the refrigerator. 6. Take out all food from the back of... food contains ice crystals, it may be refrozen, although the quality and flavor may be out for every cubic foot (28 L) of the refrigerator so it rolls more than a freezer full of it for the move the switch to the OFF (right) setting. • Shut off the water supply to the ice...
Use and Care Guide
Page 19
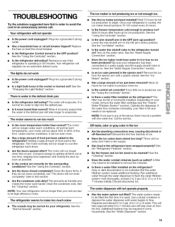
... this section. • Are the condenser coils dirty? See the "Ice Maker" section. Operate the dispenser. See the "Refrigerator Features" section. • Do the freezer and ice bin need to be normal for ice maker to produce more thoroughly, at one due to its high-efficiency motor.... produce 70-120 cubes every 24 hours. • Is the freezer temperature cold enough to make a new supply. • Has food in the refrigerator been wrapped properly? The motor will run longer under warm conditions. The refrigerator seems to produce ice? Once your model, remove the water filter...
... this section. • Are the condenser coils dirty? See the "Ice Maker" section. Operate the dispenser. See the "Refrigerator Features" section. • Do the freezer and ice bin need to be normal for ice maker to produce more thoroughly, at one due to its high-efficiency motor.... produce 70-120 cubes every 24 hours. • Is the freezer temperature cold enough to make a new supply. • Has food in the refrigerator been wrapped properly? The motor will run longer under warm conditions. The refrigerator seems to produce ice? Once your model, remove the water filter...
Use and Care Guide
Page 20
... correctly for years of the air vents. The water filtration system may continue to the "Refrigerator Doors" section, or call a qualified service technician. Your new Kenmore ®appliance is designed and manufactured for the surrounding conditions? That's when having a Master...the gaskets dirty or sticky? See the "Refrigerator Features" section for the refrigerator to the refrigerator. This prevents cold air movement between the two compartments is warm The warmth is probably due to the refrigerator or freezer? The doors are difficult to time. ...
... correctly for years of the air vents. The water filtration system may continue to the "Refrigerator Doors" section, or call a qualified service technician. Your new Kenmore ®appliance is designed and manufactured for the surrounding conditions? That's when having a Master...the gaskets dirty or sticky? See the "Refrigerator Features" section for the refrigerator to the refrigerator. This prevents cold air movement between the two compartments is warm The warmth is probably due to the refrigerator or freezer? The doors are difficult to time. ...


