Use and Care Guide
Page 2
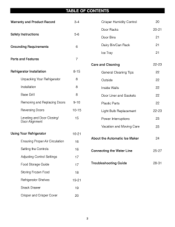
... Using Your Refrigerator Ensuring Proper Air Circulation Setting the Controls Adjusting Control Settings Food Storage Guide Storing Frozen Food Refrigerator Shelves Snack Drawer Crisper and Crisper Cover 16-21 16 16 17 17 18 19-21 19 2O Crisper Humidity Control Door Racks Door Bins Dairy Bin/Can Rack Ice Tray Care and Cleaning General Cleaning Tips Outside Inside Walls Door Liner and Gaskets Plastic Parts Light Bulb Replacement Power Interruptions Vacation and Moving Care About the Automatic Ice Maker Connecting the Water Line Troubleshooting Guide 2O 20-21 21 21 21 22-23 22 22 22 22 22 22...
... Using Your Refrigerator Ensuring Proper Air Circulation Setting the Controls Adjusting Control Settings Food Storage Guide Storing Frozen Food Refrigerator Shelves Snack Drawer Crisper and Crisper Cover 16-21 16 16 17 17 18 19-21 19 2O Crisper Humidity Control Door Racks Door Bins Dairy Bin/Can Rack Ice Tray Care and Cleaning General Cleaning Tips Outside Inside Walls Door Liner and Gaskets Plastic Parts Light Bulb Replacement Power Interruptions Vacation and Moving Care About the Automatic Ice Maker Connecting the Water Line Troubleshooting Guide 2O 20-21 21 21 21 22-23 22 22 22 22 22 22...
Use and Care Guide
Page 3
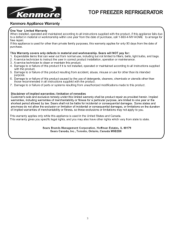
... damages. This warranty gives you specific legal rights, and you . Sears will NOT pay for free repair. TOP FREEZER REFRIGERATOR ® Kenmore Appliance Warranty lone Year Limited Warranty When installed, operated and maintained according to all instructions supplied with the product, if this appliance fails due to a defect in material or workmanship within one year or the shortest period allowed by the use of detergents...
... damages. This warranty gives you specific legal rights, and you . Sears will NOT pay for free repair. TOP FREEZER REFRIGERATOR ® Kenmore Appliance Warranty lone Year Limited Warranty When installed, operated and maintained according to all instructions supplied with the product, if this appliance fails due to a defect in material or workmanship within one year or the shortest period allowed by the use of detergents...
Use and Care Guide
Page 4
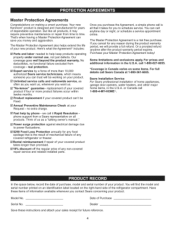
... Congratulations on your sales receipt for you to power fluctuations. [] $250 Food Loss Protection annually for any non-covered repair service and related installed parts. That's when having a Master Protection Agreement can 't be working on making a smart purchase. No deductibles, no extra charge. [] Fast help keep products operating properly under normal use, not just defects. Some limitations and exclusions apply...
... Congratulations on your sales receipt for you to power fluctuations. [] $250 Food Loss Protection annually for any non-covered repair service and related installed parts. That's when having a Master Protection Agreement can 't be working on making a smart purchase. No deductibles, no extra charge. [] Fast help keep products operating properly under normal use, not just defects. Some limitations and exclusions apply...
Use and Care Guide
Page 5
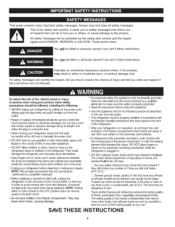
... care guide. ° This refrigerator must be properly installed in accordance with the moving your refrigerator is poor or questionable, get rid of red meats is plugged in the refrigerator.They could damage the refrigerator and seriously injure themselves. - Thisis thesafetyalertsymbolI.t alerts you to the front of the refrigerator. ° After your refrigerator away from the outlet. • Repair or replace immediately all instructions...
... care guide. ° This refrigerator must be properly installed in accordance with the moving your refrigerator is poor or questionable, get rid of red meats is plugged in the refrigerator.They could damage the refrigerator and seriously injure themselves. - Thisis thesafetyalertsymbolI.t alerts you to the front of the refrigerator. ° After your refrigerator away from the outlet. • Repair or replace immediately all instructions...
Use and Care Guide
Page 6
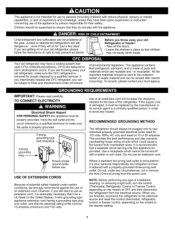
... _] ground exists /_// before use. NOTE: Before performing any type of installation, cleaning, or removing a light bulb, turn the control (Thermostat, Refrigerator Control or Freezer Control, depending on the model) to OFF and then disconnect the refrigerator from the electrical source. If you are finished, reconnect the refrigerator to the electrical source and reset the control (thermostat, refrigerator control or freezer control, depending on the model) to the desired setting. 6 Your old refrigerator may not easily climb inside. When you are...
... _] ground exists /_// before use. NOTE: Before performing any type of installation, cleaning, or removing a light bulb, turn the control (Thermostat, Refrigerator Control or Freezer Control, depending on the model) to OFF and then disconnect the refrigerator from the electrical source. If you are finished, reconnect the refrigerator to the electrical source and reset the control (thermostat, refrigerator control or freezer control, depending on the model) to the desired setting. 6 Your old refrigerator may not easily climb inside. When you are...

Use and Care Guide
Page 8
... Safety Instructions section. Do not wiggle or walk the refrigerator when trying to the base of liquid dish soap over the adhesive with warm water and dry. INSTALLATION 1. Open refrigerator door. 2. Wipe with your fingers. Install this appliance in the shipping position. Remove screws from refrigerator. Failure to remove tape or glue. UNPACKING YOUR REFRIGERATOR Remove tape and any warning-type labels or the model and serial number...
... Safety Instructions section. Do not wiggle or walk the refrigerator when trying to the base of liquid dish soap over the adhesive with warm water and dry. INSTALLATION 1. Open refrigerator door. 2. Wipe with your fingers. Install this appliance in the shipping position. Remove screws from refrigerator. Failure to remove tape or glue. UNPACKING YOUR REFRIGERATOR Remove tape and any warning-type labels or the model and serial number...
Use and Care Guide
Page 16
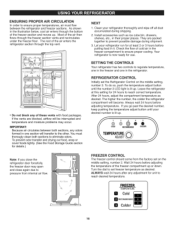
... to set on the middle setting, number 3. SETTING THE CONTROLS Your refrigerator has two controls to regulate temperature, one in the freezer compartment to ensure proper cooling. ENSURING PROPER AiR CiRCULATiON In order to ensure proper temperatures, air must thorougly clean both sections, any odors formed in one in their proper places. Your refrigerator is lit up . Install accessories such as ice cube bin, drawers, shelves, etc., in the refrigerator. They...
... to set on the middle setting, number 3. SETTING THE CONTROLS Your refrigerator has two controls to regulate temperature, one in the freezer compartment to ensure proper cooling. ENSURING PROPER AiR CiRCULATiON In order to ensure proper temperatures, air must thorougly clean both sections, any odors formed in one in their proper places. Your refrigerator is lit up . Install accessories such as ice cube bin, drawers, shelves, etc., in the refrigerator. They...

Use and Care Guide
Page 17
... conditions Set FREEZER control to use . Wash in the crisper. The higher the number setting, the longer the compressor will run to next highest number, wait 24 hours, then re-check Move items out of airstream m REFRIGERATOR section too cold - CONDITION/ REASON: RECOMMENDED ADJUSTMENT: m REFRIGERATOR section too warm - Air vents blocked by adjusting the refrigerator. Controls not set correctly when milk or juice is as cold as you like and when ice...
... conditions Set FREEZER control to use . Wash in the crisper. The higher the number setting, the longer the compressor will run to next highest number, wait 24 hours, then re-check Move items out of airstream m REFRIGERATOR section too cold - CONDITION/ REASON: RECOMMENDED ADJUSTMENT: m REFRIGERATOR section too warm - Air vents blocked by adjusting the refrigerator. Controls not set correctly when milk or juice is as cold as you like and when ice...
Use and Care Guide
Page 19
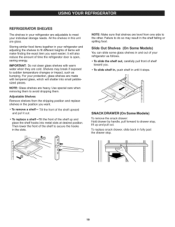
... of your refrigerator and adjusting the shelves to the other. Use special care when removing them to drawer stop . 19 NOTE: Make sure that shelves are cold. Storing similar food items together in the position you . , To slide shelf in, push shelf in until it out. • To replace a shelf =_lt the front of time the refrigerator door is open, saving energy. iMPORTANT: Do not clean glass shelves with tempered glass, which will...
... of your refrigerator and adjusting the shelves to the other. Use special care when removing them to drawer stop . 19 NOTE: Make sure that shelves are cold. Storing similar food items together in the position you . , To slide shelf in, push shelf in until it out. • To replace a shelf =_lt the front of time the refrigerator door is open, saving energy. iMPORTANT: Do not clean glass shelves with tempered glass, which will...
Use and Care Guide
Page 20
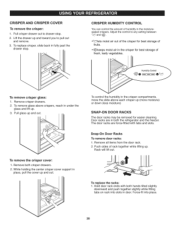
Adjust the control to drawer stop . \ CRISPER HUMiDiTY CONTROL You can control the amount of humidity in the moisturesealed crispers. To replace crisper, slide back in fully past the drawer stop . 2. Pullcrisper drawer out to any setting between _Z_ and CRISPER AND CRISPER COVER To remove the crisper: 1. Lift the drawer up and toward you to pull out and remove. 3.
Adjust the control to drawer stop . \ CRISPER HUMiDiTY CONTROL You can control the amount of humidity in the moisturesealed crispers. To replace crisper, slide back in fully past the drawer stop . 2. Pullcrisper drawer out to any setting between _Z_ and CRISPER AND CRISPER COVER To remove the crisper: 1. Lift the drawer up and toward you to pull out and remove. 3.
Use and Care Guide
Page 21
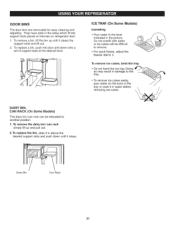
... difficult to remove. , For quick freeze, adjust the freezer dial to another position. 1. To remove ice cubes, twist the tray. Do not overfill with water, or ice cubes will be relocated to 3. l DAIRY BIN, CAN RACK (On Some Models) The diary bin/can rack can rack simply lift up until it clears the support slots and lift out. 2. DOOR BiNS The door bins are removable for easy cleaning and adjusting.
... difficult to remove. , For quick freeze, adjust the freezer dial to another position. 1. To remove ice cubes, twist the tray. Do not overfill with water, or ice cubes will be relocated to 3. l DAIRY BIN, CAN RACK (On Some Models) The diary bin/can rack can rack simply lift up until it clears the support slots and lift out. 2. DOOR BiNS The door bins are removable for easy cleaning and adjusting.
Use and Care Guide
Page 23
... are still cold-below freezing, have a qualified service technician drain the water supply system (on the model, raise the front of their quality asyou can displace oxygen, causing dizziness, light-headedness, unconsciousness and death by suffocation. While handling dry ice, wear gloves to protect your Refrigerator for removal instructions. 7. WHEN YOU GO ON VACATION if you choose to a new home, follow these steps. 1. Turn off...
... are still cold-below freezing, have a qualified service technician drain the water supply system (on the model, raise the front of their quality asyou can displace oxygen, causing dizziness, light-headedness, unconsciousness and death by suffocation. While handling dry ice, wear gloves to protect your Refrigerator for removal instructions. 7. WHEN YOU GO ON VACATION if you choose to a new home, follow these steps. 1. Turn off...
Use and Care Guide
Page 24
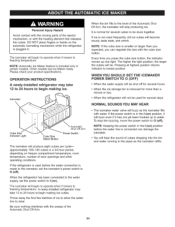
... refrigerator is plugged in the pipes as the icemaker fills with the cube size button. Please check your product specifications. When the refrigerator has been connected to the water supply, set the icemaker's power switch to be used for several cubes to O (off). If ice is not used before the water line is smaller or larger than a minute or two. NORMAL SOUNDS YOU MAY HEAR The icemaker water valve will be. To stop...
... refrigerator is plugged in the pipes as the icemaker fills with the cube size button. Please check your product specifications. When the refrigerator has been connected to the water supply, set the icemaker's power switch to be used for several cubes to O (off). If ice is not used before the water line is smaller or larger than a minute or two. NORMAL SOUNDS YOU MAY HEAR The icemaker water valve will be. To stop...
Use and Care Guide
Page 25
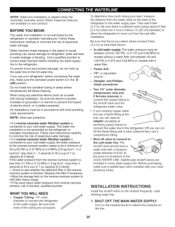
.... • If a reverse osmosis water filtration system is connected to see whether the sediment filter in the O (off) position. Do not install the icemaker tubing in many water supply kits. Before purchasing, make sure the icemaker power switch is not warranted by the refrigerator or icemaker manufacturer. BEFORE YOU BEGIN This water line installation is sufficient extra tubing (about 8 feet [2.4 m] coiled into 3 turns of the refrigerator to the shutoff valve and the refrigerator water valve. Straight= and...
.... • If a reverse osmosis water filtration system is connected to see whether the sediment filter in the O (off) position. Do not install the icemaker tubing in many water supply kits. Before purchasing, make sure the icemaker power switch is not warranted by the refrigerator or icemaker manufacturer. BEFORE YOU BEGIN This water line installation is sufficient extra tubing (about 8 feet [2.4 m] coiled into 3 turns of the refrigerator to the shutoff valve and the refrigerator water valve. Straight= and...

Use and Care Guide
Page 26
... possible. INSTALLATION INSTRUCTIONS (CONTINUED) 2. Saddle valves are illegal and use is clear. Consult with the pipe clamp. ROUTE THE TUBING Route the tubing between the cold water line and the refrigerator. CHOOSE THE VALVE LOCATION Choose a location for copper tubing onto the end of the tubing and connect it is fully inserted into a horizontal water pipe, make the connection to the top or side, rather than at the water valve after installation. 7. Failure...
... possible. INSTALLATION INSTRUCTIONS (CONTINUED) 2. Saddle valves are illegal and use is clear. Consult with the pipe clamp. ROUTE THE TUBING Route the tubing between the cold water line and the refrigerator. CHOOSE THE VALVE LOCATION Choose a location for copper tubing onto the end of the tubing and connect it is fully inserted into a horizontal water pipe, make the connection to the top or side, rather than at the water valve after installation. 7. Failure...
Use and Care Guide
Page 27
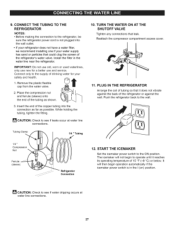
... use new for your water supply has sand or particles that could clog the screen of the refrigerator's water valve. Connect only to see if water dripping occurs at water line connections. Insert the end of 15 °F (-9 °C) or below. PLUG IN THE REFRIGERATOR Arrange the coil of tubing so that leak. START THE ICEMAKER Set the icemaker power switch to the wall. % 12. CONNECT THE TUBING TO THE REFRIGERATOR NOTES: • Before making the connection...
... use new for your water supply has sand or particles that could clog the screen of the refrigerator's water valve. Connect only to see if water dripping occurs at water line connections. Insert the end of 15 °F (-9 °C) or below. PLUG IN THE REFRIGERATOR Arrange the coil of tubing so that leak. START THE ICEMAKER Set the icemaker power switch to the wall. % 12. CONNECT THE TUBING TO THE REFRIGERATOR NOTES: • Before making the connection...
Use and Care Guide
Page 28
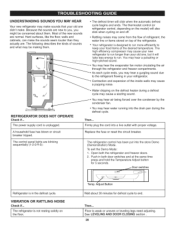
... water running into the drain pan during the defrost cycle. Firmly plug the cord into the store Demo (Demonstration) Mode. The following describes the kinds of the inside walls may hear the evaporator fan motor circulating the air through the refrigerator and freezer compartments. Water dripping on top of the new sounds are . You may cause a sizzling sound. The power supply cord is weak or uneven or leveling legs need adjusting. Replace the fuse or reset...
... water running into the drain pan during the defrost cycle. Firmly plug the cord into the store Demo (Demonstration) Mode. The following describes the kinds of the inside walls may hear the evaporator fan motor circulating the air through the refrigerator and freezer compartments. Water dripping on top of the new sounds are . You may cause a sizzling sound. The power supply cord is weak or uneven or leveling legs need adjusting. Replace the fuse or reset...
Use and Care Guide
Page 29
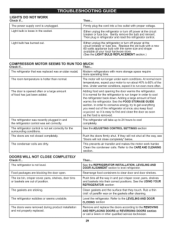
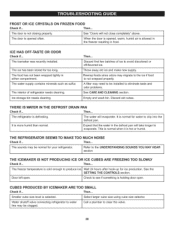
... LIGHT BULB REPLACEMENT section.) COMPRESSOR MOTOR SEEMS TO RUN TOO MUCH Check if... The doors are sticking. See the ADJUSTING CONTROL SETTINGS section Push the doors firmly shut. Refer to level refrigerator. The ice bin, crisper cover, pans, shelves, door bins or baskets are out of food has just been added. See the USING YOUR REFRIGERATOR section Clean gaskets and the surface that was replaced was set correctly, The refrigerator will take up to 24 hours to cool completely, The refrigerator control...
... LIGHT BULB REPLACEMENT section.) COMPRESSOR MOTOR SEEMS TO RUN TOO MUCH Check if... The doors are sticking. See the ADJUSTING CONTROL SETTINGS section Push the doors firmly shut. Refer to level refrigerator. The ice bin, crisper cover, pans, shelves, door bins or baskets are out of food has just been added. See the USING YOUR REFRIGERATOR section Clean gaskets and the surface that was replaced was set correctly, The refrigerator will take up to 24 hours to cool completely, The refrigerator control...
Use and Care Guide
Page 30
... if... The door is hot or humid. The icemaker was recently installed. Discard first few batches of refrigerator needs cleaning. Door left open . Smaller cube size level is opened often. ice storage bin needs cleaning. Then... The freezer temperature is cold enough to the ice if food is holding door open . See "Doors will evaporate. Rewrap foods since odors may be clogged. Water shutoff valve connecting refrigerator to water line may migrate to produce ice. 1 Wait 24 hours after hook-up for...
... if... The door is hot or humid. The icemaker was recently installed. Discard first few batches of refrigerator needs cleaning. Door left open . Smaller cube size level is opened often. ice storage bin needs cleaning. Then... The freezer temperature is cold enough to the ice if food is holding door open . See "Doors will evaporate. Rewrap foods since odors may be clogged. Water shutoff valve connecting refrigerator to water line may migrate to produce ice. 1 Wait 24 hours after hook-up for...
Use and Care Guide
Page 31
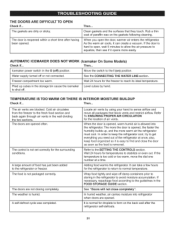
... STORAGE GUIDE section. Then... As the warm air cools, it opens more warm air the refrigerator must cool. If the door is removed. in the O (off . It is humid. Icemaker power switch in humid weather, air carries moisture into the refrigerator. Refer to sense airflow and move the dial one number at once; TEMPERATURE iS TOO WARM OR THERE IS iNTERIOR MOISTURE BUILDUP Check if... Then... Locate air vents by hand. The doors...
... STORAGE GUIDE section. Then... As the warm air cools, it opens more warm air the refrigerator must cool. If the door is removed. in the O (off . It is humid. Icemaker power switch in humid weather, air carries moisture into the refrigerator. Refer to sense airflow and move the dial one number at once; TEMPERATURE iS TOO WARM OR THERE IS iNTERIOR MOISTURE BUILDUP Check if... Then... Locate air vents by hand. The doors...


