Use and Care Guide
Page 2
... and Replaclng Doors 10 CARE AND CLEANING 23 How to Remove Freezer Door 10 General Cleaning Tips 23 How to Remove Refrigertor Door 10 Outside 23 Replacing Refrigerator Door 11 Inside Walls 23 Replacing Freezer Door 11 Door Line and Gaskets 23 Reversing Doors 12 Plastic ...24 USING YOUR REFRIGERATOR 17 When you move 24 Ensuring Proper Air Circulation 17 ABOUT AUTOMATIC ICEMAKER 25 Setting the Controls 17 CONNECTING THE WATER LINE 26 Adjusting Control Settings 18 TROUBLESHOOTING GUIDE 29 Water Dispenser 18 Food Storage Guide 18 Storing Frozen Food 19 3
... and Replaclng Doors 10 CARE AND CLEANING 23 How to Remove Freezer Door 10 General Cleaning Tips 23 How to Remove Refrigertor Door 10 Outside 23 Replacing Refrigerator Door 11 Inside Walls 23 Replacing Freezer Door 11 Door Line and Gaskets 23 Reversing Doors 12 Plastic ...24 USING YOUR REFRIGERATOR 17 When you move 24 Ensuring Proper Air Circulation 17 ABOUT AUTOMATIC ICEMAKER 25 Setting the Controls 17 CONNECTING THE WATER LINE 26 Adjusting Control Settings 18 TROUBLESHOOTING GUIDE 29 Water Dispenser 18 Food Storage Guide 18 Storing Frozen Food 19 3
Use and Care Guide
Page 3
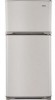
... maintained according to all instructions supplied with the product. 5. Implied warranties, including warranties of purchase. Sears shall not be product repair as provided herein. BOTTOM FREEZER REFRIGERATOR ® I(enmore Appliance Warranty One Year Limited Warranty When installed, operated and maintained according to all instructions supplied with the product, if this product. If...
... maintained according to all instructions supplied with the product. 5. Implied warranties, including warranties of purchase. Sears shall not be product repair as provided herein. BOTTOM FREEZER REFRIGERATOR ® I(enmore Appliance Warranty One Year Limited Warranty When installed, operated and maintained according to all instructions supplied with the product, if this product. If...
Use and Care Guide
Page 4
...life of your Request no functional failure excluded from a Sears representative on some items. For tuff details call lm8OO-4-MYmHOME®. Your new Kenmore ® product is a risk free purchase. real protection. [] Expert service by phone - we call it may require preventive maintenance or...which means someone you purchase the Agreement t a simple phone caii is aii that is the result of mechanical failure of any Covered refrigerator or freezer. [] Rental reimbursement if repair of your covered product takes longer than promised. [] 10% discount off the regular price of your ...
...life of your Request no functional failure excluded from a Sears representative on some items. For tuff details call lm8OO-4-MYmHOME®. Your new Kenmore ® product is a risk free purchase. real protection. [] Expert service by phone - we call it may require preventive maintenance or...which means someone you purchase the Agreement t a simple phone caii is aii that is the result of mechanical failure of any Covered refrigerator or freezer. [] Rental reimbursement if repair of your covered product takes longer than promised. [] 10% discount off the regular price of your ...
Use and Care Guide
Page 5
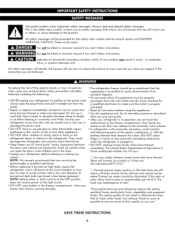
...wire filament. (A burned-out light bulb may break when being replaced.) NOTE: Setting either theplug or connector end.When moving your refrigerator away from the outlet. ° Repair or replace immediately all instructions before cleaning or making any offodoror off power at either or...cause damage to eat." Skin may break when frozen, causing damage. ° The refrigerator-freezer should be performedby a qualified individual. ° Before replacing a burned-out light bulb, unplug the refrigerator orturn off -color should not be refrozen and should not be eaten.Thawed ice cream...
...wire filament. (A burned-out light bulb may break when being replaced.) NOTE: Setting either theplug or connector end.When moving your refrigerator away from the outlet. ° Repair or replace immediately all instructions before cleaning or making any offodoror off power at either or...cause damage to eat." Skin may break when frozen, causing damage. ° The refrigerator-freezer should be performedby a qualified individual. ° Before replacing a burned-out light bulb, unplug the refrigerator orturn off -color should not be refrozen and should not be eaten.Thawed ice cream...
Use and Care Guide
Page 6
... cord will sit for their safety. Children should always be 15 amperes (minimum) and 120 volts. BEFORE YOU THROW AWAY YOUR OLD REFRIGERATOR OR FREEZER ° Take off with a switch or pull chain. S 3-prong grounding plug 3-prong grounding type wall receptacle Ensureproper ground exists before... with the appliance. Do not, under any type of installation, cleaning, or removing a light bulb, turn the control (Thermostat, Refrigerator Control or Freezer Control, depending on the model) to the desired setting. However, if you are believed to harm stratospheric Ozone. Even if they ...
... cord will sit for their safety. Children should always be 15 amperes (minimum) and 120 volts. BEFORE YOU THROW AWAY YOUR OLD REFRIGERATOR OR FREEZER ° Take off with a switch or pull chain. S 3-prong grounding plug 3-prong grounding type wall receptacle Ensureproper ground exists before... with the appliance. Do not, under any type of installation, cleaning, or removing a light bulb, turn the control (Thermostat, Refrigerator Control or Freezer Control, depending on the model) to the desired setting. However, if you are believed to harm stratospheric Ozone. Even if they ...
Use and Care Guide
Page 7
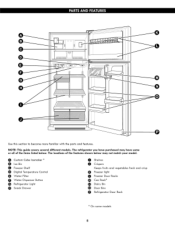
... 0 Snack Drawer 00 SChriesplveerss Keeps fruits and vecjetabies fresh and crisp (_ Freezer iicjht 0 Freezer Door Racks _ Can Rack _ _ Dairy Bin _) Door Bins Refrigerator Door Rack On some or all of the features shown below . The refrigerator you have purchased may not match your model. The locations of the items listed below may have some...
... 0 Snack Drawer 00 SChriesplveerss Keeps fruits and vecjetabies fresh and crisp (_ Freezer iicjht 0 Freezer Door Racks _ Can Rack _ _ Dairy Bin _) Door Bins Refrigerator Door Rack On some or all of the features shown below . The refrigerator you have purchased may not match your model. The locations of the items listed below may have some...
Use and Care Guide
Page 8
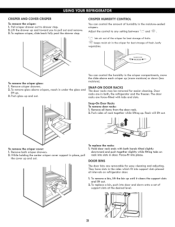
... opened or removed. (Necessary on some models). • Take out the base grille by rubbing a small amount of your refrigerator. INSTALLATION 1. NEVER install the refrigerator on the 9 the 2 screws on a platform or a weakly supported structure. 5. Wipe with hinge, base grille, stopper ...To remove the base grille • Open or remove refrigerator doors. (Necessary on some models), that is heavy. Do not remove any temporary labels from refrigerator. Refrigerator shelves are installed in the freezer compartment to protect the floor. They are not recommended....
... opened or removed. (Necessary on some models). • Take out the base grille by rubbing a small amount of your refrigerator. INSTALLATION 1. NEVER install the refrigerator on the 9 the 2 screws on a platform or a weakly supported structure. 5. Wipe with hinge, base grille, stopper ...To remove the base grille • Open or remove refrigerator doors. (Necessary on some models), that is heavy. Do not remove any temporary labels from refrigerator. Refrigerator shelves are installed in the freezer compartment to protect the floor. They are not recommended....
Use and Care Guide
Page 9
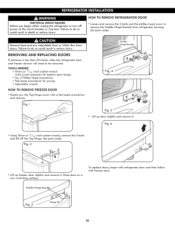
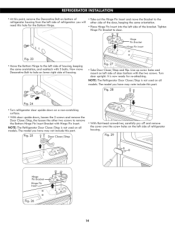
Place door on a non scratching surface. To replace doors, begin , either unplug the refrigerator or turn off the Top Hinge. Fig. 1 Lift up freezer door slightly and remove it . ° Using lOmm or 13/32 -inch socket wrench, remove the 3 bolts and lift off power at the circuit breaker ...or fuse box. HOW TO REMOVE REFRIGERATOR DOOR ° Loosen and remove the 2 bolts and the phillips head ...
Place door on a non scratching surface. To replace doors, begin , either unplug the refrigerator or turn off the Top Hinge. Fig. 1 Lift up freezer door slightly and remove it . ° Using lOmm or 13/32 -inch socket wrench, remove the 3 bolts and lift off power at the circuit breaker ...or fuse box. HOW TO REMOVE REFRIGERATOR DOOR ° Loosen and remove the 2 bolts and the phillips head ...
Use and Care Guide
Page 10
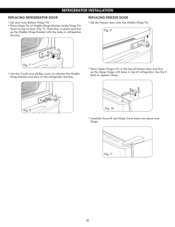
... Hinge Bracket inside Hinge Pin insert on top of refrigerator. Fig. 10 ° Carefully force-fit top Hinge Cover back into place over Hinge. 11 Use the 3 baits to the refrigerator housing. ° Place Upper Hinge's Pin in the top pf freezer door and line up the Middle Hinge ...Bracket with holes in refrigerator housing. REPLACING FREEZER DOOR ° Set the freezer door onto the Middle Hinge Pin. 9 Fig. 7 ° ...
... Hinge Bracket inside Hinge Pin insert on top of refrigerator. Fig. 10 ° Carefully force-fit top Hinge Cover back into place over Hinge. 11 Use the 3 baits to the refrigerator housing. ° Place Upper Hinge's Pin in the top pf freezer door and line up the Middle Hinge ...Bracket with holes in refrigerator housing. REPLACING FREEZER DOOR ° Set the freezer door onto the Middle Hinge Pin. 9 Fig. 7 ° ...
Use and Care Guide
Page 11
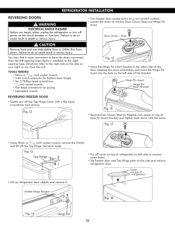
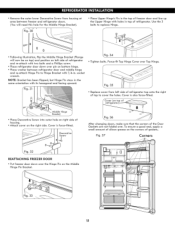
... for prying ° Adjustable wrench hinge) REVERSING FREEZER DOOR ° Gently pry off cover on top of refrigerator on left side to uncover screw holes. ° Set freezer door and Top Hinge parts to the side and remove refrigerator door. ° Lift up refrigerator door slightly and remove it more convenient to remove... Hine Pin Insert Bracket, and tighten both down on your right as you begin, either unplug the refrigerator or turn off the Top Hinge. Fig. 14 12 REVERSING DOORS ELECTRICAL SHOCK HAZARD Before you face the unit. Failure to the rightopening type. You may ...
... for prying ° Adjustable wrench hinge) REVERSING FREEZER DOOR ° Gently pry off cover on top of refrigerator on left side to uncover screw holes. ° Set freezer door and Top Hinge parts to the side and remove refrigerator door. ° Lift up refrigerator door slightly and remove it more convenient to remove... Hine Pin Insert Bracket, and tighten both down on your right as you begin, either unplug the refrigerator or turn off the Top Hinge. Fig. 14 12 REVERSING DOORS ELECTRICAL SHOCK HAZARD Before you face the unit. Failure to the rightopening type. You may ...
Use and Care Guide
Page 12
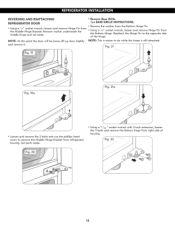
...parts aside. ° Using a 13/3 2 " socket wrench with 2-inch extension, loosen the 3 bolts and remove the Bottom hinge from refrigerator housing. Reattach the Hinge Pin to remove the Middle Hinge Bracket from right side of the hinge. NOTE: This is easier to do while... 2 bolts and use the phillips head screw to the opposite side of housing. 13 Remove washer underneath the middle hinge and set aside. REVERSINAGND REATTACHING REFRIGERATOR DOOR ° Using a 1/4" socket wrench, loosen and remove Hinge Pin from the Bottom Hinge. See BASE GRILLE iNSTRUCTiONS. ° Remove the washer...
...parts aside. ° Using a 13/3 2 " socket wrench with 2-inch extension, loosen the 3 bolts and remove the Bottom hinge from refrigerator housing. Reattach the Hinge Pin to remove the Middle Hinge Bracket from right side of the hinge. NOTE: This is easier to do while... 2 bolts and use the phillips head screw to the opposite side of housing. 13 Remove washer underneath the middle hinge and set aside. REVERSINAGND REATTACHING REFRIGERATOR DOOR ° Using a 1/4" socket wrench, loosen and remove Hinge Pin from the Bottom Hinge. See BASE GRILLE iNSTRUCTiONS. ° Remove the washer...
Use and Care Guide
Page 13
... the Bottom Hinge Pin Insert Bracket with Hinge Pin Insert. Turn door upright. The model you have may note include this part. _Fig. 24 " Turn refrigerator door upside down on a non-scratching surface. ° With door upside down, loosen the 2 screws and remove the Door Closer/Stop, the loosen the ... the Bottom Hinge. The model you will need this hole for re-attaching. • At this point, remove the Decorative Bolt on bottom of refrigerator housing from the left side of refrJgeraton you have may not include this part. Line up screw holes and mount on the left side of...
... the Bottom Hinge Pin Insert Bracket with Hinge Pin Insert. Turn door upright. The model you have may note include this part. _Fig. 24 " Turn refrigerator door upside down on a non-scratching surface. ° With door upside down, loosen the 2 screws and remove the Door Closer/Stop, the loosen the ... the Bottom Hinge. The model you will need this hole for re-attaching. • At this point, remove the Decorative Bolt on bottom of refrigerator housing from the left side of refrJgeraton you have may not include this part. Line up screw holes and mount on the left side of...
Use and Care Guide
Page 14
... outer hole on right side of housing. ° Attach cover on bottom hinge. ° Place washer between freezer and refrigerator doors. (You will now be on top) and position on left side of refrigerator top onto the right of top to replace Hinge. ,f © © ° Following illustration, flip the Middle Hinge Bracket (Flange will need...
... outer hole on right side of housing. ° Attach cover on bottom hinge. ° Place washer between freezer and refrigerator doors. (You will now be on top) and position on left side of refrigerator top onto the right of top to replace Hinge. ,f © © ° Following illustration, flip the Middle Hinge Bracket (Flange will need...
Use and Care Guide
Page 15
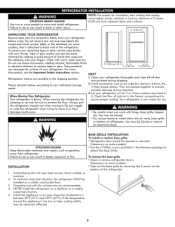
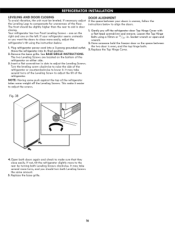
...3. NOTE: Having some push against the top of the refrigerator takes some weight off : the refrigerator door Top Hinge Cover with a fiat head screwdriver and remove. Loosen the Top Hinge Bolts using the instruction below to align the doors. 1. Replace the Top Hinge Cover. Fig. 38 4.0pen both...the bottom of the floor. Have someone hold the freezer door so the space between your refrigerator seems unsteady or you should be leveled. Insert a flat screwdriver in slots to compensate for unevenness of the refrigerator on the left. LEVELING AND DOOR CLOSING To ...
...3. NOTE: Having some push against the top of the refrigerator takes some weight off : the refrigerator door Top Hinge Cover with a fiat head screwdriver and remove. Loosen the Top Hinge Bolts using the instruction below to align the doors. 1. Replace the Top Hinge Cover. Fig. 38 4.0pen both...the bottom of the floor. Have someone hold the freezer door so the space between your refrigerator seems unsteady or you should be leveled. Insert a flat screwdriver in slots to compensate for unevenness of the refrigerator on the left. LEVELING AND DOOR CLOSING To ...

Use and Care Guide
Page 16
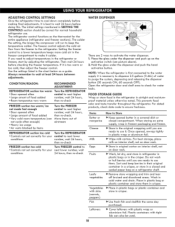
...the device or a power failure occur it returns to top of the refrigerator. If you go past the desired number, keep pushing the temperature adjust button until the number 3 LED light is forced up to the freezer. To do so, push the temperature adjust button until...The higher the number, the colder the refrigerator compartment wili become. ECOMME.N...S. Air enters to the refrigerator through top vent, then circulates and exists at this setting for 24 hours to ensure proper temperatures, air must flow between the refrigerator and freezer sections. After 24 hours, adjust the ...
...the device or a power failure occur it returns to top of the refrigerator. If you go past the desired number, keep pushing the temperature adjust button until the number 3 LED light is forced up to the freezer. To do so, push the temperature adjust button until...The higher the number, the colder the refrigerator compartment wili become. ECOMME.N...S. Air enters to the refrigerator through top vent, then circulates and exists at this setting for 24 hours to ensure proper temperatures, air must flow between the refrigerator and freezer sections. After 24 hours, adjust the ...
Use and Care Guide
Page 17
...Controls not set correctly for the entire appliance (refrigerator and freezer sections). The freezer control adjusts the cold air flow from the freezer to check for normal household refrigerator use it is too warm or too cold, then adjust the freezer control. items Butter or margarine Cheese Mill< ... leftovers with plastic wrap or aiuminium foil. It is necesarry to Store I_ Keep opened , rewrap tightly in the refrigerator or freezer, start by items Turn the FREEZER control to activate the water dispenser. 1. If it . Move items out of least 24 hours between adjustments. Do...
...Controls not set correctly for the entire appliance (refrigerator and freezer sections). The freezer control adjusts the cold air flow from the freezer to check for normal household refrigerator use it is too warm or too cold, then adjust the freezer control. items Butter or margarine Cheese Mill< ... leftovers with plastic wrap or aiuminium foil. It is necesarry to Store I_ Keep opened , rewrap tightly in the refrigerator or freezer, start by items Turn the FREEZER control to activate the water dispenser. 1. If it . Move items out of least 24 hours between adjustments. Do...

Use and Care Guide
Page 18
... cookbook. NOTE: Do not store food near the sensor; Do not put more unfrozen food into the freezer than 2 to malfunction. 19 Ice crystals inside the package have food odor and taste transfer throughout the refrigerator and also dry out frozen food. Cooling hot foods before freezing saves energy. When you could have...
... cookbook. NOTE: Do not store food near the sensor; Do not put more unfrozen food into the freezer than 2 to malfunction. 19 Ice crystals inside the package have food odor and taste transfer throughout the refrigerator and also dry out frozen food. Cooling hot foods before freezing saves energy. When you could have...
Use and Care Guide
Page 19
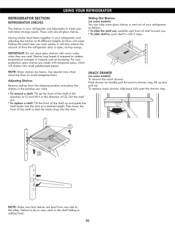
...not clean glass shelves with tempered glass, which wiii shatter into the slots at a desired height. Shelves may result in until it in your refrigerator and adjusting the shelves to fit different heights of shelf toward you want . SNACK DRAWER (on some models) You can slide some models)..., glass shelves are heavy. Then lower the B front of (2). Sliding Out Shelves (on some glass shelves in and out of time the refrigerator door is open, saving energy. NOTE: Glass shelves are made with warm water when they are aii glass shelves. Failure to do so may...
...not clean glass shelves with tempered glass, which wiii shatter into the slots at a desired height. Shelves may result in until it in your refrigerator and adjusting the shelves to fit different heights of shelf toward you want . SNACK DRAWER (on some models) You can slide some models)..., glass shelves are heavy. Then lower the B front of (2). Sliding Out Shelves (on some glass shelves in and out of time the refrigerator door is open, saving energy. NOTE: Glass shelves are made with warm water when they are aii glass shelves. Failure to do so may...
Use and Care Guide
Page 20
...and out. Door racks are removable for easy cleaning and adiusting. Remove both hands tilted slightly downward and push together slighlty while fitting tabs on refrigerator door. 1. To replace the racks: 1. Hold door rack ends with tabs and slots. To replace a bin, push into support slots ... DOOR BINS The door bins are in the sides which fit into door and down (less moisture). They have slots in both, the refrigerator and the freezer. You can control the amount of support slots at intervals on rack into place. Push glass up . 3. The door racks are force...
...and out. Door racks are removable for easy cleaning and adiusting. Remove both hands tilted slightly downward and push together slighlty while fitting tabs on refrigerator door. 1. To replace the racks: 1. Hold door rack ends with tabs and slots. To replace a bin, push into support slots ... DOOR BINS The door bins are in the sides which fit into door and down (less moisture). They have slots in both, the refrigerator and the freezer. You can control the amount of support slots at intervals on rack into place. Push glass up . 3. The door racks are force...
Use and Care Guide
Page 21
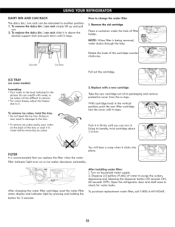
... holding the button for water leaks. Turn on the back of its handle_ twist cartridge about 1/4 turn it in the picture. Open the refrigerator door and shelf area to remove. NOTE: When filter is recommended that you can turn . Using its packaging and remove protective cover from ... new cartridge out of the tray or soak it clicks into the cover until it stops. _ Push it . " For wuick freeze, adjust the freezer dial to the tray. * To remove ice cubes easily, pour water on household water supply. 2. After installing water filter: 1. To purchase replacement water...
... holding the button for water leaks. Turn on the back of its handle_ twist cartridge about 1/4 turn it in the picture. Open the refrigerator door and shelf area to remove. NOTE: When filter is recommended that you can turn . Using its packaging and remove protective cover from ... new cartridge out of the tray or soak it clicks into the cover until it stops. _ Push it . " For wuick freeze, adjust the freezer dial to the tray. * To remove ice cubes easily, pour water on household water supply. 2. After installing water filter: 1. To purchase replacement water...


