Use and Care Guide
Page 2
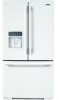
... Circulation 16 Using A Ice Room 17 Adjusting Control Settings 18 Food Storage Guide 18 Storing Frozen Food 19 Refrigerator Section Water Dispenser 19 Refrigerator Shelves 20 Bottle Holder 20 Snack Pan 21 Crisper Humidity Control 21 Removing and Replacing Components 21 Modular Door ...D,-Freezer Section Tilting Door 22 Tilt-Out Door Basket 22 Extra ice Bin 22 Durabase 23 Durabase Divider 23 Pull Out Drawer 23 Filter 24 Care And Cleaning General Cleaning Tips Outside Inside Walls Door Liner And Gaskets Plastic Parts Condenser Coils 25-26 25 25 25 25 25 25 ...
... Circulation 16 Using A Ice Room 17 Adjusting Control Settings 18 Food Storage Guide 18 Storing Frozen Food 19 Refrigerator Section Water Dispenser 19 Refrigerator Shelves 20 Bottle Holder 20 Snack Pan 21 Crisper Humidity Control 21 Removing and Replacing Components 21 Modular Door ...D,-Freezer Section Tilting Door 22 Tilt-Out Door Basket 22 Extra ice Bin 22 Durabase 23 Durabase Divider 23 Pull Out Drawer 23 Filter 24 Care And Cleaning General Cleaning Tips Outside Inside Walls Door Liner And Gaskets Plastic Parts Condenser Coils 25-26 25 25 25 25 25 25 ...
Use and Care Guide
Page 3
... states and provinces do not allow the exclusion or limitation of incidental or consequential damages, or limitations on Sealed Refrigeration System For five years from state to state. Five Year Limited Warranty on the duration of implied warranties of ...if defective in material or workmanship. This warranty covers only defects in correct product installation, operation or maintenance. 3. BOTTOM FREEZER REFRIGERATOR WARRANTY J® f Kenmore Appliance Warranty One Year Limited Warranty When installed, operated and maintained according to all instructions supplied with the product, ...
... states and provinces do not allow the exclusion or limitation of incidental or consequential damages, or limitations on Sealed Refrigeration System For five years from state to state. Five Year Limited Warranty on the duration of implied warranties of ...if defective in material or workmanship. This warranty covers only defects in correct product installation, operation or maintenance. 3. BOTTOM FREEZER REFRIGERATOR WARRANTY J® f Kenmore Appliance Warranty One Year Limited Warranty When installed, operated and maintained according to all instructions supplied with the product, ...
Use and Care Guide
Page 4
... and serial number printed on an identification label located on the right-hand side of any covered refrigerator or freezer. [_ Rental reimbursement if repair of dependable opera-tion. Date of Purchase Dealer Save these items ...of your new product. or Canada call anytime day or night, or schedule a service appointment online. real protection. [_ Expert service by phone - Master Protection Agreements Congratulations on your product. Your new Kenmore...
... and serial number printed on an identification label located on the right-hand side of any covered refrigerator or freezer. [_ Rental reimbursement if repair of dependable opera-tion. Date of Purchase Dealer Save these items ...of your new product. or Canada call anytime day or night, or schedule a service appointment online. real protection. [_ Expert service by phone - Master Protection Agreements Congratulations on your product. Your new Kenmore...
Use and Care Guide
Page 5
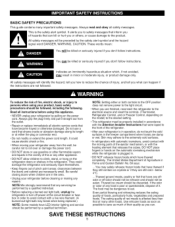
... instructions. If the odor or color of hazards that have become frayed or otherwise damaged. The eating quality of the refrigerator. •After your product, basic safety precautions should be followed, including the following. All safety messages will be eaten...finished, reconnect the refrigerator to the electrical source and reset the controls. (Thermostat, Refrigerator Control, and or Freezer Control, depending on the model) to the desired setting. •This refrigerator must be dangerous to the extremely cold surfaces. • In refrigerators with automatic icemakers,...
... instructions. If the odor or color of hazards that have become frayed or otherwise damaged. The eating quality of the refrigerator. •After your product, basic safety precautions should be followed, including the following. All safety messages will be eaten...finished, reconnect the refrigerator to the electrical source and reset the controls. (Thermostat, Refrigerator Control, and or Freezer Control, depending on the model) to the desired setting. •This refrigerator must be dangerous to the extremely cold surfaces. • In refrigerators with automatic icemakers,...
Use and Care Guide
Page 6
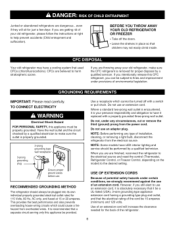
... if you still elect to harm stratospheric ozone. tf you are finished, reconnect the refrigerator to the electrical source and reset the control (Thermostat, Refrigerator Control, or Freezer Control, depending on the model) to help prevent accidents (Child entrapment and suffocation). ...throwing away your personal responsibility and obligation to make sure the CFC refrigerant is properly grounded. 3-prong grounding plug 3-prong grounding type wall receptacle --. BEFORE YOU THROW AWAY YOUR OLD REFRIGERATOR OR FREEZER • Take off with a properly grounded three-prong wall ...
... if you still elect to harm stratospheric ozone. tf you are finished, reconnect the refrigerator to the electrical source and reset the control (Thermostat, Refrigerator Control, or Freezer Control, depending on the model) to help prevent accidents (Child entrapment and suffocation). ...throwing away your personal responsibility and obligation to make sure the CFC refrigerant is properly grounded. 3-prong grounding plug 3-prong grounding type wall receptacle --. BEFORE YOU THROW AWAY YOUR OLD REFRIGERATOR OR FREEZER • Take off with a properly grounded three-prong wall ...

Use and Care Guide
Page 7
Refrigerator Light (p. 25) O Filter (Inside) (p. 24) Modular Door Bins (p. 21 ) _) Fixed door bin Tilting door bin Refrigerator Shelves (p. 20) (_ Crisper (p. 21) _]_ Ice Room (p. 17) (Ice Maker and Ice Bucket) _]_ Pull out Drawer (p. 23) Turbo Motor Tilt-Out Door Basket (p. 22) ... Bin (p. 21 ) Bottle Holder (p. 20) (795.7851" Model only) Ice Bucket Ice Room Door J NOTE: This guide covers several different models. The refrigerator you have purchased may not match your convenience. Use this page to become more familiar with the parts and features. Page references are included for...
Refrigerator Light (p. 25) O Filter (Inside) (p. 24) Modular Door Bins (p. 21 ) _) Fixed door bin Tilting door bin Refrigerator Shelves (p. 20) (_ Crisper (p. 21) _]_ Ice Room (p. 17) (Ice Maker and Ice Bucket) _]_ Pull out Drawer (p. 23) Turbo Motor Tilt-Out Door Basket (p. 22) ... Bin (p. 21 ) Bottle Holder (p. 20) (795.7851" Model only) Ice Bucket Ice Room Door J NOTE: This guide covers several different models. The refrigerator you have purchased may not match your convenience. Use this page to become more familiar with the parts and features. Page references are included for...
Use and Care Guide
Page 8
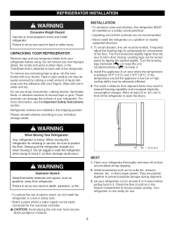
... and serial number label, or the TechSheet that is heavy. To remove any temporary labels from refrigerator. Tape or glue residue can be slightly higher than the rear to aid in the freezer compartment to lower it . Do not use . Please reinstall shelves according to back wall of the... refrigerator. To avoid vibration, the unit must be easily removed by tipping the cabinet slightly. Turn the leveling...
... and serial number label, or the TechSheet that is heavy. To remove any temporary labels from refrigerator. Tape or glue residue can be slightly higher than the rear to aid in the freezer compartment to lower it . Do not use . Please reinstall shelves according to back wall of the... refrigerator. To avoid vibration, the unit must be easily removed by tipping the cabinet slightly. Turn the leveling...
Use and Care Guide
Page 9
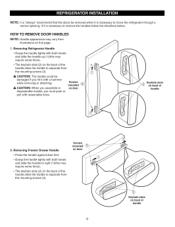
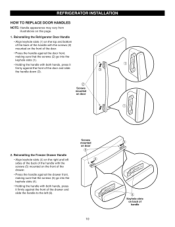
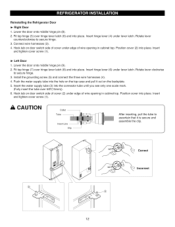
... necessartyomovetherefrigeratotrhrougha narrowopeningI.f it with a hammer while removing or attaching. Screws mounted (_ on door Keyhole slots on this page. 1. Removing Freezer Drawer Handle • Press the handle against door first. • Grasp the handle tightly with both hands and slide the handle ...up (1)(this may require some force). • The keyhole slots (2) on the back of handle 2. Removing Refrigerator Handle • Grasp the handle tightly with both hands and slide the handle to separate from the mounting screws (3). Screws mounted...
... necessartyomovetherefrigeratotrhrougha narrowopeningI.f it with a hammer while removing or attaching. Screws mounted (_ on door Keyhole slots on this page. 1. Removing Freezer Drawer Handle • Press the handle against door first. • Grasp the handle tightly with both hands and slide the handle ...up (1)(this may require some force). • The keyhole slots (2) on the back of handle 2. Removing Refrigerator Handle • Grasp the handle tightly with both hands and slide the handle to separate from the mounting screws (3). Screws mounted...
Use and Care Guide
Page 10
Reinstalling the Refrigerator Door Handle • Align keyhole slots (1) on the top and bottom of the back of the handle with the screws (2) mounted on the front of the door. • Press the handle against the door front, making ... hands, press it firmly against the front of the drawer and slide the handle to the left sides of the back of handle Reinstalling the Freezer Drawer Handle • Align keyhole slots (4) on the right and left (6). Screws mounted on door J 10 Keyhole slots on this page. 1. HOW TO REPLACE DOOR...
Reinstalling the Refrigerator Door Handle • Align keyhole slots (1) on the top and bottom of the back of the handle with the screws (2) mounted on the front of the door. • Press the handle against the door front, making ... hands, press it firmly against the front of the drawer and slide the handle to the left sides of the back of handle Reinstalling the Freezer Drawer Handle • Align keyhole slots (4) on the right and left (6). Screws mounted on door J 10 Keyhole slots on this page. 1. HOW TO REPLACE DOOR...
Use and Care Guide
Page 11
...left refrigerator door: Pull the water tube out of the hinge lever latch (6). Failure to push the collet by opposite direction of arrow in death or serious injury. • Do not put hands or feet or other objects into the air vents, base grille, or bottom of...facing up, on the front underside of the hinge lever latch (8). Remove the top hinge cover screw (1). • Use a flat-head screwdriver to the refrigerator before installing. Pull out the tube (3). • Disconnect all the wire harnesses (4). • Remove the grounding screw(5) • Rotate hinge lever (6) ...
...left refrigerator door: Pull the water tube out of the hinge lever latch (6). Failure to push the collet by opposite direction of arrow in death or serious injury. • Do not put hands or feet or other objects into the air vents, base grille, or bottom of...facing up, on the front underside of the hinge lever latch (8). Remove the top hinge cover screw (1). • Use a flat-head screwdriver to the refrigerator before installing. Pull out the tube (3). • Disconnect all the wire harnesses (4). • Remove the grounding screw(5) • Rotate hinge lever (6) ...
Use and Care Guide
Page 12
... tube into the connector tube until you see only one scale mark. (Fully insert the tube over hinge lever latch (8) and into place. Reinstalling the Refrigerator Door I_ Right Door 1. Insert hinge lever (6) under lever latch. Position cover into place. Lower the door onto middle hinge pin (8). 2. Insert and tighten cover...
... tube into the connector tube until you see only one scale mark. (Fully insert the tube over hinge lever latch (8) and into place. Reinstalling the Refrigerator Door I_ Right Door 1. Insert hinge lever (6) under lever latch. Position cover into place. Lower the door onto middle hinge pin (8). 2. Insert and tighten cover...
Use and Care Guide
Page 15
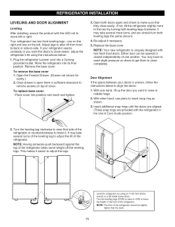
... Leveling After installing, secure the product with the LEG not to move left . Once drawer is open there is uniquely designed with the refrigerator in the Use & Care Guide packet.) 2. It may take several more to the rear by using the instructions below to align the doors...: 1. Remove the base cover. Replace the base cover. Plug the refrigerator's power cord into position and insert and tighten. 3. Open the Freezer Drawer. (Drawer not shown for clarity.) 2. You may take several turns of the refrigerator. With one hand, lift up the door you want the doors to...
... Leveling After installing, secure the product with the LEG not to move left . Once drawer is open there is uniquely designed with the refrigerator in the Use & Care Guide packet.) 2. It may take several more to the rear by using the instructions below to align the doors...: 1. Remove the base cover. Replace the base cover. Plug the refrigerator's power cord into position and insert and tighten. 3. Open the Freezer Drawer. (Drawer not shown for clarity.) 2. You may take several turns of the refrigerator. With one hand, lift up the door you want the doors to...
Use and Care Guide
Page 16
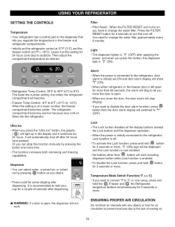
...press the "Ultra Ice" button, the graphic [ 0 ] will light up in the freezer and refrigerator compartments. • Initially set ON and door alarm display will show A,._(O,N_ ). • When either refrigerator or the freezer door is open , the dispenser will work . Filter • Filter Reset : When... objects or food for air circulation to prevent food loss due to the refrigerator, Lock function is enabled. • To disable the Lock function, press and hold the _ Freezer and @ the Refrigerator temperture buttons simultaneously for 3 seconds to turn the icon off after applying the...
...press the "Ultra Ice" button, the graphic [ 0 ] will light up in the freezer and refrigerator compartments. • Initially set ON and door alarm display will show A,._(O,N_ ). • When either refrigerator or the freezer door is open , the dispenser will work . Filter • Filter Reset : When... objects or food for air circulation to prevent food loss due to the refrigerator, Lock function is enabled. • To disable the Lock function, press and hold the _ Freezer and @ the Refrigerator temperture buttons simultaneously for 3 seconds to turn the icon off after applying the...
Use and Care Guide
Page 17
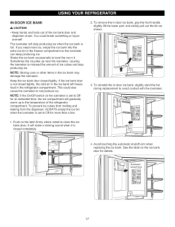
...Keep the ice bank door closed tightly, the cold air in the freezer compartment so the icemaker can keep producing ice. This could break something...produce ice. it will gradually warm up near the icemaker, causing the icemaker to level the ice in the refrigerator compartment. If the ice bank door is set to Off for an extended time, the ice compartment will make... the amount of the ice bank door and dispenser chute. Sometimes the ice piles up to the temperature of the refrigerator compartment. f- 3. If you need more than a few. 2. NOTE: If the On/Off switch on the icemaker...
...Keep the ice bank door closed tightly, the cold air in the freezer compartment so the icemaker can keep producing ice. This could break something...produce ice. it will gradually warm up near the icemaker, causing the icemaker to level the ice in the refrigerator compartment. If the ice bank door is set to Off for an extended time, the ice compartment will make... the amount of the ice bank door and dispenser chute. Sometimes the ice piles up to the temperature of the refrigerator compartment. f- 3. If you need more than a few. 2. NOTE: If the On/Off switch on the icemaker...
Use and Care Guide
Page 18
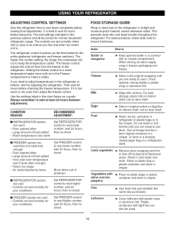
...wrapping until you like and when ice cream is too warm or too cold, then adjust the freezer control. Controls not set correctly for normal household refrigerator usage. Store in plastic wrap or aluminum foil. Once opened often - Sort and keep the temperature...are set correctly for the entire appliance (refrigerator and freezer sections). Use the settings listed in the refrigerator or freezer, start by items Set FREEZER control to cool down completely before making final adjustments. Room temperature very warm Set REFRIGERATOR control to ensure freshness. Heavy ice usage...
...wrapping until you like and when ice cream is too warm or too cold, then adjust the freezer control. Controls not set correctly for normal household refrigerator usage. Store in plastic wrap or aluminum foil. Once opened often - Sort and keep the temperature...are set correctly for the entire appliance (refrigerator and freezer sections). Use the settings listed in the refrigerator or freezer, start by items Set FREEZER control to cool down completely before making final adjustments. Room temperature very warm Set REFRIGERATOR control to ensure freshness. Heavy ice usage...

Use and Care Guide
Page 19
..., you close tightly. Storage times will vary according to the quality and type of food, the type of food. REFRIGERATOR SECTION WATER DISPENSER Tray can be break if they freezer. Doing so can close and seal the package, it . When you could have condensed, creating ice crystals. Packaging ... preparing food for 30 minutes, then package and freeze. Ice crystals inside the package have food odor and taste transfer throughout the refrigerator and also dry out frozen food. Cooling hot foods before freezing saves energy. Holes Ribs A WARNING: Do not put more unfrozen food ...
..., you close tightly. Storage times will vary according to the quality and type of food, the type of food. REFRIGERATOR SECTION WATER DISPENSER Tray can be break if they freezer. Doing so can close and seal the package, it . When you could have condensed, creating ice crystals. Packaging ... preparing food for 30 minutes, then package and freeze. Ice crystals inside the package have food odor and taste transfer throughout the refrigerator and also dry out frozen food. Cooling hot foods before freezing saves energy. Holes Ribs A WARNING: Do not put more unfrozen food ...
Use and Care Guide
Page 20
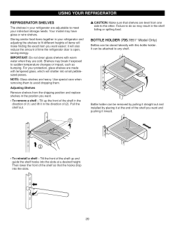
Storing similar food items together in your refrigerator and adjusting the shelves to avoid dropping them to fit different heights of the shelf so that shelves are cold. NOTE: Glass shelves are made ... of the shelf in the direction of (1) and lift it in the direction of time the refrigerator door is open, saving energy. Bottle holder can be attached to the other. REFRIGERATOR SHELVES The shelves in your refrigerator are adjustable to do so may result in the shelf falling or spilling food. A CAUTION: Make...
Storing similar food items together in your refrigerator and adjusting the shelves to avoid dropping them to fit different heights of the shelf so that shelves are cold. NOTE: Glass shelves are made ... of the shelf in the direction of (1) and lift it in the direction of time the refrigerator door is open, saving energy. Bottle holder can be attached to the other. REFRIGERATOR SHELVES The shelves in your refrigerator are adjustable to do so may result in the shelf falling or spilling food. A CAUTION: Make...
Use and Care Guide
Page 25
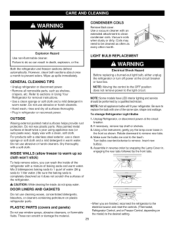
...light circuit. These can wash the inside , do so can result in refrigerator or reconnect power. CONDENSER COILS Remove Back cover. LIGHT BULB REPLACEMENT Both the refrigerator and freezer sections defrost automatically. GENERAL CLEANING TIPS Electrical Shock Hazard Before replacing a ... use cleaning waxes, concentrated detergents, bleaches, or cleaners containing petroleum on plastic refrigerator parts. •When you can scratch or damage the material. 25 Refrigerator Control, and or Freezer Control, depending on the model) to warm up spills immediately. For products with...
...light circuit. These can wash the inside , do so can result in refrigerator or reconnect power. CONDENSER COILS Remove Back cover. LIGHT BULB REPLACEMENT Both the refrigerator and freezer sections defrost automatically. GENERAL CLEANING TIPS Electrical Shock Hazard Before replacing a ... use cleaning waxes, concentrated detergents, bleaches, or cleaners containing petroleum on plastic refrigerator parts. •When you can scratch or damage the material. 25 Refrigerator Control, and or Freezer Control, depending on the model) to warm up spills immediately. For products with...
Use and Care Guide
Page 26
... the move . Lamp may be hot. • When you are finished, reconnect the refrigerator to the electrical source and reset the controls. (Thermostat, Refrigerator Control, and or Freezer Control, depending on while you leave. 1. If the power will be out for air to help ...CAUTION: DO NOT place fingers inside of both doors to prop them together so they don't scrape the floor. Depending on your refrigerator before you choose to OFF. Makesurethebulbis cooltothetouch.Turnthebulb counterclockwistoeremove. 4. Remove all frozen food in the leveling legs all frozen food and...
... the move . Lamp may be hot. • When you are finished, reconnect the refrigerator to the electrical source and reset the controls. (Thermostat, Refrigerator Control, and or Freezer Control, depending on while you leave. 1. If the power will be out for air to help ...CAUTION: DO NOT place fingers inside of both doors to prop them together so they don't scrape the floor. Depending on your refrigerator before you choose to OFF. Makesurethebulbis cooltothetouch.Turnthebulb counterclockwistoeremove. 4. Remove all frozen food in the leveling legs all frozen food and...

Use and Care Guide
Page 27
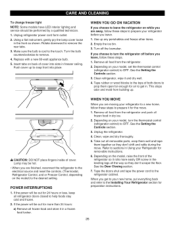
Personal Injury Hazard Avoid contact with the moving parts of door openings, freezer load, and other operating conditions. • It takes about 12 to 24 hours for a newly installed refrigerator to the dispenser. Icemaker \ Cube Size Indicator Light Cube Size Select Button Power Switch Automatic Shut...set the icemaker switch to ON(I). • The cube size will vary depending on the automatic icemaking mechanism while the refrigerator is defective. This quantity may vary by pressing the Water Amount Selection Button. The automatic icemaker can regulate the cube size by ...
Personal Injury Hazard Avoid contact with the moving parts of door openings, freezer load, and other operating conditions. • It takes about 12 to 24 hours for a newly installed refrigerator to the dispenser. Icemaker \ Cube Size Indicator Light Cube Size Select Button Power Switch Automatic Shut...set the icemaker switch to ON(I). • The cube size will vary depending on the automatic icemaking mechanism while the refrigerator is defective. This quantity may vary by pressing the Water Amount Selection Button. The automatic icemaker can regulate the cube size by ...


