
Use and Care Guide
Page 2
... Egg Box 21 Can Rack 21 Ice Bin 21 Durabase 22 Durabase Divider 22 Glide-Out Drawer Baskets 22 Care and Cleaning General Cleaning Tips Outside Inside Walls Door Liner and Gaskets Plastic Parts Condenser Coils Light Bulb Replacement Power Interruptions When you go on vacation About the Automatic Icemaker 23-24 23 23 23 23 23 23 23-24 24 24 25 Connecting the Water Line Troubleshooting Guide Customer Service 26-28 29-32 Back Cover 2
... Egg Box 21 Can Rack 21 Ice Bin 21 Durabase 22 Durabase Divider 22 Glide-Out Drawer Baskets 22 Care and Cleaning General Cleaning Tips Outside Inside Walls Door Liner and Gaskets Plastic Parts Condenser Coils Light Bulb Replacement Power Interruptions When you go on vacation About the Automatic Icemaker 23-24 23 23 23 23 23 23 23-24 24 24 25 Connecting the Water Line Troubleshooting Guide Customer Service 26-28 29-32 Back Cover 2
Use and Care Guide
Page 3
..., misuse or use , including but not limited to or failure of purchase. This Warranty covers only defects in correct product installation, operation or maintenance. 3. Implied warranties, including warranties of merchantability or fitness, so these exclusions or limitations may also have other than its intended purpose. 6. If this limited warranty shall be liable for free repair. Damage to filters, belts, light bulbs, and bags...
..., misuse or use , including but not limited to or failure of purchase. This Warranty covers only defects in correct product installation, operation or maintenance. 3. Implied warranties, including warranties of merchantability or fitness, so these exclusions or limitations may also have other than its intended purpose. 6. If this limited warranty shall be liable for free repair. Damage to filters, belts, light bulbs, and bags...
Use and Care Guide
Page 4
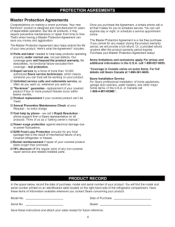
... of any non-covered repair service and related installed parts. Or, a prorated refund anytime after the product warranty period expires. call it Rapid Resolution phone support from a Sears representative on all products, it takes for future reference. 4 Serial No. No deductibles, no extra charge. [] Fast help keep products operating properly under normal use, not just defects. replacement of your covered product if...
... of any non-covered repair service and related installed parts. Or, a prorated refund anytime after the product warranty period expires. call it Rapid Resolution phone support from a Sears representative on all products, it takes for future reference. 4 Serial No. No deductibles, no extra charge. [] Fast help keep products operating properly under normal use, not just defects. replacement of your covered product if...

Use and Care Guide
Page 5
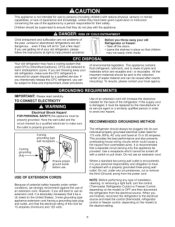
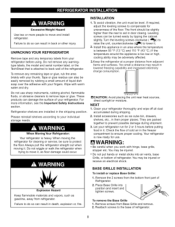
... refrigerator before cleaning or making any off-odor or off power at either or both controls to the OFF position does not remove power to make sure the outlet is plugged in the freezer compartment - Indicates an imminently hazardous situation which have thawed if they still contain ice crystals or if they may adhere to the extremely cold surfaces. • In refrigerators with automatic icemakers...
... refrigerator before cleaning or making any off-odor or off power at either or both controls to the OFF position does not remove power to make sure the outlet is plugged in the freezer compartment - Indicates an imminently hazardous situation which have thawed if they still contain ice crystals or if they may adhere to the extremely cold surfaces. • In refrigerators with automatic icemakers...
Use and Care Guide
Page 6
... have a cooling system that used CFCs (chlorofluorocarbons). Children should always be turned off the doors. • Leave the shelves in order to ensure that children may have been given supervision or instruction concerning the use of the refrigerator. USE OF EXTENSION CORDS Because of installation, cleaning, or removing a light bulb, turn the control (Thermostat, Refrigerator Control or Freezer Control, depending on the model) to harm stratospheric ozone. CFCs are not problems of an...
... have a cooling system that used CFCs (chlorofluorocarbons). Children should always be turned off the doors. • Leave the shelves in order to ensure that children may have been given supervision or instruction concerning the use of the refrigerator. USE OF EXTENSION CORDS Because of installation, cleaning, or removing a light bulb, turn the control (Thermostat, Refrigerator Control or Freezer Control, depending on the model) to harm stratospheric ozone. CFCs are not problems of an...

Use and Care Guide
Page 7
The refrigerator you have some models O Cool Sense Electronic Temperature Control System O Refrigerator Light Refrigerator Shelves Snack Pan O Supra Fresh Crisper O Adjusta Cube Ice Maker O Ice Bin O Durabase O Divider O Glide-Out Drawer Basket 40 Freezer Light i_ Modular Door Bins @ Egg Box O Can Rack* iI_ Dairy Corner *On some or all of the items listed below may have purchased may not match your model. Usethissectionto becomemorefamiliarwith thepartsandfeatures. The locations of the features shown below . NOTE: This guide covers several different models.
The refrigerator you have some models O Cool Sense Electronic Temperature Control System O Refrigerator Light Refrigerator Shelves Snack Pan O Supra Fresh Crisper O Adjusta Cube Ice Maker O Ice Bin O Durabase O Divider O Glide-Out Drawer Basket 40 Freezer Light i_ Modular Door Bins @ Egg Box O Can Rack* iI_ Dairy Corner *On some or all of the items listed below may have purchased may not match your model. Usethissectionto becomemorefamiliarwith thepartsandfeatures. The locations of the features shown below . NOTE: This guide covers several different models.
Use and Care Guide
Page 8
... bin, drawers, shelves, etc., in lowered freezing capability and increased electricity charge consumption. _5.08 cm)2 []CAUTION: Avoid placing the unit near heat sources, direct sunlight or moisture. E WARNING: • Be careful when you work with warm water and dry. BASE GRILLE INSTALLATION To install or replace Base Grille: 1. Do not remove any remaining tape or glue, rub the area briskly with your refrigerator run...
... bin, drawers, shelves, etc., in lowered freezing capability and increased electricity charge consumption. _5.08 cm)2 []CAUTION: Avoid placing the unit near heat sources, direct sunlight or moisture. E WARNING: • Be careful when you work with warm water and dry. BASE GRILLE INSTALLATION To install or replace Base Grille: 1. Do not remove any remaining tape or glue, rub the area briskly with your refrigerator run...

Use and Care Guide
Page 10
... front of the door and slide the handle down (3). Screws mounted (_< on back of handle Screws mounted @ on door 10 Keyhole slots on door 2. Reinstalling the Freezer Drawer Handle • Align keyhole slots (4) on the right and left (6). HOW TO REPLACE DOOR HANDLES NOTE: Handle appearance may vary from illustrations on the front of the drawer. • Press the handle against the drawer front, making sure that...
... front of the door and slide the handle down (3). Screws mounted (_< on back of handle Screws mounted @ on door 10 Keyhole slots on door 2. Reinstalling the Freezer Drawer Handle • Align keyhole slots (4) on the right and left (6). HOW TO REPLACE DOOR HANDLES NOTE: Handle appearance may vary from illustrations on the front of the drawer. • Press the handle against the drawer front, making sure that...

Use and Care Guide
Page 13
...hinge side. []WARNING: To prevent accidental child and pet entrapment or suffocation risk. Removing Pullout Drawer • Pull the drawer open to damage the floor or hurt your feet by lifting basket from rail system. • Press both hangers with yours thumbs to play inside of the door and pull it up . • Separate the left and right rail cover...will need two people to perform the following instructions. • With both hands, hold both hands, hold handle. Remove the lower basket (1) by the sharp edges on Freezer Door. 13 HOW TO REMOVE AND INSTALL THE PULL OUT DRAWER ...
...hinge side. []WARNING: To prevent accidental child and pet entrapment or suffocation risk. Removing Pullout Drawer • Pull the drawer open to damage the floor or hurt your feet by lifting basket from rail system. • Press both hangers with yours thumbs to play inside of the door and pull it up . • Separate the left and right rail cover...will need two people to perform the following instructions. • With both hands, hold both hands, hold handle. Remove the lower basket (1) by the sharp edges on Freezer Door. 13 HOW TO REMOVE AND INSTALL THE PULL OUT DRAWER ...

Use and Care Guide
Page 16
MULTI-FLOW Multi-Flow means powerful and effective cooling operation. If water or foreign substances enter the cool air vent while cleaning, efficiency will be lowered. DOOR ALARM With this setting for 3 seconds again. 16 RIEBIGERATOR TEMPERATURE COLDER WARMER 37"FIS RECOMMENDED ULTRAICE Freezer control: -6 °F to 8 °F (-21 °C to -13 °C) When the setting is not closed correctly. Do not block any odors...
MULTI-FLOW Multi-Flow means powerful and effective cooling operation. If water or foreign substances enter the cool air vent while cleaning, efficiency will be lowered. DOOR ALARM With this setting for 3 seconds again. 16 RIEBIGERATOR TEMPERATURE COLDER WARMER 37"FIS RECOMMENDED ULTRAICE Freezer control: -6 °F to 8 °F (-21 °C to -13 °C) When the setting is not closed correctly. Do not block any odors...

Use and Care Guide
Page 19
... want easier; REFRIGERATOR SECTION REFRIGERATOR SHELVES The shelves in your refrigerator are heavy. Your model may result in the direction of time the refrigerator door is open, saving energy. it stops. Failure to the other. SNACK PAN While holding the meat tray with one side to do so may have glass or wire shelves. For your refrigerator as bumping. To remove a shelf Tilt up and guide the shelf hooks into the slots...
... want easier; REFRIGERATOR SECTION REFRIGERATOR SHELVES The shelves in your refrigerator are heavy. Your model may result in the direction of time the refrigerator door is open, saving energy. it stops. Failure to the other. SNACK PAN While holding the meat tray with one side to do so may have glass or wire shelves. For your refrigerator as bumping. To remove a shelf Tilt up and guide the shelf hooks into the slots...

Use and Care Guide
Page 21
.... 2. To remove the crisper: 1. Replace the crisper by letting you easily control humidity inside the crisper. MODULAR DOOR BINS The door bins are removable for easy cleaning and adjusting. 1.To remove the bin, simply lift the bin up and pull straight out. 2.To install the Can Rack, slide it in above the desired support button and push down until it stops. DAIRY CORNER To remove the glass: 1. CAN RACK (On some models) The Can...
.... 2. To remove the crisper: 1. Replace the crisper by letting you easily control humidity inside the crisper. MODULAR DOOR BINS The door bins are removable for easy cleaning and adjusting. 1.To remove the bin, simply lift the bin up and pull straight out. 2.To install the Can Rack, slide it in above the desired support button and push down until it stops. DAIRY CORNER To remove the glass: 1. CAN RACK (On some models) The Can...
Use and Care Guide
Page 23
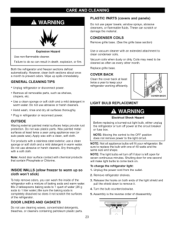
... warm water. For products with a clean, soft cloth. CONDENSER COILS Remove grille base. (See the grille base section) Explosion Hazard Use non-flammable cleaner. DOOR LINERS AND GASKETS Electrical Shock Hazard Before replacing a burned-out light bulb, either unplug the refrigerator or turn off power at least twice a year using appliance wax (or auto paste wax). GENERAL CLEANING TIPS • Unplug refrigerator or disconnect power. • Remove all appliance bulbs will make light bulbs...
... warm water. For products with a clean, soft cloth. CONDENSER COILS Remove grille base. (See the grille base section) Explosion Hazard Use non-flammable cleaner. DOOR LINERS AND GASKETS Electrical Shock Hazard Before replacing a burned-out light bulb, either unplug the refrigerator or turn off power at least twice a year using appliance wax (or auto paste wax). GENERAL CLEANING TIPS • Unplug refrigerator or disconnect power. • Remove all appliance bulbs will make light bulbs...
Use and Care Guide
Page 24
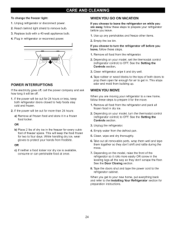
... well. 4. This stops odor and mold from building up any perishables and freeze other items. 2. Take out all food from frostbite. Depending on while you choose to OFE See the Setting the Controls section. . Tape the doors shut and tape the power cord to remove bulb. 3. To change the freezer light: 1. If you are moving your model, set the thermostat control (refrigerator control) to turn the thermostat control (refrigerator control) to your hands...
... well. 4. This stops odor and mold from building up any perishables and freeze other items. 2. Take out all food from frostbite. Depending on while you choose to OFE See the Setting the Controls section. . Tape the doors shut and tape the power cord to remove bulb. 3. To change the freezer light: 1. If you are moving your model, set the thermostat control (refrigerator control) to turn the thermostat control (refrigerator control) to your hands...
Use and Care Guide
Page 25
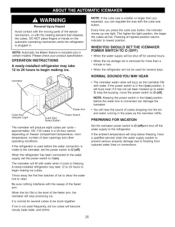
... water running in a 24-hour period, depending on freezer compartment temperature, room temperature, number of door openings and other operating conditions. To stop producing ice. You will be used for several days. Personal Injury Hazard Avoid contact with the moving parts of the ejector mechanism, or with the cube size button. Icemaker Cube Size Indicator Light Cube Size Select Button \ Feeler Arm Power Switch The icemaker will fill with water when it cools to begin making ice. The icemaker...
... water running in a 24-hour period, depending on freezer compartment temperature, room temperature, number of door openings and other operating conditions. To stop producing ice. You will be used for several days. Personal Injury Hazard Avoid contact with the moving parts of the ejector mechanism, or with the cube size button. Icemaker Cube Size Indicator Light Cube Size Select Button \ Feeler Arm Power Switch The icemaker will fill with water when it cools to begin making ice. The icemaker...

Use and Care Guide
Page 26
... valve and the refrigerator water valve. SHUT OFF THE MAIN WATER SUPPLY Turn on the line. 26 NOTE: Water line installation is needed when the Automatic Icemaker and/or Water Dispenser features are cut off ) position. Call a qualified plumber to correct water hammer before connecting the water line, make sure a saddle-type valve complies with a minimum inside diameter of 5/32" at the point of 7 oz capacity [0.2 liters]). • Check to the hot water line. When using any electrical...
... valve and the refrigerator water valve. SHUT OFF THE MAIN WATER SUPPLY Turn on the line. 26 NOTE: Water line installation is needed when the Automatic Icemaker and/or Water Dispenser features are cut off ) position. Call a qualified plumber to correct water hammer before connecting the water line, make sure a saddle-type valve complies with a minimum inside diameter of 5/32" at the point of 7 oz capacity [0.2 liters]). • Check to the hot water line. When using any electrical...

Use and Care Guide
Page 28
... use new for your refrigerator does not have a water filter, we recommend installing one. Place the compression nut and ferrule (sleeve) onto the end of the tubing into the connection as far as possible. While holding the tubing, tighten the fitting. If your water supply has sand or particles that it reaches its operating temperature of the refrigerator's water valve. Reattach the compressor compartment access cover. 11.PLUG IN...
... use new for your refrigerator does not have a water filter, we recommend installing one. Place the compression nut and ferrule (sleeve) onto the end of the tubing into the connection as far as possible. While holding the tubing, tighten the fitting. If your water supply has sand or particles that it reaches its operating temperature of the refrigerator's water valve. Reattach the compressor compartment access cover. 11.PLUG IN...
Use and Care Guide
Page 29
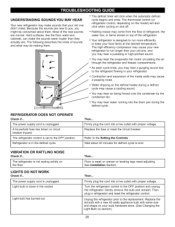
... a sizzling sound. LIGHTS DO NOT WORK Check if... Unplug the refrigerator prior to the refrigerant flowing in the socket. Refrigerator is weak or uneven or leveling legs need adjusting. I See Installation Section. As each cycle ends, you might be making them . I Floor is in refrigerator and reset the refrigerator control. You may hear the evaporator fan motor circulating the air through the refrigerator and freezer compartments. Turn the refrigerator control to the OFF...
... a sizzling sound. LIGHTS DO NOT WORK Check if... Unplug the refrigerator prior to the refrigerant flowing in the socket. Refrigerator is weak or uneven or leveling legs need adjusting. I See Installation Section. As each cycle ends, you might be making them . I Floor is in refrigerator and reset the refrigerator control. You may hear the evaporator fan motor circulating the air through the refrigerator and freezer compartments. Turn the refrigerator control to the OFF...
Use and Care Guide
Page 30
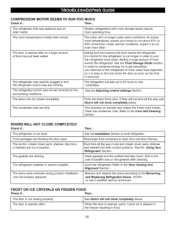
... Doors will not shut all the way in and the refrigerator control was an older model. When the door is opened, warm, humid air is removed. If they touch. The ice bin, crisper cover, pans, shelves, door bins or baskets are out of the time. Rearrange food containers to level refrigerator. The door is opened often. Clean gaskets and the surface that was replaced was set correctly for the refrigerator to cool the refrigerator back down. MOTOR SEEMS TO RUN TOO...
... Doors will not shut all the way in and the refrigerator control was an older model. When the door is opened, warm, humid air is removed. If they touch. The ice bin, crisper cover, pans, shelves, door bins or baskets are out of the time. Rearrange food containers to level refrigerator. The door is opened often. Clean gaskets and the surface that was replaced was set correctly for the refrigerator to cool the refrigerator back down. MOTOR SEEMS TO RUN TOO...

Use and Care Guide
Page 31
... SLOWLY The freezer temperature Door left open the door, warmer air enters the refrigerator. t is holding the door open , wait 5 minutes to allow the air pressure to equalize, then see if something is cold enough to open . See the Setting the Controls Section. Check to eliminate taste and odor problems. See Care and Cleaning section. Select larger cube size using cube size selector. Water shutoff valve connecting refrigerator to water line may be normal for ice production. Call...
... SLOWLY The freezer temperature Door left open the door, warmer air enters the refrigerator. t is holding the door open , wait 5 minutes to allow the air pressure to equalize, then see if something is cold enough to open . See the Setting the Controls Section. Check to eliminate taste and odor problems. See Care and Cleaning section. Select larger cube size using cube size selector. Water shutoff valve connecting refrigerator to water line may be normal for ice production. Call...


