Use and Care Guide
Page 2
... Safety Instructions 2-3 Warranty Information 3 Master Protection Agreements 4 Installation--Includes Connecting Household Water Supply to cover every possible condition and situation that may not easily climb inside the refrigerator compartment. These instructions are not meant to Refrigerator 5-6 Door Removal & Reversal 7-10 Features At A Glance 11 Temperature Controls 12 Looking Inside 13-14 Food Storage & Energy Saving Tips ... 15 Ice Service 16 Normal Operating Sounds & Sights .... 17 Care & Cleaning Before You Call 18-19 20 Child...
... Safety Instructions 2-3 Warranty Information 3 Master Protection Agreements 4 Installation--Includes Connecting Household Water Supply to cover every possible condition and situation that may not easily climb inside the refrigerator compartment. These instructions are not meant to Refrigerator 5-6 Door Removal & Reversal 7-10 Features At A Glance 11 Temperature Controls 12 Looking Inside 13-14 Food Storage & Energy Saving Tips ... 15 Ice Service 16 Normal Operating Sounds & Sights .... 17 Care & Cleaning Before You Call 18-19 20 Child...

Use and Care Guide
Page 3
... use an extension cord or adapter plug. = Immediately repair or replace any circumstances, cut_ remove_ I or bypass the grounding prong. _j Power cord with 3-prong grounded plug KENIVIORE APPLIANCE WARRANTY OneYear Limited Warranty When installed, operated and maintained according to all instructions supplied with insufficient power can wear out from unauthorized modifications made to instruct the user in all instructions supplied with the product. 7. The power cord of remedies Customer...
... use an extension cord or adapter plug. = Immediately repair or replace any circumstances, cut_ remove_ I or bypass the grounding prong. _j Power cord with 3-prong grounded plug KENIVIORE APPLIANCE WARRANTY OneYear Limited Warranty When installed, operated and maintained according to all instructions supplied with insufficient power can wear out from unauthorized modifications made to instruct the user in all instructions supplied with the product. 7. The power cord of remedies Customer...
Use and Care Guide
Page 4
..., we call it Rapid Resolution - real protection. [] Expert service by phone- Or, a prorated refund anytime after the product warranty period expires. Your new Kenmore ®product is the result of mechanical failure of any covered refrigerator or freezer. [] Rental reimbursement if repair of home appliances, garage door openers, water heaters, and other major home items, in the U.S.A. call 1-800-827-6655...
..., we call it Rapid Resolution - real protection. [] Expert service by phone- Or, a prorated refund anytime after the product warranty period expires. Your new Kenmore ®product is the result of mechanical failure of any covered refrigerator or freezer. [] Rental reimbursement if repair of home appliances, garage door openers, water heaters, and other major home items, in the U.S.A. call 1-800-827-6655...

Use and Care Guide
Page 5
... Use & Care Manual. To LevelYour Refrigerator: 1. Do Not use an extension cord or an adapter plug. • If possible, place the refrigerator out of installation, proper air circulation, and plumbing and electrical connections: Sides & Top 3/8" Back 1" Adjustable Front Roller (some models) Raise Stationary Front Roller with Leveling Screw (some models) Use adjustable wrench to adjust front rollers. INSTALLATION DOOR OPENING Your refrigerator should be reversed. Your refrigerator is equipped with an automatic ice maker. Before starting the refrigerator...
... Use & Care Manual. To LevelYour Refrigerator: 1. Do Not use an extension cord or an adapter plug. • If possible, place the refrigerator out of installation, proper air circulation, and plumbing and electrical connections: Sides & Top 3/8" Back 1" Adjustable Front Roller (some models) Raise Stationary Front Roller with Leveling Screw (some models) Use adjustable wrench to adjust front rollers. INSTALLATION DOOR OPENING Your refrigerator should be reversed. Your refrigerator is equipped with an automatic ice maker. Before starting the refrigerator...

Use and Care Guide
Page 6
... moving refrigerator oat for connecting the water supply line to the ice maker inlet valve. \Plastic Water Tubing \\ to electrical power source. 10. Coil excess water supply line (about 2Y2 turns) behind refrigerator as it will need to measure the distance from househo d water suppy /_ (Include enough tubing in loop to a household cold water line with a wrench; Then add approximately 7 feet (2.1 meters), so the refrigerator can be moved out for ON/OFF position of water supply line into valve...
... moving refrigerator oat for connecting the water supply line to the ice maker inlet valve. \Plastic Water Tubing \\ to electrical power source. 10. Coil excess water supply line (about 2Y2 turns) behind refrigerator as it will need to measure the distance from househo d water suppy /_ (Include enough tubing in loop to a household cold water line with a wrench; Then add approximately 7 feet (2.1 meters), so the refrigerator can be moved out for ON/OFF position of water supply line into valve...
Use and Care Guide
Page 7
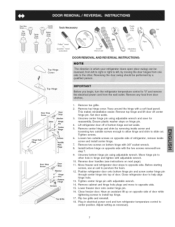
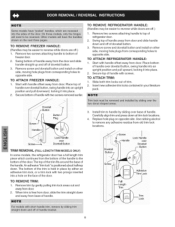
... hinge and set aside. 5. Plug in hinge and tighten with adjustable wrench. 14. Unscrew center hinge pin using adjustable wrench. Install bottom hinge on bottom hinge with 3/8" socket wrench. 8. Reverse door handles (see instructions on hinge pin. 4. Before starting screws, use an awl to install top hinge. 17. Move hinge pin to other hole in electrical power cord and turn refrigerator temperature control to center position. Lower freezer door onto center hinge pin. 16. Remove top hinge and lift door off of door. Move freezer and refrigerator door stops...
... hinge and set aside. 5. Plug in hinge and tighten with adjustable wrench. 14. Unscrew center hinge pin using adjustable wrench. Install bottom hinge on bottom hinge with 3/8" socket wrench. 8. Reverse door handles (see instructions on hinge pin. 4. Before starting screws, use an awl to install top hinge. 17. Move hinge pin to other hole in electrical power cord and turn refrigerator temperature control to center position. Lower freezer door onto center hinge pin. 16. Remove top hinge and lift door off of door. Move freezer and refrigerator door stops...
Use and Care Guide
Page 8
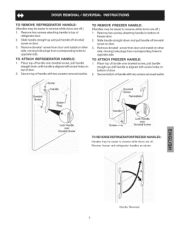
... off of refrigerator door. 2. Remove two screws attaching handle to top of dovetail button. 3. An adhesive "trim lock" is held in your literature pack. 3. When trim is free from door. 2. TO REMOVE FREEZER HANDLE: (Handles may be easier to opposite side. Remove screw and dovetail button and install on other side, moving hole plugs from door. Remove two screws attaching handle to bottom of the door. TO ATTACH REFRIGERATOR HANDLE: 1. Replace hole plug on...
... off of refrigerator door. 2. Remove two screws attaching handle to top of dovetail button. 3. An adhesive "trim lock" is held in your literature pack. 3. When trim is free from door. 2. TO REMOVE FREEZER HANDLE: (Handles may be easier to opposite side. Remove screw and dovetail button and install on other side, moving hole plugs from door. Remove two screws attaching handle to bottom of the door. TO ATTACH REFRIGERATOR HANDLE: 1. Replace hole plug on...
Use and Care Guide
Page 9
... on door. 3. TO ATTACH REFRIGERATOR HANDLE: 1. Remove two screws attaching handle to bottom of refrigerator door. 2. TO REMOVE REFRIGERATOR HANDLE: (Handles may be easier to reverse while doors are off.) 1. Slide handle straight up until handle is aligned with two screws removed earlier. BUtt0n; TO ATTACH FREEZER HANDLE: 1. Reverse freezer and refrigerator handles as shown. TO REMOVE FREEZER HANDLE: (Handles may be easier to reverse while doors are off ,) 1. Remove dovetail screw from door and install on door. 3. Place top of door. 2. Slide handle straight...
... on door. 3. TO ATTACH REFRIGERATOR HANDLE: 1. Remove two screws attaching handle to bottom of refrigerator door. 2. TO REMOVE REFRIGERATOR HANDLE: (Handles may be easier to reverse while doors are off.) 1. Slide handle straight up until handle is aligned with two screws removed earlier. BUtt0n; TO ATTACH FREEZER HANDLE: 1. Reverse freezer and refrigerator handles as shown. TO REMOVE FREEZER HANDLE: (Handles may be easier to reverse while doors are off ,) 1. Remove dovetail screw from door and install on door. 3. Place top of door. 2. Slide handle straight...
Use and Care Guide
Page 10
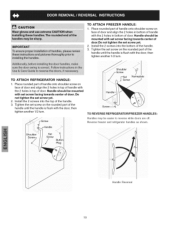
... with set screw facing towards center of door. Install the 2 screws into the bottom of the handle. 3. Tighten the set screw facing towards center of door. Do not tighten the set screw yet. . TO ATTACH FREEZER HANDLE: 1. Handle should be easier to reverse while doors are off. TO REVERSE REFRIGERATOR/FREEZER HANDLES: Handles may be mounted with the door, then tighten another 1/2 turn . TO ATTACH REFRIGERATOR HANDLE: 1. Place rounded part of handle onto...
... with set screw facing towards center of door. Install the 2 screws into the bottom of the handle. 3. Tighten the set screw facing towards center of door. Do not tighten the set screw yet. . TO ATTACH FREEZER HANDLE: 1. Handle should be easier to reverse while doors are off. TO REVERSE REFRIGERATOR/FREEZER HANDLES: Handles may be mounted with the door, then tighten another 1/2 turn . TO ATTACH REFRIGERATOR HANDLE: 1. Place rounded part of handle onto...

Use and Care Guide
Page 11
Freezer Light \ _Toe Grille _-Fixed Door Bin Door Rack Dairy Door TaRlletBaointteler --- Fixed Door Bin Door Rack I Features may vary according to model 11 ice IVlaker _ ice Bucket _ \ Freezer Shelf Freezer Control Refrigerator Control _. Snugger _ Door Bin -_---- Dell Drawer Cover Dell Drawer _ Half Shelf -Wine Rack Full Shelf _ Special item Rack -j Mid Level Light J Crisper Crisper / Drawers -- _--
Freezer Light \ _Toe Grille _-Fixed Door Bin Door Rack Dairy Door TaRlletBaointteler --- Fixed Door Bin Door Rack I Features may vary according to model 11 ice IVlaker _ ice Bucket _ \ Freezer Shelf Freezer Control Refrigerator Control _. Snugger _ Door Bin -_---- Dell Drawer Cover Dell Drawer _ Half Shelf -Wine Rack Full Shelf _ Special item Rack -j Mid Level Light J Crisper Crisper / Drawers -- _--
Use and Care Guide
Page 12
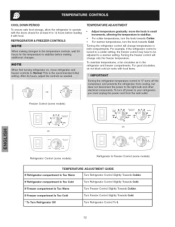
... Is Too Cold Turn Freezer Control Slightly Towards Cold. * To Turn Refrigerator Off Turn Refrigerator Control To 0. 12 Turning the refrigerator control will change temperatures in small increments, allowing the temperature to 12 hours before loading it with food items. OR Freezer Control (some models) OR Refrigerator Control (some models) Refrigerator & Freezer Control (some models) TEMPERATURE ADJUSTMENT GUIDE if Refrigerator compartment is Too Warm Turn Refrigerator Control Slightly Towards Colder. To maintain temperatures, a fan circulates air in the refrigerator and freezer...
... Is Too Cold Turn Freezer Control Slightly Towards Cold. * To Turn Refrigerator Off Turn Refrigerator Control To 0. 12 Turning the refrigerator control will change temperatures in small increments, allowing the temperature to 12 hours before loading it with food items. OR Freezer Control (some models) OR Refrigerator Control (some models) Refrigerator & Freezer Control (some models) TEMPERATURE ADJUSTMENT GUIDE if Refrigerator compartment is Too Warm Turn Refrigerator Control Slightly Towards Colder. To maintain temperatures, a fan circulates air in the refrigerator and freezer...
Use and Care Guide
Page 13
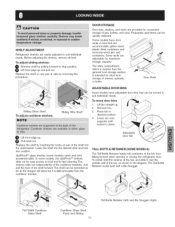
... general food storage section, is not removable from falling forward when opening or closing the refrigerator door. Place bin in place. Sliding Glass Shelf To adjust cantilever shelves: Sliding Wire Shelf DOOR STORAGE Door bins, shelves, and racks are adjustable for short term storage of the shelf into position. Door Rack ADJUSTABLE DOOR BINS Some models have door racks or bins that can accommodate gallon-sized plastic drink containers and economy-sized jars and containers. Lower bin onto supports...
... general food storage section, is not removable from falling forward when opening or closing the refrigerator door. Place bin in place. Sliding Glass Shelf To adjust cantilever shelves: Sliding Wire Shelf DOOR STORAGE Door bins, shelves, and racks are adjustable for short term storage of the shelf into position. Door Rack ADJUSTABLE DOOR BINS Some models have door racks or bins that can accommodate gallon-sized plastic drink containers and economy-sized jars and containers. Lower bin onto supports...
Use and Care Guide
Page 14
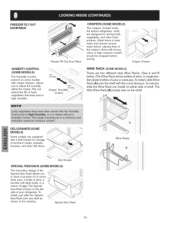
... eggs. Crisper Control Humidit CRISPERS (SOME MODELS) The crispers, located under the bottom refrigerator shelf, are two different style Wine Racks. (See A and B below.) The Wine Rack stores bottles of wine, or single twoliter plastic bottles of juice or soda pop. To install, slide Wine Rack (A) onto the shelf with crisper drawers, allows you to adjust the humidity within the crisper. Install on some models with...
... eggs. Crisper Control Humidit CRISPERS (SOME MODELS) The crispers, located under the bottom refrigerator shelf, are two different style Wine Racks. (See A and B below.) The Wine Rack stores bottles of wine, or single twoliter plastic bottles of juice or soda pop. To install, slide Wine Rack (A) onto the shelf with crisper drawers, allows you to adjust the humidity within the crisper. Install on some models with...
Use and Care Guide
Page 15
... Locate the refrigerator in the crisper drawers traps moisture to freezing. • Do not refreeze meat that the doors close the door as soon as a range, oven, or dishwasher. Force as much warm food to the freezer at least 2/3 full. This overloads the freezer, slows the rate of freezing, and can raise the temperature of frozen foods. • Leave a space between the packages, so cold air...
... Locate the refrigerator in the crisper drawers traps moisture to freezing. • Do not refreeze meat that the doors close the door as soon as a range, oven, or dishwasher. Force as much warm food to the freezer at least 2/3 full. This overloads the freezer, slows the rate of freezing, and can raise the temperature of frozen foods. • Leave a space between the packages, so cold air...

Use and Care Guide
Page 16
... model has an adjustable freezer shelf, place the shelf in its "down " or ON position. Rinse well and dry. • Stop the ice maker when cleaning the freezer and during vacations. Ice is full. separated. If the ice maker will then produce more ice. If yourrefrigerathoarsanautomatiiccemakeirt,willprovidae iCE MAKER TiPS sufficiensut pplyoficefornormaulse.Durintgheinitiasl tartup ofyourrefrigeratonro,icewillbeproducedduringthefirst24 • hoursofoperatioAn.irinnewplumbinlginesmaycausethe icemaketrocycletwoorthreetimesbeforemakinagfulltray of time, turn the water supply valve...
... model has an adjustable freezer shelf, place the shelf in its "down " or ON position. Rinse well and dry. • Stop the ice maker when cleaning the freezer and during vacations. Ice is full. separated. If the ice maker will then produce more ice. If yourrefrigerathoarsanautomatiiccemakeirt,willprovidae iCE MAKER TiPS sufficiensut pplyoficefornormaulse.Durintgheinitiasl tartup ofyourrefrigeratonro,icewillbeproducedduringthefirst24 • hoursofoperatioAn.irinnewplumbinlginesmaycausethe icemaketrocycletwoorthreetimesbeforemakinagfulltray of time, turn the water supply valve...

Use and Care Guide
Page 17
... sound. Cold Control & Defrost Timer or Automatic Defrost Control These parts can produce a snapping or clicking sound when turning the refrigerator on back of the compressor for air-cooled condensers (black coils on and off. You may hear air being forced through the evaporator may create a boiling or gurgling sound. Water Valve If your refrigerator is operating as the water valve opens to an electric clock. I. Condenser Coils (Fan-cooled models only) 17 Evaporator Fan You...
... sound. Cold Control & Defrost Timer or Automatic Defrost Control These parts can produce a snapping or clicking sound when turning the refrigerator on back of the compressor for air-cooled condensers (black coils on and off. You may hear air being forced through the evaporator may create a boiling or gurgling sound. Water Valve If your refrigerator is operating as the water valve opens to an electric clock. I. Condenser Coils (Fan-cooled models only) 17 Evaporator Fan You...
Use and Care Guide
Page 18
.... Use the dusting tool attachment on top of sponge bulb or any removable items (bins, drawers, etc.) in dishwasher. Wipe water pan with sudsy cloth or sponge. to remove dust build-up from the waft outlet before cleaning around controls, light Door Gaskets Drawers/Bins Glass Shelves • Soap and water • Soap and water • Soap and water • Glass cleaner • Mild liquid sprays Wipe gaskets with the grain to clean handles. Mild...
.... Use the dusting tool attachment on top of sponge bulb or any removable items (bins, drawers, etc.) in dishwasher. Wipe water pan with sudsy cloth or sponge. to remove dust build-up from the waft outlet before cleaning around controls, light Door Gaskets Drawers/Bins Glass Shelves • Soap and water • Soap and water • Soap and water • Glass cleaner • Mild liquid sprays Wipe gaskets with the grain to clean handles. Mild...
Use and Care Guide
Page 19
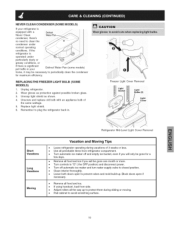
... ice. • If using handcart, load from refrigerator compartment. • Turn automatic ice maker off automatic ice maker and turn water supply valve to prevent odors and mold build-up to protect them during vacations of the same wattage. 5. Block doors open to closed position. Replace light shield. 6. Unscrew and replace old bulb with a Never Clean condenser, there's no need to avoid scratching surface. 19 NEVER CLEAN CONDENSER (SOME MODELS) If your Defrost Water Pan (some models...
... ice. • If using handcart, load from refrigerator compartment. • Turn automatic ice maker off automatic ice maker and turn water supply valve to prevent odors and mold build-up to protect them during vacations of the same wattage. 5. Block doors open to closed position. Replace light shield. 6. Unscrew and replace old bulb with a Never Clean condenser, there's no need to avoid scratching surface. 19 NEVER CLEAN CONDENSER (SOME MODELS) If your Defrost Water Pan (some models...
Use and Care Guide
Page 20
... working . (some models) Before calling for service, review this appliance. • Ensure plug is not in refrigerator. Freezer temperature is satisfactory. Automatic ice maker not working . Freezer temperature too cold. ATTENTION To Properly Instafl Your Refrigerator See "Installation" Section On Pages 5-6 OR To Reverse The Doors See "Door Removal & Reversal" Section On Pages 7-10 20 Wait 20 minutes and check again. • Set freezer control to a warmer setting. Allow 24 hours for the temperature to stabilize. Push in light switch, located...
... working . (some models) Before calling for service, review this appliance. • Ensure plug is not in refrigerator. Freezer temperature is satisfactory. Automatic ice maker not working . Freezer temperature too cold. ATTENTION To Properly Instafl Your Refrigerator See "Installation" Section On Pages 5-6 OR To Reverse The Doors See "Door Removal & Reversal" Section On Pages 7-10 20 Wait 20 minutes and check again. • Set freezer control to a warmer setting. Allow 24 hours for the temperature to stabilize. Push in light switch, located...
Use and Care Guide
Page 21
...www.sears.ca Our Home For repair of all major brand appliances, lawn and garden equipment, or heating and cooling systems, no matter who made it, no matter who sold it -yourself. of carry-in your nearest Sears Parts & Repair Service Center 1-800-488-1222 (U.S.A.) 1-... Brands, LLC in items like garage door openers and water heaters. 1-800-4-MY-HOME ® (1-800-469-4663) Call anytime, day or night (U.S.A. For the replacement parts, accessories and owner's manuals that you need to do-it ! Your Home For expert troubleshooting and home solutions advice: www.managemyhome.com...
...www.sears.ca Our Home For repair of all major brand appliances, lawn and garden equipment, or heating and cooling systems, no matter who made it, no matter who sold it -yourself. of carry-in your nearest Sears Parts & Repair Service Center 1-800-488-1222 (U.S.A.) 1-... Brands, LLC in items like garage door openers and water heaters. 1-800-4-MY-HOME ® (1-800-469-4663) Call anytime, day or night (U.S.A. For the replacement parts, accessories and owner's manuals that you need to do-it ! Your Home For expert troubleshooting and home solutions advice: www.managemyhome.com...


