Use and Care Guide
Page 2
...Service 39-40 Recipes for Slow Cook 41 Sears Service back cover Kenmore Elite Appliance Warranty One Year Limited Warranty When installed, operated and maintained... items that are limited to one year from the date of parts or systems resulting from state to or failure of purchase. Damage... user in the United States or Canada. Table of Contents Freestanding Range Warranty 2 IMPORTANTSAFETYINSTRUCTIONS 3-5 Before Using Your Range 5 • Assembly of implied warranties; A service technician to ... 30-31 • Setting Warm & Hold 31 Self-Cleaning 3.2.-3.4...........
...Service 39-40 Recipes for Slow Cook 41 Sears Service back cover Kenmore Elite Appliance Warranty One Year Limited Warranty When installed, operated and maintained... items that are limited to one year from the date of parts or systems resulting from state to or failure of purchase. Damage... user in the United States or Canada. Table of Contents Freestanding Range Warranty 2 IMPORTANTSAFETYINSTRUCTIONS 3-5 Before Using Your Range 5 • Assembly of implied warranties; A service technician to ... 30-31 • Setting Warm & Hold 31 Self-Cleaning 3.2.-3.4...........
Use and Care Guide
Page 3
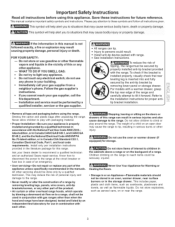
...risk of an emergency. For models with a warmer drawer, grasp the top rear edge of the product. , Air curtain or other part of the range and carefully attempt to sitUations that rear leveJing leg is not followed exactly, a fire or explosion may result causing property damage, personal injury...on Appliance=Flammable materials should be performed by a qualified technician, This may cause the range to tip, resulting in serious injuries and also cause damage to climb or play with the National Fuel Gas Code ANSI Z223.latest ed it forward. Destroy the carton and plastic bags after ...
...risk of an emergency. For models with a warmer drawer, grasp the top rear edge of the product. , Air curtain or other part of the range and carefully attempt to sitUations that rear leveJing leg is not followed exactly, a fire or explosion may result causing property damage, personal injury...on Appliance=Flammable materials should be performed by a qualified technician, This may cause the range to tip, resulting in serious injuries and also cause damage to climb or play with the National Fuel Gas Code ANSI Z223.latest ed it forward. Destroy the carton and plastic bags after ...
Use and Care Guide
Page 4
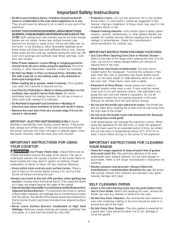
... except as suggested in ignition of grease that burner has tit. Visually check that could catch fire. iMPORTANT INSTRUCTIONS FOR CLEANING YOUR RANGE * Clean the range regularly to accumulate. Do not allow dripping fat to flame will also improve efficiency. * Know which knob controls each surface element.... that excess residue from the oven. , Do Not Use Oven Cleaners--No commercial oven cleaner or oven liner protective coating of any part of the burner flame to the area underneath each surface burner. Pay particular attention to direct contact and may cause container to burst and...
... except as suggested in ignition of grease that burner has tit. Visually check that could catch fire. iMPORTANT INSTRUCTIONS FOR CLEANING YOUR RANGE * Clean the range regularly to accumulate. Do not allow dripping fat to flame will also improve efficiency. * Know which knob controls each surface element.... that excess residue from the oven. , Do Not Use Oven Cleaners--No commercial oven cleaner or oven liner protective coating of any part of the burner flame to the area underneath each surface burner. Pay particular attention to direct contact and may cause container to burst and...
Use and Care Guide
Page 25
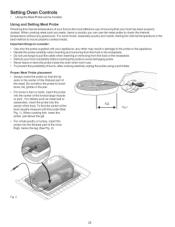
... avoid damaging probe. • Never leave or store the probe inside the oven when not in ham or lamb, insert the probe into the thickest part of burns, after cooking carefully unplug the probe using a pot holder. Proper Meat Probe placement • Always insert the probe so that your food ..., especially poultry and roasts, testing the internal temperature is the most effective way of insuring that the tip rests in the center of the thickest part of the meat. Do not allow the probe to consider: • Use only the probe supplied with the probe (See Fig. 1). any guesswork. For ...
... avoid damaging probe. • Never leave or store the probe inside the oven when not in ham or lamb, insert the probe into the thickest part of burns, after cooking carefully unplug the probe using a pot holder. Proper Meat Probe placement • Always insert the probe so that your food ..., especially poultry and roasts, testing the internal temperature is the most effective way of insuring that the tip rests in the center of the thickest part of the meat. Do not allow the probe to consider: • Use only the probe supplied with the probe (See Fig. 1). any guesswork. For ...
Use and Care Guide
Page 32
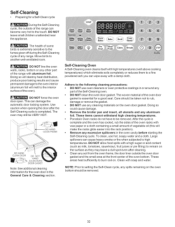
... Self-Clean cycle During the Self=Cleaning cycle, the outside the oven door gasket and the small area at the front center of the range with high temperatures (well above cooking temperatures) which eliminate soils completely or reduces them to another well-ventilated room. The woven material of ...the oven racks with soap and water. Doing so could cause damage. • Remove the broiler pan and insert, all utensils and any part of any excessive spillovers in or around any aluminum foil, These items cannot withstand high cleaning temperatures. • Porcelain Oven racks do not ...
... Self-Clean cycle During the Self=Cleaning cycle, the outside the oven door gasket and the small area at the front center of the range with high temperatures (well above cooking temperatures) which eliminate soils completely or reduces them to another well-ventilated room. The woven material of ...the oven racks with soap and water. Doing so could cause damage. • Remove the broiler pan and insert, all utensils and any part of any excessive spillovers in or around any aluminum foil, These items cannot withstand high cleaning temperatures. • Porcelain Oven racks do not ...
Use and Care Guide
Page 36
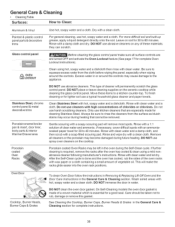
... when wiping around the controls may become damaged during heating that are turned OFF and activate the Oven Lockout feature (See page 17 for 30 to rub, damage or remove this gasket. DO NOT immerse the door in the General Care & Cleaning section. On Self-Cleaning models ... and paper towels. Porcelain coated Oven Racks may occur during future heating. Always be sure to Clean: Aluminum & Vinyl Painted & plastic control panel parts & decorative trims Use hot, soapy water and a cloth. Gentle scouring with clean water and let dry. Oven Door _J,_,l To clean Oven Door...
... when wiping around the controls may become damaged during heating that are turned OFF and activate the Oven Lockout feature (See page 17 for 30 to rub, damage or remove this gasket. DO NOT immerse the door in the General Care & Cleaning section. On Self-Cleaning models ... and paper towels. Porcelain coated Oven Racks may occur during future heating. Always be sure to Clean: Aluminum & Vinyl Painted & plastic control panel parts & decorative trims Use hot, soapy water and a cloth. Gentle scouring with clean water and let dry. Oven Door _J,_,l To clean Oven Door...
Use and Care Guide
Page 37
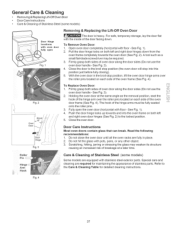
...-OffOven Door • DoorCare Instructions • Care & Cleaning of Stainless Steel (some models) Some models are equipped with stainless steel exterior parts. Open oven door completely (horizontal with pots, pans, or any other object. 3. Firmly grasp both left and right oven door hinges (...Replacing the Lift=Off Oven Door The door is heavy. To Remove Oven Door: 1. Close the oven door. ii.i........... ...i.i..i Care & Cleaning of stainless parts. Fig. 4 37 See Fig. 1). 2. See Fig. 3). 2. Holding the oven door at a later time. Door Care instructions Most oven doors ...
...-OffOven Door • DoorCare Instructions • Care & Cleaning of Stainless Steel (some models) Some models are equipped with stainless steel exterior parts. Open oven door completely (horizontal with pots, pans, or any other object. 3. Firmly grasp both left and right oven door hinges (...Replacing the Lift=Off Oven Door The door is heavy. To Remove Oven Door: 1. Close the oven door. ii.i........... ...i.i..i Care & Cleaning of stainless parts. Fig. 4 37 See Fig. 1). 2. See Fig. 3). 2. Holding the oven door at a later time. Door Care instructions Most oven doors ...
Use and Care Guide
Page 38
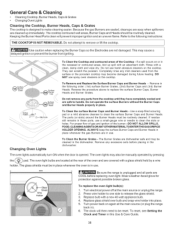
... (or slots) around the Burner Heads must be cleaned in these ports, use harsh abrasive cleaners on again at the main source or unplug the range. 2. If residue still remains in the dishwasher. Replace bulb with a clean, damp cloth and wipe dry. The clock will prevent improper ignition and an uneven... oven light bulbs are located at the rear of the oven and are COOL before placing in place whenever the oven is unplugged and all parts are covered with an absorbent cloth. Wire Holder To replace the oven light bulb(s): 1. The oven lights may be in the dishwasher. This may ...
... (or slots) around the Burner Heads must be cleaned in these ports, use harsh abrasive cleaners on again at the main source or unplug the range. 2. If residue still remains in the dishwasher. Replace bulb with a clean, damp cloth and wipe dry. The clock will prevent improper ignition and an uneven... oven light bulbs are located at the rear of the oven and are COOL before placing in place whenever the oven is unplugged and all parts are covered with an absorbent cloth. Wire Holder To replace the oven light bulb(s): 1. The oven lights may be in the dishwasher. This may ...

Use and Care Guide
Page 42
iiiiiiiiiii iiiiiiiiiiiiiiiiiiiii For the replacement parts, accessories and owoer's manuals that you need to do=it ! iii_i.i.i¸.i_.ii.i'i_ YouHr ome For repair- of home appliances iiiiiiiiiii iiiiiiiiiii and ... www.sears.ca _o°rx_e,o, rn.o,.,o_n,svc,o.:w.._o°o_o_,,o_o.oo_ iiiiiiiiiii O_rHom For repair of carry-in your nearest iiiiiiiiiii Sears Parts & Repair Service Center 1-800-488-1222 (U.S.A.) 1-800-469-4663 (Canada) Call anytime, day or night _v._oor_.oo_m,,,.,oo_.oo To purchase a protection agreement on...
iiiiiiiiiii iiiiiiiiiiiiiiiiiiiii For the replacement parts, accessories and owoer's manuals that you need to do=it ! iii_i.i.i¸.i_.ii.i'i_ YouHr ome For repair- of home appliances iiiiiiiiiii iiiiiiiiiii and ... www.sears.ca _o°rx_e,o, rn.o,.,o_n,svc,o.:w.._o°o_o_,,o_o.oo_ iiiiiiiiiii O_rHom For repair of carry-in your nearest iiiiiiiiiii Sears Parts & Repair Service Center 1-800-488-1222 (U.S.A.) 1-800-469-4663 (Canada) Call anytime, day or night _v._oor_.oo_m,,,.,oo_.oo To purchase a protection agreement on...
Installation Instructions
Page 2
... burner when power resumes ifthe oven thermostat control was left in Canada CSA Standard 022.1, Canadian Electrical Code, Part 1, and local code requirements. Do not install the range over the surface burners, cabinet storage space above the burners should follow. Hold a lighted match to the ...manufactured (mobile) home, installation must be seriously burned climbing on page 7-9 in the Installation Steps. = Before installing the range in an area covered with the National Fuel Gas Code ANSI Z223= latest edition, or in Canada CAN/CGA B149.1 and CAN/GGA B149.2, and the National Electrical...
... burner when power resumes ifthe oven thermostat control was left in Canada CSA Standard 022.1, Canadian Electrical Code, Part 1, and local code requirements. Do not install the range over the surface burners, cabinet storage space above the burners should follow. Hold a lighted match to the ...manufactured (mobile) home, installation must be seriously burned climbing on page 7-9 in the Installation Steps. = Before installing the range in an area covered with the National Fuel Gas Code ANSI Z223= latest edition, or in Canada CAN/CGA B149.1 and CAN/GGA B149.2, and the National Electrical...
Installation Instructions
Page 12
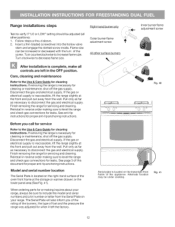
...anti-tip anchoring instructions. Before you of the rating of the burners, the type of fuel and the pressure the range was adjusted for cleaning instructions. If the gas or electrical supply is inaccessible, lift the range slightly at the storage or warmer drawer; Turn clockwise to the Use & Care Guide ...out away from the Serial Plate on the right-hand surface of the appliance. Disconnect the gas and electrical supply. Finish removing the range for or making inquires about your range, always be under cooktop. 12 When ordering parts for servicing and cleaning.
...anti-tip anchoring instructions. Before you of the rating of the burners, the type of fuel and the pressure the range was adjusted for cleaning instructions. If the gas or electrical supply is inaccessible, lift the range slightly at the storage or warmer drawer; Turn clockwise to the Use & Care Guide ...out away from the Serial Plate on the right-hand surface of the appliance. Disconnect the gas and electrical supply. Finish removing the range for or making inquires about your range, always be under cooktop. 12 When ordering parts for servicing and cleaning.

