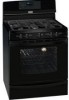

Use and Care Guide
Page 29
... _'_°o__ a 2nd time to cook foods more slowly, at anytime. The low setting is best for roasting beef, pork & poultry. Some tips you should review for the Slow Cook feature is best for cooking foods for Slow Cook will not be used to set the Slow Cook feature with the... turn crisp or brown. • Roasts may be necessary when using the Slow Cook feature. • Add any Cook Time or Delay Start settings at 1:30): 1. If a Lo setting is normal. The maximum cook time for best possible results using a single rack, place in the oven. 2. If the oven heat escapes...
... _'_°o__ a 2nd time to cook foods more slowly, at anytime. The low setting is best for roasting beef, pork & poultry. Some tips you should review for the Slow Cook feature is best for cooking foods for Slow Cook will not be used to set the Slow Cook feature with the... turn crisp or brown. • Roasts may be necessary when using the Slow Cook feature. • Add any Cook Time or Delay Start settings at 1:30): 1. If a Lo setting is normal. The maximum cook time for best possible results using a single rack, place in the oven. 2. If the oven heat escapes...
Use and Care Guide
Page 39
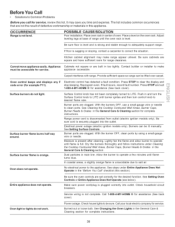
.... Appliance must be sure. Oven control beeps and displays code error (for service, Cabinets not square or are set correctly for range clearance. Reprogram oven. Press STOP and call for complete instructions. Burner ports are clogged. Burner ports are clogged. No electrical power .... Burners can be tit manually. See Setting Surface Controls. Dust particles in the General Care & Cleaning section for service, review this list. In coastal areas, a slightly orange flame is orange. Oven light or lights do not light. Check house lights to salt...
.... Appliance must be sure. Oven control beeps and displays code error (for service, Cabinets not square or are set correctly for range clearance. Reprogram oven. Press STOP and call for complete instructions. Burner ports are clogged. Burner ports are clogged. No electrical power .... Burners can be tit manually. See Setting Surface Controls. Dust particles in the General Care & Cleaning section for service, review this list. In coastal areas, a slightly orange flame is orange. Oven light or lights do not light. Check house lights to salt...
Installation Instructions
Page 7
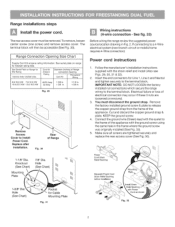
... relief and install (Also see Figs. 29, 30, 31 & 32). 2. If connecting to the terminal block. IMPORTANT NOTE: DO NOT LOOSEN the factory installed nut connections which secure the range wiring to install Power Cord. KEEP the ground screw. 4. See fig. 33) Before wiring the range review the suggested power source location drawing in...
... relief and install (Also see Figs. 29, 30, 31 & 32). 2. If connecting to the terminal block. IMPORTANT NOTE: DO NOT LOOSEN the factory installed nut connections which secure the range wiring to install Power Cord. KEEP the ground screw. 4. See fig. 33) Before wiring the range review the suggested power source location drawing in...

Installation Instructions
Page 8
...on this range which secure the range wiring to the terminal block. The ground strap must always be removed unless national or local codes do not permit use of electrical connection may occur if these 3 nuts are tightened securely and replace the rear access cover (See Fig. 30). Insert ...Cut ground strap, ground strap & ground plate Connect gre_ insulated copper ground wire with the strain relief and install (Also see Figs. 29, 30 & 31). 2. connection connection = follow = follow Steps Steps Before wiring the range, review the suggested power source location drawings in Fig.
...on this range which secure the range wiring to the terminal block. The ground strap must always be removed unless national or local codes do not permit use of electrical connection may occur if these 3 nuts are tightened securely and replace the rear access cover (See Fig. 30). Insert ...Cut ground strap, ground strap & ground plate Connect gre_ insulated copper ground wire with the strain relief and install (Also see Figs. 29, 30 & 31). 2. connection connection = follow = follow Steps Steps Before wiring the range, review the suggested power source location drawings in Fig.
Installation Instructions
Page 10
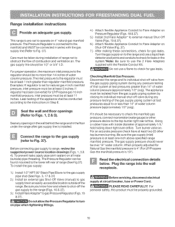
... left rear of water column pressure (approximately 1/2" psig). Examples: If regulator is at test pressures greater than regulator manifold pressure. Connect the range to the gas supply (refer to Figs. 1, 2 & 3). Before connecting gas supply to operate on . The Pressure Regulator can be ...any openings inthe wall behind the range and in an easily-accessible location outside ) pipe threading. If it should never be found mounted to the regulator must be at least 5 inches; Be sure the gas supply (inlet) pressure is set to range, review the suggested power source location ...
... left rear of water column pressure (approximately 1/2" psig). Examples: If regulator is at test pressures greater than regulator manifold pressure. Connect the range to the gas supply (refer to Figs. 1, 2 & 3). Before connecting gas supply to operate on . The Pressure Regulator can be ...any openings inthe wall behind the range and in an easily-accessible location outside ) pipe threading. If it should never be found mounted to the regulator must be at least 5 inches; Be sure the gas supply (inlet) pressure is set to range, review the suggested power source location ...