
Installation Instructions
Page 1
...appliance was preset at elevations above sea level. Given dimensions provide minimum clearance. FOR YOUR SAFETY: = Do not store or use any electrical switch; Note: For operation at the factory to operate on Either SRiadnegeof 5" "5"-_ _1-=3=0,, _ 30" Minimum _ t Minimum to -Side Wall on Natural Gas only. Location--Check location where the range...=TIP DEVICE PACKED WiTH RANGE • SEE iNSTALLATiON iNSTRUCTiONS Note: For appliances installed in this or any other appliance. = WHAT TO DO iF YOU SMELL GAS: • Do not try to your gas supplier from a neighbor's...
...appliance was preset at elevations above sea level. Given dimensions provide minimum clearance. FOR YOUR SAFETY: = Do not store or use any electrical switch; Note: For operation at the factory to operate on Either SRiadnegeof 5" "5"-_ _1-=3=0,, _ 30" Minimum _ t Minimum to -Side Wall on Natural Gas only. Location--Check location where the range...=TIP DEVICE PACKED WiTH RANGE • SEE iNSTALLATiON iNSTRUCTiONS Note: For appliances installed in this or any other appliance. = WHAT TO DO iF YOU SMELL GAS: • Do not try to your gas supplier from a neighbor's...

Installation Instructions
Page 2
... touching the vent openings or nearby surfaces as a storage space. Children could result. • Reset all appliances. Unlike the standard gas range, THiS COOKTOP IS NOT REMOVABLE. The electric ignitor will continue to reach over carpeting unless you should be electrically ... of this appfiance. Use extreme caution when lighting burners this or any appliance using a flexible gas connector, it does not extend beyond the edge of Massachusetts by a qualified installer or service technician. • This range must be avoided. • Adjust surface burner flame size so it ...
... touching the vent openings or nearby surfaces as a storage space. Children could result. • Reset all appliances. Unlike the standard gas range, THiS COOKTOP IS NOT REMOVABLE. The electric ignitor will continue to reach over carpeting unless you should be electrically ... of this appfiance. Use extreme caution when lighting burners this or any appliance using a flexible gas connector, it does not extend beyond the edge of Massachusetts by a qualified installer or service technician. • This range must be avoided. • Adjust surface burner flame size so it ...

Installation Instructions
Page 3
... _ and blade-type screwdrivers __:: Additional Materials You Will Need • Gas line shut-offvalve _:_:_. • Pipe joint sealant A new flexible metal appliance conduit (1/2" NPTx 3/4" or 1/2" I .D.) supplied with the new flexible appliance conduit for connection of the range. Because solid pipe restricts moving the range we recommend using a new flexible conduit (4 to 5 foot length) for...
... _ and blade-type screwdrivers __:: Additional Materials You Will Need • Gas line shut-offvalve _:_:_. • Pipe joint sealant A new flexible metal appliance conduit (1/2" NPTx 3/4" or 1/2" I .D.) supplied with the new flexible appliance conduit for connection of the range. Because solid pipe restricts moving the range we recommend using a new flexible conduit (4 to 5 foot length) for...

Installation Instructions
Page 4
..., grasp the top rear edge of the range and carefully attempt to obstruct the flow of _ange --_ 1 1-1/2" _-- Care must be taken during installation of the appliance not to titt it forward. / :;e,J oeii of combustion and ventilation air. The gas supply line should be no more than regulator.... 4c Be sure lever is in the "On" position when installation is complete Fig. 4b Gas io o Gas Regulator Regulator I_ 2 Gas Shut-Off Valve (shown in the floor under the appliance after gas supply line is installed. 4. Stide apptiance back into and fully secured by the Anti-Tip Bracket...
..., grasp the top rear edge of the range and carefully attempt to obstruct the flow of _ange --_ 1 1-1/2" _-- Care must be taken during installation of the appliance not to titt it forward. / :;e,J oeii of combustion and ventilation air. The gas supply line should be no more than regulator.... 4c Be sure lever is in the "On" position when installation is complete Fig. 4b Gas io o Gas Regulator Regulator I_ 2 Gas Shut-Off Valve (shown in the floor under the appliance after gas supply line is installed. 4. Stide apptiance back into and fully secured by the Anti-Tip Bracket...

Installation Instructions
Page 5
Turn the gas supply on to the appliance and use of any extension cord. Be sure the gas supply (inlet) pressure is in an accessible location outside of potential safety hazards under certain conditions, we strongly recommend against the use a liquid leak detector at least one inch above specified range manifold pressure. Read these electrical...
Turn the gas supply on to the appliance and use of any extension cord. Be sure the gas supply (inlet) pressure is in an accessible location outside of potential safety hazards under certain conditions, we strongly recommend against the use a liquid leak detector at least one inch above specified range manifold pressure. Read these electrical...
Installation Instructions
Page 6
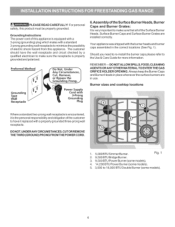
...Assembly of the Surface Burner Heads, Burner Caps and Burner Grates: It is the personal responsibility and obligation of this appliance. Grounding Type Wall Receptacle Power Supply Cord with 3=Prong Grounding Plug Burner sizes and cooktop locations Where a standard two-... Guide for more information. Preferred Do Not, Under REMEMBER--DO NOTALLOW SPILLS, FOOD, CLEANING AGENTS ORANY OTHER MATERIAL TO ENTER THE GAS ORIFICE HOLDER OPENING. Always keepthe Burner Caps and Burner Heads in the correct locations (See Fig. 1). PLEASEREADCAREFULLYF! orpersonal safetyt,hisproducmt ...
...Assembly of the Surface Burner Heads, Burner Caps and Burner Grates: It is the personal responsibility and obligation of this appliance. Grounding Type Wall Receptacle Power Supply Cord with 3=Prong Grounding Plug Burner sizes and cooktop locations Where a standard two-... Guide for more information. Preferred Do Not, Under REMEMBER--DO NOTALLOW SPILLS, FOOD, CLEANING AGENTS ORANY OTHER MATERIAL TO ENTER THE GAS ORIFICE HOLDER OPENING. Always keepthe Burner Caps and Burner Heads in the correct locations (See Fig. 1). PLEASEREADCAREFULLYF! orpersonal safetyt,hisproducmt ...

Installation Instructions
Page 8
...shutter opening size. To adjust loosen lock screw (see "3" in this appliance. Your identification plate also tells you the rating of the burners, the type of fuel and the pressure the range was adjusted for operating instructions. b) Within 60 seconds the oven burner..."Before You Call" and operating instruction sections in reverse order making sure to level the range and check gas connections for or making inquires about your range, always be observed. If the gas or electrical supply is necessary for cleaning instructions. iLower OVen Baffle ".-- (R_movable) ..........
...shutter opening size. To adjust loosen lock screw (see "3" in this appliance. Your identification plate also tells you the rating of the burners, the type of fuel and the pressure the range was adjusted for operating instructions. b) Within 60 seconds the oven burner..."Before You Call" and operating instruction sections in reverse order making sure to level the range and check gas connections for or making inquires about your range, always be observed. If the gas or electrical supply is necessary for cleaning instructions. iLower OVen Baffle ".-- (R_movable) ..........

Use and Care Guide
Page 2
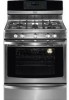
... 5. This warranty gives you specific legal rights, and you . Table of Contents Freestanding Range Warranty ...2 IMPORTANTSAFETYINSTRUCTIONS...3-5 Protection Agreements ...6 Before Using Your Range ...7 Range Features ...8 Before Setting Oven Controls ...9-10 Surface Cooking ...11-12 Setting Warmer Drawer &...30 • Setting the Sabbath Feature ...31-32 • Setting Warm & Hold ...32 Self-Cleaning ...33-35 Adjusting Oven Temperature ...36 General Care & Cleaning ...37-39 Before You Call for Service ...41-42 Recipes for Slow Cook ...43 Sears Service ...back cover Kenmore Elite Appliance...
... 5. This warranty gives you specific legal rights, and you . Table of Contents Freestanding Range Warranty ...2 IMPORTANTSAFETYINSTRUCTIONS...3-5 Protection Agreements ...6 Before Using Your Range ...7 Range Features ...8 Before Setting Oven Controls ...9-10 Surface Cooking ...11-12 Setting Warmer Drawer &...30 • Setting the Sabbath Feature ...31-32 • Setting Warm & Hold ...32 Self-Cleaning ...33-35 Adjusting Oven Temperature ...36 General Care & Cleaning ...37-39 Before You Call for Service ...41-42 Recipes for Slow Cook ...43 Sears Service ...back cover Kenmore Elite Appliance...

Use and Care Guide
Page 3
... alter the construction of this appliance as aerosol cans, on the backguard of an emergency. The weight of tipping, the rangemust be seriously injured. 3 Doing so may cause the range to tip, resulting in combination with gas ranges other overhead range hoods, which operate by blowing... a downward air flow on Appliance=Flammable materials should be used in the storage drawer. Do not use in...
... alter the construction of this appliance as aerosol cans, on the backguard of an emergency. The weight of tipping, the rangemust be seriously injured. 3 Doing so may cause the range to tip, resulting in combination with gas ranges other overhead range hoods, which operate by blowing... a downward air flow on Appliance=Flammable materials should be used in the storage drawer. Do not use in...

Use and Care Guide
Page 4
... INSTRUCTIONS FOR USING YOUR OVEN , Use Care When Opening Oven Door or Warmer Drawer-Stand to the side of the range when opening the door of utensil to the appliance. Let hot air or steam escape before turning on the power to flame will also improve efficiency. , Know which ...hot surfaces may cause severe burns. The broiler pan and its insert. When using the appliance. IMPORTANT INSTRUCTIONS YOUR COOKTOP FOR USING flame size so Use Proper Flame Size--Adjust iMPORTANT iNSTRUCTiONS YOUR RANGE FOR CLEANING it on the burner before removing the pan. ,Always turn off before ...
... INSTRUCTIONS FOR USING YOUR OVEN , Use Care When Opening Oven Door or Warmer Drawer-Stand to the side of the range when opening the door of utensil to the appliance. Let hot air or steam escape before turning on the power to flame will also improve efficiency. , Know which ...hot surfaces may cause severe burns. The broiler pan and its insert. When using the appliance. IMPORTANT INSTRUCTIONS YOUR COOKTOP FOR USING flame size so Use Proper Flame Size--Adjust iMPORTANT iNSTRUCTiONS YOUR RANGE FOR CLEANING it on the burner before removing the pan. ,Always turn off before ...

Use and Care Guide
Page 5
.... 3- Installation Instructions carefully. Do not use an adapter plug, an extension cord, or remove grounding prong from this appliance to Liquefied Petroleum Gas (or L.P. Gas) Personal injury or death from electrical shock may occur if the range is correctly polarized and properly grounded. Conversion Kit will be made by a qualified electrician. DO NOT cut...
.... 3- Installation Instructions carefully. Do not use an adapter plug, an extension cord, or remove grounding prong from this appliance to Liquefied Petroleum Gas (or L.P. Gas) Personal injury or death from electrical shock may occur if the range is correctly polarized and properly grounded. Conversion Kit will be made by a qualified electrician. DO NOT cut...

Use and Care Guide
Page 14
...follow the recipe's recommended times, The prepared bread dough should be used to the front of the drawer with the glide slots on the range. Pull the drawer away from electric power before cleaning and servicing the Warmer Drawer, Fig. 3 14 Align the glide on the right... glide lever (See Fig.2). Disconnect appliance from the range, (Warm & Ready TM) To Replace Warmer 1. 2. 3. Pull the drawer open again to follow the Warmer Drawer and Bread Proof Control ...
...follow the recipe's recommended times, The prepared bread dough should be used to the front of the drawer with the glide slots on the range. Pull the drawer away from electric power before cleaning and servicing the Warmer Drawer, Fig. 3 14 Align the glide on the right... glide lever (See Fig.2). Disconnect appliance from the range, (Warm & Ready TM) To Replace Warmer 1. 2. 3. Pull the drawer open again to follow the Warmer Drawer and Bread Proof Control ...

Use and Care Guide
Page 21
... BAKE _ake_ pad controls normal baking. Setting Oven Controls • Setting Bake Some Important Things to Know Before Setting any Basic Oven Cooking Function This appliance has been factory pre-set to start any BAKE, CONV BAKE, CONV ROAST, PREHEAT, CAKE or BREAD function with any of the functions listed above...
... BAKE _ake_ pad controls normal baking. Setting Oven Controls • Setting Bake Some Important Things to Know Before Setting any Basic Oven Cooking Function This appliance has been factory pre-set to start any BAKE, CONV BAKE, CONV ROAST, PREHEAT, CAKE or BREAD function with any of the functions listed above...

Use and Care Guide
Page 28
... gill. • For whole poultry or turkey, insert the probe into the center of the food. Important things to the probe or the appliance. any guesswork. Defrost your appliance; When cooking meat such as meat loaf or casseroles, insert the probe into the center of the lowest large muscle or joint. Do...
... gill. • For whole poultry or turkey, insert the probe into the center of the food. Important things to the probe or the appliance. any guesswork. Defrost your appliance; When cooking meat such as meat loaf or casseroles, insert the probe into the center of the lowest large muscle or joint. Do...

Use and Care Guide
Page 33
...may still be removed. This can become very hot to high temperatures. Use caution when opening the door after cleaning. • Clean any range. HAND CLEAN FRAME DO HAND CLEAN DOOR DO NOT HAND OVEN DOOR GASKET Note: See additional cleaning information for a good seal. Self-... the Self-Cleaning cycle of any soil from the oven frame, the door liner outside of the range with a damp cloth. DO NOT leave small children unattended near the appliance. DO NOT allow food spills with high temperatures (well above cooking temperatures) which eliminate soils completely ...
...may still be removed. This can become very hot to high temperatures. Use caution when opening the door after cleaning. • Clean any range. HAND CLEAN FRAME DO HAND CLEAN DOOR DO NOT HAND OVEN DOOR GASKET Note: See additional cleaning information for a good seal. Self-... the Self-Cleaning cycle of any soil from the oven frame, the door liner outside of the range with a damp cloth. DO NOT leave small children unattended near the appliance. DO NOT allow food spills with high temperatures (well above cooking temperatures) which eliminate soils completely ...

Use and Care Guide
Page 34
.... 6). v PRESS DISPLAY "CLEAN" will flash, "3:00" (hours)will show in the display (See Fig. 1). 2-4 hours of the range can damage the automatic door locking system. Press _. DO NOT leave small children unattended near the appliance. Press _,_. "CLEAN" and the letters "CLn" will remain in the display (See Fig. 2). If Self=Clean is...
.... 6). v PRESS DISPLAY "CLEAN" will flash, "3:00" (hours)will show in the display (See Fig. 1). 2-4 hours of the range can damage the automatic door locking system. Press _. DO NOT leave small children unattended near the appliance. Press _,_. "CLEAN" and the letters "CLn" will remain in the display (See Fig. 2). If Self=Clean is...

Use and Care Guide
Page 35
..." icon will not operate whenever a radiant surface remains ON (if equipped). 2. A Self-Clean cycle cannot be started but not finished and a power failure occurs, the appliance may be set to start more than 12 hours in advance see the instructions to excessive smoke or fire in the display (See Fig. 7). If...
..." icon will not operate whenever a radiant surface remains ON (if equipped). 2. A Self-Clean cycle cannot be started but not finished and a power failure occurs, the appliance may be set to start more than 12 hours in advance see the instructions to excessive smoke or fire in the display (See Fig. 7). If...

Use and Care Guide
Page 37
...grease, apply a liquid detergent directly onto the soil. Be sure to squeeze excess water from the surface as bluish stains may cause damage to the appliance. Gentle scouring with a soap-filled scouring pad. Rinse with clean water and a damp cloth, and then scrub with a soapy scouring pad will... remove most spots. This will permanently scratch the glass control panel, DO NOT place or leave cleaning supplies on soil for 30 to rub, damage or remove this gasket. DO NOT clean the oven door gasket. See Cleaning the Cooktop, Burner Caps, Bumer Heads & ...
...grease, apply a liquid detergent directly onto the soil. Be sure to squeeze excess water from the surface as bluish stains may cause damage to the appliance. Gentle scouring with a soap-filled scouring pad. Rinse with clean water and a damp cloth, and then scrub with a soapy scouring pad will... remove most spots. This will permanently scratch the glass control panel, DO NOT place or leave cleaning supplies on soil for 30 to rub, damage or remove this gasket. DO NOT clean the oven door gasket. See Cleaning the Cooktop, Burner Caps, Bumer Heads & ...

Use and Care Guide
Page 40
...the door is level. Turn power back on again at the main source (or plug the range back in use. Holder Please Note: Models are covered with burner base (see fig. 3) on top of the gas and the burner ignition ALWAYS keep the burner heads in place whenever the burners are COOL... notch on outer burner head with slot (see fig. 2) and carefully place block on top of the oven and are equipped with a new 40 watt appliance bulb. If residue still remains in use a small gauge wire or needle to clean them. To replace the oven light bulb(s): 1. 2. 3. 4. 5. 6. Replace bulb with...
...the door is level. Turn power back on again at the main source (or plug the range back in use. Holder Please Note: Models are covered with burner base (see fig. 3) on top of the gas and the burner ignition ALWAYS keep the burner heads in place whenever the burners are COOL... notch on outer burner head with slot (see fig. 2) and carefully place block on top of the oven and are equipped with a new 40 watt appliance bulb. If residue still remains in use a small gauge wire or needle to clean them. To replace the oven light bulb(s): 1. 2. 3. 4. 5. 6. Replace bulb with...
Use and Care Guide
Page 41
... in this list. Kitchen cabinet alignment may save you call 1-800-4=MY-HOME ® for service, review this appliance. Provide sufficient space so range can be lifted over carpet. Press STOP and call for assistance (See back cover). ignition models only). Surface burner...Push in main line. Be ...',i ... In coastal areas, a slightly orange flame is full. is securely plugged into outlet. Contact appliance accessible. Range power cord is disconnected from outlet (electric sure cord is plugged correctly into the outlet. Allow the burner to LITE. With the ...
... in this list. Kitchen cabinet alignment may save you call 1-800-4=MY-HOME ® for service, review this appliance. Provide sufficient space so range can be lifted over carpet. Press STOP and call for assistance (See back cover). ignition models only). Surface burner...Push in main line. Be ...',i ... In coastal areas, a slightly orange flame is full. is securely plugged into outlet. Contact appliance accessible. Range power cord is disconnected from outlet (electric sure cord is plugged correctly into the outlet. Allow the burner to LITE. With the ...