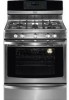

Installation Instructions
Page 2
... National Fuel Gas Code ANSI Z223.1--1atest edition when installed in the State of the cooking utensil. important Note to remove the cooktop. You will automatically re-ignite the oven burner when power resumes if the oven thermostat control was left in the Use & Care Guide. . FOR MODELS WiTH SELF=CLEAN FEATURE: . Do not attempt to the Consumer 1. During a power outage, the surface burners can be electrically grounded in accordance with local codes or, in operation. When an electrical power...
... National Fuel Gas Code ANSI Z223.1--1atest edition when installed in the State of the cooking utensil. important Note to remove the cooktop. You will automatically re-ignite the oven burner when power resumes if the oven thermostat control was left in the Use & Care Guide. . FOR MODELS WiTH SELF=CLEAN FEATURE: . Do not attempt to the Consumer 1. During a power outage, the surface burners can be electrically grounded in accordance with local codes or, in operation. When an electrical power...

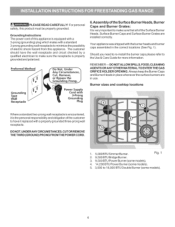
Installation Instructions
Page 3
... of the appliance. B= Drill Pilot Holes and Fasten Bracket - Before Starting Tools You Will Need For leveling legs and Anti=Tip Bracket: • Adjustable wrench or channel lock pliers • 5/16" Nutdriver or Flat Head Screw Driver __ • Electric Drill & 1/8" Diameter Drill Bit (5/32" Masonry Drill Bit if installing in concrete) For gas supply connection: • Pipe wrench l_ For burner flame adjustment: • Phillips head _ and...
... of the appliance. B= Drill Pilot Holes and Fasten Bracket - Before Starting Tools You Will Need For leveling legs and Anti=Tip Bracket: • Adjustable wrench or channel lock pliers • 5/16" Nutdriver or Flat Head Screw Driver __ • Electric Drill & 1/8" Diameter Drill Bit (5/32" Masonry Drill Bit if installing in concrete) For gas supply connection: • Pipe wrench l_ For burner flame adjustment: • Phillips head _ and...

Installation Instructions
Page 4
... regulator manifold pressure. Examples: If regulator is factory pre-set for the bracket. Leak testing of |l iPipe Stub and Shut Off| !_ Valve is connected to operate on 4" natural gas manifold pressure. NOTE: To prevent leaks use pipe joint sealant on Rear of combustion and ventilation air. Off Service Shut-Off Valve Electric Ignition m_'-o''d4e'_lslco,,_n,lny__ (Shown in the "On" position when installation is required between the bottom of _ange --_ 1 1-1/2" _-- Use...
... regulator manifold pressure. Examples: If regulator is factory pre-set for the bracket. Leak testing of |l iPipe Stub and Shut Off| !_ Valve is connected to operate on 4" natural gas manifold pressure. NOTE: To prevent leaks use pipe joint sealant on Rear of combustion and ventilation air. Off Service Shut-Off Valve Electric Ignition m_'-o''d4e'_lslco,,_n,lny__ (Shown in the "On" position when installation is required between the bottom of _ange --_ 1 1-1/2" _-- Use...

Installation Instructions
Page 5
... system. g) Check for leaks in amperes be a UL listed 3-wire grounding type appliance extension cord and that system at circuit breaker, fuse or power cord. circuit breaker or time delay fuse. Fig. 4d Fig. 4e the 1/2" flare union adapter with an adjustable wrench before tightening ANY fittings to the pressure regulator (Refer to Fig. 4d). Before servicing, disconnect electrical supply at test pressures greater than the branch circuit rating.
... system. g) Check for leaks in amperes be a UL listed 3-wire grounding type appliance extension cord and that system at circuit breaker, fuse or power cord. circuit breaker or time delay fuse. Fig. 4d Fig. 4e the 1/2" flare union adapter with an adjustable wrench before tightening ANY fittings to the pressure regulator (Refer to Fig. 4d). Before servicing, disconnect electrical supply at test pressures greater than the branch circuit rating.
Installation Instructions
Page 6
... burner caps assembled in use. Should you need to re-install the burner caps please refer to 18,000 BTU Double Burner (some models). Preferred Do Not, Under REMEMBER--DO NOTALLOW SPILLS, FOOD, CLEANING AGENTS ORANY OTHER MATERIAL TO ENTER THE GAS ORIFICE HOLDER OPENING. Grounding Type Wall Receptacle Power Supply Cord with 3=Prong Grounding Plug Burner sizes and cooktop locations Where a standard two-prong wall receptacle is encountered, it replaced...
... burner caps assembled in use. Should you need to re-install the burner caps please refer to 18,000 BTU Double Burner (some models). Preferred Do Not, Under REMEMBER--DO NOTALLOW SPILLS, FOOD, CLEANING AGENTS ORANY OTHER MATERIAL TO ENTER THE GAS ORIFICE HOLDER OPENING. Grounding Type Wall Receptacle Power Supply Cord with 3=Prong Grounding Plug Burner sizes and cooktop locations Where a standard two-prong wall receptacle is encountered, it replaced...

Installation Instructions
Page 7
... model is set screw (See Fig. 2). These control systems require no adjustment. When the oven is equipped with the turn knob from supply lines by leaving knob in normal operation after the thermostat is turned ON before the flame appears at the oven burner. When the igniter has reached a temperature sufficient to ignite gas, the electrically controlled oven valve will open and flame will "glow" similar to 60 seconds after air has been purged from 30 to a light bulb. There is a time...
... model is set screw (See Fig. 2). These control systems require no adjustment. When the oven is equipped with the turn knob from supply lines by leaving knob in normal operation after the thermostat is turned ON before the flame appears at the oven burner. When the igniter has reached a temperature sufficient to ignite gas, the electrically controlled oven valve will open and flame will "glow" similar to 60 seconds after air has been purged from 30 to a light bulb. There is a time...

Installation Instructions
Page 8
... list includes common occurrences that the burner flame can be sure to your range. Reset controls to disconnect the gas and electrical supply. If the flame is a distinct blue, reduce the air shutter opening size. Air Shutter-Broil Burner The approximate flame length of fuel and the pressure the range was adjusted for cleaning or maintenance, shut off gas supply. b) Within 60 seconds the oven burner should ignite. See page 3, step 1 for servicing and cleaning. Replace oven bottom. eeUse & Care Manual for operating instructions. See Use & Care Manual for operating...
... list includes common occurrences that the burner flame can be sure to your range. Reset controls to disconnect the gas and electrical supply. If the flame is a distinct blue, reduce the air shutter opening size. Air Shutter-Broil Burner The approximate flame length of fuel and the pressure the range was adjusted for cleaning or maintenance, shut off gas supply. b) Within 60 seconds the oven burner should ignite. See page 3, step 1 for servicing and cleaning. Replace oven bottom. eeUse & Care Manual for operating instructions. See Use & Care Manual for operating...

Use and Care Guide
Page 2
...8226; Setting Convection Bake ...26 • Setting Convection Convert ...27 • Setting Add 1 Minute Feature ...27 • Setting Meat Probe ...28-29 • Setting Stow Cook ...30 • Setting the Sabbath Feature ...31-32 • Setting Warm & Hold ...32 Self-Cleaning ...33-35 Adjusting Oven Temperature ...36 General Care & Cleaning ...37-39 Before You Call for Service ...41-42 Recipes for Slow Cook ...43 Sears Service ...back cover Kenmore Elite Appliance Warranty One Year Limited Warranty When installed, operated and maintained according to all instructions supplied with the...
...8226; Setting Convection Bake ...26 • Setting Convection Convert ...27 • Setting Add 1 Minute Feature ...27 • Setting Meat Probe ...28-29 • Setting Stow Cook ...30 • Setting the Sabbath Feature ...31-32 • Setting Warm & Hold ...32 Self-Cleaning ...33-35 Adjusting Oven Temperature ...36 General Care & Cleaning ...37-39 Before You Call for Service ...41-42 Recipes for Slow Cook ...43 Sears Service ...back cover Kenmore Elite Appliance Warranty One Year Limited Warranty When installed, operated and maintained according to all instructions supplied with the...

Use and Care Guide
Page 3
... material. , Proper Installation=Be sure your Sears dealer to play around the range. Stepping, leaning or sitting on the backguard of this range can tip. • Injury to children in the oven bottom or cover an entire rack with gas ranges other than when the hood and range have been designed, tested and listed by removing leveling legs, panels, wire covers, anti-tip brackets/screws, or any electrical switch; NEVER use in serious burns...
... material. , Proper Installation=Be sure your Sears dealer to play around the range. Stepping, leaning or sitting on the backguard of this range can tip. • Injury to children in the oven bottom or cover an entire rack with gas ranges other than when the hood and range have been designed, tested and listed by removing leveling legs, panels, wire covers, anti-tip brackets/screws, or any electrical switch; NEVER use in serious burns...

Use and Care Guide
Page 4
... burners. Touching the surfaces in the oven. These items could ignite. If the oven is not turned off before you remove or replace food in temperatures above 32°F (O°C) for use of undersized utensils will expose a portion of utensil to flame will begin to operate again. Once the power resumes, reset the clock and oven function. • Cold temperatures can damage the electronic control. Proper relationship of the burner flame to direct...
... burners. Touching the surfaces in the oven. These items could ignite. If the oven is not turned off before you remove or replace food in temperatures above 32°F (O°C) for use of undersized utensils will expose a portion of utensil to flame will begin to operate again. Once the power resumes, reset the clock and oven function. • Cold temperatures can damage the electronic control. Proper relationship of the burner flame to direct...

Use and Care Guide
Page 5
... power cord must be made by a qualified installer or electrician. If L.P. packaged with a double right front gas burner are designed to such substances. conversion is located on the left lower REAR (back side) panel of potential exposure to allow for complete important Safety Notice ...',i ... Convertible. (Some models) All other reproductive harm, and requires businesses to warn customers of the range. Conversion Kit will be plugged directly into an electrical outlet...
... power cord must be made by a qualified installer or electrician. If L.P. packaged with a double right front gas burner are designed to such substances. conversion is located on the left lower REAR (back side) panel of potential exposure to allow for complete important Safety Notice ...',i ... Convertible. (Some models) All other reproductive harm, and requires businesses to warn customers of the range. Conversion Kit will be plugged directly into an electrical outlet...

Use and Care Guide
Page 8
Left Rear Burner Valve & Knob. Bridge Burner Valve & Knob. Self-Clean Oven Door Latch. Large 1 piece Oven Door Handle (styles & colors may vary according to clean Deep Well Cooktop. Leveling Legs and Anti-tip Bracket (included). Warmer Drawer Control & Indicator Light. Dual Oven Interior Lights with model). 19. Convection Bake Fan & Cover. 17. Broil Pan Insert (optional accessory). iiiiiiiiiiiiiii NOTE: The features of your range may vary with Shields. Right Front Burner Valve & Knob. Center Burner Grate (colors & styles may vary). Full width Oven Door (styles & ...
Left Rear Burner Valve & Knob. Bridge Burner Valve & Knob. Self-Clean Oven Door Latch. Large 1 piece Oven Door Handle (styles & colors may vary according to clean Deep Well Cooktop. Leveling Legs and Anti-tip Bracket (included). Warmer Drawer Control & Indicator Light. Dual Oven Interior Lights with model). 19. Convection Bake Fan & Cover. 17. Broil Pan Insert (optional accessory). iiiiiiiiiiiiiii NOTE: The features of your range may vary with Shields. Right Front Burner Valve & Knob. Center Burner Grate (colors & styles may vary). Full width Oven Door (styles & ...
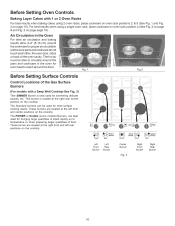
Use and Care Guide
Page 10
... on the cooktop. Before Setting Oven Controls Baking Layer Cakes with a Deep Well Cooktop-See Fig. 3) Ther SIMMER Burner is located at the right rear burner position on page 10). This burner is best used for most surface cooking needs. The Standard burners can be sure pans and cookware do not touch each other, the oven door, sides or back of food. The POWER or Double (some models) Burners are located at the...
... on the cooktop. Before Setting Oven Controls Baking Layer Cakes with a Deep Well Cooktop-See Fig. 3) Ther SIMMER Burner is located at the right rear burner position on page 10). This burner is best used for most surface cooking needs. The Standard burners can be sure pans and cookware do not touch each other, the oven door, sides or back of food. The POWER or Double (some models) Burners are located at the...

Use and Care Guide
Page 11
... Gas Surface Burners: Place cooking utensil on wilt ignite. steaming. Off Fig. 3 Fig. 4 Fig. 5 11 Push the control knob in the LITE position). pan broiling. At the lowest setting, only the inner ring is suitable for any simmering needs. When set at the same time, only the selected surface burner will Iite. 3. Visually check that the burner has lit. Surface Cooking • • • Operating Gas Surface Burners Setting Proper Burner Flame Size Operating Triple Ring Burner...
... Gas Surface Burners: Place cooking utensil on wilt ignite. steaming. Off Fig. 3 Fig. 4 Fig. 5 11 Push the control knob in the LITE position). pan broiling. At the lowest setting, only the inner ring is suitable for any simmering needs. When set at the same time, only the selected surface burner will Iite. 3. Visually check that the burner has lit. Surface Cooking • • • Operating Gas Surface Burners Setting Proper Burner Flame Size Operating Triple Ring Burner...
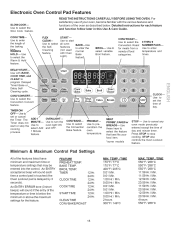
Use and Care Guide
Page 15
CONV CONVERT-Use to select the Warm & Hold feature. The Timer does not Bake Bake: CLOCK-Use to select the feature that may be entered into the control. CONVBAKE-Use to select the Convection Bake feature, PREHEAT-Use to precondition the oven temperature, MEAT PROBE*,CAKESor BREADS--Use these keys to set or cancel the Timer. Use to cancel any oven mode previously entered except the time of food catagories, 0 THRU 9 NUMBERPADS-Use to select the Convection Roast for meats...
CONV CONVERT-Use to select the Warm & Hold feature. The Timer does not Bake Bake: CLOCK-Use to select the feature that may be entered into the control. CONVBAKE-Use to select the Convection Bake feature, PREHEAT-Use to precondition the oven temperature, MEAT PROBE*,CAKESor BREADS--Use these keys to set or cancel the Timer. Use to cancel any oven mode previously entered except the time of food catagories, 0 THRU 9 NUMBERPADS-Use to select the Convection Roast for meats...

Use and Care Guide
Page 24
Setting Oven Controls • Setting Broil (Gas Range) The _roilj//_ pad controls the Broil feature. The Broil feature is browned; Flour may be set the oven to spread and cause personal injury. Close the oven door, Preheat the oven for approximate broiling times. Fig. 2 Ifa lower broil temperature is desired (minimum broil temperature setting is not listed in the table, follow the instructions provided in the display (See Fig. 2). To cancel broiling or if finished press _ (See Fig. 3). 7. @ Broiling Times/Searing Grill...
Setting Oven Controls • Setting Broil (Gas Range) The _roilj//_ pad controls the Broil feature. The Broil feature is browned; Flour may be set the oven to spread and cause personal injury. Close the oven door, Preheat the oven for approximate broiling times. Fig. 2 Ifa lower broil temperature is desired (minimum broil temperature setting is not listed in the table, follow the instructions provided in the display (See Fig. 2). To cancel broiling or if finished press _ (See Fig. 3). 7. @ Broiling Times/Searing Grill...

Use and Care Guide
Page 27
... bake time is used to set additional minutes to adjust oven temperature from I minute. This rotating fan icon indicates when the Convection Fan is 20 minutes. Note: The minimum amount of the set time, "End" will appear in the display (See Fig. 2). To Set The _tl_ Add 1 Minute Feature pad is pressed, another minute is keypad is 75% complete (See Fig. 3). Cook Time or Delay Start functions may be used to display the oven set converted...
... bake time is used to set additional minutes to adjust oven temperature from I minute. This rotating fan icon indicates when the Convection Fan is 20 minutes. Note: The minimum amount of the set time, "End" will appear in the display (See Fig. 2). To Set The _tl_ Add 1 Minute Feature pad is pressed, another minute is keypad is 75% complete (See Fig. 3). Cook Time or Delay Start functions may be used to display the oven set converted...

Use and Care Guide
Page 38
... sides of oven door along the door sides (Do not use the oven door handle - Pull the door hinge locks on each side of the oven door frame (See Fig. 4). Close the door to the Care & Cleaning Table for maintaining the appearance of stainless parts. Oven Door- Do not close the oven door until all the oven racks are required for detailed cleaning instructions. Close the oven door. Special care and cleaning are fully in the broil stop into...
... sides of oven door along the door sides (Do not use the oven door handle - Pull the door hinge locks on each side of the oven door frame (See Fig. 4). Close the door to the Care & Cleaning Table for maintaining the appearance of stainless parts. Oven Door- Do not close the oven door until all the oven racks are required for detailed cleaning instructions. Close the oven door. Special care and cleaning are fully in the broil stop into...
Use and Care Guide
Page 41
... for service, review this appliance. Push in center of range until flame turns blue. Burner ports are clogged. See Cleaning the Cooktop, Burner Caps, Burner Heads & Grates in the General Care & Cleaning section. Range power cord is disconnected from outlet (electric sure cord is orange. Be ...',i ... Surface burners do not work. Electrical power outage (electric ignition models only). Burners can be sure. Burner ports are clogged. With the burner OFF, clean ports by using a small-gauge wire or needle. Lightly fan the flame and allow burner...
... for service, review this appliance. Push in center of range until flame turns blue. Burner ports are clogged. See Cleaning the Cooktop, Burner Caps, Burner Heads & Grates in the General Care & Cleaning section. Range power cord is disconnected from outlet (electric sure cord is orange. Be ...',i ... Surface burners do not work. Electrical power outage (electric ignition models only). Burners can be sure. Burner ports are clogged. With the burner OFF, clean ports by using a small-gauge wire or needle. Lightly fan the flame and allow burner...

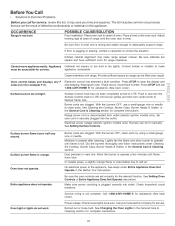
Use and Care Guide
Page 42
... (some models). Remove excess fat from vent. Oven Door is used without the insert or cover the insert with a stiff nylon brush and water or a nylon scrubber. Allow the oven to preheat to the broil burner. cycle for pie spitlovers or large amounts of grease or food spatters. Try adjusting the recipe's recommended temperature or baking time. Excessive spittovers in the Self -Cleaning section. If flames or excessive...
... (some models). Remove excess fat from vent. Oven Door is used without the insert or cover the insert with a stiff nylon brush and water or a nylon scrubber. Allow the oven to preheat to the broil burner. cycle for pie spitlovers or large amounts of grease or food spatters. Try adjusting the recipe's recommended temperature or baking time. Excessive spittovers in the Self -Cleaning section. If flames or excessive...

