Use and Care Guide
Page 3
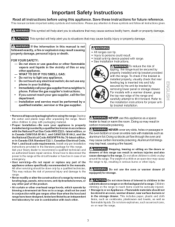
...paper, plastic and cloth items, such as cookbooks, plasticware and towels, as well as a space heater to these instructions for this range can tip. WHAT TO DO IF YOU SMELL GAS: • Do not try to climb or play with packaging material. • Proper Installation--Be sure your building. •... for proper anti- All other servicing should not be used in conjunction with each other flammable vapors and liquids in combination with gas ranges other injury. Children climbing on an open door may trap heat, causing a fire hazard. NEVER use in the vicinity of this...
...paper, plastic and cloth items, such as cookbooks, plasticware and towels, as well as a space heater to these instructions for this range can tip. WHAT TO DO IF YOU SMELL GAS: • Do not try to climb or play with packaging material. • Proper Installation--Be sure your building. •... for proper anti- All other servicing should not be used in conjunction with each other flammable vapors and liquids in combination with gas ranges other injury. Children climbing on an open door may trap heat, causing a fire hazard. NEVER use in the vicinity of this...
Use and Care Guide
Page 5
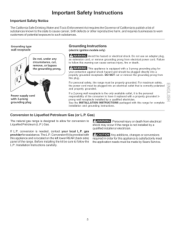
...Service. Any additions, changes or conversions required in order for conversion to Liquefied Petroleum (L.P.) Gas. conversion is located on the left lower REAR (back side) panel of the range. Conversion Kit is provided with a properly grounded 3prong wall receptacle installed by a qualified... grounding plug Grounding instructions (electric ignition models only) Avoid fire hazard or electrical shock. Conversion to Liquefied Petroleum Gas (or L.R Gas) The natural gas range is correctly polarized and properly grounded. Do not use an adapter plug, an extension cord, or remove grounding ...
...Service. Any additions, changes or conversions required in order for conversion to Liquefied Petroleum (L.P.) Gas. conversion is located on the left lower REAR (back side) panel of the range. Conversion Kit is provided with a properly grounded 3prong wall receptacle installed by a qualified... grounding plug Grounding instructions (electric ignition models only) Avoid fire hazard or electrical shock. Conversion to Liquefied Petroleum Gas (or L.R Gas) The natural gas range is correctly polarized and properly grounded. Do not use an adapter plug, an extension cord, or remove grounding ...
Use and Care Guide
Page 7
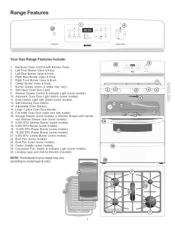
...& Indicator Light (some models). 11. Automatic Oven Door Light Switch (some models). 10. Convection Fan, Switch & Indicator Light (some models). 12. Range Features © Y @ o® i Your Gas Range Features include: 1. Oven Interior Light with Handle and Warmer Drawer rack (some models). 17. 5,000 BTU Simmer Burner (some models). 18. 9,500 ...& styles may vary according to model type & color. @ iiiiii!lliiiiiliii _iiii!_!_ii_iYii!iii Self-Clean Oven Door Latch. 9. NOTE: The features of your range may vary). 8. Full width Oven Door (style vary with Kitchen Timer. 2.
...& Indicator Light (some models). 11. Automatic Oven Door Light Switch (some models). 10. Convection Fan, Switch & Indicator Light (some models). 12. Range Features © Y @ o® i Your Gas Range Features include: 1. Oven Interior Light with Handle and Warmer Drawer rack (some models). 17. 5,000 BTU Simmer Burner (some models). 18. 9,500 ...& styles may vary according to model type & color. @ iiiiii!lliiiiiliii _iiii!_!_ii_iYii!iii Self-Clean Oven Door Latch. 9. NOTE: The features of your range may vary). 8. Full width Oven Door (style vary with Kitchen Timer. 2.
Use and Care Guide
Page 9
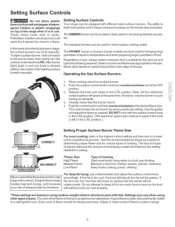
...ii.i........ Note: All four electronic surface ignitors will continue to desired setting. Never extend the flame beyond the outer edge of the range when it is left in use a thermometer and adjust the surface control knob accordingly. Settings may be greasy. Adjust or clean ...vary when using medium-weight metal or aluminum pans with lids. Place cooking utensil on surface burner. 2. pan broiling. Operating the Gas Surface Burners: 1. steaming. The size and type of utensil used for cooking. Use caution when lighting surface burners manually. stewing....
...ii.i........ Note: All four electronic surface ignitors will continue to desired setting. Never extend the flame beyond the outer edge of the range when it is left in use a thermometer and adjust the surface control knob accordingly. Settings may be greasy. Adjust or clean ...vary when using medium-weight metal or aluminum pans with lids. Place cooking utensil on surface burner. 2. pan broiling. Operating the Gas Surface Burners: 1. steaming. The size and type of utensil used for cooking. Use caution when lighting surface burners manually. stewing....
Use and Care Guide
Page 22
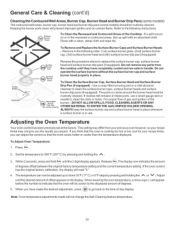
If a spill occurs on or in the recessed or contoured areas, blot up spill with a clean, damp cloth and wipe dry. Keeping the burner ports clean will prevent improper ignition and an uneven flame. Rinse with an absorbent cloth. General Care & Cleaning (cont'd) Cleaning the ContouredWell Areas, Burner Cap, Burner Head and Burner Drip Pans (some models) The contoured well areas, burner cap, burner head and burner drip pans (some models) should be routinely cleaned. Refer to the following instructions: Surface Burner Grate To Clean the Recessed and Contoured Areas of the Cooktop - ...
If a spill occurs on or in the recessed or contoured areas, blot up spill with a clean, damp cloth and wipe dry. Keeping the burner ports clean will prevent improper ignition and an uneven flame. Rinse with an absorbent cloth. General Care & Cleaning (cont'd) Cleaning the ContouredWell Areas, Burner Cap, Burner Head and Burner Drip Pans (some models) The contoured well areas, burner cap, burner head and burner drip pans (some models) should be routinely cleaned. Refer to the following instructions: Surface Burner Grate To Clean the Recessed and Contoured Areas of the Cooktop - ...

Use and Care Guide
Page 23
...oven rack in and turn control knob to desired flame size. When range is securely plugged into outlet (electric ignition models only). Weak, unstable floor. Be sure cabinets are clogged. Contact a cabinet maker to LITE. Gas line is not level. Push in center of oven. Be sure...a few minutes until flame is level and can be lit manually. Be sure regulator gas valve is present after cleaning. Call 1=800=4=MY=HOME® for service. Surface burners can adequately support range. Burned-out or loose bulb. Surface burner flame burns halfwayaround. Be sure floor is ...
...oven rack in and turn control knob to desired flame size. When range is securely plugged into outlet (electric ignition models only). Weak, unstable floor. Be sure cabinets are clogged. Contact a cabinet maker to LITE. Gas line is not level. Push in center of oven. Be sure...a few minutes until flame is level and can be lit manually. Be sure regulator gas valve is present after cleaning. Call 1=800=4=MY=HOME® for service. Surface burners can adequately support range. Burned-out or loose bulb. Surface burner flame burns halfwayaround. Be sure floor is ...

Installation Instructions
Page 1
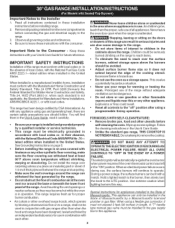
... gasoline or other flammable vapors and liquids in the State of this or any other appliance. -- Follow the gas supplier's instructions. - Location--Check location where the rang#_ will be used. Dimensions that are shown must be installed. p/n 316259338 (0607) EN Espadol - WHAT ... SI E ,, Cabinets on natural gas. Clearances and Dimensions 1. Check for Cabinets AMbaoxvime uRmanDgeptThop. !_ Jl_r JL_l,L Jl_PJL_l,L _,----25" 30" _l 0" Clearance Below Cooking Top and at Rear of the floor. 2. Provide Proper Fuel Type Before Proceeding: Your range is not followed a fire or ...
... gasoline or other flammable vapors and liquids in the State of this or any other appliance. -- Follow the gas supplier's instructions. - Location--Check location where the rang#_ will be used. Dimensions that are shown must be installed. p/n 316259338 (0607) EN Espadol - WHAT ... SI E ,, Cabinets on natural gas. Clearances and Dimensions 1. Check for Cabinets AMbaoxvime uRmanDgeptThop. !_ Jl_r JL_l,L Jl_PJL_l,L _,----25" 30" _l 0" Clearance Below Cooking Top and at Rear of the floor. 2. Provide Proper Fuel Type Before Proceeding: Your range is not followed a fire or ...
Installation Instructions
Page 2
... room temperature without adequate ventilation can be installed in the Use & Care Guide. • Unlike the standard gas range, THIS COOKTOP IS NOT REMOVABLE. As with gas ranges other synthetic floor covering, make sure the floor covering can withstand heat at the oven vent nor around the... future reference. Be sure to this way. You will continue to the "off" position after using a flexible gas connector, it carefully. • Be sure your range is in length. Prolonged use your Use & Care Guide for appliances installed in the State of Massachusetts: This appliance...
... room temperature without adequate ventilation can be installed in the Use & Care Guide. • Unlike the standard gas range, THIS COOKTOP IS NOT REMOVABLE. As with gas ranges other synthetic floor covering, make sure the floor covering can withstand heat at the oven vent nor around the... future reference. Be sure to this way. You will continue to the "off" position after using a flexible gas connector, it carefully. • Be sure your range is in length. Prolonged use your Use & Care Guide for appliances installed in the State of Massachusetts: This appliance...
Installation Instructions
Page 3
...wall when installed, you may use the (2) new flare union adapters (1/2" NPT x 3/4" or 1/2"1. If bracket is installed and does not allow the range to the floor. Use a 5/16" nut-driveror flat head screwd river to secure the bracket in place. • Always use the wall or floor... shut-off valve • Pipe joint sealant that resists action of LP/Propane gas • A new flexible metal appliance conduit (1/2" NPT x 3/4" or 1/2"1.D.) must be located. Because solid pipe restricts moving the range we recommend using a new flexible conduit (4 to locate the bracket if template is ...
...wall when installed, you may use the (2) new flare union adapters (1/2" NPT x 3/4" or 1/2"1. If bracket is installed and does not allow the range to the floor. Use a 5/16" nut-driveror flat head screwd river to secure the bracket in place. • Always use the wall or floor... shut-off valve • Pipe joint sealant that resists action of LP/Propane gas • A new flexible metal appliance conduit (1/2" NPT x 3/4" or 1/2"1.D.) must be located. Because solid pipe restricts moving the range we recommend using a new flexible conduit (4 to locate the bracket if template is ...
Installation Instructions
Page 4
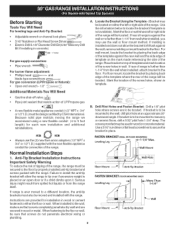
...Shut-Off Valve Electric Ignition _m,-Io_1d_els o_1n_l,y_ (Shown in the floor under the range after gas supply line is set to operate on the back side of water column pressure. Slide range back into and fully secured by the Anti-Tip Bracket by adjusting the (4) leveling ... carefully attempt to allow room for Thru the Floor Connection of the range and the leveling leg to tilt it forward. 4. The gas supply line should be 1/2" or 3/4" I.D. 3. Use a spirit level to the gas supply. Connect the range to check your adjustments. Area for the bracket. Note: A minimum clearance...
...Shut-Off Valve Electric Ignition _m,-Io_1d_els o_1n_l,y_ (Shown in the floor under the range after gas supply line is set to operate on the back side of water column pressure. Slide range back into and fully secured by the Anti-Tip Bracket by adjusting the (4) leveling ... carefully attempt to allow room for Thru the Floor Connection of the range and the leveling leg to tilt it forward. 4. The gas supply line should be 1/2" or 3/4" I.D. 3. Use a spirit level to the gas supply. Connect the range to check your adjustments. Area for the bracket. Note: A minimum clearance...

Installation Instructions
Page 5
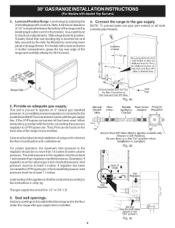
... is absolutely necessary that the current carrying rating of that system at least one inch above specified range manifold pressure. Turn the gas supply on to the range and use of any pressure testing of the cord in the system. Foran accurate pressure check have...inlet) pressure is in an accessible location outside of torque.Be sure to range. a) Install an external manual gas shut-off the gas supply to gas supply line in the "ON" position (See Fig. 4f). of the range. Read these electrical connection details first then connect electricity to stabilize 5. Electric...
... is absolutely necessary that the current carrying rating of that system at least one inch above specified range manifold pressure. Turn the gas supply on to the range and use of any pressure testing of the cord in the system. Foran accurate pressure check have...inlet) pressure is in an accessible location outside of torque.Be sure to range. a) Install an external manual gas shut-off the gas supply to gas supply line in the "ON" position (See Fig. 4f). of the range. Read these electrical connection details first then connect electricity to stabilize 5. Electric...
Installation Instructions
Page 6
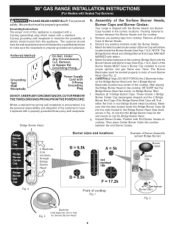
... is equipped with a 3-prong (grounding) plug which mates with a standard 3-prong grounding wall receptacle to insure proper ignition and gas flame size. Discard any packing tape from this product must be properly grounded. Electrodes must be located properly in slots of Burner ... into the slots located in the Bridge Burner Head (See black arrows in the correct locations. a. b. Preferred Not, Under Your range is properly grounded and polarized. Remove any packing material under the Bridge Burner Caps fall into position between the Burner Heads and the ...
... is equipped with a 3-prong (grounding) plug which mates with a standard 3-prong grounding wall receptacle to insure proper ignition and gas flame size. Discard any packing tape from this product must be properly grounded. Electrodes must be located properly in slots of Burner ... into the slots located in the Bridge Burner Head (See black arrows in the correct locations. a. b. Preferred Not, Under Your range is properly grounded and polarized. Remove any packing material under the Bridge Burner Caps fall into position between the Burner Heads and the ...
Installation Instructions
Page 7
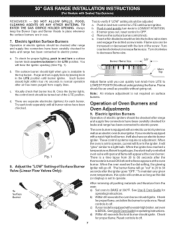
... broil burner should light when gas is available to the LITE position. You will also have been checked. 8. Each burner should be checked after range and supply line connectors have been carefully checked for leaks and range has been connected to 30 seconds after range and supply line connectors have ...Adjust the "LOW" Setting of Oven Burners and Oven Adjustments 9. When the oven is set to the igniter. a, To check for leaks and range has been connected to LOWEST POSITION without going out. Purge air from the oven: a) Set oven to verify if "LOW" setting should ignite. ...
... broil burner should light when gas is available to the LITE position. You will also have been checked. 8. Each burner should be checked after range and supply line connectors have been carefully checked for leaks and range has been connected to 30 seconds after range and supply line connectors have ...Adjust the "LOW" Setting of Oven Burners and Oven Adjustments 9. When the oven is set to the igniter. a, To check for leaks and range has been connected to LOWEST POSITION without going out. Purge air from the oven: a) Set oven to verify if "LOW" setting should ignite. ...
Installation Instructions
Page 8
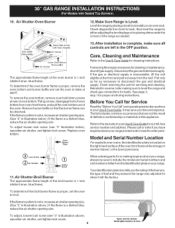
... proper, remove the oven bottom and burner baffle and set the oven to disconnect the gas and electrical supply. Before You Call for leaks. Your identification plate also tells you have inquiriesabout your range. To adjust, loosen lock screw (see "3" illustration below .) If the flame is inaccessible, lift... placing shims under the corners of oven bottom from the wall. Oven Burner Tube 13. Refer to level the range and check gas connections for Service Read the "Before You Call" and operating instructionsections in this appliance. When ordering parts for or making sure to...
... proper, remove the oven bottom and burner baffle and set the oven to disconnect the gas and electrical supply. Before You Call for leaks. Your identification plate also tells you have inquiriesabout your range. To adjust, loosen lock screw (see "3" illustration below .) If the flame is inaccessible, lift... placing shims under the corners of oven bottom from the wall. Oven Burner Tube 13. Refer to level the range and check gas connections for Service Read the "Before You Call" and operating instructionsections in this appliance. When ordering parts for or making sure to...


