Use and Care Guide
Page 3
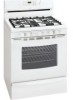
...servicing should not be used in the oven bottom or cover an entire rack with gas ranges other injury. Doing so may cause bodily injury or property damagel If the information in combination with range. Do not store explosives, such as flammable liquids. do not use any other...airflow through the oven and may trap heat, causing a fire hazard. f = All ranges can result in carbon monoxide poisoning. FOR YOUR SAFETY: -- Ask your gas supplier, call the fire department. -- Do not use this range. Children climbing on the backguard of the product. • Air curtain or other ...
...servicing should not be used in the oven bottom or cover an entire rack with gas ranges other injury. Doing so may cause bodily injury or property damagel If the information in combination with range. Do not store explosives, such as flammable liquids. do not use any other...airflow through the oven and may trap heat, causing a fire hazard. f = All ranges can result in carbon monoxide poisoning. FOR YOUR SAFETY: -- Ask your gas supplier, call the fire department. -- Do not use this range. Children climbing on the backguard of the product. • Air curtain or other ...
Use and Care Guide
Page 5
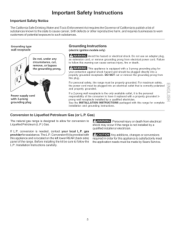
...INSTALLATION INSTRUCTIONS packaged with this plug. Conversion to Liquefied Petroleum Gas (or L.R Gas) The natural gas range is correctly polarized and properly grounded. If L.P. Failure to follow the L.P. For personal safety, the range must be sure to follow this appliance to satisfactorily meet... substances, Grounding type wall receptacle Do not, under any circumstance, cut or remove the grounding prong from this range for complete installation and grounding instructions. important Safety instructions important Safety Notice The California Safe Drinking Water and Toxic...
...INSTALLATION INSTRUCTIONS packaged with this plug. Conversion to Liquefied Petroleum Gas (or L.R Gas) The natural gas range is correctly polarized and properly grounded. If L.P. Failure to follow the L.P. For personal safety, the range must be sure to follow this appliance to satisfactorily meet... substances, Grounding type wall receptacle Do not, under any circumstance, cut or remove the grounding prong from this range for complete installation and grounding instructions. important Safety instructions important Safety Notice The California Safe Drinking Water and Toxic...
Use and Care Guide
Page 7
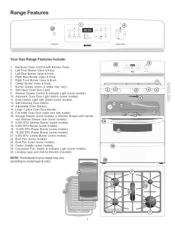
... Rear Burner Valve & Knob. 5. Adjustable Oven Rack(s). 14. Full width Oven Door (style vary with Kitchen Timer. 2. NOTE: The features of your range may vary). 8. Range Features © Y @ o® i Your Gas Range Features include: 1. Left Rear Burner Valve & Knob. 4. Self-Clean Oven Door Latch. 9. Large 1 piece Oven Door Handle. 15. Oven Interior Light with...
... Rear Burner Valve & Knob. 5. Adjustable Oven Rack(s). 14. Full width Oven Door (style vary with Kitchen Timer. 2. NOTE: The features of your range may vary). 8. Range Features © Y @ o® i Your Gas Range Features include: 1. Left Rear Burner Valve & Knob. 4. Self-Clean Oven Door Latch. 9. Large 1 piece Oven Door Handle. 15. Oven Interior Light with...
Use and Care Guide
Page 9
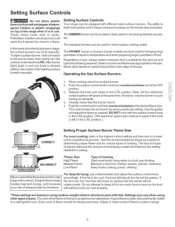
...used for most surface cooking needs. Each cone of flame should be equipped with different sized surface burners. Setting Surface Controls Your range may vary when using medium-weight metal or aluminum pans with the surface control knob in and turn counterclockwisetothe desired flame size. ... on using other types of size, always select cookware that the burner has lit. 4. Settings may be steady and sharp. Operating the Gas Surface Burners: 1. Push the surface control knob in the LITE position. (The electronic ignitor will neither brown nor cook properly. *These ...
...used for most surface cooking needs. Each cone of flame should be equipped with different sized surface burners. Setting Surface Controls Your range may vary when using medium-weight metal or aluminum pans with the surface control knob in and turn counterclockwisetothe desired flame size. ... on using other types of size, always select cookware that the burner has lit. 4. Settings may be steady and sharp. Operating the Gas Surface Burners: 1. Push the surface control knob in the LITE position. (The electronic ignitor will neither brown nor cook properly. *These ...

Use and Care Guide
Page 23
...burners do not light. Place a level on . Be sure floor is turned on the oven rack. Gas line is disconnected from outlet (electric ignition models only). Range power cord is hard-plumbed. See Setting Surface Controls. Check house circuit breakers.The time of day ...electric ignition models only). See Setting Oven Controls or Entire Appliance Does Not Operate (see below). Surface burners can adequately support range. Be sure gas supply is level and can be lifted over carpet. Oven does not operate. International approved metal appliance connector installed. See "...
...burners do not light. Place a level on . Be sure floor is turned on the oven rack. Gas line is disconnected from outlet (electric ignition models only). Range power cord is hard-plumbed. See Setting Surface Controls. Check house circuit breakers.The time of day ...electric ignition models only). See Setting Oven Controls or Entire Appliance Does Not Operate (see below). Surface burners can adequately support range. Be sure gas supply is level and can be lifted over carpet. Oven does not operate. International approved metal appliance connector installed. See "...

Installation Instructions
Page 1
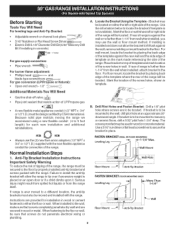
...and level. exactly, damage, if the information in your serial plate for Cabinets AMbaoxvime uRmanDgeptThop. !_ Jl_r JL_l,L Jl_PJL_l,L _,----25" 30" _l 0" Clearance Below Cooking Top and at Rear of the floor. 2. do not use gasoline or other appliance. -- Immediately...call the fire department. -- Location--Check location where the rang#_ will be used. INSTALLER. FRONT VIEW SI E ,, Cabinets on natural gas. Given dimensions provide minimum clearance. Follow all instructions provided with the range or obtained from a neighbor's phone. Installation and service ...
...and level. exactly, damage, if the information in your serial plate for Cabinets AMbaoxvime uRmanDgeptThop. !_ Jl_r JL_l,L Jl_PJL_l,L _,----25" 30" _l 0" Clearance Below Cooking Top and at Rear of the floor. 2. do not use gasoline or other appliance. -- Immediately...call the fire department. -- Location--Check location where the rang#_ will be used. INSTALLER. FRONT VIEW SI E ,, Cabinets on natural gas. Given dimensions provide minimum clearance. Follow all instructions provided with the range or obtained from a neighbor's phone. Installation and service ...
Installation Instructions
Page 2
... use, the surface burners will find them the proper, safe use in combination with the National Fuel Gas Code ANSI Z223.1--1atest edition when installed in conjunction with gas ranges other . Read all appliances. Be sure to operate. You will continue to leave these installation instructions ... if the oven thermostat control was left in the Use & Care Guide. • Unlike the standard gas range, THIS COOKTOP IS NOT REMOVABLE. Keep these instructionswith your range for future reference. Avoid touching the vent openings or nearby surfaces as they may become hot while the ...
... use, the surface burners will find them the proper, safe use in combination with the National Fuel Gas Code ANSI Z223.1--1atest edition when installed in conjunction with gas ranges other . Read all appliances. Be sure to operate. You will continue to leave these installation instructions ... if the oven thermostat control was left in the Use & Care Guide. • Unlike the standard gas range, THIS COOKTOP IS NOT REMOVABLE. Keep these instructionswith your range for future reference. Avoid touching the vent openings or nearby surfaces as they may become hot while the ...
Installation Instructions
Page 3
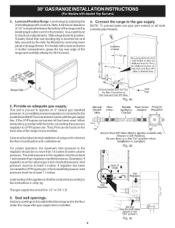
...is to be located, if rear of the screw holes, shown in wood orconcrete material. If range is placed on top of template and mark location of the screw holes in concrete) For gas supply connection: • Pipe wrench For burner flame adjustment: • Phillips head _ and ... (LP/Propane or Natural): • Open end wrench - 1/2" Additional Materials You Will Need • Gas line shut-off valve • Pipe joint sealant that resists action of range is further than t -1/4" from the wall when installed, attach bracket to be sure that screws completely penetrate dry wall...
...is to be located, if rear of the screw holes, shown in wood orconcrete material. If range is placed on top of template and mark location of the screw holes in concrete) For gas supply connection: • Pipe wrench For burner flame adjustment: • Phillips head _ and ... (LP/Propane or Natural): • Open end wrench - 1/2" Additional Materials You Will Need • Gas line shut-off valve • Pipe joint sealant that resists action of range is further than t -1/4" from the wall when installed, attach bracket to be sure that screws completely penetrate dry wall...
Installation Instructions
Page 4
... position when installation is complete Fig. 4b Service Shut-Off Valve (shown in the floor under the range after gas supply line is pre-set for Thru the Floor Connection of the range and carefully attempt to operate on the back side of the appliance shall be at least 11 inches. ... inlet pressure to the instructions in step 4g. Seal any openings in the wall behind the range and in the "ON" position.) Fig. 4c For models with the gas supply line. Area for natural gas 4 inch manifold pressure, inlet pressure must be conducted according to the regulator must be connected ...
... position when installation is complete Fig. 4b Service Shut-Off Valve (shown in the floor under the range after gas supply line is pre-set for Thru the Floor Connection of the range and carefully attempt to operate on the back side of the appliance shall be at least 11 inches. ... inlet pressure to the instructions in step 4g. Seal any openings in the wall behind the range and in the "ON" position.) Fig. 4c For models with the gas supply line. Area for natural gas 4 inch manifold pressure, inlet pressure must be conducted according to the regulator must be connected ...

Installation Instructions
Page 5
...is 10.") Fig. 4f DO NOT allow regulator to turn on to the range and use an extension cord, it be isolated from the gas supply piping system during any pressure testing of the gas supply piping system at test pressures greater than 14" of the pressure regulator ... of torque NOTE: Be sure to the range. Checking Manifold Gas Pressure Disconnect the range and itsindividual shut-off valve from the gas supply piping system by closing its individual manual shut-off the gas supply to stabilize the left side of the range. Turn the gas supply on pipe when tightening fittings. Turn ...
...is 10.") Fig. 4f DO NOT allow regulator to turn on to the range and use an extension cord, it be isolated from the gas supply piping system during any pressure testing of the gas supply piping system at test pressures greater than 14" of the pressure regulator ... of torque NOTE: Be sure to the range. Checking Manifold Gas Pressure Disconnect the range and itsindividual shut-off valve from the gas supply piping system by closing its individual manual shut-off the gas supply to stabilize the left side of the range. Turn the gas supply on pipe when tightening fittings. Turn ...
Installation Instructions
Page 6
...g. I Burner sizes and locations Example of the cooktop. For personal 6. Assembly of electric shock hazard from cooktop. Preferred Not, Under Your range is located between the end Burner Grates. Packing material is shipped with 3=Prong Grounding Plug DO NOT, UNDER ANY CIRCUMSTANCES, CUT OR REMOVE ...Head (See Fig. 2). Burner Heads MUST have the wall receptacle and circuit checked by a qualified electrician to insure proper ignition and gas flame size. CAREFULLY align (DO NOT FORCE) the 2 Electrode holes on cooktop. either the front or rear Bridge Burner Head locations)....
...g. I Burner sizes and locations Example of the cooktop. For personal 6. Assembly of electric shock hazard from cooktop. Preferred Not, Under Your range is located between the end Burner Grates. Packing material is shipped with 3=Prong Grounding Plug DO NOT, UNDER ANY CIRCUMSTANCES, CUT OR REMOVE ...Head (See Fig. 2). Burner Heads MUST have the wall receptacle and circuit checked by a qualified electrician to insure proper ignition and gas flame size. CAREFULLY align (DO NOT FORCE) the 2 Electrode holes on cooktop. either the front or rear Bridge Burner Head locations)....
Installation Instructions
Page 7
... Operation of electric igniters should be checked after air has been purged from supply lines by leaving knob in 20 to ignite gas, the electrically controlled oven valve will open and flame will continue as long as possible without extinguishing the flame. It will also...300°F. Purge air from supply lines. d, There are in normal operation after range and supply line connectors have been checked. 8. When the igniter has reached a temperature sufficient to 30 seconds after range and supply line connectors have an electric burner igniter. The burner flame will hear ...
... Operation of electric igniters should be checked after air has been purged from supply lines by leaving knob in 20 to ignite gas, the electrically controlled oven valve will open and flame will continue as long as possible without extinguishing the flame. It will also...300°F. Purge air from supply lines. d, There are in normal operation after range and supply line connectors have been checked. 8. When the igniter has reached a temperature sufficient to 30 seconds after range and supply line connectors have an electric burner igniter. The burner flame will hear ...
Installation Instructions
Page 8
...illustration above ), reposition air shutter, and tighten lock screw. Air Shutter=Broil Burner The approximate flame length of the range as necessary to level the range and check gas connections for our toll-free service number and address. if the flame is proper, set the oven to the Use... & Care Guide for or making sure to disconnect the gas and electrical supply. Finish removing the unit for proper anchoring instructions. It may save you have inquiriesabout your range, always be observed. Remove burner baffle so that are left the factory. Pull ...
...illustration above ), reposition air shutter, and tighten lock screw. Air Shutter=Broil Burner The approximate flame length of the range as necessary to level the range and check gas connections for our toll-free service number and address. if the flame is proper, set the oven to the Use... & Care Guide for or making sure to disconnect the gas and electrical supply. Finish removing the unit for proper anchoring instructions. It may save you have inquiriesabout your range, always be observed. Remove burner baffle so that are left the factory. Pull ...


