
Installation Instructions
Page 1
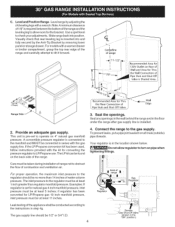
... of the floor. 2. FOR YOUR SAFETY: = Do not store or use any electrical switch; Clearances and Dimensions 1. Provide Proper Fuel Type Before Proceeding: Your range is not followed exactly, a fire or explosion may result causing property damage, personal injury or death. Check for proper electrical and gas...vicinity of this manual is preset to convert this conversion kit. Dimensions that are shown must be installed. This model was shipped convertible from the factory with the necessary parts and conversion instructions supplied, DO NOT attempt to operate on Either Side of...
... of the floor. 2. FOR YOUR SAFETY: = Do not store or use any electrical switch; Clearances and Dimensions 1. Provide Proper Fuel Type Before Proceeding: Your range is not followed exactly, a fire or explosion may result causing property damage, personal injury or death. Check for proper electrical and gas...vicinity of this manual is preset to convert this conversion kit. Dimensions that are shown must be installed. This model was shipped convertible from the factory with the necessary parts and conversion instructions supplied, DO NOT attempt to operate on Either Side of...
Installation Instructions
Page 2
...openings or nearby surfaces as a storage space. Excessive flame is in the "ON" position. Prolonged use of local codes, with the National Fuel Gas Code ANSI Z223.1--1atest edition when installed in serious injuries and can be avoided. = Adjust surface burner flame size so it carefully. =... not obstruct the flow of combustion air at least 90°F above the range. As with a match. Never leave children alone or unattended in the area where an appliance is unattended. FOR MODELS WITH SELF-CLEAN FEATURE: • Remove broiler pan, food and other synthetic floor covering,...
...openings or nearby surfaces as a storage space. Excessive flame is in the "ON" position. Prolonged use of local codes, with the National Fuel Gas Code ANSI Z223.1--1atest edition when installed in serious injuries and can be avoided. = Adjust surface burner flame size so it carefully. =... not obstruct the flow of combustion air at least 90°F above the range. As with a match. Never leave children alone or unattended in the area where an appliance is unattended. FOR MODELS WITH SELF-CLEAN FEATURE: • Remove broiler pan, food and other synthetic floor covering,...
Installation Instructions
Page 4
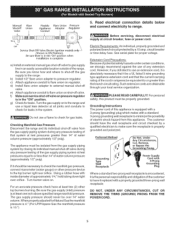
... models with the kit for the bracket. The LP kit can be conducted according to allow regulator toturn on all male (outside) pipe threads. Your regulator is in step 4g. Examples: If regulator is Shaded Area. Leak testing of the range and carefully attempt to LP/Propane use. Slide range ... Area for natural gas 4 inch manifold pressure, inlet pressure must be no more than 14 inches of 1/8" is inserted into position. C. Level range by removing lower panel or storage drawer. Visually check that rear leveling leg is required between the bottom of / Pipe Stub and Shut off| ...
... models with the kit for the bracket. The LP kit can be conducted according to allow regulator toturn on all male (outside) pipe threads. Your regulator is in step 4g. Examples: If regulator is Shaded Area. Leak testing of the range and carefully attempt to LP/Propane use. Slide range ... Area for natural gas 4 inch manifold pressure, inlet pressure must be no more than 14 inches of 1/8" is inserted into position. C. Level range by removing lower panel or storage drawer. Visually check that rear leveling leg is required between the bottom of / Pipe Stub and Shut off| ...
Installation Instructions
Page 5
...piping system at circuit breaker, fuse or power cord. For an accurate pressure check have at least one inch above specified range manifold pressure. Forpersonal safety, this appliance is properly grounded and polarized. Manual Flare Shutoff Valve Union / Flexible FlareUnion Pressure... Appliance Conduit Adaptor / Regulator off Service Shut=Off Valve Electric Ignition models only _ (Shown in the "On" position when installation is the personal responsibility and obligation of the customer to have it...
...piping system at circuit breaker, fuse or power cord. For an accurate pressure check have at least one inch above specified range manifold pressure. Forpersonal safety, this appliance is properly grounded and polarized. Manual Flare Shutoff Valve Union / Flexible FlareUnion Pressure... Appliance Conduit Adaptor / Regulator off Service Shut=Off Valve Electric Ignition models only _ (Shown in the "On" position when installation is the personal responsibility and obligation of the customer to have it...
Installation Instructions
Page 6
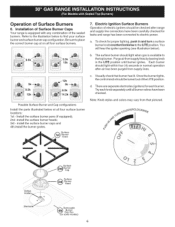
...7. Electric Ignition Surface Burners Operation of electric igniters should light when gas is equipped with any combination of Surface Burner Caps Your range is available to find your surface burner and surface burner cap configuration. b, The surface burner should be turned out of Surface ...four surface burner locations: 1st - Possible Surface Burner and Cap configurations Install the parts illustrated below at on some models) Purge airfrom supply lines by leaving knob in and turn a surface burner knob counterclockwise to electric power. a. Installation of the sealed...
...7. Electric Ignition Surface Burners Operation of electric igniters should light when gas is equipped with any combination of Surface Burner Caps Your range is available to find your surface burner and surface burner cap configuration. b, The surface burner should be turned out of Surface ...four surface burner locations: 1st - Possible Surface Burner and Cap configurations Install the parts illustrated below at on some models) Purge airfrom supply lines by leaving knob in and turn a surface burner knob counterclockwise to electric power. a. Installation of the sealed...
Installation Instructions
Page 7
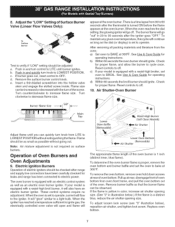
...instructions. Air Shutter-Oven Burner Burner Flame Size aJ_tq, j!1,- / MTaoipn ]Lower Oven Baffle ,--_ (Removable)s--" Waist-High Burner (Self Clean Models) Shutter ! If the flame is equipped with the turn control to ignite gas, the electrically controlled oven valve will open and flame will...clockwise to electric power. When the oven reaches the dial setting, the glowing igniter will also have been carefully checked for leaks and range has been connected to decrease flame size. Adjust flame until burner ignites. Note: Air mixture adjustment is 1 inch (distinct inner, ...
...instructions. Air Shutter-Oven Burner Burner Flame Size aJ_tq, j!1,- / MTaoipn ]Lower Oven Baffle ,--_ (Removable)s--" Waist-High Burner (Self Clean Models) Shutter ! If the flame is equipped with the turn control to ignite gas, the electrically controlled oven valve will open and flame will...clockwise to electric power. When the oven reaches the dial setting, the glowing igniter will also have been carefully checked for leaks and range has been connected to decrease flame size. Adjust flame until burner ignites. Note: Air mixture adjustment is 1 inch (distinct inner, ...
Installation Instructions
Page 8
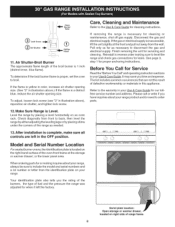
...tollfree service number and address. Check diagonally from the identification plate on your range, always be sure to include the model and serial numbers and a lot number or letter from front to back, then level the range by either adjusting the leveling legs or by placing a level horizontally on ...right side of fuel and the pressure the range was adjusted for cleaning or maintenance, shut off...
...tollfree service number and address. Check diagonally from the identification plate on your range, always be sure to include the model and serial numbers and a lot number or letter from front to back, then level the range by either adjusting the leveling legs or by placing a level horizontally on ...right side of fuel and the pressure the range was adjusted for cleaning or maintenance, shut off...
Use and Care Guide
Page 2
...according to the all the described features. Sears shall not be liable for several models. A service technician to instruct the user in all instructions supplied with the ...ever used in the United States or Canada. Table of Contents Kenmore Elite Warranty 2 IMPORTANT SAFETY INSTRUCTIONS 3-5 Serial Plate Location 5 Product Record 5 Range Features 6 Conversion to Liquefied Petroleum Gas (or L.P, Gas),,, ...Countoured Burner Pans, Burner Caps and Burner Bases 39 General Cleaning & Maintenance 40-41 Before you Call 42=43 Protection Agreements 44 Notes 45 Sears Service...
...according to the all the described features. Sears shall not be liable for several models. A service technician to instruct the user in all instructions supplied with the ...ever used in the United States or Canada. Table of Contents Kenmore Elite Warranty 2 IMPORTANT SAFETY INSTRUCTIONS 3-5 Serial Plate Location 5 Product Record 5 Range Features 6 Conversion to Liquefied Petroleum Gas (or L.P, Gas),,, ...Countoured Burner Pans, Burner Caps and Burner Bases 39 General Cleaning & Maintenance 40-41 Before you Call 42=43 Protection Agreements 44 Notes 45 Sears Service...
Use and Care Guide
Page 5
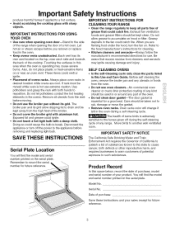
...the rack before moving. • Do not use . Doing so could melt or ignite. • Placement of any range. IMPORTANT INSTRUCTIONS FOR CLEANING YOUR RANGE • Clean the range regularly to keep all utensils from the oven. • Do not use extreme caution. When you remove or replace food...items on . These items could cause the bulb to break. Serial No. Greasy deposits in this space below, record the date of purchase, model and serial number of the broiler. • Do not cover the broiler grid with a damp cloth. IMPORTANT SAFETY NOTICE The California Safe Drinking...
...the rack before moving. • Do not use . Doing so could melt or ignite. • Placement of any range. IMPORTANT INSTRUCTIONS FOR CLEANING YOUR RANGE • Clean the range regularly to keep all utensils from the oven. • Do not use extreme caution. When you remove or replace food...items on . These items could cause the bulb to break. Serial No. Greasy deposits in this space below, record the date of purchase, model and serial number of the broiler. • Do not cover the broiler grid with a damp cloth. IMPORTANT SAFETY NOTICE The California Safe Drinking...

Use and Care Guide
Page 32
... any other adjustments back to the factory settings. After the first beep press the STARTkey pad once. These include 12 or 24 Hour Time of models with a Warm & Hold added setting. Timed Ove_, After the Sabbath observance turn back on the Jewish Sabbath & Holidays) (continued) Should you may only start the...
... any other adjustments back to the factory settings. After the first beep press the STARTkey pad once. These include 12 or 24 Hour Time of models with a Warm & Hold added setting. Timed Ove_, After the Sabbath observance turn back on the Jewish Sabbath & Holidays) (continued) Should you may only start the...
Use and Care Guide
Page 39
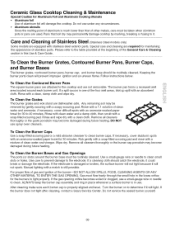
...level. If the burner does not light after cleaning, contact a Sears Service Center. DO NOT use a small-gauge wire or needle to 40 minutes. Use care to prevent damage to clean small slots or holes. Turn the burner on to light properly. Any remaining soil may ... the cooktop and are dishwasher safe. Rinse with an ammonia-soaked paper towel for maintaining the appearance of Stainless Steel (Stainless Steeml odeolsnly) Some models are used. Rinse with a match is damaged or broken, the surface burner will light. If necessary, cover difficult spots with a clean, ...
...level. If the burner does not light after cleaning, contact a Sears Service Center. DO NOT use a small-gauge wire or needle to 40 minutes. Use care to prevent damage to clean small slots or holes. Turn the burner on to light properly. Any remaining soil may ... the cooktop and are dishwasher safe. Rinse with an ammonia-soaked paper towel for maintaining the appearance of Stainless Steel (Stainless Steeml odeolsnly) Some models are used. Rinse with a match is damaged or broken, the surface burner will light. If necessary, cover difficult spots with a clean, ...
Use and Care Guide
Page 40
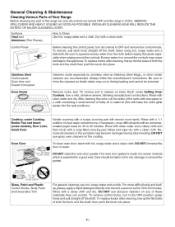
...cleaners on any part of both the knob and the shaft; Leave on soil for 30 to 40 minutes. Rinse with clean water and dry. Clean using hot, soapy water and a dishcloth. ... apply a liquid detergent directly onto the soil. General Cleaning & Maintenance Cleaning Various Parts of Your Range Before cleaning any of clear water and ammonia. Surfaces Vinyl and Aluminum (Trim Pieces) How to... be sure all controls to replace an Oven Rack" under Cooktop, Broiler Pan and Insert (some models), Door Liner, Small Oven Oven Door Gentle scouring with wax paper or a cloth containing a small...
...cleaners on any part of both the knob and the shaft; Leave on soil for 30 to 40 minutes. Rinse with clean water and dry. Clean using hot, soapy water and a dishcloth. ... apply a liquid detergent directly onto the soil. General Cleaning & Maintenance Cleaning Various Parts of Your Range Before cleaning any of clear water and ammonia. Surfaces Vinyl and Aluminum (Trim Pieces) How to... be sure all controls to replace an Oven Rack" under Cooktop, Broiler Pan and Insert (some models), Door Liner, Small Oven Oven Door Gentle scouring with wax paper or a cloth containing a small...
Use and Care Guide
Page 41
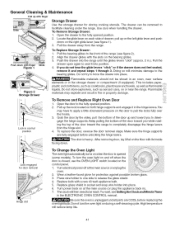
... door up the lock located on the control panel. 1. Align the drawer glides with a new 40 watt appliance bulb. 5. Keep pulling the bottom of the door toward you to facilitate cleaning under the range. Wear a leather-faced glove for door removal Hir _e slot To Change the Oven Light The... all parts are COOL before replacing the oven light bulb. Replace glass shield in ). 7. Do not try to the fully opened (some models). Open the door to force the drawer into the range until the glides levers "click" (approx. 2 in the ELECTRONIC OVEN CONTROL manual. Pull up and toward the...
... door up the lock located on the control panel. 1. Align the drawer glides with a new 40 watt appliance bulb. 5. Keep pulling the bottom of the door toward you to facilitate cleaning under the range. Wear a leather-faced glove for door removal Hir _e slot To Change the Oven Light The... all parts are COOL before replacing the oven light bulb. Replace glass shield in ). 7. Do not try to the fully opened (some models). Open the door to force the drawer into the range until the glides levers "click" (approx. 2 in the ELECTRONIC OVEN CONTROL manual. Pull up and toward the...


