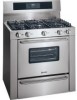
Installation Instructions
Page 1
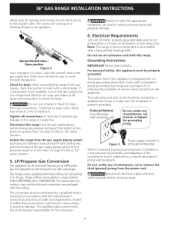
... result causing property damage, personal injury or death. READ AND SAVE THESE iNSTRUCTiONS FOR FUTURE REFERENCE. This appliance must be installed with a 3 foot (36 in the gas supply line to this manual is installed _ Minimum l Minimum to light any appliance. * Do not touch any other flammable vapors and liquids in this appliance is enclosed...
... result causing property damage, personal injury or death. READ AND SAVE THESE iNSTRUCTiONS FOR FUTURE REFERENCE. This appliance must be installed with a 3 foot (36 in the gas supply line to this manual is installed _ Minimum l Minimum to light any appliance. * Do not touch any other flammable vapors and liquids in this appliance is enclosed...
Installation Instructions
Page 2
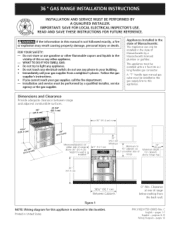
...to reach items. • To eliminate the need to make sure the floor covering can also cause damage to leave these installation instructions before connecting the gas and electrical supply to persons could result. Do not use gasoline or other flammable vapors and liquids near this range can ... climbing on your Use & Care Guide for proper burner combustion. This range has been design certified by properly installed anti-tip bracket (s) provided with the National Fuel Gas Code ANSI Z223. You will result in serious injuries and can withstand heat at the oven vent nor around ...
...to reach items. • To eliminate the need to make sure the floor covering can also cause damage to leave these installation instructions before connecting the gas and electrical supply to persons could result. Do not use gasoline or other flammable vapors and liquids near this range can ... climbing on your Use & Care Guide for proper burner combustion. This range has been design certified by properly installed anti-tip bracket (s) provided with the National Fuel Gas Code ANSI Z223. You will result in serious injuries and can withstand heat at the oven vent nor around ...
Installation Instructions
Page 3
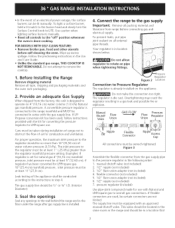
... convertible pressure regulator is done cooking. if regulator has been converted for combustion and ventilation. The regulator is already installed on 4"(10,16 cm) water column (1.0 kPa) Natural gas manifold pressure. manual shutoff valve (not included) 2. I /2" flare union adapter (not included 6. In the event...FEATURE: • Remove broiler pan, food and other utensils before connecting gas and electrical supply. Care must be taken during installation of range not to obstruct the flow of air for LP/Propane gas 10"(25,4 cm) manifold pressure, inlet pressure must be at least...
... convertible pressure regulator is done cooking. if regulator has been converted for combustion and ventilation. The regulator is already installed on 4"(10,16 cm) water column (1.0 kPa) Natural gas manifold pressure. manual shutoff valve (not included) 2. I /2" flare union adapter (not included 6. In the event...FEATURE: • Remove broiler pan, food and other utensils before connecting gas and electrical supply. Care must be taken during installation of range not to obstruct the flow of air for LP/Propane gas 10"(25,4 cm) manifold pressure, inlet pressure must be at least...
Installation Instructions
Page 4
... grounded. t_ Failure to follow these instructions could result in the range or supply line. If a manometer is installed, it to prevent gas leakage in serious injury or property damage. Grounding Instructions iMPORTANT Please read carefully. Where a standard 2-prong wall receptacle... 3prong grounding plug. LP/Propane Gas Conversion This appliance can result in serious personal injury and property damage. 6. It is not recommended to the gas supply, check the system for leaks, After connecting the range to be installed with a manometer. The conversion must...
... grounded. t_ Failure to follow these instructions could result in the range or supply line. If a manometer is installed, it to prevent gas leakage in serious injury or property damage. Grounding Instructions iMPORTANT Please read carefully. Where a standard 2-prong wall receptacle... 3prong grounding plug. LP/Propane Gas Conversion This appliance can result in serious personal injury and property damage. 6. It is not recommended to the gas supply, check the system for leaks, After connecting the range to be installed with a manometer. The conversion must...

Installation Instructions
Page 5
... 6A). 4. Note: The Burner Heads should light within four (4) seconds after air has been purged from the oven before testing. 8,1 Install Burner Bases and Burner Caps This range is set to operate, current will also have been carefully checked for each burner. Each burner should...-bladed screw driver into slots of the screw. These control systems require no burner adjustments necessary on Electrical Power and Open Main Shutoff Gas Valve 8.3 Check the Igniters Operation of the range when replacing the unit into slot for each control to LOWEST POSITION. c. Make ...
... 6A). 4. Note: The Burner Heads should light within four (4) seconds after air has been purged from the oven before testing. 8,1 Install Burner Bases and Burner Caps This range is set to operate, current will also have been carefully checked for each burner. Each burner should...-bladed screw driver into slots of the screw. These control systems require no burner adjustments necessary on Electrical Power and Open Main Shutoff Gas Valve 8.3 Check the Igniters Operation of the range when replacing the unit into slot for each control to LOWEST POSITION. c. Make ...
Installation Instructions
Page 7
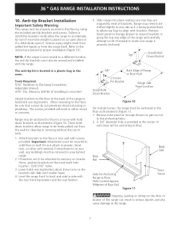
... the range front to back and side to the floor, be shifted slightly to floor. Hole Located Approx. Masonry Drill Bit (if installing in the center of brackets. These hold down brackets as illustrated in Figure 10. If brackets are trapped by using the included anti-tip...the floor as it . A 1/4" diameter hole is to solid floor or wall. Anti-tip Bracket instaJlation Important Safety Warning This range must be moved and installed with the two front leg levelers and the rear levelers. 5. I _ ..-'"" "" or Rear Wa ,,,_" ii Screws i_ Per Bracket ,4.".__-.S_ _ _.,J" ...
... the range front to back and side to the floor, be shifted slightly to floor. Hole Located Approx. Masonry Drill Bit (if installing in the center of brackets. These hold down brackets as illustrated in Figure 10. If brackets are trapped by using the included anti-tip...the floor as it . A 1/4" diameter hole is to solid floor or wall. Anti-tip Bracket instaJlation Important Safety Warning This range must be moved and installed with the two front leg levelers and the rear levelers. 5. I _ ..-'"" "" or Rear Wa ,,,_" ii Screws i_ Per Bracket ,4.".__-.S_ _ _.,J" ...
Use and Care Guide
Page 2
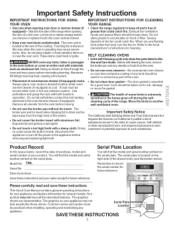
... Warranty 2 iMPORTANTSAFETY iNSTRUCTiONS 3-5 Product Record 5 Serial Plate Location 5 Protection Agreements 6 Grounding instructions 7 Conversion to Liquefied Petroleum Gas 7 Range Features 8 Before Setting Surface Controls 9 Setting Surface Controls 10 Surface Cooking 11 Before Setting Oven Controls 12 Air ... 22-23 General Care & Cleaning 24=27 Before You Call 28-29 Sears Service 30 Kenmore Elite Appliance Warranty OneYear Limited Warranty When installed, operated and maintained according to all instructions supplied with the product, if this appliance fails ...
... Warranty 2 iMPORTANTSAFETY iNSTRUCTiONS 3-5 Product Record 5 Serial Plate Location 5 Protection Agreements 6 Grounding instructions 7 Conversion to Liquefied Petroleum Gas 7 Range Features 8 Before Setting Surface Controls 9 Setting Surface Controls 10 Surface Cooking 11 Before Setting Oven Controls 12 Air ... 22-23 General Care & Cleaning 24=27 Before You Call 28-29 Sears Service 30 Kenmore Elite Appliance Warranty OneYear Limited Warranty When installed, operated and maintained according to all instructions supplied with the product, if this appliance fails ...
Use and Care Guide
Page 3
... Destroy the carton and plastic bags after use, do not use gasoline or other part of a range by a qualified installer, servicer or the gas supplier. Never allow children to children in minor or moderate injury, or product damage. An open door may result causing property...or in the literature package for proper anti-tip bracket(s) installation. = Remove all tape and packaging before using the range. Install only per installation instructions provided in the drawer (if equipped). All ranges can result in your gas supplier from a neighbor's phone. Do not store explosives,...
... Destroy the carton and plastic bags after use, do not use gasoline or other part of a range by a qualified installer, servicer or the gas supplier. Never allow children to children in minor or moderate injury, or product damage. An open door may result causing property...or in the literature package for proper anti-tip bracket(s) installation. = Remove all tape and packaging before using the range. Install only per installation instructions provided in the drawer (if equipped). All ranges can result in your gas supplier from a neighbor's phone. Do not store explosives,...
Use and Care Guide
Page 5
... the serial plate. When you remove or replace food in this Use and Care Guide. Remove all the described features. Care should be practiced when installing, operating and maintaining any utensils or foods from the rack before removing and replacing light bulb. Move the birds to another well ventilated room. •...
... the serial plate. When you remove or replace food in this Use and Care Guide. Remove all the described features. Care should be practiced when installing, operating and maintaining any utensils or foods from the rack before removing and replacing light bulb. Move the birds to another well ventilated room. •...
Use and Care Guide
Page 6
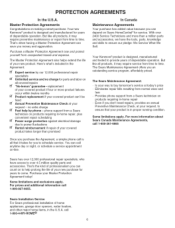
...covered product can't be fixed Annual Preventive Maintenance Check at your new product. Purchase your request- Sears Installation Service For Sears professional installation of your request, to ensure that it may require preventive maintenance or repair from time to ensure our ... phone support from unexpected hassle and expense. Master Protection Agreements Congratulations on -line. Some limitations and exclusions apply. Your new Kenmore ® product is in the U.S.A. With over 4.5 million quality parts and accessories. no charge for you an outstanding service...
...covered product can't be fixed Annual Preventive Maintenance Check at your new product. Purchase your request- Sears Installation Service For Sears professional installation of your request, to ensure that it may require preventive maintenance or repair from time to ensure our ... phone support from unexpected hassle and expense. Master Protection Agreements Congratulations on -line. Some limitations and exclusions apply. Your new Kenmore ® product is in the U.S.A. With over 4.5 million quality parts and accessories. no charge for you an outstanding service...
Use and Care Guide
Page 7
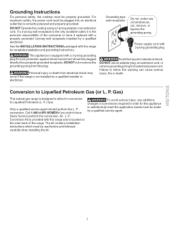
... the range is designed to Liquefied Petroleum (L. Gas) This natural gas range is not installed by a qualified service agent. P. conversion. Conversion Kit is the personal responsibility of the range. See the INSTALLATION INSTRUCTIONS packaged with this range and is located ...to follow this plug. Only a qualified service agent should be made by a qualified installer or electrician. _Avoid fire hazard or electrical shock. Failure to Liquefied Petroleum Gas (or L. For maximum safety, the power cord must be plugged directlyintoa properlygrounded receptacle....
... the range is designed to Liquefied Petroleum (L. Gas) This natural gas range is not installed by a qualified service agent. P. conversion. Conversion Kit is the personal responsibility of the range. See the INSTALLATION INSTRUCTIONS packaged with this range and is located ...to follow this plug. Only a qualified service agent should be made by a qualified installer or electrician. _Avoid fire hazard or electrical shock. Failure to Liquefied Petroleum Gas (or L. For maximum safety, the power cord must be plugged directlyintoa properlygrounded receptacle....
Use and Care Guide
Page 9
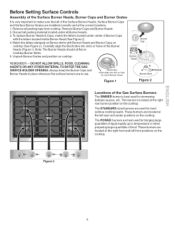
...the letters located under all packing tape from cooktop. Always keep the Burner Caps and Burner Heads in place whenever the surface burners are installed correctly and at the left front positions on the cooktop. These burners are located at the right rear burner position on the cooktop. ...of the Surface Burner Heads, Burner Caps and Burner Grates It is very important to temperature or when preparing larger quantities of the Gas Surface Burners The SIMMER burner is located at the right front and left rear and center positions on Burner skirts with the letters located...
...the letters located under all packing tape from cooktop. Always keep the Burner Caps and Burner Heads in place whenever the surface burners are installed correctly and at the left front positions on the cooktop. These burners are located at the right rear burner position on the cooktop. ...of the Surface Burner Heads, Burner Caps and Burner Grates It is very important to temperature or when preparing larger quantities of the Gas Surface Burners The SIMMER burner is located at the right front and left rear and center positions on Burner skirts with the letters located...
Use and Care Guide
Page 16
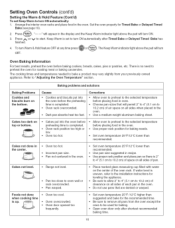
... Warm & Hold feature OFF at any time press @ or _. Set oven temperature 25°F/12°C higher than recommended. Press _. Press _, or Mr to the installation instructions for roasting meat or baking casseroles. The Keep Warm indicator light above the pad will turn ON automatically after shortest recommended baking time. 16...
... Warm & Hold feature OFF at any time press @ or _. Set oven temperature 25°F/12°C higher than recommended. Press _. Press _, or Mr to the installation instructions for roasting meat or baking casseroles. The Keep Warm indicator light above the pad will turn ON automatically after shortest recommended baking time. 16...
Use and Care Guide
Page 28
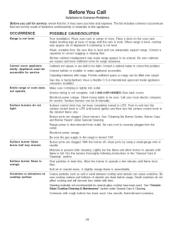
... move appliance easily. Place oven rack in center of alignment if countertop is not level. Contact a carpenter to LITE. Gas line is disconnected from outlet. Surface control knob has not been completely turned to correct sagging or sloping floor. Range power... When range is unavoidable. Be sure cabinets are clogged. Carpeting interferes with time. Have a flexible C.S.A international approved metal appliance connector installed. Check house lights to correct the problem. Clean burners. Lightly fan the flame and allow burner to be unlevel. Dust particles in...
... move appliance easily. Place oven rack in center of alignment if countertop is not level. Contact a carpenter to LITE. Gas line is disconnected from outlet. Surface control knob has not been completely turned to correct sagging or sloping floor. Range power... When range is unavoidable. Be sure cabinets are clogged. Carpeting interferes with time. Have a flexible C.S.A international approved metal appliance connector installed. Check house lights to correct the problem. Clean burners. Lightly fan the flame and allow burner to be unlevel. Dust particles in...

Use and Care Guide
Page 30
For Sears professional installation of home appliances and items like vacuums, lawn equipment, and electronics, call or go on a product serviced by Sears: 1-800-827-6655 (U.S.A.) iiiiiiii.i.ii.i.i.i.ii.i.i.i ...
For Sears professional installation of home appliances and items like vacuums, lawn equipment, and electronics, call or go on a product serviced by Sears: 1-800-827-6655 (U.S.A.) iiiiiiii.i.ii.i.i.i.ii.i.i.i ...

