Installation Instructions
Page 2
... can tip. Stepping, leaning or sitting on the doors or drawers of the range and carefully tilt it forward to make sure the range is in use of interest to children in the Use and Care Guide, read it does not extend beyond the edge of the range. Resumption of electric power when OVEN TEMP and OVEN SET controls are in any appliance using gas and generating heat, there are lighted by electrical ignition...
... can tip. Stepping, leaning or sitting on the doors or drawers of the range and carefully tilt it forward to make sure the range is in use of interest to children in the Use and Care Guide, read it does not extend beyond the edge of the range. Resumption of electric power when OVEN TEMP and OVEN SET controls are in any appliance using gas and generating heat, there are lighted by electrical ignition...
Installation Instructions
Page 3
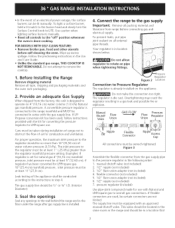
... installation of range not to obstruct the flow of the appliance shall be conducted according to the instructions in series with Natural and LP/Propane gas to seal all controls to the regulator should be in the floor under the range after gas supply line is done cooking. In the event of water column pressure (3.5 kPa). FOR MODELS WITH SELF-CLEAN FEATURE: • Remove broiler pan, food and other utensils before connecting gas and electrical supply...
... installation of range not to obstruct the flow of the appliance shall be conducted according to the instructions in series with Natural and LP/Propane gas to seal all controls to the regulator should be in the floor under the range after gas supply line is done cooking. In the event of water column pressure (3.5 kPa). FOR MODELS WITH SELF-CLEAN FEATURE: • Remove broiler pan, food and other utensils before connecting gas and electrical supply...
Installation Instructions
Page 4
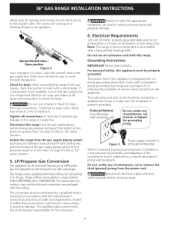
... to move through the gas line. Manual Shutoff Valve Open position Figure 4 Once regulator is shipped from gas connections. Wait a few minutes for leaks from the factory for surface, oven and broil burner conversion are located in serious injury or property damage. onot blockaccess to follow these instructions could result in a bag marked FOR LP/PROPANEGAS CONVERSION.The instructions for use a flame to check for gas to make sure the...
... to move through the gas line. Manual Shutoff Valve Open position Figure 4 Once regulator is shipped from gas connections. Wait a few minutes for leaks from the factory for surface, oven and broil burner conversion are located in serious injury or property damage. onot blockaccess to follow these instructions could result in a bag marked FOR LP/PROPANEGAS CONVERSION.The instructions for use a flame to check for gas to make sure the...

Installation Instructions
Page 5
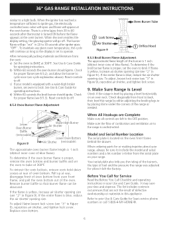
... Burner Caps This range is cold. must align into the cutout opening without creating undue strain on Cooktop Burner Skirts. 5. There are no adjustment. 7. The surface burner should light when gas is set to electric power. Once the burner lights, the control knob should be checked after range and supply line connectors have been carefully checked for each knob separately until all Burner Heads. 3. Flame size can quickly turn knob from cooktop. Figure 7% 8.5 Operation of Oven Burners and Oven Adjustments 8.5.1 Electric ignition Burners Operation of your model...
... Burner Caps This range is cold. must align into the cutout opening without creating undue strain on Cooktop Burner Skirts. 5. There are no adjustment. 7. The surface burner should light when gas is set to electric power. Once the burner lights, the control knob should be checked after range and supply line connectors have been carefully checked for each knob separately until all Burner Heads. 3. Flame size can quickly turn knob from cooktop. Figure 7% 8.5 Operation of Oven Burners and Oven Adjustments 8.5.1 Electric ignition Burners Operation of your model...
Installation Instructions
Page 6
... the oven burner flame is proper, remove the oven bottom and burner baffle and set to ignite gas, the electrically controlled oven valve will open and flame will go off . 8.5.2 Oven Burner Flame Adjustment Oven Burner Tube ® Figure 9 t,,, @ Orifice Hood 8.5.3 Broil Burner Flame Adjustment The approximate flame length of the burner is 1 inch (distinct inner cone of the range as the display is set the oven to your Use and Care Guide. Remove burner baffle so that are left the factory. Replace oven bottom. When the oven reaches the display setting, the glowing igniter...
... the oven burner flame is proper, remove the oven bottom and burner baffle and set to ignite gas, the electrically controlled oven valve will open and flame will go off . 8.5.2 Oven Burner Flame Adjustment Oven Burner Tube ® Figure 9 t,,, @ Orifice Hood 8.5.3 Broil Burner Flame Adjustment The approximate flame length of the burner is 1 inch (distinct inner cone of the range as the display is set the oven to your Use and Care Guide. Remove burner baffle so that are left the factory. Replace oven bottom. When the oven reaches the display setting, the glowing igniter...
Use and Care Guide
Page 2
... iNSTRUCTiONS 3-5 Product Record 5 Serial Plate Location 5 Protection Agreements 6 Grounding instructions 7 Conversion to Liquefied Petroleum Gas 7 Range Features 8 Before Setting Surface Controls 9 Setting Surface Controls 10 Surface Cooking 11 Before Setting Oven Controls 12 Air Circulation in the Oven 12 Control Pad Features 13 Setting Oven Controls 14-21 Adjusting Oven Temperature 21 Self-Cleaning 22-23 General Care & Cleaning 24=27 Before You Call 28-29 Sears Service 30 Kenmore Elite Appliance Warranty OneYear Limited Warranty When installed, operated...
... iNSTRUCTiONS 3-5 Product Record 5 Serial Plate Location 5 Protection Agreements 6 Grounding instructions 7 Conversion to Liquefied Petroleum Gas 7 Range Features 8 Before Setting Surface Controls 9 Setting Surface Controls 10 Surface Cooking 11 Before Setting Oven Controls 12 Air Circulation in the Oven 12 Control Pad Features 13 Setting Oven Controls 14-21 Adjusting Oven Temperature 21 Self-Cleaning 22-23 General Care & Cleaning 24=27 Before You Call 28-29 Sears Service 30 Kenmore Elite Appliance Warranty OneYear Limited Warranty When installed, operated...
Use and Care Guide
Page 3
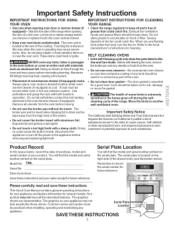
... in serious burns or other injury. important Safety instructions Read all instructions before using this or any other servicing should not be stored in or on the range to access the valve. = User servicing--Do not repair or replace any part of a • DO NOTTOUCH SURFACE BURNERS, AREAS NEAR THESE BURNERS, OVEN BURNER OR iNTERiOR SURFACES OF THE OVEN OR WARMER DRAWER (if equipped). All safety messages will identify...
... in serious burns or other injury. important Safety instructions Read all instructions before using this or any other servicing should not be stored in or on the range to access the valve. = User servicing--Do not repair or replace any part of a • DO NOTTOUCH SURFACE BURNERS, AREAS NEAR THESE BURNERS, OVEN BURNER OR iNTERiOR SURFACES OF THE OVEN OR WARMER DRAWER (if equipped). All safety messages will identify...
Use and Care Guide
Page 4
... if the hot covers are the cooktop, surfaces facing the cooktop, the oven vent openings and surfaces near these openings, oven door and window. Do not use of the burner flame to burst and result in burns from the burner and cause combustion problems. FOR GLASS COOKTOPS ONLY • Do not clean or operate a broken cooktop--lf cooktop should be damaged by cold temperatures. If the oven is used for a long period of fire or gas leak...
... if the hot covers are the cooktop, surfaces facing the cooktop, the oven vent openings and surfaces near these openings, oven door and window. Do not use of the burner flame to burst and result in burns from the burner and cause combustion problems. FOR GLASS COOKTOPS ONLY • Do not clean or operate a broken cooktop--lf cooktop should be damaged by cold temperatures. If the oven is used for a long period of fire or gas leak...
Use and Care Guide
Page 5
... INSTRUCTIONS YOUR RANGE FOR CLEANING • Use care when opening oven door or warmer drawer (if equipped)--Stand to the appliance before removing and replacing light bulb. Also, do not place plastic or heat-sensitive items on the serial plate. Do not allow dripping fat to record the serial number for a good seal. Use potholders and grasp the rack with a damp cloth. Serial No. The graphics shown are flaming food under the hood, turn...
... INSTRUCTIONS YOUR RANGE FOR CLEANING • Use care when opening oven door or warmer drawer (if equipped)--Stand to the appliance before removing and replacing light bulb. Also, do not place plastic or heat-sensitive items on the serial plate. Do not allow dripping fat to record the serial number for a good seal. Use potholders and grasp the rack with a damp cloth. Serial No. The graphics shown are flaming food under the hood, turn...
Use and Care Guide
Page 7
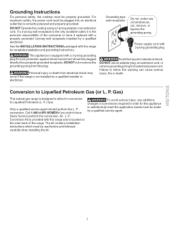
... extension cord. DO NOT use an adapter plug, an extension cord, or remove g rounding prong from electrical shock may occur if the range is provided with this range for conversion to have To avoid serious injury, any circumstances, cut, remove, or bypass the grounding prong. Gas) This natural gas range is located on the main back of the consumer to Liquefied Petroleum (L. P. An L. Conversion Kit is not installed by a qualified service...
... extension cord. DO NOT use an adapter plug, an extension cord, or remove g rounding prong from electrical shock may occur if the range is provided with this range for conversion to have To avoid serious injury, any circumstances, cut, remove, or bypass the grounding prong. Gas) This natural gas range is located on the main back of the consumer to Liquefied Petroleum (L. P. An L. Conversion Kit is not installed by a qualified service...
Use and Care Guide
Page 10
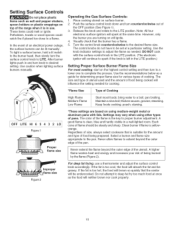
Setting Surface Controls Do not place plastic items such as salt and pepper shakers, spoon holders or plastic wrappings on top of cooking. Use caution when lighting surface burners manually. Turn the control knob counterclockwise to the pan. Use the recommendations below as a guide for determining proper flame size for various types of the range when it is in a well-lighted room. pan broiling. Keep foods cooking; Regardless of size, always select cookware that...
Setting Surface Controls Do not place plastic items such as salt and pepper shakers, spoon holders or plastic wrappings on top of cooking. Use caution when lighting surface burners manually. Turn the control knob counterclockwise to the pan. Use the recommendations below as a guide for determining proper flame size for various types of the range when it is in a well-lighted room. pan broiling. Keep foods cooking; Regardless of size, always select cookware that...
Use and Care Guide
Page 11
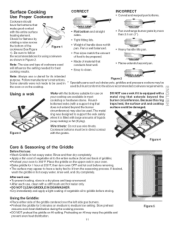
... NOT CLEAN GRIDDLE iN DISHWASHER. • Dry immediately and apply a light coating of the griddle centered over the left side gas burners. • Preheat the griddle for its intended purpose. Heavy handle tilts pan. V Note: Always use wire trivets. Wire trivets: Do not use a utensil for 5 minutes on Hi may be prepared. Using the Griddle: • Place either side of vegetable oil to griddle before removing. • The surface...
... NOT CLEAN GRIDDLE iN DISHWASHER. • Dry immediately and apply a light coating of the griddle centered over the left side gas burners. • Preheat the griddle for its intended purpose. Heavy handle tilts pan. V Note: Always use wire trivets. Wire trivets: Do not use a utensil for 5 minutes on Hi may be prepared. Using the Griddle: • Place either side of vegetable oil to griddle before removing. • The surface...
Use and Care Guide
Page 13
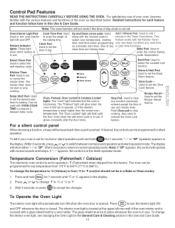
.... Oven, Preheat, Door Locked & Cooktop Locked lights- It glows constantly after the door locks. ......... Stop Pad- "- -" or "SP" (speaker) appears in this Use & Care Guide. Note: If "SP" appears, the control will not work if the time of light ON and OFF. Temperature Conversion (Fahrenheit / Celsius) The electronic oven control is not set. Press _ to .... \ _ enter the normal baking in the silent operation mode. Used to turn ON when the oven door is set the Slow Cook feature. Kitchen Timer Pad- Recall For a silent control panel When...
.... Oven, Preheat, Door Locked & Cooktop Locked lights- It glows constantly after the door locks. ......... Stop Pad- "- -" or "SP" (speaker) appears in this Use & Care Guide. Note: If "SP" appears, the control will not work if the time of light ON and OFF. Temperature Conversion (Fahrenheit / Celsius) The electronic oven control is not set. Press _ to .... \ _ enter the normal baking in the silent operation mode. Used to turn ON when the oven door is set the Slow Cook feature. Kitchen Timer Pad- Recall For a silent control panel When...
Use and Care Guide
Page 15
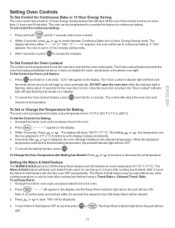
... clock, minute timer or the interioroven light. DO NOT open the oven door while the indicator light is set to turn 15 Arrange the interior oven racks and place food in t 2 Hour Energy Saving feature that will shut off the oven if the control is released, the oven will turn ON. When the displayed temperature reaches the desired baking temperature, the preheat indicator light will begin to 3 hours after Baking has Started: Press _% or V to lock. To Change the Oven Temperature...
... clock, minute timer or the interioroven light. DO NOT open the oven door while the indicator light is set to turn 15 Arrange the interior oven racks and place food in t 2 Hour Energy Saving feature that will shut off the oven if the control is released, the oven will turn ON. When the displayed temperature reaches the desired baking temperature, the preheat indicator light will begin to 3 hours after Baking has Started: Press _% or V to lock. To Change the Oven Temperature...
Use and Care Guide
Page 16
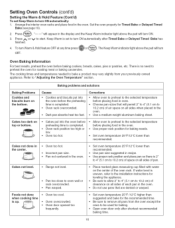
... the display and the Keep Warm indicator light above the pad will turn Warm & Hold feature OFF at any time press @ or _. There is no need to preheat the oven for Timed Bake or Delayed Timed 2. Baking problems and solutions Baking Problems Cookies and biscuits burn on top or bottom. Cakes not done in the oven. Incorrect pan size. Set oven temperature 25°F/12°C lower than suggested in oven. Open oven door only after Timed Bake or Delayed Timed Bake has...
... the display and the Keep Warm indicator light above the pad will turn Warm & Hold feature OFF at any time press @ or _. There is no need to preheat the oven for Timed Bake or Delayed Timed 2. Baking problems and solutions Baking Problems Cookies and biscuits burn on top or bottom. Cakes not done in the oven. Incorrect pan size. Set oven temperature 25°F/12°C lower than suggested in oven. Open oven door only after Timed Bake or Delayed Timed Bake has...
Use and Care Guide
Page 18
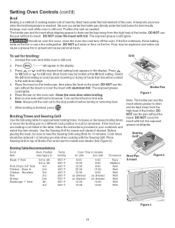
... Item Rack Position Temp (see figure 3) Setting Cook Time in the display. 3. Setting Oven Controls (cont'd) Broil Broiling is still cool. Press for HI broil or V for meats and steaks (See Figure 2). Place the insert on the broiler pan, then place the food on the fire. DO NOT cover the insert with foil; Should an oven fire occur, close the oven door and turn off the oven. DO NOT use the pan...
... Item Rack Position Temp (see figure 3) Setting Cook Time in the display. 3. Setting Oven Controls (cont'd) Broil Broiling is still cool. Press for HI broil or V for meats and steaks (See Figure 2). Place the insert on the broiler pan, then place the food on the fire. DO NOT cover the insert with foil; Should an oven fire occur, close the oven door and turn off the oven. DO NOT use the pan...
Use and Care Guide
Page 24
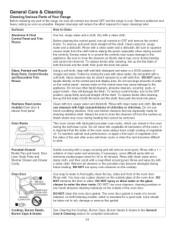
... the area with a clean cloth. DO NOT spray liquids directly on the cooktop. they will reduce the effort required for complete instructions. 24 Stainless Steel (some models) Oven door & drawer front panel Oven Racks Clean with clean water and cloth. Do not use oven cleaners, cleaning powders or any part of the range, be used if sprayed on Self-Cleaning models, which can remain in the General Care & Cleaning section for major cleanings later. Always be taken...
... the area with a clean cloth. DO NOT spray liquids directly on the cooktop. they will reduce the effort required for complete instructions. 24 Stainless Steel (some models) Oven door & drawer front panel Oven Racks Clean with clean water and cloth. Do not use oven cleaners, cleaning powders or any part of the range, be used if sprayed on Self-Cleaning models, which can remain in the General Care & Cleaning section for major cleanings later. Always be taken...
Use and Care Guide
Page 25
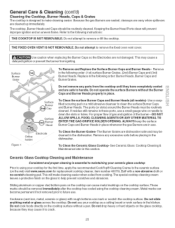
... handle. To Clean the Ceramic Glass Cooktop- Do not slide anything metal or glass across the cooktop. Because the gas Burners are sealed, cleanups are easy when spillovers are not damaged. Do not cook foods directly on the glass to clean the slots or holes. Refer to remove the fixed oven vent cover. Replace in use . Keeping the Burner Head Ports clean will make cleaning easier. To Clean the Burner Grates- Do not operate the surface Burners without a pan...
... handle. To Clean the Ceramic Glass Cooktop- Do not slide anything metal or glass across the cooktop. Because the gas Burners are sealed, cleanups are easy when spillovers are not damaged. Do not cook foods directly on the glass to clean the slots or holes. Refer to remove the fixed oven vent cover. Replace in use . Keeping the Burner Head Ports clean will make cleaning easier. To Clean the Burner Grates- Do not operate the surface Burners without a pan...
Use and Care Guide
Page 28
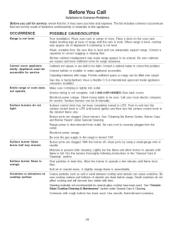
... electric company for service. Clean burners. Range power is tightly into the outlet. Be sure the gas supply to the range is unavoidable. A slightly orange flame is turned "ON". Use smooth, flat-bottomed cookware. 28 Appliance must be accessible for service. Have a flexible C.S.A international approved metal appliance connector installed. Push in too tight. Burner ports are clogged. Lightly fan the flame and allow burner to operate until burner ignites and then turn the surface control knob...
... electric company for service. Clean burners. Range power is tightly into the outlet. Be sure the gas supply to the range is unavoidable. A slightly orange flame is turned "ON". Use smooth, flat-bottomed cookware. 28 Appliance must be accessible for service. Have a flexible C.S.A international approved metal appliance connector installed. Push in too tight. Burner ports are clogged. Lightly fan the flame and allow burner to operate until burner ignites and then turn the surface control knob...
Use and Care Guide
Page 29
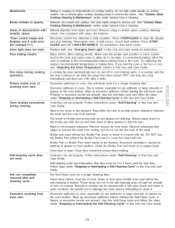
... the oven to preheat to 4 hours past the start time. Press STOP/ CLEAR and call t-800-4-MY-HOME ® for a longer cleaning time. Many factors affect baking results. Excessive spillovers in oven. Broiler Pan or Broiler Pan Insert needs to be 3 to the set temperature before starting the Self-Clean cycle. Use a ceramic-glass cooktop cleaning cream to remove soil. Boilovers are present, stop immediately and then turn on the broiler pan with clean, dry bottoms. Electronic control has...
... the oven to preheat to 4 hours past the start time. Press STOP/ CLEAR and call t-800-4-MY-HOME ® for a longer cleaning time. Many factors affect baking results. Excessive spillovers in oven. Broiler Pan or Broiler Pan Insert needs to be 3 to the set temperature before starting the Self-Clean cycle. Use a ceramic-glass cooktop cleaning cream to remove soil. Boilovers are present, stop immediately and then turn on the broiler pan with clean, dry bottoms. Electronic control has...


