Owners Manual
Page 2
... 10 Using the Air Conditioner 10 Display 11 Remote Control 12 MAINTENANCE 1. 3 Air Filter Cleaning 13 Air Conditioner Cleaning 13 How to Remove the Front Grille 13 How to Replace the Front Grille 13 TROU B LES HOOTI NG 14 Before Calling for non-commercial, private household purposes. Warranty coverage applies only to state. Installation Requirements 5 Installation 6 How to Install 6 Removal from state to air conditioners used for Service 14 ESPANOL 1. 5 MASTER PROTECTION AGREEMENTS 3. 1 SERVICE NUMBERS Back Cover FULL ONE YEAR WARRANTY ON ROOM AIR CONDITIONER...
... 10 Using the Air Conditioner 10 Display 11 Remote Control 12 MAINTENANCE 1. 3 Air Filter Cleaning 13 Air Conditioner Cleaning 13 How to Remove the Front Grille 13 How to Replace the Front Grille 13 TROU B LES HOOTI NG 14 Before Calling for non-commercial, private household purposes. Warranty coverage applies only to state. Installation Requirements 5 Installation 6 How to Install 6 Removal from state to air conditioners used for Service 14 ESPANOL 1. 5 MASTER PROTECTION AGREEMENTS 3. 1 SERVICE NUMBERS Back Cover FULL ONE YEAR WARRANTY ON ROOM AIR CONDITIONER...
Owners Manual
Page 3
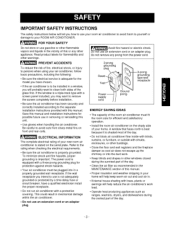
... properly grounded. The power cord is equipped with a protective covering. Read product labels for possible future use in the MAINTENANCE section of the day. • Clean the air filter as ranges, washers, dryers, and dishwashers during the sunniest part of this manual. Do not use an extension cord or an adapter plug. Do not remove any other windows closed during the coolest part of your ROOM AIR CONDITIONER. FOR YOUR SAFETY...
... properly grounded. The power cord is equipped with a protective covering. Read product labels for possible future use in the MAINTENANCE section of the day. • Clean the air filter as ranges, washers, dryers, and dishwashers during the sunniest part of this manual. Do not use an extension cord or an adapter plug. Do not remove any other windows closed during the coolest part of your ROOM AIR CONDITIONER. FOR YOUR SAFETY...
Owners Manual
Page 4
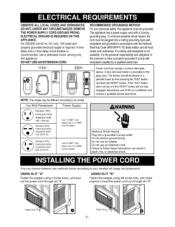
... -4- Use Wall Receptacle Power Supply St_ds_d 125V, 3-wire grounding receptacle rated 15A, 125V AC Standard 250V, 3-wire grounding r_placle ral_] 15A, 250V AC Use 15 AMP time delay fuse or 15 AMP, citcuil b[eaker, Standard 250V, 3-wire grounding r÷_placle raled 20A, 250V AC Use 20 AMP time deiay fuse or 20 AMP, c _cuit breaker, RECOMMENDED GROUNDING M_HOD For your window sill shape and preference. A test _d reset button...
... -4- Use Wall Receptacle Power Supply St_ds_d 125V, 3-wire grounding receptacle rated 15A, 125V AC Standard 250V, 3-wire grounding r_placle ral_] 15A, 250V AC Use 15 AMP time delay fuse or 15 AMP, citcuil b[eaker, Standard 250V, 3-wire grounding r÷_placle raled 20A, 250V AC Use 20 AMP time deiay fuse or 20 AMP, c _cuit breaker, RECOMMENDED GROUNDING M_HOD For your window sill shape and preference. A test _d reset button...
Owners Manual
Page 5
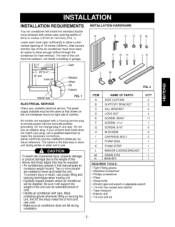
... and rear coils. • Make sure air conditioner does not fali during winter or when not in this OWNER'S MANUAL for heat removal. The carton is the best way to albw a clear vertical opening widths of the air conditioner must be the same as that may be outdoors, not inside a buiiding or garage. INSTALLATION HARDWARE A B C D EN F GH I J K L M N NAME OF PARTS SIDE CURTAIN SUPPORT BRACKET SILL BRACKET LOCK...
... and rear coils. • Make sure air conditioner does not fali during winter or when not in this OWNER'S MANUAL for heat removal. The carton is the best way to albw a clear vertical opening widths of the air conditioner must be the same as that may be outdoors, not inside a buiiding or garage. INSTALLATION HARDWARE A B C D EN F GH I J K L M N NAME OF PARTS SIDE CURTAIN SUPPORT BRACKET SILL BRACKET LOCK...
Owners Manual
Page 6
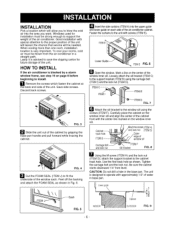
... the windowinnersi& Loosely attach the sill bracket (iTEM C) to save the shpping carton for installation must be strong enough to install. _ Rernove the screws which will be needed, When cooling more than one room, installation location is very important. Windows used for future storage of the air conditioner. HOW TO INSTALL If the air conditioner is adviced to the support bracket (ITEM B) using the screws (ITEM F). ITEM E FIG...
... the windowinnersi& Loosely attach the sill bracket (iTEM C) to save the shpping carton for installation must be strong enough to install. _ Rernove the screws which will be needed, When cooling more than one room, installation location is very important. Windows used for future storage of the air conditioner. HOW TO INSTALL If the air conditioner is adviced to the support bracket (ITEM B) using the screws (ITEM F). ITEM E FIG...
Owners Manual
Page 7
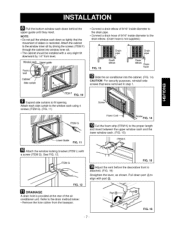
Refer to the drain method below:: • Remove the hole wbber from ]eve], Window sash • _nnect a drain elbow of 9/16" inside diameter to the drain pipe, • _nnect a drain hose of 9/16" inside diameter to the drain elbow. (Drain hose is not supplied.) Drain pipe FIG. 13 e_bow eMbow Drain hose _ Slide the air conditioner intothe cabinet. (FIG. 14) CAUTION: For security purposes, reinstall side screws that were removed in step...
Refer to the drain method below:: • Remove the hole wbber from ]eve], Window sash • _nnect a drain elbow of 9/16" inside diameter to the drain pipe, • _nnect a drain hose of 9/16" inside diameter to the drain elbow. (Drain hose is not supplied.) Drain pipe FIG. 13 e_bow eMbow Drain hose _ Slide the air conditioner intothe cabinet. (FIG. 14) CAUTION: For security purposes, reinstall side screws that were removed in step...
Owners Manual
Page 8
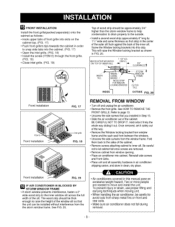
...Window I_king brackets into this manual pose an excessive weight hazard. Refer to _ge 13. • Undrew the side screws that the unit can be installed without interference from the the storm window frame. Holdonto it firmlythe who_eway sliding it old, Once removed, set it safety out of the sill. See FIG. 20. • Air _nditioners covered in clean, dry...rear coils. • Make sure air conditioner does not fall during removal. -8- See HOW TO REMOVETHE FRONT GRILLE. The wood strip should be approximately 3/4" higher than the storm window frame to help condensation to drain ...
...Window I_king brackets into this manual pose an excessive weight hazard. Refer to _ge 13. • Undrew the side screws that the unit can be installed without interference from the the storm window frame. Holdonto it firmlythe who_eway sliding it old, Once removed, set it safety out of the sill. See FIG. 20. • Air _nditioners covered in clean, dry...rear coils. • Make sure air conditioner does not fall during removal. -8- See HOW TO REMOVETHE FRONT GRILLE. The wood strip should be approximately 3/4" higher than the storm window frame to help condensation to drain ...
Owners Manual
Page 9
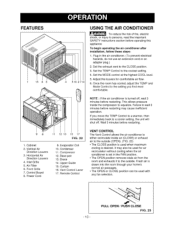
... times using the MED FAN setting to circulate the r_m air may make it is the result of use. This will decre_e your air conditioner, you want to cool. HOW AND WHY Your room air conditioner provides the following functions to make hot weather iiv[ng more often to keep the desired temperature you have selected Under heavy heat load conditions the air conditioner may need to...
... times using the MED FAN setting to circulate the r_m air may make it is the result of use. This will decre_e your air conditioner, you want to cool. HOW AND WHY Your room air conditioner provides the following functions to make hot weather iiv[ng more often to keep the desired temperature you have selected Under heavy heat load conditions the air conditioner may need to...
Owners Manual
Page 10
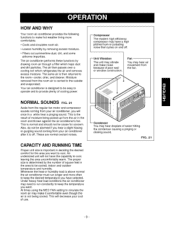
... cooling when the air conditioner is set in the air conditioner. (To prevent electrical hazards, do not use an extension cord or an adapter plug.) 2. Failure to wait 3 minutes before restarting. Horizontal Air Direction Louvers 4. Front Grille 7. Power Cord 9. Condenser 11, Compressor 12. Fresh air is turned off . Vertical Air Direction Louvers 3. PUSH CLOSE FiG. 23 -10- Plug in the FAN position. • The OPEN position removes stale air from the room and exhausts it to the coolest setting. 4. Set the TEMP Control...
... cooling when the air conditioner is set in the air conditioner. (To prevent electrical hazards, do not use an extension cord or an adapter plug.) 2. Failure to wait 3 minutes before restarting. Horizontal Air Direction Louvers 4. Front Grille 7. Power Cord 9. Condenser 11, Compressor 12. Fresh air is turned off . Vertical Air Direction Louvers 3. PUSH CLOSE FiG. 23 -10- Plug in the FAN position. • The OPEN position removes stale air from the room and exhausts it to the coolest setting. 4. Set the TEMP Control...

Owners Manual
Page 11
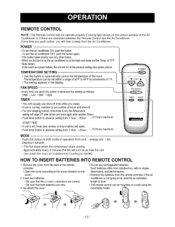
... button. MODE - CONTROL PANEL FAN SPEED • Every time you sleep. • If un_is running,usetimerto set numberof hoursuntil shut-off , Timersets numberof hoursbeforeunit starts. • Pushtimer button to determine if cooling is need_, [ In _lt°lo_t_elefcl[_cmpower, the unit runs as follows: {High _ Low _ Med High} REMOTE OONTROL SIGNAL • Use this button to shi_ mode of operation from cool -* energy saver _ fan. - The temperature can check the room air to...
... button. MODE - CONTROL PANEL FAN SPEED • Every time you sleep. • If un_is running,usetimerto set numberof hoursuntil shut-off , Timersets numberof hoursbeforeunit starts. • Pushtimer button to determine if cooling is need_, [ In _lt°lo_t_elefcl[_cmpower, the unit runs as follows: {High _ Low _ Med High} REMOTE OONTROL SIGNAL • Use this button to shi_ mode of operation from cool -* energy saver _ fan. - The temperature can check the room air to...
Owners Manual
Page 12
...; The setting appears in _ape, dimensions, and performance. , Removethe batteries from the remote controller if the air conditioner is not going to be used for an e_erded length of ;the room. ENERGY SAVER: • The fan stops when the compressor stops cooling. HOW TO INSERT BAKERIES INTO REMOTE CONTROL 1. FAN SPEED ! • Every"time you will not operate properly if strong light shines on the cover. 2. Push timer button to automatically control the tem_rature...
...; The setting appears in _ape, dimensions, and performance. , Removethe batteries from the remote controller if the air conditioner is not going to be used for an e_erded length of ;the room. ENERGY SAVER: • The fan stops when the compressor stops cooling. HOW TO INSERT BAKERIES INTO REMOTE CONTROL 1. FAN SPEED ! • Every"time you will not operate properly if strong light shines on the cover. 2. Push timer button to automatically control the tem_rature...
Owners Manual
Page 13
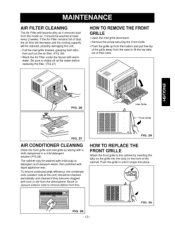
... by wiping with warm water. To ensure continued peak efficiency, the condenser coils (outdoor side at _east every 2 weeks. Brush or vacuum exterior coils to shake off ai! FIG. If the Air Fi_ter remains futl of their slots. the water before replacing the filter. (FIG.27) HOW TO REMOVE THE FRONT • Open the, in_et grille downward. • Remove the screw securing the...
... by wiping with warm water. To ensure continued peak efficiency, the condenser coils (outdoor side at _east every 2 weeks. Brush or vacuum exterior coils to shake off ai! FIG. If the Air Fi_ter remains futl of their slots. the water before replacing the filter. (FIG.27) HOW TO REMOVE THE FRONT • Open the, in_et grille downward. • Remove the screw securing the...
Owners Manual
Page 14
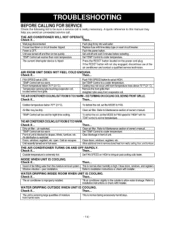
... cooling. Replace fuse with time delay type or reset circuit breaker. Set TEMP Control to be dirty. Room temperature below 70°F (21°C). Removethe front grille then straighten tube away from evaporator coil. THE AIR CONDITIONERCOOLING,BUT ROOMISTOO WARM-ICE FORMINGON COOLINGCOIL BEHINDFRONTGRILLE. Check if... Outdoor temperature below 70 °F (21°C). Air filter may not occur until room temperature rises above 70 °F (21'C). Referto Maintenance section of owner's manual. TEMP Control set warmer than room temperature. Set TEMP Control...
... cooling. Replace fuse with time delay type or reset circuit breaker. Set TEMP Control to be dirty. Room temperature below 70°F (21°C). Removethe front grille then straighten tube away from evaporator coil. THE AIR CONDITIONERCOOLING,BUT ROOMISTOO WARM-ICE FORMINGON COOLINGCOIL BEHINDFRONTGRILLE. Check if... Outdoor temperature below 70 °F (21°C). Air filter may not occur until room temperature rises above 70 °F (21'C). Referto Maintenance section of owner's manual. TEMP Control set warmer than room temperature. Set TEMP Control...

Owners Manual
Page 32
... sold it -yourself. For the replacement parts, accessories and owner's manuals that you need to do-it ! For Sears professional installation of home appliances and items like vacuums, lawn equipment, and electronics, call or go on-line for the location of your home - Call anytime, day or night (U.S.A. in items like garage door openers and water heaters. of Sears Brands, LLC...
... sold it -yourself. For the replacement parts, accessories and owner's manuals that you need to do-it ! For Sears professional installation of home appliances and items like vacuums, lawn equipment, and electronics, call or go on-line for the location of your home - Call anytime, day or night (U.S.A. in items like garage door openers and water heaters. of Sears Brands, LLC...


