Owners Manual
Page 2
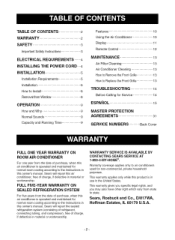
... .......4 INSTALLING THE POWER CORD....4 INSTALLATION 5 Installation Requirements 5 installation 6 How to Install 6 Removal from Window 8 OPERATION 9 How and Why 9 Normal Sounds 9 Capacity and Running Time 9 Features 10 Using the Air Conditioner 10 Display 11 Remote Control 12 MAINTENANCE 13 Air Filter Cleaning 13 Air Conditioner Cleaning... Back Cover FULL ONE YEAR WARRANTY ON ROOM AIR CONDITIONER For one year from the date of purchase, when this air conditioner is operated and maintained for normal room cooling according to the instructions in this owner...
... .......4 INSTALLING THE POWER CORD....4 INSTALLATION 5 Installation Requirements 5 installation 6 How to Install 6 Removal from Window 8 OPERATION 9 How and Why 9 Normal Sounds 9 Capacity and Running Time 9 Features 10 Using the Air Conditioner 10 Display 11 Remote Control 12 MAINTENANCE 13 Air Filter Cleaning 13 Air Conditioner Cleaning... Back Cover FULL ONE YEAR WARRANTY ON ROOM AIR CONDITIONER For one year from the date of purchase, when this air conditioner is operated and maintained for normal room cooling according to the instructions in this owner...
Owners Manual
Page 3
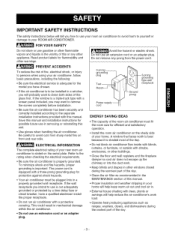
.... • External house shading with a three-prong grounding plug for protection against shock hazards. • Your air conditioner must fit the room size for efficient and satisfactory operation. • Install the room air conditioner on the shady side of your new room air conditioner is to be plugged into the duct work load. • Operate heat producing appliances such as...
.... • External house shading with a three-prong grounding plug for protection against shock hazards. • Your air conditioner must fit the room size for efficient and satisfactory operation. • Install the room air conditioner on the shady side of your new room air conditioner is to be plugged into the duct work load. • Operate heat producing appliances such as...
Owners Manual
Page 5
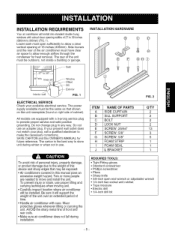
The rear of 27 to 39 inches (686mmto 990mm)(FIG. 1). INSTALLATION HARDWARE 27"to39"q I _ f" ,.'._"÷i'1;_ Lower sash must open sufficiently to allow a clear vertical opening of the air conditioner must be outdoors, not inside a building or garage. Side louvers and the rear of 16 inches (406mm). INSTALLATION REQUIREMENTS Your air conditioner willinstallintostandard double hung windows with actualcleat openingwidths of the unit must have clear air space to allow enough airflow through the condenser for heat removal. inner silll I 1116m" 'n.
The rear of 27 to 39 inches (686mmto 990mm)(FIG. 1). INSTALLATION HARDWARE 27"to39"q I _ f" ,.'._"÷i'1;_ Lower sash must open sufficiently to allow a clear vertical opening of the air conditioner must be outdoors, not inside a building or garage. Side louvers and the rear of 16 inches (406mm). INSTALLATION REQUIREMENTS Your air conditioner willinstallintostandard double hung windows with actualcleat openingwidths of the unit must have clear air space to allow enough airflow through the condenser for heat removal. inner silll I 1116m" 'n.
Owners Manual
Page 6
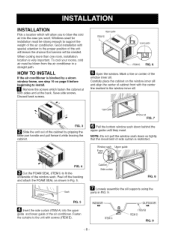
.... Discard back screws. Carefully place the cabinet on center of the air conditioner. Windowsash Upperguide FIG. 4 I_1 Cut the FOAM SEAL (ITEM I) to install. Fasten the curtains to the unit with the center line marked in a straight path. When cooling more than one room, installation location is restricted. FIG. 5 D Insert the side curtain (ITEM A) into...
.... Discard back screws. Carefully place the cabinet on center of the air conditioner. Windowsash Upperguide FIG. 4 I_1 Cut the FOAM SEAL (ITEM I) to install. Fasten the curtains to the unit with the center line marked in a straight path. When cooling more than one room, installation location is restricted. FIG. 5 D Insert the side curtain (ITEM A) into...
Owners Manual
Page 7
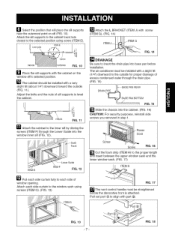
... closest to the selected position using screws (ITEM G). (FIG. 13) FIG. 17 straightened _oThree thevendteccoornattrivoel hfaronndtleismauttsatchbeed. The air conditioner must be installed with a very slight tilt (about 1/4") downward toward the outside for proper drainage of sill supports to level the cabinet.... DRAINAGE Be sure to insert the drain pipe into the window inner sill (FIG. 12). ITEMG FIG. 13 -7- ..--. -_. Cord Screw ...
... closest to the selected position using screws (ITEM G). (FIG. 13) FIG. 17 straightened _oThree thevendteccoornattrivoel hfaronndtleismauttsatchbeed. The air conditioner must be installed with a very slight tilt (about 1/4") downward toward the outside for proper drainage of sill supports to level the cabinet.... DRAINAGE Be sure to insert the drain pipe into the window inner sill (FIG. 12). ITEMG FIG. 13 -7- ..--. -_. Cord Screw ...
Owners Manual
Page 8
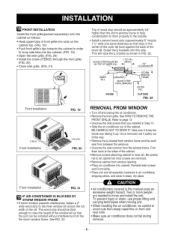
... strain, use proper lifting and carrying techniques when moving unit. • When handling the air conditioner, be thick enough to raise the height of the window sill so that you installed in the center of the outer sill flush against the back of the inner sill. This... side screws and Front Grille. • Place unit and all assembly hardware in air conditioner shipping carton, and store in clean, dry place. _!_ [e.7:TIJ i [e] _I • Air conditioners covered in FIG. 22. J}TJ FRONT INSTALLATION Install the front grille(packed separately) onto the cabinet as follows: • Hook upper...
... strain, use proper lifting and carrying techniques when moving unit. • When handling the air conditioner, be thick enough to raise the height of the window sill so that you installed in the center of the outer sill flush against the back of the inner sill. This... side screws and Front Grille. • Place unit and all assembly hardware in air conditioner shipping carton, and store in clean, dry place. _!_ [e.7:TIJ i [e] _I • Air conditioners covered in FIG. 22. J}TJ FRONT INSTALLATION Install the front grille(packed separately) onto the cabinet as follows: • Hook upper...
Owners Manual
Page 10
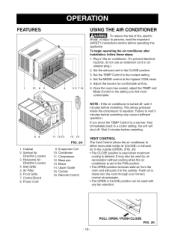
...to wait 3 minutes before operating this appliance To begin operating the air conditioner after installation, follow these steps: 1. PULL OPEN / PUSH CLOSE FIG. 25 Air Filter 6. Base pan 13. Once the room has cooled, adjust the TEMP and Mode Control to the setting ... 5 98 1. Vertical Air Direction Louvers 3. Evaporator Coil 10. Compressor 12. Upper Guide 15. Curtain 16. Set the TEMP Control to the CLOSE position. 3. Adjust the louvers for air recirculation without cooling when the air conditioner is drawn into the room through your home's normal air passages. • The...
...to wait 3 minutes before operating this appliance To begin operating the air conditioner after installation, follow these steps: 1. PULL OPEN / PUSH CLOSE FIG. 25 Air Filter 6. Base pan 13. Once the room has cooled, adjust the TEMP and Mode Control to the setting ... 5 98 1. Vertical Air Direction Louvers 3. Evaporator Coil 10. Compressor 12. Upper Guide 15. Curtain 16. Set the TEMP Control to the CLOSE position. 3. Adjust the louvers for air recirculation without cooling when the air conditioner is drawn into the room through your home's normal air passages. • The...

Owners Manual
Page 32
... repair- in items like garage door openers and water heaters. 1-800-4-MY-HOME ® (1-800-469-4663) Call anytime, day or night (U.S.A. For Sears professional installation of all major brand appliances, lawn and garden equipment, or heating and cooling systems, no matter who made it, no matter who sold it -yourself...
... repair- in items like garage door openers and water heaters. 1-800-4-MY-HOME ® (1-800-469-4663) Call anytime, day or night (U.S.A. For Sears professional installation of all major brand appliances, lawn and garden equipment, or heating and cooling systems, no matter who made it, no matter who sold it -yourself...