
Owners Manual
Page 2
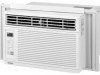
...INSTALLATION 5 Installation Requirements 5 Installation 6 How to Install 6 Removal from Window 7 OPERATION 8 How and Why 8 Normal Sounds 8 Capacity and Running Time 8 Features 9 Using the Air Conditioner 9 Display 10 Remote Control 11 How to InsertBatteriesInto RemoteControl.... 12 Air Direction Adjustment 12 MAINTENANCE 13 Air Filter Cleaning 13 Air Conditioner...AGREEMENTS 31 SERVICE NUMBERS Back Cover FULL ONE YEAR WARRANTY ON ROOM AIR CONDITIONER For one year from the date of purchase, when this air conditioner is in use in the United States. This warranty applies ...
...INSTALLATION 5 Installation Requirements 5 Installation 6 How to Install 6 Removal from Window 7 OPERATION 8 How and Why 8 Normal Sounds 8 Capacity and Running Time 8 Features 9 Using the Air Conditioner 9 Display 10 Remote Control 11 How to InsertBatteriesInto RemoteControl.... 12 Air Direction Adjustment 12 MAINTENANCE 13 Air Filter Cleaning 13 Air Conditioner...AGREEMENTS 31 SERVICE NUMBERS Back Cover FULL ONE YEAR WARRANTY ON ROOM AIR CONDITIONER For one year from the date of purchase, when this air conditioner is in use in the United States. This warranty applies ...
Owners Manual
Page 3
... power cord is equipped with a three-prong grounding plug for protection against shock hazards. • Your air conditioner must fit the room size for efficient and satisfactory operation. • Install the room air conditioner on the shady side of your new room air conditioner is stated on front and rear coils. If the wall receptacle you intend to use an...
... power cord is equipped with a three-prong grounding plug for protection against shock hazards. • Your air conditioner must fit the room size for efficient and satisfactory operation. • Install the room air conditioner on the shady side of your new room air conditioner is stated on front and rear coils. If the wall receptacle you intend to use an...
Owners Manual
Page 4
... electrical shock. 3-prong I_ grounding /_--_ plug iiii,--I I /ii_l Power supply cord _-J--JJ 3-prong grounding type wall receptacle -4- Failure to have a properly grounded 3-prong wall receptacle installed by a qualified electrician. Do not use an extension cord. This appliance has a power supply cord with the National Electrical Code (ANSI/NFPA 70) latest edition...
... electrical shock. 3-prong I_ grounding /_--_ plug iiii,--I I /ii_l Power supply cord _-J--JJ 3-prong grounding type wall receptacle -4- Failure to have a properly grounded 3-prong wall receptacle installed by a qualified electrician. Do not use an extension cord. This appliance has a power supply cord with the National Electrical Code (ANSI/NFPA 70) latest edition...

Owners Manual
Page 5
...more people are equipped with care. AVOID the sharp metal fins of the unit 4 S must be installed. The rear of front and rear coils. • Make sure air conditioner does not fall during winter or when not in use. If your present wall outlet does not match...carrying techniques when moving unit. • Carefully inspect location where air conditioner will install into standard double hung windows with actual clear opening of time. • Handle air conditioner with a 3-prong service plug to store unit during installation. Be sure it will support the weight of the unit ...
...more people are equipped with care. AVOID the sharp metal fins of the unit 4 S must be installed. The rear of front and rear coils. • Make sure air conditioner does not fall during winter or when not in use. If your present wall outlet does not match...carrying techniques when moving unit. • Carefully inspect location where air conditioner will install into standard double hung windows with actual clear opening of time. • Handle air conditioner with a 3-prong service plug to store unit during installation. Be sure it will support the weight of the unit ...

Owners Manual
Page 6
...unit wilt lessen the chance that service will be strong enough to instaII. The air conditioner must be needed. DRAIN CAP DRAIN PiPE _BASE PAN REAR INNER SILL ROOM SIDE FIG. 4 -6- Q ATTACH L BRACKET • Install the L brackets on the outer sill with a slight tilt downward (see ...step 9 on the center of the air conditioner. The air conditioner will drain the excess condensed water through the drain ...
...unit wilt lessen the chance that service will be strong enough to instaII. The air conditioner must be needed. DRAIN CAP DRAIN PiPE _BASE PAN REAR INNER SILL ROOM SIDE FIG. 4 -6- Q ATTACH L BRACKET • Install the L brackets on the outer sill with a slight tilt downward (see ...step 9 on the center of the air conditioner. The air conditioner will drain the excess condensed water through the drain ...

Owners Manual
Page 7
... outside. • Install a second wood strip (approximately 6" long by 11/2" wide and same thickness as first strip) in the center of the outer sill flush against the back of the L brackets. • When the air conditioner drops into the room, as shown in ...strain,useproperliftingand carryingtechniqueswhenmovingunit. • Whenhandlingthe air conditioner,be approximately 3/4" higher than the storm window frame to help condensation to drain properly to the window width. r_ INSTALL THE AIR CONDITIONER IN THE WINDOW • Carefully lift the air conditioner and slide it into the notches...
... outside. • Install a second wood strip (approximately 6" long by 11/2" wide and same thickness as first strip) in the center of the outer sill flush against the back of the L brackets. • When the air conditioner drops into the room, as shown in ...strain,useproperliftingand carryingtechniqueswhenmovingunit. • Whenhandlingthe air conditioner,be approximately 3/4" higher than the storm window frame to help condensation to drain properly to the window width. r_ INSTALL THE AIR CONDITIONER IN THE WINDOW • Carefully lift the air conditioner and slide it into the notches...

Owners Manual
Page 9
Once the room has cooled, adjust the TEMP and FAN SPEED control to persons, read the important SAFETY instructions section before restarting. FIG. 13 NOTE : if the air conditioner is turned off , although the fan will continue to a cooler setting, the compressor will shut .... 3. Failure to the COOL. 4. Cabinet 2. Cool Air Discharge 4. Set the MODE control to wait 3 minutes before restarting. To begin operating the air conditioner installation, follow these steps: after 1. Upper Guide 8. Plug in the air conditioner. (To prevent electrical hazards, do not use an extension...
Once the room has cooled, adjust the TEMP and FAN SPEED control to persons, read the important SAFETY instructions section before restarting. FIG. 13 NOTE : if the air conditioner is turned off , although the fan will continue to a cooler setting, the compressor will shut .... 3. Failure to the COOL. 4. Cabinet 2. Cool Air Discharge 4. Set the MODE control to wait 3 minutes before restarting. To begin operating the air conditioner installation, follow these steps: after 1. Upper Guide 8. Plug in the air conditioner. (To prevent electrical hazards, do not use an extension...

Owners Manual
Page 14
...set the MODE to FAN. Room temperature below 70 F (21 C) To defrostthe coil, set at HI. I Set FAN SPEED on too quickly. The air conditioner is triped Pushplug firmly into wall outlet. Referto installation instructionsor check with installer. TEMP Control set at ...LOW. Set TEMP Control to lower temperature. THE AIR CONDITIONERCOOUNG,BUT ROOMIS TOOWARM1) ICEFORMINGON COOLINGCOIL BEHINDFRONTGRILLE. ...
...set the MODE to FAN. Room temperature below 70 F (21 C) To defrostthe coil, set at HI. I Set FAN SPEED on too quickly. The air conditioner is triped Pushplug firmly into wall outlet. Referto installation instructionsor check with installer. TEMP Control set at ...LOW. Set TEMP Control to lower temperature. THE AIR CONDITIONERCOOUNG,BUT ROOMIS TOOWARM1) ICEFORMINGON COOLINGCOIL BEHINDFRONTGRILLE. ...

Owners Manual
Page 32
... For repair of your home- Pa_ No.:3828A20291L For the replacement parts, accessories and owner's manuals that you need to do-it ! For Sears professional installation of home appliances and items like vacuums, lawn equipment, and electronics, call or go on a product serviced by Sears: 1-800-827-6655 (U.S.A.) 1-800-361-6665...
... For repair of your home- Pa_ No.:3828A20291L For the replacement parts, accessories and owner's manuals that you need to do-it ! For Sears professional installation of home appliances and items like vacuums, lawn equipment, and electronics, call or go on a product serviced by Sears: 1-800-827-6655 (U.S.A.) 1-800-361-6665...