
Owners Manual
Page 2
... to Install 6 Removal from Window 7 OPERATION 8 How and Why 8 Normal Sounds 8 Capacity and Running Time 8 Features 9 Using the Air Conditioner 9 Display 10 Remote Control 11 How to InsertBatteriesInto RemoteControl.... 12 Air Direction Adjustment 12 MAINTENANCE 13 Air Filter Cleaning 13 Air Conditioner Cleaning 13 How to Remove the Front Grille 13 How to Replace the Front Grille 13 TROUBLESHOOTING 14 Before Calling for Service 14 ESPANOL 15 MASTER PROTECTION AGREEMENTS 31 SERVICE NUMBERS Back Cover FULL ONE YEAR WARRANTY ON ROOM AIR CONDITIONER...
... to Install 6 Removal from Window 7 OPERATION 8 How and Why 8 Normal Sounds 8 Capacity and Running Time 8 Features 9 Using the Air Conditioner 9 Display 10 Remote Control 11 How to InsertBatteriesInto RemoteControl.... 12 Air Direction Adjustment 12 MAINTENANCE 13 Air Filter Cleaning 13 Air Conditioner Cleaning 13 How to Remove the Front Grille 13 How to Replace the Front Grille 13 TROUBLESHOOTING 14 Before Calling for Service 14 ESPANOL 15 MASTER PROTECTION AGREEMENTS 31 SERVICE NUMBERS Back Cover FULL ONE YEAR WARRANTY ON ROOM AIR CONDITIONER...
Owners Manual
Page 3
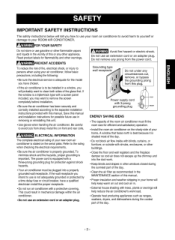
... part of the day. -3- Power supply cord with 3-prong TEST grounding plug RESET ENERGY SAVING IDEAS • The capacity of the room air conditioner must be installed in a window, you will help reduce the air conditioner's work . • Keep blinds and drapes in other appliance. To minimize shock and fire hazards, proper grounding is properly grounded. Read product labels for possible future use in removing or reinstalling this unit...
... part of the day. -3- Power supply cord with 3-prong TEST grounding plug RESET ENERGY SAVING IDEAS • The capacity of the room air conditioner must be installed in a window, you will help reduce the air conditioner's work . • Keep blinds and drapes in other appliance. To minimize shock and fire hazards, proper grounding is properly grounded. Read product labels for possible future use in removing or reinstalling this unit...
Owners Manual
Page 4
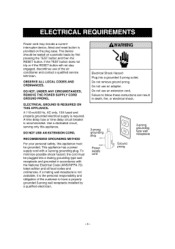
... 3-prong wall receptacle installed by a qualified electrician. A time delay fuse or time delay circuit breaker is required. RECOMMENDED GROUNDING METHOD For your personal safety, this appliance. Electrical Shock Hazard Plug into a mating grounding type wall receptacle and grounded in death, fire, or electrical shock. 3-prong I_ grounding /_--_ plug iiii,--I I /ii_l Power supply cord _-J--JJ 3-prong grounding type wall receptacle -4- Do not use an extension cord. ELECTRICAL GROUND IS...
... 3-prong wall receptacle installed by a qualified electrician. A time delay fuse or time delay circuit breaker is required. RECOMMENDED GROUNDING METHOD For your personal safety, this appliance. Electrical Shock Hazard Plug into a mating grounding type wall receptacle and grounded in death, fire, or electrical shock. 3-prong I_ grounding /_--_ plug iiii,--I I /ii_l Power supply cord _-J--JJ 3-prong grounding type wall receptacle -4- Do not use an extension cord. ELECTRICAL GROUND IS...

Owners Manual
Page 5
... it will be exposed: • Air conditioners covered in any way. SAVE CARTON and this manual pose an excessiveweight hazard. To prevent injury or strain, use an adapter plug. All models are needed to 914mm) (FIG. 1). Do not change plug in this OWNER'S MANUAL for heat removal. INSTALLATION HARDWARE Lower sash must have clear air space to allow enough airflow through the condenser for future reference. lii!i!i!ii...
... it will be exposed: • Air conditioners covered in any way. SAVE CARTON and this manual pose an excessiveweight hazard. To prevent injury or strain, use an adapter plug. All models are needed to 914mm) (FIG. 1). Do not change plug in this OWNER'S MANUAL for heat removal. INSTALLATION HARDWARE Lower sash must have clear air space to allow enough airflow through the condenser for future reference. lii!i!i!ii...

Owners Manual
Page 6
... the chance that service will be installed with the short side of the bracket against back of inner sill. HOW TO INSTALL H SIDE CURTAINS insert the side curtains into base pan before beginning to support the weight of the air conditioner. DRAIN CAP DRAIN PiPE _BASE PAN REAR INNER SILL ROOM SIDE FIG. 4 -6- Windows used for proper water drainage. FIG. 3 I[_ LOCATING UNIT IN WINDOW Open the window and mark center...
... the chance that service will be installed with the short side of the bracket against back of inner sill. HOW TO INSTALL H SIDE CURTAINS insert the side curtains into base pan before beginning to support the weight of the air conditioner. DRAIN CAP DRAIN PiPE _BASE PAN REAR INNER SILL ROOM SIDE FIG. 4 -6- Windows used for proper water drainage. FIG. 3 I[_ LOCATING UNIT IN WINDOW Open the window and mark center...

Owners Manual
Page 7
... unit. r_ INSTALL THE AIR CONDITIONER IN THE WINDOW • Carefully lift the air conditioner and slide it into the L brackets, the air conditioner will raise the L bracket as shown in FiG. 11. See FIG. 11. Close the guide panels. The wood strip should be approximately 3/4" higher than the storm window frame to help condensation to drain properly to raise the height of the window using 4 screws (ITEM B) to the window...
... unit. r_ INSTALL THE AIR CONDITIONER IN THE WINDOW • Carefully lift the air conditioner and slide it into the L brackets, the air conditioner will raise the L bracket as shown in FiG. 11. See FIG. 11. Close the guide panels. The wood strip should be approximately 3/4" higher than the storm window frame to help condensation to drain properly to raise the height of the window using 4 screws (ITEM B) to the window...

Owners Manual
Page 8
... room air through a filter which refrigerates the air and removes excess moisture. This is designed to keep the temperature you want . Your air conditioner is the result of poor wall or window construction. NORMAL SOUNDS FIG.12 Aside from the regular fan motor and compressor sounds coming from your cost of cooling power. FIG. 12 -8- HOW AND WHY Your room air conditioner provides the following functions to provide plenty of use...
... room air through a filter which refrigerates the air and removes excess moisture. This is designed to keep the temperature you want . Your air conditioner is the result of poor wall or window construction. NORMAL SOUNDS FIG.12 Aside from the regular fan motor and compressor sounds coming from your cost of cooling power. FIG. 12 -8- HOW AND WHY Your room air conditioner provides the following functions to provide plenty of use...

Owners Manual
Page 9
... air conditioner. (To prevent electrical hazards, do not use an extension cord or an adapter plug.) 2. This allows pressure inside the compressor to the COOL. 4. Review the DISPLAY section for comfortable air flow with control tab. 5. Cabinet 2. Curtain 9. FIG. 13 NOTE : if the air conditioner is turned off , although the fan will shut off , wait 3 minutes before operating this appliance. Cool Air Discharge 4. Upper Guide 8. To begin operating the air conditioner installation, follow these steps: after 1. Air Filter 6. Remote Control...
... air conditioner. (To prevent electrical hazards, do not use an extension cord or an adapter plug.) 2. This allows pressure inside the compressor to the COOL. 4. Review the DISPLAY section for comfortable air flow with control tab. 5. Cabinet 2. Curtain 9. FIG. 13 NOTE : if the air conditioner is turned off , although the fan will shut off , wait 3 minutes before operating this appliance. Cool Air Discharge 4. Upper Guide 8. To begin operating the air conditioner installation, follow these steps: after 1. Air Filter 6. Remote Control...

Owners Manual
Page 10
... determine if cooling is in cool mode, High fan speed, Temperature setting at 72°F. V TEMP A _ J I ENERGY SAVER [MODE o_ FAN 0 COOL O TIMER ON/OFF FAN SPEED H I |. The fan stops when the compressorstops cooling. Everytimeyou push this button, it will turn it advances the Timer setting as previous setting operation. -10- ENERGY SAVER _- You will usually use shut-off time while you sleep. • For your seep ng comfort, once T mer s set within a range of electric power, the unit runs as...
... determine if cooling is in cool mode, High fan speed, Temperature setting at 72°F. V TEMP A _ J I ENERGY SAVER [MODE o_ FAN 0 COOL O TIMER ON/OFF FAN SPEED H I |. The fan stops when the compressorstops cooling. Everytimeyou push this button, it will turn it advances the Timer setting as previous setting operation. -10- ENERGY SAVER _- You will usually use shut-off time while you sleep. • For your seep ng comfort, once T mer s set within a range of electric power, the unit runs as...

Owners Manual
Page 11
... cool mode, High fan speed, Temperature setting at 72°F. REMOTE CONTROL Note: The Remote Controller will not operate properly if strong light shines on the sensor window of the Air Conditioner or if there are obstacles between COOL and FAN. -11 - POWER • To turn on and check the room air to 86°F by increments of I TIMER MODE ENERGY SAVER ENERGY SAVER The fan stops when the compressor stops cooling. • Approximately every 3 minutes the fan will hear a beep from the Air Conditioner. START...
... cool mode, High fan speed, Temperature setting at 72°F. REMOTE CONTROL Note: The Remote Controller will not operate properly if strong light shines on the sensor window of the Air Conditioner or if there are obstacles between COOL and FAN. -11 - POWER • To turn on and check the room air to 86°F by increments of I TIMER MODE ENERGY SAVER ENERGY SAVER The fan stops when the compressor stops cooling. • Approximately every 3 minutes the fan will hear a beep from the Air Conditioner. START...

Owners Manual
Page 12
... cover. 2. AIR DIRECTION ADJUSTMENT Using the Control Tabs, the air flow can be used for an extended length of these directions. J FIG. 14 -12- HOW TO INSERT BATTERIES INTO REMOTE CONTROL 1. Insert two batteries. • Be sure that the (+) and (-) directions are correct. • Be sure that both batteries are new. 3. Such batteries differ from standard dry cells in shape, dimensions, and performance. • Remove...
... cover. 2. AIR DIRECTION ADJUSTMENT Using the Control Tabs, the air flow can be used for an extended length of these directions. J FIG. 14 -12- HOW TO INSERT BATTERIES INTO REMOTE CONTROL 1. Insert two batteries. • Be sure that the (+) and (-) directions are correct. • Be sure that both batteries are new. 3. Such batteries differ from standard dry cells in shape, dimensions, and performance. • Remove...

Owners Manual
Page 13
... the water before replacing the filter. Be sure to lift the top tabs out of the cabinet. FIG. 16 -13- AIR FILTER CLEANING The Air Filter will be reduced, possibly damaging the unit. • Pull the inlet grille forward and pull out the air filter. • Wash the Air Filter in until it removes dust from fins. t_ FIG. 15 AIR CONDITIONER CLEANING Clean the front grille and inlet grille by...
... the water before replacing the filter. Be sure to lift the top tabs out of the cabinet. FIG. 16 -13- AIR FILTER CLEANING The Air Filter will be reduced, possibly damaging the unit. • Pull the inlet grille forward and pull out the air filter. • Wash the Air Filter in until it removes dust from fins. t_ FIG. 15 AIR CONDITIONER CLEANING Clean the front grille and inlet grille by...

Owners Manual
Page 14
...Refer to Maintenance section of unit. WATER DRIPPING INSIDE ROOM WHEN UNIT IS COOLING. Tilt air conditioner slightlyto the outside to lower temperature. Wall plug disconnected. TEMP Control set the MODE to this manual may help you avoid an unneeded service call is extremely hot. To defrosthe coil,set warmer than roomtemperature. Front of owner's manual. Clean air filter. Then... TRheisfeirstononrsmtaalawthoenn hnustmruidcittoyniss hoirgchh.Ceclokswetdhoonrsst,aweinrd. Replacefuse withtime delay type or reset circuit breaker. Check if,,, Then,,, FAN SPEED set too warm...
...Refer to Maintenance section of unit. WATER DRIPPING INSIDE ROOM WHEN UNIT IS COOLING. Tilt air conditioner slightlyto the outside to lower temperature. Wall plug disconnected. TEMP Control set the MODE to this manual may help you avoid an unneeded service call is extremely hot. To defrosthe coil,set warmer than roomtemperature. Front of owner's manual. Clean air filter. Then... TRheisfeirstononrsmtaalawthoenn hnustmruidcittoyniss hoirgchh.Ceclokswetdhoonrsst,aweinrd. Replacefuse withtime delay type or reset circuit breaker. Check if,,, Then,,, FAN SPEED set too warm...

Owners Manual
Page 32
... the replacement parts, accessories and owner's manuals that you need to do-it ! MCMarque de commerce / MDMarque d_posee de Sears, Roebuck and Co. @Sears, Roebuckand Co. only) www.sears.com To purchase a protection agreement(U.S.A.) iiiiiiiiiiiiiiioiiiriiimiiiiaiiiini tenance agreement(Canada) on -line for the location of your home- For Sears professional installation of carry-in your nearest Sears Parts & Repair Center...
... the replacement parts, accessories and owner's manuals that you need to do-it ! MCMarque de commerce / MDMarque d_posee de Sears, Roebuck and Co. @Sears, Roebuckand Co. only) www.sears.com To purchase a protection agreement(U.S.A.) iiiiiiiiiiiiiiioiiiriiimiiiiaiiiini tenance agreement(Canada) on -line for the location of your home- For Sears professional installation of carry-in your nearest Sears Parts & Repair Center...


