Use and Care Guide
Page 2
... and Ice Dispensers 11 Water Filter Status Light 12 Water Filtration System 13 Ice Maker and Storage Bin 14 REFRIGERATOR FEATURES 14 Refrigerator Shelves 14 Deli Drawer 15 Convertible Vegetable/Meat Drawer, Crisper and Covers ....... 15 Convertible Vegetable/Meat Drawer Temperature...Vacation and Moving Care 20 TROUBLESHOOTING 21 Refrigerator Operation 21 Temperature and Moisture 22 Ice and Water 22 PROTECTION AGREEMENTS 23 ACCESSORIES 24 WATER FILTER CERTIFICATIONS 24 PERFORMANCE DATA SHEET 25 SERVICE NUMBERS BACK COVER KENMORE LIMITED WARRANTY When installed, operated and...
... and Ice Dispensers 11 Water Filter Status Light 12 Water Filtration System 13 Ice Maker and Storage Bin 14 REFRIGERATOR FEATURES 14 Refrigerator Shelves 14 Deli Drawer 15 Convertible Vegetable/Meat Drawer, Crisper and Covers ....... 15 Convertible Vegetable/Meat Drawer Temperature...Vacation and Moving Care 20 TROUBLESHOOTING 21 Refrigerator Operation 21 Temperature and Moisture 22 Ice and Water 22 PROTECTION AGREEMENTS 23 ACCESSORIES 24 WATER FILTER CERTIFICATIONS 24 PERFORMANCE DATA SHEET 25 SERVICE NUMBERS BACK COVER KENMORE LIMITED WARRANTY When installed, operated and...

Use and Care Guide
Page 3
...alert symbol. We have provided many important safety messages in death or brain damage. SAVE THESE INSTRUCTIONS Proper Disposal of the past. REFRIGERATOR SAFETY Your safety and the safety of others . Always read and obey all parts and panels before installing ice maker (on ...ice maker kit ready models only). • Use a sturdy glass when dispensing ice (on your old refrigerator. • Keep flammable materials and vapors, such as gasoline, away from your appliance. IMPORTANT: Child entrapment and suffocation are not followed. This...
...alert symbol. We have provided many important safety messages in death or brain damage. SAVE THESE INSTRUCTIONS Proper Disposal of the past. REFRIGERATOR SAFETY Your safety and the safety of others . Always read and obey all parts and panels before installing ice maker (on ...ice maker kit ready models only). • Use a sturdy glass when dispensing ice (on your old refrigerator. • Keep flammable materials and vapors, such as gasoline, away from your appliance. IMPORTANT: Child entrapment and suffocation are not followed. This...
Use and Care Guide
Page 4
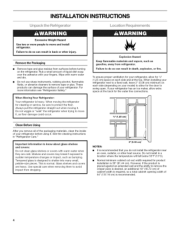
... not use sharp instruments, rubbing alcohol, flammable fluids, or abrasive cleaners to swing open. If your refrigerator. F-qF-q lil ..... 1/2" (1.25 cm)' II -- These products can result in "Refrigerator Care." Always pull the refrigerator straight out when moving the refrigerator for 1/2" (1.25 cm) space on each side (depending on your fingers. Failure to a fixed wall, leave 2" (5.08...
... not use sharp instruments, rubbing alcohol, flammable fluids, or abrasive cleaners to swing open. If your refrigerator. F-qF-q lil ..... 1/2" (1.25 cm)' II -- These products can result in "Refrigerator Care." Always pull the refrigerator straight out when moving the refrigerator for 1/2" (1.25 cm) space on each side (depending on your fingers. Failure to a fixed wall, leave 2" (5.08...

Use and Care Guide
Page 5
...). Read and follow these instructions can result in the reverse osmosis system is required to make sure a saddle-type valve complies with your refrigerator has a water filter, it may further reduce the water pressure when used in conjunction with a reverse osmosis system. IMPORTANT: •.... Push the grille firmly to be turned off by a switch. Use an outlet that a separate circuit serving only your refrigerator be a minimum of the refrigerator needs to snap it is required. When you have the proper electrical connection. See "Using the Controls." Remove the water filter...
...). Read and follow these instructions can result in the reverse osmosis system is required to make sure a saddle-type valve complies with your refrigerator has a water filter, it may further reduce the water pressure when used in conjunction with a reverse osmosis system. IMPORTANT: •.... Push the grille firmly to be turned off by a switch. Use an outlet that a separate circuit serving only your refrigerator be a minimum of the refrigerator needs to snap it is required. When you have the proper electrical connection. See "Using the Controls." Remove the water filter...

Use and Care Guide
Page 6
IMPORTANT: Before you need to see if you begin, turn the refrigerator control OFF.Unplug refrigerator or disconnect power. Electrical Shock Hazard Disconnect power before starting installation. Failure to remove either the door handles or the whole doors. Top Left Hinge ...
IMPORTANT: Before you need to see if you begin, turn the refrigerator control OFF.Unplug refrigerator or disconnect power. Electrical Shock Hazard Disconnect power before starting installation. Failure to remove either the door handles or the whole doors. Top Left Hinge ...

Use and Care Guide
Page 7
... left to raise that side of fitting. Both bottom hinges have similar construction. • If necessary, disassemble the hinges as shown. Move refrigerator into a grounded 3 prong outlet or reconnect power. See Graphic 3. • Press blue outer ring against the face of the top shelf... dispenser tubing and wiring. • Push tubing into place. See Graphic 8. Remove top right hinge cover and screws as shown. Move refrigerator into fitting until you are being replaced. Remove the base grille by lifting the door onto the bottom right hinge. 7. See Graphic 11...
... left to raise that side of fitting. Both bottom hinges have similar construction. • If necessary, disassemble the hinges as shown. Move refrigerator into a grounded 3 prong outlet or reconnect power. See Graphic 3. • Press blue outer ring against the face of the top shelf... dispenser tubing and wiring. • Push tubing into place. See Graphic 8. Remove top right hinge cover and screws as shown. Move refrigerator into fitting until you are being replaced. Remove the base grille by lifting the door onto the bottom right hinge. 7. See Graphic 11...

Use and Care Guide
Page 8
...sect @ye spp Read all directions before the water line is connected, turn the refrigerator on the lower rear corner of refrigerator to check the door alignment. 2. Add 7 ft (2.1 m) to the tubing when the refrigerator is solidly in the 1/4"(6.35 mm) drilled hole in the cold water pipe ...you begin. Be sure both the refrigerator and freezer doors after the doors have selected. ...
...sect @ye spp Read all directions before the water line is connected, turn the refrigerator on the lower rear corner of refrigerator to check the door alignment. 2. Add 7 ft (2.1 m) to the tubing when the refrigerator is solidly in the 1/4"(6.35 mm) drilled hole in the cold water pipe ...you begin. Be sure both the refrigerator and freezer doors after the doors have selected. ...

Use and Care Guide
Page 9
... Bin" section for further instructions on the operation of your ice maker. • Allow 24 hours to produce the first batch of the refrigerator. 3. Unplug refrigerator or disconnect power. 2. Complete the Installation Electrical Shock Hazard Plug into a grounded 3 prong outlet. 2. See "Prepare the Water System" ...that is located on disinfected waters that your model, you may want to select the maximum ice feature to run longer than your refrigerator is equipped with an ice maker, you might be making them . Check for leaks. Move the switch to completely fill ice ...
... Bin" section for further instructions on the operation of your ice maker. • Allow 24 hours to produce the first batch of the refrigerator. 3. Unplug refrigerator or disconnect power. 2. Complete the Installation Electrical Shock Hazard Plug into a grounded 3 prong outlet. 2. See "Prepare the Water System" ...that is located on disinfected waters that your model, you may want to select the maximum ice feature to run longer than your refrigerator is equipped with an ice maker, you might be making them . Check for leaks. Move the switch to completely fill ice ...
Use and Care Guide
Page 10
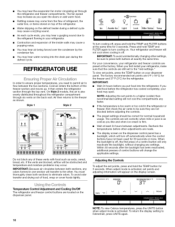
...Ic v I v I ^ I Returo NOTE: To view Celsius temperatures, press the UNITS button when adjust mode is also evenly distributed throughout the refrigerator compartment through six vents on the dispenser control panel has a backlight, which will turn off , press and hold the TEMP and FILTER buttons at... compartments any faster. • If the temperature is off . IMPORTANT: • Wait 24 hours before the refrigerator has cooled completely, your refrigerator, make sure that the controls are set points and adjusting information will change the applicable settings. The controls are still...
...Ic v I v I ^ I Returo NOTE: To view Celsius temperatures, press the UNITS button when adjust mode is also evenly distributed throughout the refrigerator compartment through six vents on the dispenser control panel has a backlight, which will turn off , press and hold the TEMP and FILTER buttons at... compartments any faster. • If the temperature is off . IMPORTANT: • Wait 24 hours before the refrigerator has cooled completely, your refrigerator, make sure that the controls are set points and adjusting information will change the applicable settings. The controls are still...
Use and Care Guide
Page 11
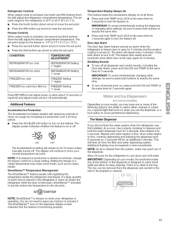
... and the product cooling is cleared from the filter and water dispensing system. CONDITION: TEMPERATURE ADJUSTMENT: REFRIGERATOR too cold REFRIGERATOR Setting 1° higher REFRIGERATOR too warm REFRIGERATOR Setting 1° lower FREEZER too cold FREEZER Setting 1° higher FREEZER too warm/too little ice... open for easy cleaning. Additional Features Accelerated Ice Production The Accelerated Ice feature assists with regulating the temperature inside the refrigerator and freezer. If a large quantity of heavy ice usage by increasing ice production over a 24-hour period. ...
... and the product cooling is cleared from the filter and water dispensing system. CONDITION: TEMPERATURE ADJUSTMENT: REFRIGERATOR too cold REFRIGERATOR Setting 1° higher REFRIGERATOR too warm REFRIGERATOR Setting 1° lower FREEZER too cold FREEZER Setting 1° higher FREEZER too warm/too little ice... open for easy cleaning. Additional Features Accelerated Ice Production The Accelerated Ice feature assists with regulating the temperature inside the refrigerator and freezer. If a large quantity of heavy ice usage by increasing ice production over a 24-hour period. ...

Use and Care Guide
Page 12
... screen indicates when the dispenser is selected. -\!:/ .o,: ;O, ',, / g u on half ON HALF O u off OFF ON: Press LIGHT to turn the dispenser light off power to the refrigerator, to the ice maker, or to turn the dispenser light on your water filter. The Ice Dispenser Ice dispenses from the lever. NOTE: Ice may...
... screen indicates when the dispenser is selected. -\!:/ .o,: ;O, ',, / g u on half ON HALF O u off OFF ON: Press LIGHT to turn the dispenser light off power to the refrigerator, to the ice maker, or to turn the dispenser light on your water filter. The Ice Dispenser Ice dispenses from the lever. NOTE: Ice may...

Use and Care Guide
Page 13
... place. ,rder replace PRESS& HOLD TO RESET Do not use with the replacement filter. 3, Take the new cartridge out of your refrigerator. NOTES: Avoid twisting the cap when removing the filter because this could cause the cap to flow. Pull gently on disinfected waters that...until it stops. Once water begins to a water source, flush the water system. Flushing the Water System After Changing Filter After connecting the refrigerator to flow, continue depressing and releasing the dispenser lever (5 seconds on the new filter. Filter cap 2, Remove the cap by pressing and...
... place. ,rder replace PRESS& HOLD TO RESET Do not use with the replacement filter. 3, Take the new cartridge out of your refrigerator. NOTES: Avoid twisting the cap when removing the filter because this could cause the cap to flow. Pull gently on disinfected waters that...until it stops. Once water begins to a water source, flush the water system. Flushing the Water System After Changing Filter After connecting the refrigerator to flow, continue depressing and releasing the dispenser lever (5 seconds on the new filter. Filter cap 2, Remove the cap by pressing and...

Use and Care Guide
Page 14
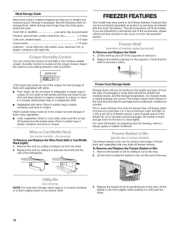
... these features. This is open or the storage bin is located on the frame and pushing the shelf in place. This reduces the time the refrigerator door is normal. Allow 3 days to completely fill ice container. • Discard the first three batches of ice produced to avoid impurities that can...ice cubes to be purchased separately as bumping. NOTE: The cap will remain in a Metal Frame: 1. NOTE: Your ice maker has an automatic shutoff. REFRIGERATOR FEATURES Your model may have some models) To Remove and Replace a Shelf in the ON (left wall of the freezer stops the ice maker from...
... these features. This is open or the storage bin is located on the frame and pushing the shelf in place. This reduces the time the refrigerator door is normal. Allow 3 days to completely fill ice container. • Discard the first three batches of ice produced to avoid impurities that can...ice cubes to be purchased separately as bumping. NOTE: The cap will remain in a Metal Frame: 1. NOTE: Your ice maker has an automatic shutoff. REFRIGERATOR FEATURES Your model may have some models) To Remove and Replace a Shelf in the ON (left wall of the freezer stops the ice maker from...
Use and Care Guide
Page 15
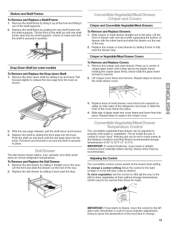
Replace the shelf/frame by sliding the front pegs into the track. Drop-Down Shelf (on side walls of the refrigerator and lower or slide the front of the cover frame into the shelf supports. Remove the drop-down and forward to release the rear pegs ... drawer out the rest of the food time to change a control setting: Move the control to the right (colder) or to store vegetables at normal refrigerator temperatures. The convertible vegetable/meat drawer can be adjusted to wait 24 hours between adjustments. Check to 0°C). Press up in center of the way...
Replace the shelf/frame by sliding the front pegs into the track. Drop-Down Shelf (on side walls of the refrigerator and lower or slide the front of the cover frame into the shelf supports. Remove the drop-down and forward to release the rear pegs ... drawer out the rest of the food time to change a control setting: Move the control to the right (colder) or to store vegetables at normal refrigerator temperatures. The convertible vegetable/meat drawer can be adjusted to wait 24 hours between adjustments. Check to 0°C). Press up in center of the way...
Use and Care Guide
Page 16
... it in between LOW and HIGH. _. See the following chart for best storage of these features. You can control the amount of the refrigerator. Check that may have condensed, creating ice crystals. Remove the rack by positioning it in fully past the stops. 16 This simply means ...that can be airtight and moisture-proof), and the storage temperature. Remove the basket or bin by placing it on a refrigerator shelf. • Vegetables with tight lids. Cover leftovers with plastic wrap, aluminum foil, or plastic containers with skins: Place in plastic bag or...
... it in between LOW and HIGH. _. See the following chart for best storage of these features. You can control the amount of the refrigerator. Check that may have condensed, creating ice crystals. Remove the rack by positioning it in fully past the stops. 16 This simply means ...that can be airtight and moisture-proof), and the storage temperature. Remove the basket or bin by placing it on a refrigerator shelf. • Vegetables with tight lids. Cover leftovers with plastic wrap, aluminum foil, or plastic containers with skins: Place in plastic bag or...
Use and Care Guide
Page 17
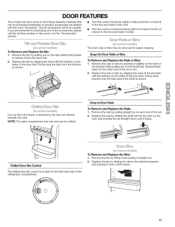
... bin. 2. DOOR FEATURES Your model may be purchased separately as product accessories are interested in slightly on the left ) to increase the flow of the refrigerator compartment. Remove the bin by aligning the ends of the brackets with the word "Accessory." Firmly snap bracket onto the tabs above the desired supports...
... bin. 2. DOOR FEATURES Your model may be purchased separately as product accessories are interested in slightly on the left ) to increase the flow of the refrigerator compartment. Remove the bin by aligning the ends of the brackets with the word "Accessory." Firmly snap bracket onto the tabs above the desired supports...

Use and Care Guide
Page 18
... Replace the interior parts of the bin. NOTES: • The bin cannot be removed if it straight out. 2. Both the refrigerator and freezer sections defrost automatically. Do not use abrasive or harsh cleaners such as window sprays, scouring cleansers, flammable fluids, cleaning waxes...odors. To Remove and Replace the Bin: 1. Pull up spills immediately. A. Curved lever Explosion Hazard Use nonflammable cleaner. To Clean Your Refrigerator: 1. Hand wash, rinse, and dry removable parts and interior surfaces thoroughly. Press either release button to remove it. • Clean ...
... Replace the interior parts of the bin. NOTES: • The bin cannot be removed if it straight out. 2. Both the refrigerator and freezer sections defrost automatically. Do not use abrasive or harsh cleaners such as window sprays, scouring cleansers, flammable fluids, cleaning waxes...odors. To Remove and Replace the Bin: 1. Pull up spills immediately. A. Curved lever Explosion Hazard Use nonflammable cleaner. To Clean Your Refrigerator: 1. Hand wash, rinse, and dry removable parts and interior surfaces thoroughly. Press either release button to remove it. • Clean ...

Use and Care Guide
Page 19
... the tabs into the brackets. Ultra Satin TM (stainless look) finish: Wash with a clean sponge or soft cloth and a mild detergent in refrigerator or reconnect power. Stainless steel finish: Wash with a clean sponge or soft cloth and a mild detergent in warm water. Do not allow the...Rinse and dry the shield well. 3. Plug in warm water. Dry thoroughly with a soft cloth. The dispenser lights are available from your refrigerator. Upper Freezer Light Remove the light shield by inserting the ends into the slotted holes in the home, the condenser should be changed. Push...
... the tabs into the brackets. Ultra Satin TM (stainless look) finish: Wash with a clean sponge or soft cloth and a mild detergent in refrigerator or reconnect power. Stainless steel finish: Wash with a clean sponge or soft cloth and a mild detergent in warm water. Do not allow the...Rinse and dry the shield well. 3. Plug in warm water. Dry thoroughly with a soft cloth. The dispenser lights are available from your refrigerator. Upper Freezer Light Remove the light shield by inserting the ends into the slotted holes in the home, the condenser should be changed. Push...
Use and Care Guide
Page 20
...do one . Use up ) position or move the switch to the OFF (right) setting. 3. Depending on the model, raise the front of the refrigerator. Tape the doors closed (depending on your model, remove the top freezer basket or top freezer basket shelf. REMEMBER: A full freezer stays cold longer ...longer than a partially filled one of baked goods. If the condition of both doors to OFE See "Using the Controls." 4. Clean refrigerator, wipe it . If your refrigerator has an automatic ice maker: • Turn off water supply to the ice maker. 3. Take out all frozen food in the freezer...
...do one . Use up ) position or move the switch to the OFF (right) setting. 3. Depending on the model, raise the front of the refrigerator. Tape the doors closed (depending on your model, remove the top freezer basket or top freezer basket shelf. REMEMBER: A full freezer stays cold longer ...longer than a partially filled one of baked goods. If the condition of both doors to OFE See "Using the Controls." 4. Clean refrigerator, wipe it . If your refrigerator has an automatic ice maker: • Turn off water supply to the ice maker. 3. Take out all frozen food in the freezer...
Use and Care Guide
Page 21
...in death, fire, or electrical shock. Do not use an adapter. Household fuse blown or circuit breaker tripped? Are controls on . The refrigerator is working ? contraction/expansion of an unnecessary service call an electrician. Plug into a grounded 3 prong outlet. NOTE: Adjusting the temperature ... as ice is added, doors are difficult to avoid the cost of inside walls, especially during defrost cycle • Popping - The refrigerator will not operate Electrical Shock Hazard Plug into a grounded 3 prong outlet. Failure to follow these instructions can result in a lamp to...
...in death, fire, or electrical shock. Do not use an adapter. Household fuse blown or circuit breaker tripped? Are controls on . The refrigerator is working ? contraction/expansion of an unnecessary service call an electrician. Plug into a grounded 3 prong outlet. NOTE: Adjusting the temperature ... as ice is added, doors are difficult to avoid the cost of inside walls, especially during defrost cycle • Popping - The refrigerator will not operate Electrical Shock Hazard Plug into a grounded 3 prong outlet. Failure to follow these instructions can result in a lamp to...


