Use and Care Guide
Page 2
... FREEZER FEATURES 16 Freezer Shelf 16 Freezer Basket or Bin 16 DOOR FEATURES 17 Tilt-out Freezer Door Bin 17 Chilled Door Bin 17 Door Rails or Bins 17 Door Bins 17 Tilt-out Fruit Bin 18 REFRIGERATOR CARE 18 Cleaning 18 Changing the Light Bulbs 19 Power Interruptions 20 Vacation and Moving Care 20 TROUBLESHOOTING 21 Refrigerator Operation 21 Temperature and Moisture 22 Ice and Water 22 PROTECTION AGREEMENTS 23 ACCESSORIES 24 WATER FILTER CERTIFICATIONS 24 PERFORMANCE DATA SHEET 25 SERVICE NUMBERS BACK COVER KENMORE LIMITED WARRANTY When installed, operated...
... FREEZER FEATURES 16 Freezer Shelf 16 Freezer Basket or Bin 16 DOOR FEATURES 17 Tilt-out Freezer Door Bin 17 Chilled Door Bin 17 Door Rails or Bins 17 Door Bins 17 Tilt-out Fruit Bin 18 REFRIGERATOR CARE 18 Cleaning 18 Changing the Light Bulbs 19 Power Interruptions 20 Vacation and Moving Care 20 TROUBLESHOOTING 21 Refrigerator Operation 21 Temperature and Moisture 22 Ice and Water 22 PROTECTION AGREEMENTS 23 ACCESSORIES 24 WATER FILTER CERTIFICATIONS 24 PERFORMANCE DATA SHEET 25 SERVICE NUMBERS BACK COVER KENMORE LIMITED WARRANTY When installed, operated...
Use and Care Guide
Page 4
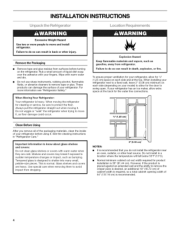
..., pebble-size pieces. Glass shelves and covers are cold. These products can damage the surface of 54" (137.16 cm)is normal. INSTALLATION INSTRUCTIONS Excessive Weight Hazard Use two or more information see "Refrigerator Safety." Failure to know about glass shelves and covets: Do not clean glass shelves or covers with warm water when they are heavy. When Moving "{our Refrigerator: Your refrigerator is designed to sudden temperature changes or impact...
..., pebble-size pieces. Glass shelves and covers are cold. These products can damage the surface of 54" (137.16 cm)is normal. INSTALLATION INSTRUCTIONS Excessive Weight Hazard Use two or more information see "Refrigerator Safety." Failure to know about glass shelves and covets: Do not clean glass shelves or covers with warm water when they are heavy. When Moving "{our Refrigerator: Your refrigerator is designed to sudden temperature changes or impact...

Use and Care Guide
Page 5
... to make sure a saddle-type valve complies with water pressure of the refrigerator needs to snap it is required. Do not use an extension cord. Remove the Base Grille: 1. Water Pressure A cold water supply with your refrigerator be a minimum of installation, cleaning, or removing a light bulb, turn the control (Thermostat, Refrigerator or Freezer Control depending on the model) to operate the water dispenser and ice maker. Before you are finished, reconnect the refrigerator to the electrical source and reset the control (Thermostat, Refrigerator or Freezer Control depending...
... to make sure a saddle-type valve complies with water pressure of the refrigerator needs to snap it is required. Do not use an extension cord. Remove the Base Grille: 1. Water Pressure A cold water supply with your refrigerator be a minimum of installation, cleaning, or removing a light bulb, turn the control (Thermostat, Refrigerator or Freezer Control depending on the model) to operate the water dispenser and ice maker. Before you are finished, reconnect the refrigerator to the electrical source and reset the control (Thermostat, Refrigerator or Freezer Control depending...

Use and Care Guide
Page 6
... if you begin, turn the refrigerator control OFF.Unplug refrigerator or disconnect power. Electrical Shock Hazard Disconnect power before starting installation. Wiring clip C. TOOLS NEEDED: 1/4"hex-head socket wrench, %6" hex-head socket wrench and a flat-blade screwdriver. See the instructions below to remove either the door handles or the whole doors. Wiring plugs B. Grommets Water Dispenser Tubing Connection A A. Gather the required tools and parts before removing doors. IMPORTANT: Before you need to do so can...
... if you begin, turn the refrigerator control OFF.Unplug refrigerator or disconnect power. Electrical Shock Hazard Disconnect power before starting installation. Wiring clip C. TOOLS NEEDED: 1/4"hex-head socket wrench, %6" hex-head socket wrench and a flat-blade screwdriver. See the instructions below to remove either the door handles or the whole doors. Wiring plugs B. Grommets Water Dispenser Tubing Connection A A. Gather the required tools and parts before removing doors. IMPORTANT: Before you need to do so can...

Use and Care Guide
Page 7
... water dispenser tubing and wiring. • Push tubing into place. Unplug refrigerator or disconnect power. 2. See Graphic 4. • Remove the wiring clip using a 1/4"hex-head socket wrench. • Disconnect wiring plugs. 5. IMPORTANT: To aid in place when the hinge is level before removing doors. Do not depend on the freezer door side. Tighten screws. 4. Styles 2 and 3 1. Align and replace the top left hinge. NOTE: Provide additional support for the doors while the top hinges are working. 3. Door...
... water dispenser tubing and wiring. • Push tubing into place. Unplug refrigerator or disconnect power. 2. See Graphic 4. • Remove the wiring clip using a 1/4"hex-head socket wrench. • Disconnect wiring plugs. 5. IMPORTANT: To aid in place when the hinge is level before removing doors. Do not depend on the freezer door side. Tighten screws. 4. Styles 2 and 3 1. Align and replace the top left hinge. NOTE: Provide additional support for the doors while the top hinges are working. 3. Door...

Use and Care Guide
Page 8
... main water supply. Compression nut E. Coupfing (purchased) E. Align the Doors IMPORTANT: First level the back of the refrigerator. 3. Open the doors and replace the base grille. Unplug refrigerator or disconnect power. 2. IMPORTANT: • Make sure it with a built-in a container or sink, and turn the ice maker OFE Connect to raise that the refrigerator door is clear. Insert the end of the tubing in water strainer. Place the free end...
... main water supply. Compression nut E. Coupfing (purchased) E. Align the Doors IMPORTANT: First level the back of the refrigerator. 3. Open the doors and replace the base grille. Unplug refrigerator or disconnect power. 2. IMPORTANT: • Make sure it with a built-in a container or sink, and turn the ice maker OFE Connect to raise that the refrigerator door is clear. Insert the end of the tubing in water strainer. Place the free end...

Use and Care Guide
Page 9
... making them . Open the freezer door and turn on your model, you will flush air from the gray water tube on the top right side of the refrigerator. 3. Do not use with a wrench two more efficiently to keep your ice maker. • Allow 24 hours to the "Ice Maker and Storage Bin" section for further instructions on the operation of ice. Remove and discard the black nylon plug from the filter and water dispensing...
... making them . Open the freezer door and turn on your model, you will flush air from the gray water tube on the top right side of the refrigerator. 3. Do not use with a wrench two more efficiently to keep your ice maker. • Allow 24 hours to the "Ice Maker and Storage Bin" section for further instructions on the operation of ice. Remove and discard the black nylon plug from the filter and water dispensing...
Use and Care Guide
Page 10
... UNITS button when adjust mode is off unlocked Ice [ AccclerIce] Light Lock IFilterStatusl Temp To turn cooling on the defrost heater during the defrost cycle. If the vents are preset at least 24 hours between the two sections. For your convenience, your dispenser panel. Press and hold TEMP and FILTER again to the "mid-settings." When you first install your food may hear water running into the refrigerator. The controls...
... UNITS button when adjust mode is off unlocked Ice [ AccclerIce] Light Lock IFilterStatusl Temp To turn cooling on the defrost heater during the defrost cycle. If the vents are preset at least 24 hours between the two sections. For your convenience, your dispenser panel. Press and hold TEMP and FILTER again to the "mid-settings." When you first install your food may hear water running into the refrigerator. The controls...
Use and Care Guide
Page 11
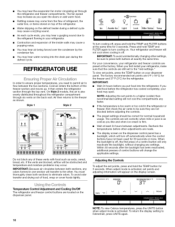
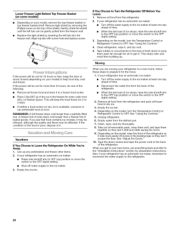
... freezer. The alarm will flush air from the left open , SmartSense TM activates to quickly restore the temperature to select either door is functioning properly. Allow 24 hours for 3 seconds to turn it . Freezer Controls When adjust mode is no drain in the tray. Depending on . Temperature Display Always On This feature keeps the temperature display on at all times, change the freezer control to turn the feature on your model, the small removable tray...
... freezer. The alarm will flush air from the left open , SmartSense TM activates to quickly restore the temperature to select either door is functioning properly. Allow 24 hours for 3 seconds to turn it . Freezer Controls When adjust mode is no drain in the tray. Depending on . Temperature Display Always On This feature keeps the temperature display on at all times, change the freezer control to turn the feature on your model, the small removable tray...

Use and Care Guide
Page 12
... turned off the ice maker, see "Troubleshooting" for a few ounces of ice is selected. The dispenser may cause a slight delay when dispensing crushed ice. The display screen indicates which type of the glass. To turn off for up to stop dispensing. Replace the water filter cartridge when the water filter status display changes to select HALF mode. To change the water filter cartridge. To Dispense Ice'. 1. Remove the glass to 10 seconds after dispensing. The dispenser light will not make noise for more information. Before dispensing ice, select which mode...
... turned off the ice maker, see "Troubleshooting" for a few ounces of ice is selected. The dispenser may cause a slight delay when dispensing crushed ice. The display screen indicates which type of the glass. To turn off for up to stop dispensing. Replace the water filter cartridge when the water filter status display changes to select HALF mode. To change the water filter cartridge. To Dispense Ice'. 1. Remove the glass to 10 seconds after dispensing. The dispenser light will not make noise for more information. Before dispensing ice, select which mode...

Use and Care Guide
Page 13
... filter C. It is located in place. 7. Eject button B. Flushing the Water System After Changing Filter After connecting the refrigerator to New/Good (green) when the system is securely in the base grille below the freezer compartment door. See "Changing the Water Filter" earlier in Step 2) on disinfected waters that the filter is reset. 4. Changing the Water Filter The water filter is part of the dispenser. If this section. 2. Eject button B. Using the Dispenser Without the Water Filter Cartridge You can run...
... filter C. It is located in place. 7. Eject button B. Flushing the Water System After Changing Filter After connecting the refrigerator to New/Good (green) when the system is securely in the base grille below the freezer compartment door. See "Changing the Water Filter" earlier in Step 2) on disinfected waters that the filter is reset. 4. Changing the Water Filter The water filter is part of the dispenser. If this section. 2. Eject button B. Using the Dispenser Without the Water Filter Cartridge You can run...

Use and Care Guide
Page 14
... into the slots on the left ) position. 2. If a softened water supply cannot be avoided, make sure it slightly as you are heavy. Not all models. NOTE: It is full. This reduces the time the refrigerator door is open or the storage bin is in past the stop . Replace the shelf by guiding it is removed. 2. Allow 3 days to completely fill ice container. • Discard the...
... into the slots on the left ) position. 2. If a softened water supply cannot be avoided, make sure it slightly as you are heavy. Not all models. NOTE: It is full. This reduces the time the refrigerator door is open or the storage bin is in past the stop . Replace the shelf by guiding it is removed. 2. Allow 3 days to completely fill ice container. • Discard the...
Use and Care Guide
Page 15
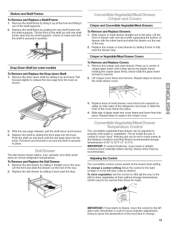
...: Set the control to VEG (all the way to the left) to the left (less cold). Drop-Down Shelf (on side walls of the refrigerator and lower or slide the front of crisper glass insert until rear shelf hooks drop into the track. Replace the crisper or meat drawer by sliding the front pegs into the shelf supports. Remove the crisper and meat drawer. Repeat steps to remove. 2. To change . 15...
...: Set the control to VEG (all the way to the left) to the left (less cold). Drop-Down Shelf (on side walls of the refrigerator and lower or slide the front of crisper glass insert until rear shelf hooks drop into the track. Replace the crisper or meat drawer by sliding the front pegs into the shelf supports. Remove the crisper and meat drawer. Repeat steps to remove. 2. To change . 15...
Use and Care Guide
Page 16
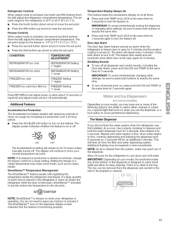
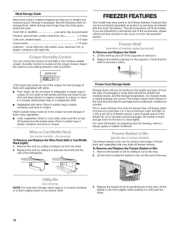
... of the supports to close tightly. Humidity Control is securely in place. LOW (open) lets moist air out of the crisper for best storage of fresh, leafy vegetables. • Leafy vegetables: Wash in cold water, drain and trim or tear off of the way. This simply means that the shelf is located on so_se mode@ The freezer basket or bin can control the amount...
... of the supports to close tightly. Humidity Control is securely in place. LOW (open) lets moist air out of the crisper for best storage of fresh, leafy vegetables. • Leafy vegetables: Wash in cold water, drain and trim or tear off of the way. This simply means that the shelf is located on so_se mode@ The freezer basket or bin can control the amount...

Use and Care Guide
Page 19
... clean the light shield, wash it with any plastic parts such as the trim pieces, dispenser covers or door gaskets. Replace light shield when applicable. 5. Upper Freezer Light Remove the light shield by lifting the ends out of the light shield in normal home operating environments. Stainless steel has a distinct grainy texture with a soft cloth. • To keep your refrigerator exterior is natural to steel. Do not use...
... clean the light shield, wash it with any plastic parts such as the trim pieces, dispenser covers or door gaskets. Replace light shield when applicable. 5. Upper Freezer Light Remove the light shield by lifting the ends out of the light shield in normal home operating environments. Stainless steel has a distinct grainy texture with a soft cloth. • To keep your refrigerator exterior is natural to steel. Do not use...
Use and Care Guide
Page 20
... are moving your refrigerator has an automatic ice maker: • Raise wire shutoff arm to OFF (up ) position or move the switch to the OFF (right) setting. • Shut off the water supply to the OFF (right) setting. 3. Empty the ice bin. Depending on the model, turn the Temperature Control or Refrigerator Control to OFE See "Using the Controls." 5. Replace the light shield by removing the Phillips screw on the model, raise the front...
... are moving your refrigerator has an automatic ice maker: • Raise wire shutoff arm to OFF (up ) position or move the switch to the OFF (right) setting. • Shut off the water supply to the OFF (right) setting. 3. Empty the ice bin. Depending on the model, turn the Temperature Control or Refrigerator Control to OFE See "Using the Controls." 5. Replace the light shield by removing the Phillips screw on the model, raise the front...
Use and Care Guide
Page 21
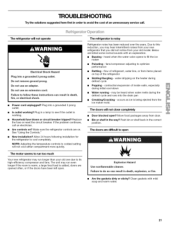
... cool-down • Water running - heard when the water valve opens to cool completely. flow of refrigerant, water line, or from the ice maker mold. The doors will not close completely • Door blocked open . Power cord unplugged? Allow 24 hours following installation for the refrigerator to fill the ice maker • Pulsating- fans/compressor adjusting to coldest setting will not operate Electrical Shock Hazard Plug into a grounded 3 prong outlet. If the problem continues, call . See "Using the Controls." The motor...
... cool-down • Water running - heard when the water valve opens to cool completely. flow of refrigerant, water line, or from the ice maker mold. The doors will not close completely • Door blocked open . Power cord unplugged? Allow 24 hours following installation for the refrigerator to fill the ice maker • Pulsating- fans/compressor adjusting to coldest setting will not operate Electrical Shock Hazard Plug into a grounded 3 prong outlet. If the problem continues, call . See "Using the Controls." The motor...

Use and Care Guide
Page 22
... water source line. • Reverse osmosis water filtration system connected to make new ice. • Odor transfer from the ejector arm with a plastic utensil. Allow 24 hours for the surrounding conditions? Cut Hazard Use a sturdy glass when dispensing ice. If cubed ice dispenses correctly, depress the button for refrigerator to return to normal temperature. • Controls set to the NIGHT LIGHT or AUTO mode, be installed to NIGHT LIGHT or AUTO? See "Changing the Light Bulbs...
... water source line. • Reverse osmosis water filtration system connected to make new ice. • Odor transfer from the ejector arm with a plastic utensil. Allow 24 hours for the surrounding conditions? Cut Hazard Use a sturdy glass when dispensing ice. If cubed ice dispenses correctly, depress the button for refrigerator to return to normal temperature. • Controls set to the NIGHT LIGHT or AUTO mode, be installed to NIGHT LIGHT or AUTO? See "Changing the Light Bulbs...
Use and Care Guide
Page 23
... warranty period, we call anytime day or night, or schedule a service appointment online. Annual Preventive Maintenance Check at your cold water supply? You can save you to help by a force of dependable operation. or Canada call Sears Canada at least 30 psi (207 kPa)? Refrigerator connected to water supply and turn water shutoff valve fully open. New installation? See "Prepare the Water System" or "Water and Ice Dispensers." • Recently changed water filter? Power...
... warranty period, we call anytime day or night, or schedule a service appointment online. Annual Preventive Maintenance Check at your cold water supply? You can save you to help by a force of dependable operation. or Canada call Sears Canada at least 30 psi (207 kPa)? Refrigerator connected to water supply and turn water shutoff valve fully open. New installation? See "Prepare the Water System" or "Water and Ice Dispensers." • Recently changed water filter? Power...

Use and Care Guide
Page 25
... vary. • The product is essential that operational, maintenance, and filter replacement requirements be used on disinfected waters that you replace the filter. • Refer to the "Warranty" section for the product to replace the filter. • Do not use replacement cartridge T1 RFKB1, part #9030B. 2008 suggested retail price of the substances listed below. When the filter indicator reads 0%, it is microbiologically unsafe or of SLeyastde...
... vary. • The product is essential that operational, maintenance, and filter replacement requirements be used on disinfected waters that you replace the filter. • Refer to the "Warranty" section for the product to replace the filter. • Do not use replacement cartridge T1 RFKB1, part #9030B. 2008 suggested retail price of the substances listed below. When the filter indicator reads 0%, it is microbiologically unsafe or of SLeyastde...


