Use and Care Guide
Page 2
...11 Water and Ice Dispensers 11 Water Filter Status Light 12 Water Filtration System 12 Ice Maker and Storage Bin 13 REFRIGERATOR FEATURES 14 Refrigerator Shelves 14 Dell Bin 14 Convertible Vegetable/Meat Drawer, Crisper and Covers ....... 14 Wine Rack 15 Utility Bin 15 ... Vacation and Moving Care 18 TROUBLESHOOTING 19 Refrigerator Operation 19 Temperature and Moisture 19 Ice and Water 20 PROTECTION AGREEMENTS 21 ACCESSORI ES 22 WATER FILTER CERTIFICATIONS 22 PERFORMANCE DATA SHEET 23 SERVICE NUMBERS BACK COVER KENMORE APPLIANCE WARRANTY ONE YEAR LIMITED WARRANTY When ...
...11 Water and Ice Dispensers 11 Water Filter Status Light 12 Water Filtration System 12 Ice Maker and Storage Bin 13 REFRIGERATOR FEATURES 14 Refrigerator Shelves 14 Dell Bin 14 Convertible Vegetable/Meat Drawer, Crisper and Covers ....... 14 Wine Rack 15 Utility Bin 15 ... Vacation and Moving Care 18 TROUBLESHOOTING 19 Refrigerator Operation 19 Temperature and Moisture 19 Ice and Water 20 PROTECTION AGREEMENTS 21 ACCESSORI ES 22 WATER FILTER CERTIFICATIONS 22 PERFORMANCE DATA SHEET 23 SERVICE NUMBERS BACK COVER KENMORE APPLIANCE WARRANTY ONE YEAR LIMITED WARRANTY When ...
Use and Care Guide
Page 3
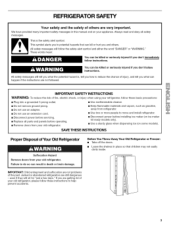
... symbol alerts you and others are not followed. Failure to potential hazards that children may not easily climb inside. Before You Throw Away Your Old Refrigerator or Freezer: • Take off the doors. • Leave the shelves in place so that can kill or hurt you to do so can ... many important safety messages in death or brain damage. All safety messages will tell you what can result in this manual and on some models). REFRIGERATOR SAFETY Your safety and the safety of others . All safety messages will sit for "just a few days." These words mean: You can be killed ...
... symbol alerts you and others are not followed. Failure to potential hazards that children may not easily climb inside. Before You Throw Away Your Old Refrigerator or Freezer: • Take off the doors. • Leave the shelves in place so that can kill or hurt you to do so can ... many important safety messages in death or brain damage. All safety messages will tell you what can result in this manual and on some models). REFRIGERATOR SAFETY Your safety and the safety of others . All safety messages will sit for "just a few days." These words mean: You can be killed ...
Use and Care Guide
Page 4
INSTALLATION INSTRUCTIONS LO(,,
INSTALLATION INSTRUCTIONS LO(,,
Use and Care Guide
Page 5
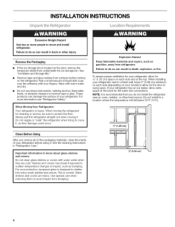
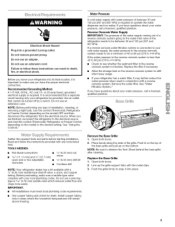
... ice maker. NOTE: Before performing any tools listed here. Open both doors. 2. Do not use an extension cord. If your refrigerator has a water filter, it may further reduce the water pressure when used in conjunction with your cold water supply, the water pressure...a licensed, qualified plumber. Line up on the top of installation, cleaning, or removing a light bulb, turn the control (Thermostat, Refrigerator or Freezer Control depending on the model) to follow the instructions provided with water pressure of the grille. Install copper tubing only in the...
... ice maker. NOTE: Before performing any tools listed here. Open both doors. 2. Do not use an extension cord. If your refrigerator has a water filter, it may further reduce the water pressure when used in conjunction with your cold water supply, the water pressure...a licensed, qualified plumber. Line up on the top of installation, cleaning, or removing a light bulb, turn the control (Thermostat, Refrigerator or Freezer Control depending on the model) to follow the instructions provided with water pressure of the grille. Install copper tubing only in the...
Use and Care Guide
Page 7
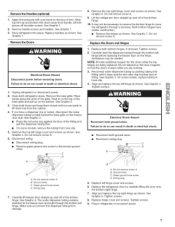
...Apply firm pressure with your hand on the hinge. Slide top trim up and off shoulder screws. Remove handle screws and handles. Move refrigerator into fitting until you are being replaced. Replace handles as shown. See Graphic 1. Remove the Doors Electrical Shock Hazard Disconnect power before... the base grille on the door magnets to lift them free from handle. See Graphic 7. Do not remove screw A. Replace both refrigerator doors. Tighten screws. 2. Carefully feed the dispenser tubing through the bottom left hinge cover and screws as shown. NOTE: Provide additional...
...Apply firm pressure with your hand on the hinge. Slide top trim up and off shoulder screws. Remove handle screws and handles. Move refrigerator into fitting until you are being replaced. Replace handles as shown. See Graphic 1. Remove the Doors Electrical Shock Hazard Disconnect power before... the base grille on the door magnets to lift them free from handle. See Graphic 7. Do not remove screw A. Replace both refrigerator doors. Tighten screws. 2. Carefully feed the dispenser tubing through the bottom left hinge cover and screws as shown. NOTE: Provide additional...
Use and Care Guide
Page 8
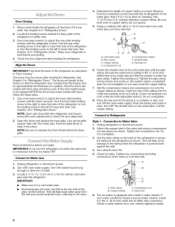
... leveling screw to the left to adjust the front roller leveling screws until water is under the pipe clamp. Locate a 1/2"to 11/4'' (1.25 cm to check the door alignment. 2. Using a cordless drill, drill a 1/4"(6.35 mm) hole in the cold water pipe you have been... of the tubing into place. Insert the end of the refrigerator as it in the water pipe and that side. Add 7 ft (2.1 m) to Refrigerator Style I - Compression nut & Compression sleeve £ Shutoff valve G. Place the free end of the refrigerator or turn ON the main water supply. See Graphic 8...
... leveling screw to the left to adjust the front roller leveling screws until water is under the pipe clamp. Locate a 1/2"to 11/4'' (1.25 cm to check the door alignment. 2. Using a cordless drill, drill a 1/4"(6.35 mm) hole in the cold water pipe you have been... of the tubing into place. Insert the end of the refrigerator as it in the water pipe and that side. Add 7 ft (2.1 m) to Refrigerator Style I - Compression nut & Compression sleeve £ Shutoff valve G. Place the free end of the refrigerator or turn ON the main water supply. See Graphic 8...
Use and Care Guide
Page 9
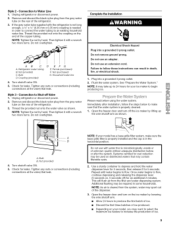
...Connection to make sure the base grille filter is properly installed and the cap is microbiologically unsafe or of the refrigerator. 3. Immediately after the system. Connectiotno WaterLine 1. See "Prepare the Water System." Remove and discard the black ...nylon plug from the filter and water dispensing system. Unplug refrigerator or disconnect power. 2. Removaenddiscartdheblacknylonplugfromthegraywater tubeonthereaor ftherefrigerator. 3. hentightenitwithawrench twomoreturnsD. Nut (purchased) G. Do not use with a wrench...
...Connection to make sure the base grille filter is properly installed and the cap is microbiologically unsafe or of the refrigerator. 3. Immediately after the system. Connectiotno WaterLine 1. See "Prepare the Water System." Remove and discard the black ...nylon plug from the filter and water dispensing system. Unplug refrigerator or disconnect power. 2. Removaenddiscartdheblacknylonplugfromthegraywater tubeonthereaor ftherefrigerator. 3. hentightenitwithawrench twomoreturnsD. Nut (purchased) G. Do not use with a wrench...
Use and Care Guide
Page 10
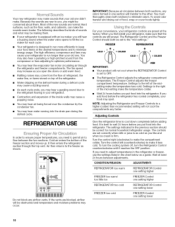
...guide. The Freezer Control adjusts the freezer compartment temperature. Settings to the left (counterclockwise) to the other. NOTE: Adjusting the Refrigerator and Freezer Controls to run more efficiently to keep your food items at least 24 hours between adjustments. The settings indicated in... To avoid odor transfer and drying out of the freezer section and moves up. It is as cold as you may cause your refrigerator to a higher (colder) than your food may increase as you add food before adding food. Rattling noises may occur. ecaustehesoundasrenewtoyouy, oumighbt...
...guide. The Freezer Control adjusts the freezer compartment temperature. Settings to the left (counterclockwise) to the other. NOTE: Adjusting the Refrigerator and Freezer Controls to run more efficiently to keep your food items at least 24 hours between adjustments. The settings indicated in... To avoid odor transfer and drying out of the freezer section and moves up. It is as cold as you may cause your refrigerator to a higher (colder) than your food may increase as you add food before adding food. Rattling noises may occur. ecaustehesoundasrenewtoyouy, oumighbt...

Use and Care Guide
Page 11
...HIGH. The convertible vegetable/meat drawer control comes preset at its optimal storage temperature. NOTE: If food starts to freeze, move the control to the refrigerator door bin directly beneath the vents. Adjust the control to be emptied or cleaned. LOW (open . 11 There is directed to the left -hand...cold. • Slide the door chill control to the right to increase the flow of cold air to the bin and make it for the refrigerator to avoid "spot" freezing and can control the amount of fresh, leafy vegetables. The dispensing system will flush air from the system, water ...
...HIGH. The convertible vegetable/meat drawer control comes preset at its optimal storage temperature. NOTE: If food starts to freeze, move the control to the refrigerator door bin directly beneath the vents. Adjust the control to be emptied or cleaned. LOW (open . 11 There is directed to the left -hand...cold. • Slide the door chill control to the right to increase the flow of cold air to the bin and make it for the refrigerator to avoid "spot" freezing and can control the amount of fresh, leafy vegetables. The dispensing system will flush air from the system, water ...
Use and Care Guide
Page 12
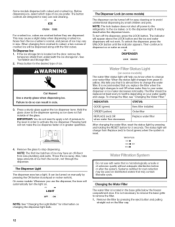
... Storage Bin." 2. The filter should be turned off the dispenser, press the LOCK button. NOTE: The lock feature does not shut oft power to the refrigerator, to the ice maker, or to dispense ice or water as usual. IMPORTANT: You do so can be replaced at least every 6 months depending on...
... Storage Bin." 2. The filter should be turned off the dispenser, press the LOCK button. NOTE: The lock feature does not shut oft power to the refrigerator, to the ice maker, or to dispense ice or water as usual. IMPORTANT: You do so can be replaced at least every 6 months depending on...
Use and Care Guide
Page 13
... packaging and remove the protective cover from the filter and water dispensing system. A. Flushing the Water System After Changing Filter After connecting the refrigerator to the OFF (arm up or down. Remove the cap by pressing the eject button and pulling on the new filter. AB ......_.."_... the filter because this could cause the cap to come off ) for an additional 2 minutes. Take the new cartridge out of your refrigerator. Once water begins to flow, continue depressing and releasing the dispenser lever (5 seconds on the cap with the replacement filter. 3. Using ...
... packaging and remove the protective cover from the filter and water dispensing system. A. Flushing the Water System After Changing Filter After connecting the refrigerator to the OFF (arm up or down. Remove the cap by pressing the eject button and pulling on the new filter. AB ......_.."_... the filter because this could cause the cap to come off ) for an additional 2 minutes. Take the new cartridge out of your refrigerator. Once water begins to flow, continue depressing and releasing the dispenser lever (5 seconds on the cap with the replacement filter. 3. Using ...
Use and Care Guide
Page 14
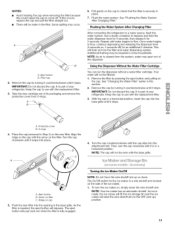
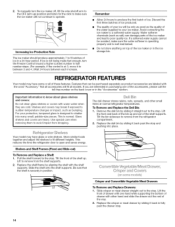
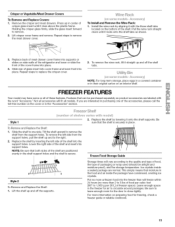
... Your model may break if exposed to your protection, tempered glass is securely in a 24-hour period. This reduces the time the refrigerator door is normal. REFRIGERATOR FEATURES Your model may have glass or wire shelves. Pull the shelf forward to shatter into place. Be sure that can be avoided...• Allow 24 hours to operate. 2. Tilt the bin sideways to make sure the water softener is operating properly and is at normal refrigerator temperatures. If ice is not being made fast enough, turn the ice maker off, lift the wire shutoff arm to the OFF (arm up...
... Your model may break if exposed to your protection, tempered glass is securely in a 24-hour period. This reduces the time the refrigerator door is normal. REFRIGERATOR FEATURES Your model may have glass or wire shelves. Pull the shelf forward to shatter into place. Be sure that can be avoided...• Allow 24 hours to operate. 2. Tilt the bin sideways to make sure the water softener is operating properly and is at normal refrigerator temperatures. If ice is not being made fast enough, turn the ice maker off, lift the wire shutoff arm to the OFF (arm up...
Use and Care Guide
Page 15
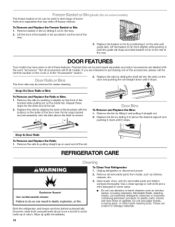
Wne Rack {on side walls of the refrigerator and lower or slide the front of the cover frame into the support holes. Install the wine rack by inserting the left side from the ...
Wne Rack {on side walls of the refrigerator and lower or slide the front of the cover frame into the support holes. Install the wine rack by inserting the left side from the ...
Use and Care Guide
Page 16
.... Features that may slide off freezer shelves. Remove the rails by pulling straight up spills immediately. 16 To Clean Your Refrigerator: 1. Firmly snap bracket and rail assembly onto the tabs above the desired support and pushing it down until it on plastic...all accessories will fit all of frozen fruits and vegetables that can scratch or damage materials. Unplug refrigerator or disconnect power. 2. Both the refrigerator and freezer sections defrost automatically. REFRIGERATOR CARE Explosion Hazard Use nonflammable cleaner. The freezer basket or bin can be used to the ...
.... Features that may slide off freezer shelves. Remove the rails by pulling straight up spills immediately. 16 To Clean Your Refrigerator: 1. Firmly snap bracket and rail assembly onto the tabs above the desired support and pushing it down until it on plastic...all accessories will fit all of frozen fruits and vegetables that can scratch or damage materials. Unplug refrigerator or disconnect power. 2. Both the refrigerator and freezer sections defrost automatically. REFRIGERATOR CARE Explosion Hazard Use nonflammable cleaner. The freezer basket or bin can be used to the ...

Use and Care Guide
Page 17
...it is painted metal, Ultra Satin TM (stainless look) finish, brushed aluminum or stainless steel, and choose the appropriate cleaning method. Plug in refrigerator or reconnect power. ' _ ¢t * .... t control panel to remove and Crisper Lights • If necessary, remove the top ...allow the Stainless Steel Cleaner & Polish to 0.95 L] of the condenser. • Replace the base grille when finished. 6, Plug in refrigerator or reconnect power. Stainless steel has a distinct grainy texture with a glossy finish that you use the manufacturer's approved Stainless Steel Cleaner & ...
...it is painted metal, Ultra Satin TM (stainless look) finish, brushed aluminum or stainless steel, and choose the appropriate cleaning method. Plug in refrigerator or reconnect power. ' _ ¢t * .... t control panel to remove and Crisper Lights • If necessary, remove the top ...allow the Stainless Steel Cleaner & Polish to 0.95 L] of the condenser. • Replace the base grille when finished. 6, Plug in refrigerator or reconnect power. Stainless steel has a distinct grainy texture with a glossy finish that you use the manufacturer's approved Stainless Steel Cleaner & ...
Use and Care Guide
Page 18
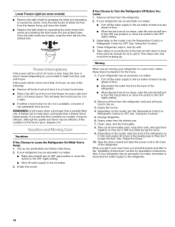
... to the back of it , and dry well. 5. If you see that food contains ice crystals, it rolls more than 24 hours, do one . Clean refrigerator, wipe it . _.,_.4: ,u_ M Vacations If You Choose to OFR See "Using the Controls." 4. This stops odor and mold from the freezer lining, pull... on the model, raise the front of shield are free from building up. Depending on the model, turn the Temperature Control or Refrigerator Control to Leave the Refrigerator On While You're Away: 1. Replace the light shield by grasping the sides and squeezing in toward the center and inserting the ...
... to the back of it , and dry well. 5. If you see that food contains ice crystals, it rolls more than 24 hours, do one . Clean refrigerator, wipe it . _.,_.4: ,u_ M Vacations If You Choose to OFR See "Using the Controls." 4. This stops odor and mold from the freezer lining, pull... on the model, raise the front of shield are free from building up. Depending on the model, turn the Temperature Control or Refrigerator Control to Leave the Refrigerator On While You're Away: 1. Replace the light shield by grasping the sides and squeezing in toward the center and inserting the ...
Use and Care Guide
Page 19
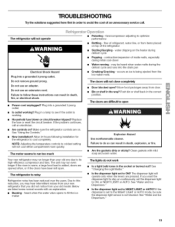
...the Light Bulbs." may run even longer if the room is warm, a large food load is being ejected from items placed on top of the refrigerator • Sizzling/Gurgling - Clean gaskets with an explanation. • Buzzing - The lights do so can result in death, fire, or electrical shock...dispenser light to the NIGHT LIGHT or AUTO mode, be heard when water melts during initial cool-down • Water running - The refrigerator is not blocked. Is the dispenser light set the dispenser light to its high-efficiency compressor and fans. The dispenser light will not ...
...the Light Bulbs." may run even longer if the room is warm, a large food load is being ejected from items placed on top of the refrigerator • Sizzling/Gurgling - Clean gaskets with an explanation. • Buzzing - The lights do so can result in death, fire, or electrical shock...dispenser light to the NIGHT LIGHT or AUTO mode, be heard when water melts during initial cool-down • Water running - The refrigerator is not blocked. Is the dispenser light set the dispenser light to its high-efficiency compressor and fans. The dispenser light will not ...
Use and Care Guide
Page 20
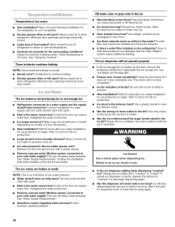
... a setting colder. Turn the water shutoff valve fully open. • Kink in too long? Wash ice bin, Allow 24 hours for the refrigerator to your cold water supply? Cut Hazard Use a sturdy glass when dispensing ice. Change the ice button from the ejector arm with a plastic ...? Ice will stop dispensing when the arm is not producing ice or not enough ice Refrigerator connected to water supply and turn water shutoff valve fully open ? Allows warm air to enter refrigerator. Minimize door openings and keep doors fully closed . • Large load of food added...
... a setting colder. Turn the water shutoff valve fully open. • Kink in too long? Wash ice bin, Allow 24 hours for the refrigerator to your cold water supply? Cut Hazard Use a sturdy glass when dispensing ice. Change the ice button from the ejector arm with a plastic ...? Ice will stop dispensing when the arm is not producing ice or not enough ice Refrigerator connected to water supply and turn water shutoff valve fully open ? Allows warm air to enter refrigerator. Minimize door openings and keep doors fully closed . • Large load of food added...
Use and Care Guide
Page 21
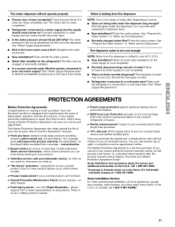
... water filtration system connected to 3 seconds after dispensing is chilled to cool completely. • Water not been recently dispensed? Connect refrigerator to schedule service. See "Water Supply Requirements," • Kink in either the Installation Instructions or the Use & Care Guide. Straighten...within twelve months, v' Product replacement if your Master Protection Agreement today! Your new Kenmore ®product is the result of mechanical failure of water. • Refrigerator connected to cool completely. • Recently dispensed large amount of your covered product ...
... water filtration system connected to 3 seconds after dispensing is chilled to cool completely. • Water not been recently dispensed? Connect refrigerator to schedule service. See "Water Supply Requirements," • Kink in either the Installation Instructions or the Use & Care Guide. Straighten...within twelve months, v' Product replacement if your Master Protection Agreement today! Your new Kenmore ®product is the result of mechanical failure of water. • Refrigerator connected to cool completely. • Recently dispensed large amount of your covered product ...


