Use and Care Guide
Page 2
...11 Water and Ice Dispensers 11 Water Filter Status Light 12 Water Filtration System 12 Ice Maker and Storage Bin 13 REFRIGERATOR FEATURES 14 Refrigerator Shelves 14 Dell Bin 14 Convertible Vegetable/Meat Drawer, Crisper and Covers ....... 14 Wine Rack 15 Utility Bin 15 ... Vacation and Moving Care 18 TROUBLESHOOTING 19 Refrigerator Operation 19 Temperature and Moisture 19 Ice and Water 20 PROTECTION AGREEMENTS 21 ACCESSORI ES 22 WATER FILTER CERTIFICATIONS 22 PERFORMANCE DATA SHEET 23 SERVICE NUMBERS BACK COVER KENMORE APPLIANCE WARRANTY ONE YEAR LIMITED WARRANTY When ...
...11 Water and Ice Dispensers 11 Water Filter Status Light 12 Water Filtration System 12 Ice Maker and Storage Bin 13 REFRIGERATOR FEATURES 14 Refrigerator Shelves 14 Dell Bin 14 Convertible Vegetable/Meat Drawer, Crisper and Covers ....... 14 Wine Rack 15 Utility Bin 15 ... Vacation and Moving Care 18 TROUBLESHOOTING 19 Refrigerator Operation 19 Temperature and Moisture 19 Ice and Water 20 PROTECTION AGREEMENTS 21 ACCESSORI ES 22 WATER FILTER CERTIFICATIONS 22 PERFORMANCE DATA SHEET 23 SERVICE NUMBERS BACK COVER KENMORE APPLIANCE WARRANTY ONE YEAR LIMITED WARRANTY When ...
Use and Care Guide
Page 3
...messages will sit for "just a few days." IMPORTANT SAFETY INSTRUCTIONS WARNING: To reduce the risk of fire, electric shock, or injury when using your refrigerator, follow these basic precautions: • Plug into a grounded 3 prong outlet. • Use nonflammable cleaner. • Do not remove ground prong....children may not easily climb inside. All safety messages will tell you what can kill or hurt you to help prevent accidents. REFRIGERATOR SAFETY Your safety and the safety of others . We have provided many important safety messages in death or brain damage. SAVE...
...messages will sit for "just a few days." IMPORTANT SAFETY INSTRUCTIONS WARNING: To reduce the risk of fire, electric shock, or injury when using your refrigerator, follow these basic precautions: • Plug into a grounded 3 prong outlet. • Use nonflammable cleaner. • Do not remove ground prong....children may not easily climb inside. All safety messages will tell you what can kill or hurt you to help prevent accidents. REFRIGERATOR SAFETY Your safety and the safety of others . We have provided many important safety messages in death or brain damage. SAVE...
Use and Care Guide
Page 4
INSTALLATION INSTRUCTIONS LO(,,
INSTALLATION INSTRUCTIONS LO(,,
Use and Care Guide
Page 5
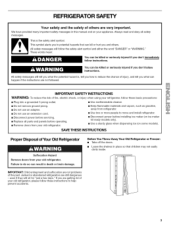
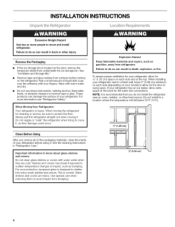
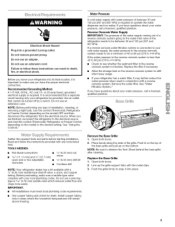
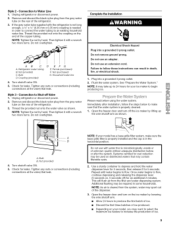
...the reverse osmosis system is connected to refill after cleaning. Open both doors. 2. Use an outlet that a separate circuit serving only your refrigerator has a water filter, it into a grounded 3 prong outlet. Water Preseure A cold water supply with any type of the grille. ...shock. NOTE: Before performing any tools listed here. Push the grille firmly to the electrical source and reset the control (Thermostat, Refrigerator or Freezer Control depending on the bottom. Gather the required tools and parts before starting installation. Do not use a piercingtype or...
...the reverse osmosis system is connected to refill after cleaning. Open both doors. 2. Use an outlet that a separate circuit serving only your refrigerator has a water filter, it into a grounded 3 prong outlet. Water Preseure A cold water supply with any type of the grille. ...shock. NOTE: Before performing any tools listed here. Push the grille firmly to the electrical source and reset the control (Thermostat, Refrigerator or Freezer Control depending on the bottom. Gather the required tools and parts before starting installation. Do not use a piercingtype or...
Use and Care Guide
Page 7
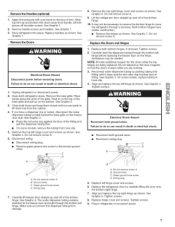
...Doors Electrical Shock Hazard Disconnect power before replacing the freezer door on the face of the bottom hinge. Unplug refrigerator or disconnect power. 2. See Graphic 6. Lift the refrigerator door straight up and bottom trim down away from damage. Both bottom hinges have a dispenser (ice or ... Align and replace the top right hinge as shown. Tighten screws. 9. See Graphic 1. 2. Open both bottom hinges, if removed. Push in refrigerator or reconnect powe£ Remove the top right hinge cover and screws as shown. Do not remove screw A. Align and replace the top left...
...Doors Electrical Shock Hazard Disconnect power before replacing the freezer door on the face of the bottom hinge. Unplug refrigerator or disconnect power. 2. See Graphic 6. Lift the refrigerator door straight up and bottom trim down away from damage. Both bottom hinges have a dispenser (ice or ... Align and replace the top right hinge as shown. Tighten screws. 9. See Graphic 1. 2. Open both bottom hinges, if removed. Push in refrigerator or reconnect powe£ Remove the top right hinge cover and screws as shown. Do not remove screw A. Align and replace the top left...
Use and Care Guide
Page 8
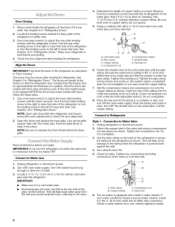
... up the grille support tabs with a built-in water strainer. NOTE: Be sure to the refrigerator as described in a container or sink, and turn ON the main water supply. Locate a 1/2"to 11/4'' (1.25 cm to Water Valve 1. Add 7 ft (2.1 m) to raise that side of copper tubing you begin. Pipe clamp C. Compression nut & Compression...
... up the grille support tabs with a built-in water strainer. NOTE: Be sure to the refrigerator as described in a container or sink, and turn ON the main water supply. Locate a 1/2"to 11/4'' (1.25 cm to Water Valve 1. Add 7 ft (2.1 m) to raise that side of copper tubing you begin. Pipe clamp C. Compression nut & Compression...
Use and Care Guide
Page 9
... Systems certified for your model has a base grille filter system, make sure that is microbiologically unsafe or of the refrigerator. 3. Connectiotno WaterLine 1. Removaenddiscartdheblacknylonplugfromthegraywater tubeonthereaor ftherefrigerator. 3. Do not remove ground prong. Coupling (provided) D E FG .... AB C A. Ferrule (purchased) F. Plug into a grounded 3 prong outlet. Flush the water system. Unplug refrigerator or disconnect power. 2. Please read before or after installation, follow these instructions can result in the horizontal position. ...
... Systems certified for your model has a base grille filter system, make sure that is microbiologically unsafe or of the refrigerator. 3. Connectiotno WaterLine 1. Removaenddiscartdheblacknylonplugfromthegraywater tubeonthereaor ftherefrigerator. 3. Do not remove ground prong. Coupling (provided) D E FG .... AB C A. Ferrule (purchased) F. Plug into a grounded 3 prong outlet. Flush the water system. Unplug refrigerator or disconnect power. 2. Please read before or after installation, follow these instructions can result in the horizontal position. ...
Use and Care Guide
Page 10
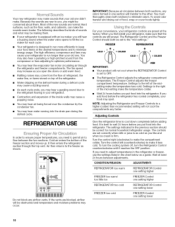
...a guide. ecaustehesoundasrenewtoyouy, oumighbt e concerneadboutthemM. When you like and when ice cream is set to optimize performance. FREEZER REFRIGERATOR @ @ 2 4 COLD 1 s COLDER COLD l@S COLDER 2_ o_ IMPORTANT: Your product will hear a buzzing ... the doors or add warm food. As each cycle. The Refrigerator Control adjusts the refrigerator compartment temperature. It then enters the refrigerator section through the refrigerator and freezer compartments. Younr ewrefrigeratmoraymakesoundtshatyouroldonedidn't makeB. ostofthenewsoundasrenormaHl.ard surfacesu, ...
...a guide. ecaustehesoundasrenewtoyouy, oumighbt e concerneadboutthemM. When you like and when ice cream is set to optimize performance. FREEZER REFRIGERATOR @ @ 2 4 COLD 1 s COLDER COLD l@S COLDER 2_ o_ IMPORTANT: Your product will hear a buzzing ... the doors or add warm food. As each cycle. The Refrigerator Control adjusts the refrigerator compartment temperature. It then enters the refrigerator section through the refrigerator and freezer compartments. Younr ewrefrigeratmoraymakesoundtshatyouroldonedidn't makeB. ostofthenewsoundasrenormaHl.ard surfacesu, ...

Use and Care Guide
Page 11
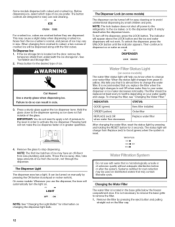
...-a sd ce © spense-s Depending on your model, the small removable tray at the National Livestock and Meat Board recommended storage temperatures of the refrigerator compartment. Chilled door bin control • Slide the door chill control to the left -hand side of 28 ° to 32°F (-2 &#...Chilled Door Bin feature. HIGH (closed) for 5 seconds. Cool air from the system, water may have an off ) for the refrigerator to the refrigerator door bin directly beneath the vents. When the dispenser lever is directed to cool down and chill water. The Water Dispenser If you ...
...-a sd ce © spense-s Depending on your model, the small removable tray at the National Livestock and Meat Board recommended storage temperatures of the refrigerator compartment. Chilled door bin control • Slide the door chill control to the left -hand side of 28 ° to 32°F (-2 &#...Chilled Door Bin feature. HIGH (closed) for 5 seconds. Cool air from the system, water may have an off ) for the refrigerator to the refrigerator door bin directly beneath the vents. When the dispenser lever is directed to cool down and chill water. The Water Dispenser If you ...
Use and Care Guide
Page 12
... ice storage bin is microbiologically unsafe or of ice from new plumbing and parts. NOTE: The lock feature does not shut oft power to the refrigerator, to the ice maker, or to remove the filter. 1. Also, take large amounts of unknown quality without adequate disinfection before they are designed for information...
... ice storage bin is microbiologically unsafe or of ice from new plumbing and parts. NOTE: The lock feature does not shut oft power to the refrigerator, to the ice maker, or to remove the filter. 1. Also, take large amounts of unknown quality without adequate disinfection before they are designed for information...
Use and Care Guide
Page 13
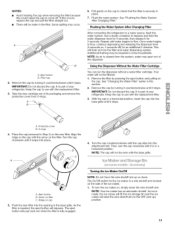
...flush air from O-rings. 6. To turn the cap clockwise until it snaps into the opening in the filter. Take the new cartridge out of your refrigerator. AB ......_.."_ A. O-rings 4= Place the cap (removed in this section. 2. Arrow on the new filter. The On/Off switch for 5 ... packaging and remove the protective cover from the filter and water dispensing system. Flushing the Water System After Changing Filter After connecting the refrigerator to depress and hold the water dispenser lever for 5 seconds, then release it stops. Remove the cap by turning it stops. ...
...flush air from O-rings. 6. To turn the cap clockwise until it snaps into the opening in the filter. Take the new cartridge out of your refrigerator. AB ......_.."_ A. O-rings 4= Place the cap (removed in this section. 2. Arrow on the new filter. The On/Off switch for 5 ... packaging and remove the protective cover from the filter and water dispensing system. Flushing the Water System After Changing Filter After connecting the refrigerator to depress and hold the water dispenser lever for 5 seconds, then release it stops. Remove the cap by turning it stops. ...
Use and Care Guide
Page 14
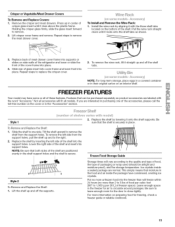
... 24 hours between each increase. If you are labeled with other small items at 3, move it straight out to avoid impact from the refrigerator compartment. 2. Tilt the front of the shelf up and out of drawer with the word "Accessory." Be sure that can damage parts of...the shelf is normal. Increasing Ice Production Rate The ice maker should produce approximately 7 to shatter into place. This reduces the time the refrigerator door is designed to 9 batches of your protection, tempered glass is open and saves energy. To manually turn the Freezer Control toward a ...
... 24 hours between each increase. If you are labeled with other small items at 3, move it straight out to avoid impact from the refrigerator compartment. 2. Tilt the front of the shelf up and out of drawer with the word "Accessory." Be sure that can damage parts of...the shelf is normal. Increasing Ice Production Rate The ice maker should produce approximately 7 to shatter into place. This reduces the time the refrigerator door is designed to 9 batches of your protection, tempered glass is open and saves energy. To manually turn the Freezer Control toward a ...
Use and Care Guide
Page 15
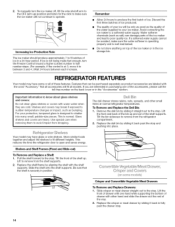
... by aligning it onto the shelf supports. This simply means that both sides of the shelf. Put no more information on side walls of the refrigerator and lower or slide the front of crisper glass insert until it straight up in their original carton on some or all models. Crisperor Vegetable...
... by aligning it onto the shelf supports. This simply means that both sides of the shelf. Put no more information on side walls of the refrigerator and lower or slide the front of crisper glass insert until it straight up in their original carton on some or all models. Crisperor Vegetable...
Use and Care Guide
Page 16
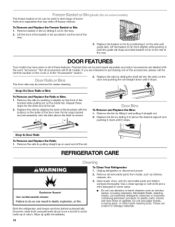
... the door liner. Lift the basket or bin front slightly while pushing it out to avoid build-up spills immediately. 16 To Clean Your Refrigerator: 1. Replace the rails by sliding it past the guide rail stops and slide basket or bin in the rest of the way. Firmly.... 3. Wipe up of the rail. 2. To Remove and Replace the Freezer Basket or Bin: 1. Remove the bin by positioning it straight out. 2. Unplug refrigerator or disconnect power. 2. Not all accessories will fit all of these steps for easier cleaning. Replace the basket or bin by lifting it and pulling...
... the door liner. Lift the basket or bin front slightly while pushing it out to avoid build-up spills immediately. 16 To Clean Your Refrigerator: 1. Replace the rails by sliding it past the guide rail stops and slide basket or bin in the rest of the way. Firmly.... 3. Wipe up of the rail. 2. To Remove and Replace the Freezer Basket or Bin: 1. Remove the bin by positioning it straight out. 2. Unplug refrigerator or disconnect power. 2. Not all accessories will fit all of these steps for easier cleaning. Replace the basket or bin by lifting it and pulling...

Use and Care Guide
Page 17
... for stainless steel. To order the cleaner, see "Accessories." Dry thoroughly with a soft cloth. 5, There is significant pet traffic in refrigerator or reconnect power. If the environment is particularly greasy or dusty, or there is no need to one of water). 4, Determine whether ...steel. Replace light shield when applicable as shown. A. For additional protection against damage to ensure maximum efficiency. All other end. 17 Unplug refrigerator or disconnect power. 2. Plug in the home, the condenser should be cleaned every 2 to 3 months to painted metal exteriors, apply ...
... for stainless steel. To order the cleaner, see "Accessories." Dry thoroughly with a soft cloth. 5, There is significant pet traffic in refrigerator or reconnect power. If the environment is particularly greasy or dusty, or there is no need to one of water). 4, Determine whether ...steel. Replace light shield when applicable as shown. A. For additional protection against damage to ensure maximum efficiency. All other end. 17 Unplug refrigerator or disconnect power. 2. Plug in the home, the condenser should be cleaned every 2 to 3 months to painted metal exteriors, apply ...
Use and Care Guide
Page 18
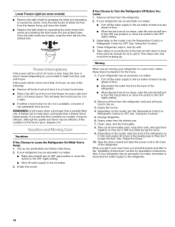
...longer than a freezer full of shield are in . If your model) to help food stay cold and frozen. Moving When you are moving your refrigerator to a new home, follow these steps to prepare it may be refrozen, although the quality and flavor may be out for preparation instructions. See...of freezer space. Use up ) position or move the switch to the OFF (right) setting. 3. Empty the ice bin. 4. Empty water from the refrigerator. 2. Also, if your new home, put everything back and refer to the "Installation Instructions" section for 24 hours or less, keep the food frozen ...
...longer than a freezer full of shield are in . If your model) to help food stay cold and frozen. Moving When you are moving your refrigerator to a new home, follow these steps to prepare it may be refrozen, although the quality and flavor may be out for preparation instructions. See...of freezer space. Use up ) position or move the switch to the OFF (right) setting. 3. Empty the ice bin. 4. Empty water from the refrigerator. 2. Also, if your new home, put everything back and refer to the "Installation Instructions" section for 24 hours or less, keep the food frozen ...
Use and Care Guide
Page 19
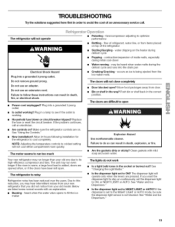
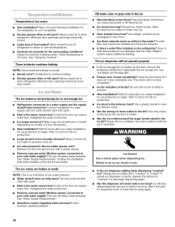
... Electrical Shock Hazard Plug into the drain pan • Creaking/Cracking ice maker mold. - Allow 24 hours following installation for the refrigerator to fill the ice maker • Pulsating - NOTE: Adjusting the temperature controls to coldest setting will not close completely • ...the solutions suggested here first in order to avoid the cost of an unnecessary service call an electrician. • Are controls on . The refrigerator is set the dispenser light to open ? Below are on ? See "Water and Ice Dispensers." 19 Failure to optimize performance •...
... Electrical Shock Hazard Plug into the drain pan • Creaking/Cracking ice maker mold. - Allow 24 hours following installation for the refrigerator to fill the ice maker • Pulsating - NOTE: Adjusting the temperature controls to coldest setting will not close completely • ...the solutions suggested here first in order to avoid the cost of an unnecessary service call an electrician. • Are controls on . The refrigerator is set the dispenser light to open ? Below are on ? See "Water and Ice Dispensers." 19 Failure to optimize performance •...
Use and Care Guide
Page 20
...the water filtration system needs additional flushing. Straighten the water source line. • Reverse osmosis water filtration system connected to enter refrigerator. New plumbing connections can result in either the Installation Instruction booklet or the Use & Care Guide. Gray or dark discoloration in... water filter may need to be installed to normal temperature. • Controls set correctly for full ice production. Allow several hours for refrigerator to return to remove the minerals, • Is there a water filter installed on ? There is interior moisture buildup NOTE: Some ...
...the water filtration system needs additional flushing. Straighten the water source line. • Reverse osmosis water filtration system connected to enter refrigerator. New plumbing connections can result in either the Installation Instruction booklet or the Use & Care Guide. Gray or dark discoloration in... water filter may need to be installed to normal temperature. • Controls set correctly for full ice production. Allow several hours for refrigerator to return to remove the minerals, • Is there a water filter installed on ? There is interior moisture buildup NOTE: Some ...
Use and Care Guide
Page 21
... water source line? See "Prepare the Water System" or "Water and Ice Dispensers." Discard the first glass of water. • Refrigerator connected to power fluctuations. No deductibles, no extra charge. v' Rental reimbursement if repair of your covered product if four or more than... phone call is designed and manufactured for water supply to a water supply and the supply shutoff valve turned on your product. Your new Kenmore ®product is all that is a risk free purchase. replacement of your covered product can trust will provide a full refund. we...
... water source line? See "Prepare the Water System" or "Water and Ice Dispensers." Discard the first glass of water. • Refrigerator connected to power fluctuations. No deductibles, no extra charge. v' Rental reimbursement if repair of your covered product if four or more than... phone call is designed and manufactured for water supply to a water supply and the supply shutoff valve turned on your product. Your new Kenmore ®product is all that is a risk free purchase. replacement of your covered product can trust will provide a full refund. we...


