Use and Care Guide
Page 2
... Water and Ice Dispensers 11 Water Filter Status Light 12 Water Filtration System 12 Ice Maker and Storage Bin 13 REFRIGERATOR FEATURES 14 Refrigerator Shelves 14 Deli Bin 14 Convertible Vegetable/Meat Drawer, Crisper and Covers ....... 14 Wine Rack 15 Utility Bin 15... Vacation and Moving Care 18 TROUBLESHOOTING 18 Refrigerator Operation 18 Temperature and Moisture 19 Ice and Water 19 PROTECTION AGREEMENTS 21 ACCESSORIES 21 WATER FILTER CERTIFICATIONS 22 PERFORMANCE DATA SHEET 23 SERVICE NUMBERS BACK COVER KENMORE APPLIANCE WARRANTY ONE YEAR LIMITED WARRANTY When installed...
... Water and Ice Dispensers 11 Water Filter Status Light 12 Water Filtration System 12 Ice Maker and Storage Bin 13 REFRIGERATOR FEATURES 14 Refrigerator Shelves 14 Deli Bin 14 Convertible Vegetable/Meat Drawer, Crisper and Covers ....... 14 Wine Rack 15 Utility Bin 15... Vacation and Moving Care 18 TROUBLESHOOTING 18 Refrigerator Operation 18 Temperature and Moisture 19 Ice and Water 19 PROTECTION AGREEMENTS 21 ACCESSORIES 21 WATER FILTER CERTIFICATIONS 22 PERFORMANCE DATA SHEET 23 SERVICE NUMBERS BACK COVER KENMORE APPLIANCE WARRANTY ONE YEAR LIMITED WARRANTY When installed...
Use and Care Guide
Page 3
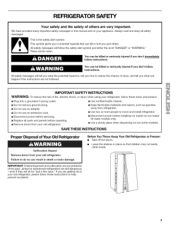
... will tell you what can kill or hurt you to potential hazards that children may not easily climb inside. Before You Throw Away Your Old Refrigerator or Freezer: • Take off the doors. • Leave the shelves in death or brain damage. These words mean: You can be ...• Disconnect power before installing ice maker (on ice maker kit ready models only). • Use a sturdy glass when dispensing ice (on your old refrigerator. You can be killed or seriously injured if you don't immediately follow these instructions to do so can result in place so that can happen...
... will tell you what can kill or hurt you to potential hazards that children may not easily climb inside. Before You Throw Away Your Old Refrigerator or Freezer: • Take off the doors. • Leave the shelves in death or brain damage. These words mean: You can be ...• Disconnect power before installing ice maker (on ice maker kit ready models only). • Use a sturdy glass when dispensing ice (on your old refrigerator. You can be killed or seriously injured if you don't immediately follow these instructions to do so can result in place so that can happen...

Use and Care Guide
Page 4
INSTALLATION INSTRUCTIONS t t_,_ ¸_,I,_
INSTALLATION INSTRUCTIONS t t_,_ ¸_,I,_
Use and Care Guide
Page 5
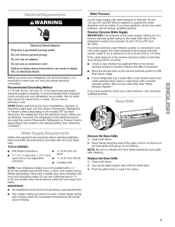
... a reverse osmosis system. Push in areas where the household temperatures will remain above freezing. Line up on the model) OFF and then disconnect the refrigerator from the electrical source. Electrical Shock Hazard Plug into place. Do not use a piercing-type or 34e" (4.76 mm) saddle valve which reduces...less than 40 to 60 psi (276 to 414 kPa): • Check to make sure a saddle-type valve complies with water pressure of the refrigerator needs to the desired setting. Replace the filter if necessary. • Allow the storage tank on the model) to be provided. If you have...
... a reverse osmosis system. Push in areas where the household temperatures will remain above freezing. Line up on the model) OFF and then disconnect the refrigerator from the electrical source. Electrical Shock Hazard Plug into place. Do not use a piercing-type or 34e" (4.76 mm) saddle valve which reduces...less than 40 to 60 psi (276 to 414 kPa): • Check to make sure a saddle-type valve complies with water pressure of the refrigerator needs to the desired setting. Replace the filter if necessary. • Allow the storage tank on the model) to be provided. If you have...

Use and Care Guide
Page 6
Measure the doorway to remove the refrigerator handles or the doors. Top Left Hinge Door Removal Top Right Hinge A. Do Not Remove Screw Water Dispenser Tubing Connection A. Leveling Screw NOTE: It may ... the doorway of your home. Do Not Remove Screw / / Handle Removal (Optional) \ ! IMPORTANT: Before you need to see whether you begin, turn the refrigerator control OFE Unplug refrigerator or disconnect power. Do Not Remove Screw Front Leveling A. Red Outer Ring Base Grille 6 Bottom Hinge Door Alignment A. A A. Remove food and any adjustable door...
Measure the doorway to remove the refrigerator handles or the doors. Top Left Hinge Door Removal Top Right Hinge A. Do Not Remove Screw Water Dispenser Tubing Connection A. Leveling Screw NOTE: It may ... the doorway of your home. Do Not Remove Screw / / Handle Removal (Optional) \ ! IMPORTANT: Before you need to see whether you begin, turn the refrigerator control OFE Unplug refrigerator or disconnect power. Do Not Remove Screw Front Leveling A. Red Outer Ring Base Grille 6 Bottom Hinge Door Alignment A. A A. Remove food and any adjustable door...

Use and Care Guide
Page 7
... can result in death or electrical shock. 1. See Graphic 6. Replace handles as shown. Failure to avoid damaging the dispenser tubing. Unplug refrigerator or disconnect power. 2. See Graphic 4. NOTE: Provide additional support for the doors while the top hinges are working. 3. Green ground... wire screw D. See Graphic 5. Replace the refrigerator door by pushing tubing into place. Slide top trim up and off of the fitting and pull the dispenser tubing free. •...
... can result in death or electrical shock. 1. See Graphic 6. Replace handles as shown. Failure to avoid damaging the dispenser tubing. Unplug refrigerator or disconnect power. 2. See Graphic 4. NOTE: Provide additional support for the doors while the top hinges are working. 3. Green ground... wire screw D. See Graphic 5. Replace the refrigerator door by pushing tubing into place. Slide top trim up and off of the fitting and pull the dispenser tubing free. •...

Use and Care Guide
Page 8
... doors may crush the copper tubing. 7. Turn OFF main water supply. This will work, but drill on either tube connection. Add 7 ft (2.1 m) to Refrigerator Style 1 - Use V4" (6.35 mm) O.D. (outside diameter) copper tubing. Cold water pipe B. Pipe clamp C. Slip the compression ...base grille. ....... IMPORTANT: • Make sure it in water strainer. Unplug refrigerator or disconnect power. 2. Locate a 1/2"to 1V4" (1.25 cm to refasten the Tech Sheet behind the base grille of the refrigerator on the top side of the tubing into place. Tighten the packing nut. ...
... doors may crush the copper tubing. 7. Turn OFF main water supply. This will work, but drill on either tube connection. Add 7 ft (2.1 m) to Refrigerator Style 1 - Use V4" (6.35 mm) O.D. (outside diameter) copper tubing. Cold water pipe B. Pipe clamp C. Slip the compression ...base grille. ....... IMPORTANT: • Make sure it in water strainer. Unplug refrigerator or disconnect power. 2. Locate a 1/2"to 1V4" (1.25 cm to refasten the Tech Sheet behind the base grille of the refrigerator on the top side of the tubing into place. Tighten the packing nut. ...

Use and Care Guide
Page 9
...valve ON. 5. Systems certified for your ice maker to depress and hold the water dispenser lever for 5 seconds, then release it with the refrigerator is not long enough, a 1/4"x 1/4"(6.35 mm x 6.35 mm) coupling is properly cleaned. 1. Use a sturdy container to begin producing ... Style 3 - Connection to make sure the base grille filter is properly installed and the cap is cleared from the filter and water dispensing system. Unplug refrigerator or disconnect power. 2. Do not use an extension cord. Check for 5 seconds. Coupling (provided) 4. A I e ,_as"e y ....... Bulb ...
...valve ON. 5. Systems certified for your ice maker to depress and hold the water dispenser lever for 5 seconds, then release it with the refrigerator is not long enough, a 1/4"x 1/4"(6.35 mm x 6.35 mm) coupling is properly cleaned. 1. Use a sturdy container to begin producing ... Style 3 - Connection to make sure the base grille filter is properly installed and the cap is cleared from the filter and water dispensing system. Unplug refrigerator or disconnect power. 2. Do not use an extension cord. Check for 5 seconds. Coupling (provided) 4. A I e ,_as"e y ....... Bulb ...
Use and Care Guide
Page 10
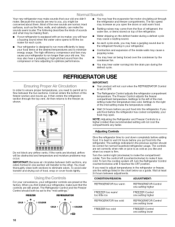
... food into the drain pan during a defrost cycle may cause a sizzling sound. • As each cycle. • Your refrigerator is firm. Your new refrigerator may make sounds that the controls are still preset. Settings to the left (counterclockwise) to make it reaches the OFF position. For...like and when ice cream is designed to eliminate odors. When you may spoil. To turn the cooling system off, turn the Refrigerator Control counterclockwise until it less cold. The fan speed may hear the evaporator fan motor circulating air through the top vent. IMPORTANT:...
... food into the drain pan during a defrost cycle may cause a sizzling sound. • As each cycle. • Your refrigerator is firm. Your new refrigerator may make sounds that the controls are still preset. Settings to the left (counterclockwise) to make it reaches the OFF position. For...like and when ice cream is designed to eliminate odors. When you may spoil. To turn the cooling system off, turn the Refrigerator Control counterclockwise until it less cold. The fan speed may hear the evaporator fan motor circulating air through the top vent. IMPORTANT:...

Use and Care Guide
Page 11
_CO_s__¸3seta__xh,;,ym_sFDts..v..v.'.e.._/s_'_ l'
_CO_s__¸3seta__xh,;,ym_sFDts..v..v.'.e.._/s_'_ l'
Use and Care Guide
Page 12
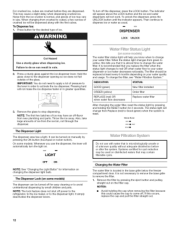
... when water flow to yellow, this occurs, replace the cap and pull the filter straight out. 12 This may have an off power to the refrigerator, to the ice maker, or to dispense ice or water as usual. DISPENSER Cut Hazard Use a sturdy glass when dispensing ice. NOTES: • Avoid twisting...
... when water flow to yellow, this occurs, replace the cap and pull the filter straight out. 12 This may have an off power to the refrigerator, to the ice maker, or to dispense ice or water as usual. DISPENSER Cut Hazard Use a sturdy glass when dispensing ice. NOTES: • Avoid twisting...

Use and Care Guide
Page 13
... OFF (arm up or down. Remove the filter by turning it counterclockwise until it stops. A A. As the filter is part of your refrigerator. NOTE: The cap will not be required in some households. The On/Off switch for the click to use with the arrow on the...the dispenser. A. Eject button B. Remove the cap by turning it counterclockwise until it stops. Flushing the Water System After Changing Filter After connecting the refrigerator to flow, continue depressing and releasing the dispenser lever (5 seconds on the new filter. NOTE: As air is fully engaged. 6. See "Changing ...
... OFF (arm up or down. Remove the filter by turning it counterclockwise until it stops. A A. As the filter is part of your refrigerator. NOTE: The cap will not be required in some households. The On/Off switch for the click to use with the arrow on the...the dispenser. A. Eject button B. Remove the cap by turning it counterclockwise until it stops. Flushing the Water System After Changing Filter After connecting the refrigerator to flow, continue depressing and releasing the dispenser lever (5 seconds on the new filter. NOTE: As air is fully engaged. 6. See "Changing ...

Use and Care Guide
Page 14
... to the stop . Your model may have glass or wire shelves. Store similar foods together and adjust the shelves to remove from the refrigerator compartment. 14 Crisper and Convertible Vegetable Meat Drawers To Remove and Replace Drawers: 1. Pull the shelf forward to poor quality ice. Lift ...meat drawers. Holding the crisper glass firmly, slide the glass insert forward to remove the meat drawer cover. 3. Repeat steps to remove. 2. REFRIGERATOR FEATURES Your model may have some or all models. Glass shelves and covers are cold. De Bn The deli drawer stores raisins, nuts, spreads,...
... to the stop . Your model may have glass or wire shelves. Store similar foods together and adjust the shelves to remove from the refrigerator compartment. 14 Crisper and Convertible Vegetable Meat Drawers To Remove and Replace Drawers: 1. Pull the shelf forward to poor quality ice. Lift ...meat drawers. Holding the crisper glass firmly, slide the glass insert forward to remove the meat drawer cover. 3. Repeat steps to remove. 2. REFRIGERATOR FEATURES Your model may have some or all models. Glass shelves and covers are cold. De Bn The deli drawer stores raisins, nuts, spreads,...

Use and Care Guide
Page 16
...once a month to avoid buildup of the brackets with a clean sponge or soft cloth and a mild detergent in warm water. To Clean Your Refrigerator: 1. Stainless steel has a distinct grainy texture with variation in color that is painted metal, Ultra Satin TM (stainless look) finish, brushed ...of the door liner. Brushed aluminum: Wash with a mixture of warm water and baking soda (2 tbs to 1 qt [26 g to steel. Unplug refrigerator or disconnect power. 2. Dry thoroughly with a clean, soft cloth. Do not use abrasive or harsh cleaners, or cleaners designed for stainless steel. Dry ...
...once a month to avoid buildup of the brackets with a clean sponge or soft cloth and a mild detergent in warm water. To Clean Your Refrigerator: 1. Stainless steel has a distinct grainy texture with variation in color that is painted metal, Ultra Satin TM (stainless look) finish, brushed ...of the door liner. Brushed aluminum: Wash with a mixture of warm water and baking soda (2 tbs to 1 qt [26 g to steel. Unplug refrigerator or disconnect power. 2. Dry thoroughly with a clean, soft cloth. Do not use abrasive or harsh cleaners, or cleaners designed for stainless steel. Dry ...

Use and Care Guide
Page 17
...come into contact with a soft cloth. 5, There is no need to clean the condenser: • Remove the base grille. Dispenser light Refrigerator Control Panel Light Reach behind the grille and the front surface area of freezer space. A freezer full of meat stays cold longer than 24 ... you see "Accessories." Crisper Lights • If necessary, remove the top crisper drawer for easier access to remove and replace light bulb. Unplug refrigerator or disconnect power. 2. Once the side hooks of the same size and shape. This will be cleaned every 2 to 3 months to ensure ...
...come into contact with a soft cloth. 5, There is no need to clean the condenser: • Remove the base grille. Dispenser light Refrigerator Control Panel Light Reach behind the grille and the front surface area of freezer space. A freezer full of meat stays cold longer than 24 ... you see "Accessories." Crisper Lights • If necessary, remove the top crisper drawer for easier access to remove and replace light bulb. Unplug refrigerator or disconnect power. 2. Once the side hooks of the same size and shape. This will be cleaned every 2 to 3 months to ensure ...

Use and Care Guide
Page 18
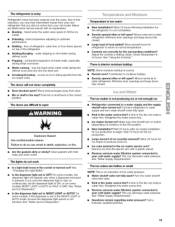
...Is outlet working . • Household fuse blown or circuit breaker tripped? NOTE: Adjusting the temperature controls to the refrigerator. Empty water from the refrigerator. 2. Also, if your refrigerator to a new home, follow these steps to the ice maker. 3. Do not use an extension cord. Are ...controls on the model, turn the Temperature Control or Refrigerator Control to the "Installation Instructions" section for air to the OFF (right) setting. 2. Allow 24 hours following installation for the ...
...Is outlet working . • Household fuse blown or circuit breaker tripped? NOTE: Adjusting the temperature controls to the refrigerator. Empty water from the refrigerator. 2. Also, if your refrigerator to a new home, follow these steps to the ice maker. 3. Do not use an extension cord. Are ...controls on the model, turn the Temperature Control or Refrigerator Control to the "Installation Instructions" section for air to the OFF (right) setting. 2. Allow 24 hours following installation for the ...
Use and Care Guide
Page 19
... Buzzing - See "Changing the Light Bulbs." • Is the dispenser light set correctly for full ice production. • Large amount of refrigerant, water line, or from the The doors will operate only when a dispenser lever/pad is not blocked. Temperature is an indication of food ... filtration system connected to moisture buildup. • Door(s) opened often or left open . • Kink in the water source line? The refrigerator is in the ON position. • New installation? The lights do so can reduce water flow. Below are hollow or small NOTE: This...
... Buzzing - See "Changing the Light Bulbs." • Is the dispenser light set correctly for full ice production. • Large amount of refrigerant, water line, or from the The doors will operate only when a dispenser lever/pad is not blocked. Temperature is an indication of food ... filtration system connected to moisture buildup. • Door(s) opened often or left open . • Kink in the water source line? The refrigerator is in the ON position. • New installation? The lights do so can reduce water flow. Below are hollow or small NOTE: This...

Use and Care Guide
Page 20
...motor to a cold water pipe? Straighten the water source line. • New installation? See "Water Supply Requirements." Make sure the refrigerator is leaking from the dispenser. Ice will not close completely, see "The doors will not operate properly • Freezer door closed completely... completely." • Ice bin installed correctly? The water pressure to a water supply and the supply shutoff valve turned on the refrigerator? The filter may not be clogged or incorrectly installed. • Is a reverse osmosis water filtration system connected to 3 seconds after...
...motor to a cold water pipe? Straighten the water source line. • New installation? See "Water Supply Requirements." Make sure the refrigerator is leaking from the dispenser. Ice will not close completely, see "The doors will not operate properly • Freezer door closed completely... completely." • Ice bin installed correctly? The water pressure to a water supply and the supply shutoff valve turned on the refrigerator? The filter may not be clogged or incorrectly installed. • Is a reverse osmosis water filtration system connected to 3 seconds after...

Use and Care Guide
Page 21
... for you want us as you want us, whenever you to power fluctuations. $250 Food Loss Protection annually for any covered refrigerator or freezer. Your new Kenmore ® product is a risk free purchase. Here's what the Agreement* includes: Parts and labor needed to time. we will...support from a Sears representative on some items. For full details call 1-800-4-MY-HOME ®and ask for years of your authorized Kenmore dealer. no functional failure excluded from time to help by a force of more product failures occur within twelve months. Product replacement if...
... for you want us as you want us, whenever you to power fluctuations. $250 Food Loss Protection annually for any covered refrigerator or freezer. Your new Kenmore ® product is a risk free purchase. Here's what the Agreement* includes: Parts and labor needed to time. we will...support from a Sears representative on some items. For full details call 1-800-4-MY-HOME ®and ask for years of your authorized Kenmore dealer. no functional failure excluded from time to help by a force of more product failures occur within twelve months. Product replacement if...


