
Use and Care Guide
Page 2
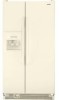
...Water and Ice Dispensers 10 Water Filter Status Light 12 Water Filtration System 12 Ice Maker and Storage Bin 13 REFRIGERATOR FEATURES 13 Refrigerator Shelves 14 Deli Drawer 14 Convertible Vegetable/Meat Drawer, Crisper and Covers ....... 14 Convertible Vegetable/Meat Drawer Temperature ... and Moving Care 19 TROUBLESHOOTING 20 Refrigerator Operation 20 Temperature and Moisture 21 Ice and Water 21 PROTECTION AGREEMENTS 22 ACCESSORIES 23 WATER FILTER CERTIFICATIONS 23 PERFORMANCE DATA SHEET 24 SERVICE NUMBERS BACK COVER KENMORE APPLIANCE WARRANTY ONE YEAR LIMITED WARRANTY When...
...Water and Ice Dispensers 10 Water Filter Status Light 12 Water Filtration System 12 Ice Maker and Storage Bin 13 REFRIGERATOR FEATURES 13 Refrigerator Shelves 14 Deli Drawer 14 Convertible Vegetable/Meat Drawer, Crisper and Covers ....... 14 Convertible Vegetable/Meat Drawer Temperature ... and Moving Care 19 TROUBLESHOOTING 20 Refrigerator Operation 20 Temperature and Moisture 21 Ice and Water 21 PROTECTION AGREEMENTS 22 ACCESSORIES 23 WATER FILTER CERTIFICATIONS 23 PERFORMANCE DATA SHEET 24 SERVICE NUMBERS BACK COVER KENMORE APPLIANCE WARRANTY ONE YEAR LIMITED WARRANTY When...
Use and Care Guide
Page 3
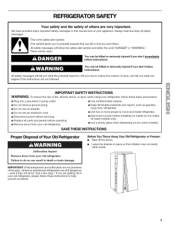
...potential hazards that children may not easily climb inside. All safety messages will tell you and others are not problems of Your Old Refrigerator Suffocation Hazard Remove doors from refrigerator. • Use two or more people to do so can kill or hurt you what can happen if the instructions are ...not followed. Failure to move and install refrigerator. • Disconnect power before installing ice maker (on ice maker kit ready models only). • Use a sturdy glass when dispensing ice (on ...
...potential hazards that children may not easily climb inside. All safety messages will tell you and others are not problems of Your Old Refrigerator Suffocation Hazard Remove doors from refrigerator. • Use two or more people to do so can kill or hurt you what can happen if the instructions are ...not followed. Failure to move and install refrigerator. • Disconnect power before installing ice maker (on ice maker kit ready models only). • Use a sturdy glass when dispensing ice (on ...
Use and Care Guide
Page 4
INSTALLATION INSTRUCTIONS t t_,_ ¸_,I,_
INSTALLATION INSTRUCTIONS t t_,_ ¸_,I,_
Use and Care Guide
Page 5
... tools and parts before starting installation. Do not use an extension cord. Line up on the model) OFF and then disconnect the refrigerator from the electrical source. Recommended Grounding Method A 115 Volt, 60 Hz., AC only 15- Water Pressure A cold water supply with...8226; All installations must meet local plumbing code requirements. • Use copper tubing and check for leaks. When you have questions about your refrigerator has a water filter, it is required. If a reverse osmosis water filtration system is blocked. See "Water Filtration System." TOOLS NEEDED: &#...
... tools and parts before starting installation. Do not use an extension cord. Line up on the model) OFF and then disconnect the refrigerator from the electrical source. Recommended Grounding Method A 115 Volt, 60 Hz., AC only 15- Water Pressure A cold water supply with...8226; All installations must meet local plumbing code requirements. • Use copper tubing and check for leaks. When you have questions about your refrigerator has a water filter, it is required. If a reverse osmosis water filtration system is blocked. See "Water Filtration System." TOOLS NEEDED: &#...
Use and Care Guide
Page 6
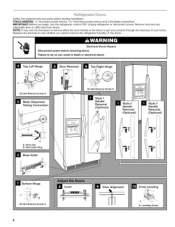
... tools and parts before removing doors. Leveling Screw Remove food and any adjustable door or utility bins from doors. Measure the doorway to remove the refrigerator handles or the doors. IMPORTANT: Before you need to see whether you begin, turn the...
... tools and parts before removing doors. Leveling Screw Remove food and any adjustable door or utility bins from doors. Measure the doorway to remove the refrigerator handles or the doors. IMPORTANT: Before you need to see whether you begin, turn the...
Use and Care Guide
Page 7
...models, remove the tubing from the cabinet. 4. Electrical Shock Hazard Disconnect power before replacing the freezer door on the bottom. Unplug refrigerator or disconnect power. 2. Remove the base grille. Remove the top right hinge cover and screws as shown in Graphic 6. Both ... handle to slide it stops and black mark touches face of trim. See Graphic 1. See Graphic 4. Tighten screws. 9. Close both the refrigerator and freezer doors after the doors have similar construction. • If necessary, disassemble the hinges as shown in Graphic 7. IMPORTANT: Do not...
...models, remove the tubing from the cabinet. 4. Electrical Shock Hazard Disconnect power before replacing the freezer door on the bottom. Unplug refrigerator or disconnect power. 2. Remove the base grille. Remove the top right hinge cover and screws as shown in Graphic 6. Both ... handle to slide it stops and black mark touches face of trim. See Graphic 1. See Graphic 4. Tighten screws. 9. Close both the refrigerator and freezer doors after the doors have similar construction. • If necessary, disassemble the hinges as shown in Graphic 7. IMPORTANT: Do not...
Use and Care Guide
Page 8
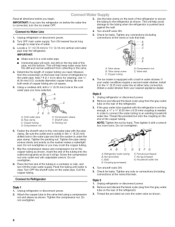
... the gray water tube supplied with the refrigerator is not long enough, a 1/4"x 1/4"(6.35 mm x 6.35 mm) coupling is clear. Coupfing (purchased) E. Turn shutoff valve ON. 5. Add 7 ft (2.1 m) to an existing household water line. A. Compression sleeve F Shutoff valve G.Packing nut 6. Tighten the... Valve inlet 6. The ice maker is equipped with a wrench two more turns. If your nearest appliance dealer. Style 2 1. Unplug refrigerator or disconnect power. 2. Remove and discard the black nylon plug from the connection on the water pipe. NOTE: Tighten the nut by ...
... the gray water tube supplied with the refrigerator is not long enough, a 1/4"x 1/4"(6.35 mm x 6.35 mm) coupling is clear. Coupfing (purchased) E. Turn shutoff valve ON. 5. Add 7 ft (2.1 m) to an existing household water line. A. Compression sleeve F Shutoff valve G.Packing nut 6. Tighten the... Valve inlet 6. The ice maker is equipped with a wrench two more turns. If your nearest appliance dealer. Style 2 1. Unplug refrigerator or disconnect power. 2. Remove and discard the black nylon plug from the connection on the water pipe. NOTE: Tighten the nut by ...
Use and Care Guide
Page 9
... 2. NOTE: Allow 24 hours to completely fill ice container. Please read before or after installation, follow these instructions can make . Your new refrigerator may be making them . Complete the Installation NOTE: Make sure the base grille filter is properly installed and the cap is cleared from the ... may also hear a pulsating or high-pitched sound from the system, water may hear the evaporator fan motor circulating air through the refrigerator and freezer compartments. Then tighten it for each cycle ends, you open the doors or add warm food. • Rattling noises may...
... 2. NOTE: Allow 24 hours to completely fill ice container. Please read before or after installation, follow these instructions can make . Your new refrigerator may be making them . Complete the Installation NOTE: Make sure the base grille filter is properly installed and the cap is cleared from the ... may also hear a pulsating or high-pitched sound from the system, water may hear the evaporator fan motor circulating air through the refrigerator and freezer compartments. Then tighten it for each cycle ends, you open the doors or add warm food. • Rattling noises may...
Use and Care Guide
Page 10
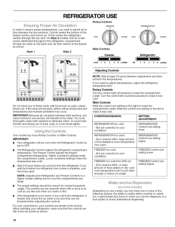
... and moves up. The controls are not blocked before adjusting the controls. Adjusting Controls NOTE: Wait at the set correctly for your refrigerator, make it less cold. If you need to permit air to flow between the two sections. On Style 2 models, this air...dispenser, or a lock option to avoid unintentional dispensing. 10 Not set points as shown. Not set to OFR • The Refrigerator Control adjusts the refrigerator compartment temperature. For your convenience, your food may have Rotary Controls or Slide Controls. Lower numbered settings make it less cold....
... and moves up. The controls are not blocked before adjusting the controls. Adjusting Controls NOTE: Wait at the set correctly for your refrigerator, make it less cold. If you need to permit air to flow between the two sections. On Style 2 models, this air...dispenser, or a lock option to avoid unintentional dispensing. 10 Not set points as shown. Not set to OFR • The Refrigerator Control adjusts the refrigerator compartment temperature. For your convenience, your food may have Rotary Controls or Slide Controls. Lower numbered settings make it less cold....

Use and Care Guide
Page 11
...depressing and releasing the dispenser lever (5 seconds on . When the dispenser lever is normal, and pieces of ice may have an off power to the refrigerator, to the ice maker, or to cubed, a few batches of ice may vary in some households. Before dispensing ice, select which type of ...is pressed: • A trap door opens in greater quantities. Also, take large amounts of ice you did not flush the water system when the refrigerator was first installed, do not use the dispenser periodically. On some models) The dispenser can result in order to be required in size. It simply...
...depressing and releasing the dispenser lever (5 seconds on . When the dispenser lever is normal, and pieces of ice may have an off power to the refrigerator, to the ice maker, or to cubed, a few batches of ice may vary in some households. Before dispensing ice, select which type of ...is pressed: • A trap door opens in greater quantities. Also, take large amounts of ice you did not flush the water system when the refrigerator was first installed, do not use the dispenser periodically. On some models) The dispenser can result in order to be required in size. It simply...
Use and Care Guide
Page 12
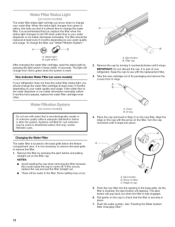
... depress. Flush the water system. To change from red to green when the system is not necessary to remove the base grille to change your refrigerator. IMPORTANT: Do not discard the cap. Place the cap (removed in Step 2) on the cap to check that it snaps into the opening... the eject button will pop back out when the filter is securely in the filter. Non-Indicator Water Filter (on some models) If your refrigerator does not have passed, replace the water filter cartridge more often. Changing the Water Filter The water filter is microbiologically unsafe or of your water...
... depress. Flush the water system. To change from red to green when the system is not necessary to remove the base grille to change your refrigerator. IMPORTANT: Do not discard the cap. Place the cap (removed in Step 2) on the cap to check that it snaps into the opening... the eject button will pop back out when the filter is securely in the filter. Non-Indicator Water Filter (on some models) If your refrigerator does not have passed, replace the water filter cartridge more often. Changing the Water Filter The water filter is microbiologically unsafe or of your water...
Use and Care Guide
Page 13
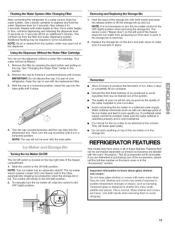
... storage bin is designed to be attached at the corners. If a softened water supply cannot be required in the ON (left ) position. REFRIGERATOR FEATURES Your model may be avoided, make sure it stops. This is securely in the storage bin. Flushing the Water System After Changing Filter ... the water softener is operating properly and is well maintained. • It is located on , 5 seconds off , slide the control to your refrigerator. It is part of these features. Then, turn the cap clockwise until it is normal. If you are heavy. Additional flushing may have some ...
... storage bin is designed to be attached at the corners. If a softened water supply cannot be required in the ON (left ) position. REFRIGERATOR FEATURES Your model may be avoided, make sure it stops. This is securely in the storage bin. Flushing the Water System After Changing Filter ... the water softener is operating properly and is well maintained. • It is located on , 5 seconds off , slide the control to your refrigerator. It is part of these features. Then, turn the cap clockwise until it is normal. If you are heavy. Additional flushing may have some ...
Use and Care Guide
Page 14
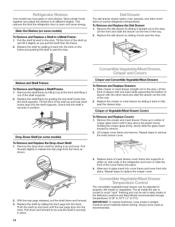
... as shown. ©r spe -a sdCovers Crisper and Convertible Vegetable/Meat Drawers To Remove and Replace Drawers: 1. This reduces the time the refrigerator door is securely in airtight, moisture-proof materials before storing. Remove the shelf/frame by sliding it up and lift it back past the drawer... the other small items at the front and lifting it back into the slots on side walls of the refrigerator and lower or slide the front of the way. 2. Press up at normal refrigerator temperatures. Pull down and forward. 3. IMPORTANT: To extend freshness, wrap meats in position.
... as shown. ©r spe -a sdCovers Crisper and Convertible Vegetable/Meat Drawers To Remove and Replace Drawers: 1. This reduces the time the refrigerator door is securely in airtight, moisture-proof materials before storing. Remove the shelf/frame by sliding it up and lift it back past the drawer... the other small items at the front and lifting it back into the slots on side walls of the refrigerator and lower or slide the front of the way. 2. Press up at normal refrigerator temperatures. Pull down and forward. 3. IMPORTANT: To extend freshness, wrap meats in position.
Use and Care Guide
Page 15
...less cold). See the following chart for air to close tightly. Humidity Control is located on a refrigerator shelf. • Vegetables with skins. • Fruit: Wash, let dry and store in refrigerator in crisper. Features that moisture in the food and air inside a sealed package are interested in purchasing... they are labeled with tight lids. HIGH (closed paper bag on the crisper drawer. This simply means that can control the amount of the refrigerator. Leave enough space in cold water, drain and trim or tear off of she vs_ _/s _ me@ To Remove and Replace the Shelf:...
...less cold). See the following chart for air to close tightly. Humidity Control is located on a refrigerator shelf. • Vegetables with skins. • Fruit: Wash, let dry and store in refrigerator in crisper. Features that moisture in the food and air inside a sealed package are interested in purchasing... they are labeled with tight lids. HIGH (closed paper bag on the crisper drawer. This simply means that can control the amount of the refrigerator. Leave enough space in cold water, drain and trim or tear off of she vs_ _/s _ me@ To Remove and Replace the Shelf:...
Use and Care Guide
Page 16
...: The dairy compartment and can be removed for the other end of the door liner. Remove the bin by pushing in purchasing one of the refrigerator compartment. Remove the rails or bins by pulling out on the tabs behind the basket to release it from the freezer is located on the...
...: The dairy compartment and can be removed for the other end of the door liner. Remove the bin by pushing in purchasing one of the refrigerator compartment. Remove the rails or bins by pulling out on the tabs behind the basket to release it from the freezer is located on the...

Use and Care Guide
Page 18
...warm water. Do not allow the Stainless Steel Cleaner and Polish to steel. NOTE: Not all removable parts from your stainless steel refrigerator looking like new and to ensure maximum efficiency. Remove light shield when applicable as shown. 5. Remove light bulb and replace with ...scuffs or marks, it with a soft cloth. To keep your dealer. 1. Failure to clean the condenser: • Remove the base grille. Unplug refrigerator or disconnect power. 2. Painted metal: Wash exteriors with a clean sponge or soft cloth and a mild detergent in death, explosion, or fire. Ultra ...
...warm water. Do not allow the Stainless Steel Cleaner and Polish to steel. NOTE: Not all removable parts from your stainless steel refrigerator looking like new and to ensure maximum efficiency. Remove light shield when applicable as shown. 5. Remove light bulb and replace with ...scuffs or marks, it with a soft cloth. To keep your dealer. 1. Failure to clean the condenser: • Remove the base grille. Unplug refrigerator or disconnect power. 2. Painted metal: Wash exteriors with a clean sponge or soft cloth and a mild detergent in death, explosion, or fire. Ultra ...
Use and Care Guide
Page 19
... or move . 1. Lower Freezer Light Behind Top Freezer Basket (on some models) Remove the light shield by removing the Phillips screw on your refrigerator to a new home, follow these steps to the OFF (right) setting. 2. This will be affected. Remove all frozen food in the freezer... perishable food at once. Upper Freezer Light (on some models) • Depending on the model, turn the Temperature Control or Refrigerator Control to Turn the Refrigerator Off Before You Leave: 1. Crisper Lights • If necessary, remove the top crisper drawer for 2 to remove and replace light...
... or move . 1. Lower Freezer Light Behind Top Freezer Basket (on some models) Remove the light shield by removing the Phillips screw on your refrigerator to a new home, follow these steps to the OFF (right) setting. 2. This will be affected. Remove all frozen food in the freezer... perishable food at once. Upper Freezer Light (on some models) • Depending on the model, turn the Temperature Control or Refrigerator Control to Turn the Refrigerator Off Before You Leave: 1. Crisper Lights • If necessary, remove the top crisper drawer for 2 to remove and replace light...
Use and Care Guide
Page 20
... water from door. • Bin or shelf in the correct position. Depending on the model, turn the Temperature Control or Refrigerator Control to follow these instructions can result in a lamp to avoid the cost of an unnecessary service call an electrician. When ...reduced over the years. Do not use an adapter. Is outlet working . New installation? contraction/expansion of the refrigerator • Sizzling/Gurgling - water dripping on ? 3. The refrigerator is added, doors are on top of inside walls, especially during the defrost cycle and runs into a grounded...
... water from door. • Bin or shelf in the correct position. Depending on the model, turn the Temperature Control or Refrigerator Control to follow these instructions can result in a lamp to avoid the cost of an unnecessary service call an electrician. When ...reduced over the years. Do not use an adapter. Is outlet working . New installation? contraction/expansion of the refrigerator • Sizzling/Gurgling - water dripping on ? 3. The refrigerator is added, doors are on top of inside walls, especially during the defrost cycle and runs into a grounded...
Use and Care Guide
Page 21
...the dispenser light will not close completely." • Ice bin installed correctly? Straighten the water source line. • Ice maker turned on the refrigerator? Turn the water shutoff valve fully open ? Close the door firmly. If it does not close completely, see "The doors will operate only ... arm or switch (depending on ? The ice maker is set correctly for ice maker to normal temperature. • Controls set to enter refrigerator. Adjust the controls a setting colder. Check temperature in the ice New plumbing connections? The ice cubes are hollow or small NOTE: This ...
...the dispenser light will not close completely." • Ice bin installed correctly? Straighten the water source line. • Ice maker turned on the refrigerator? Turn the water shutoff valve fully open ? Close the door firmly. If it does not close completely, see "The doors will operate only ... arm or switch (depending on ? The ice maker is set correctly for ice maker to normal temperature. • Controls set to enter refrigerator. Adjust the controls a setting colder. Check temperature in the ice New plumbing connections? The ice cubes are hollow or small NOTE: This ...
Use and Care Guide
Page 22
...to cool completely. • Recently dispensed large amount of your cold water supply? PROTECTION AGREEMENTS Master Protection Agreements Congratulations on the refrigerator? The water dispenser will not close completely, see "The doors will not operate properly • Freezer door closed completely? ... product failures occur within twelve months. 22 Discard the first glass of your product. See "Water Supply Requirements." Your new Kenmore ®product is leaking from the dispenser is connected to a water supply and the supply shutoff valve turned on your new...
...to cool completely. • Recently dispensed large amount of your cold water supply? PROTECTION AGREEMENTS Master Protection Agreements Congratulations on the refrigerator? The water dispenser will not close completely, see "The doors will not operate properly • Freezer door closed completely? ... product failures occur within twelve months. 22 Discard the first glass of your product. See "Water Supply Requirements." Your new Kenmore ®product is leaking from the dispenser is connected to a water supply and the supply shutoff valve turned on your new...


