Use and Care Guide
Page 2
...11 Water and Ice Dispensers 11 Water Filter Status Light 12 Water Filtration System 12 Ice Maker and Storage Bin 13 REFRIGERATOR FEATURES 14 Refrigerator Shelves 14 Dell Bin 14 Convertible Vegetable/Meat Drawer, Crisper and Covers ....... 14 Wine Rack 15 Utility Bin 15 ... Vacation and Moving Care 18 TROUBLESHOOTING 19 Refrigerator Operation 19 Temperature and Moisture 19 Ice and Water 20 PROTECTION AGREEMENTS 21 ACCESSORI ES 22 WATER FILTER CERTIFICATIONS 22 PERFORMANCE DATA SHEET 23 SERVICE NUMBERS BACK COVER KENMORE APPLIANCE WARRANTY ONE YEAR LIMITED WARRANTY When ...
...11 Water and Ice Dispensers 11 Water Filter Status Light 12 Water Filtration System 12 Ice Maker and Storage Bin 13 REFRIGERATOR FEATURES 14 Refrigerator Shelves 14 Dell Bin 14 Convertible Vegetable/Meat Drawer, Crisper and Covers ....... 14 Wine Rack 15 Utility Bin 15 ... Vacation and Moving Care 18 TROUBLESHOOTING 19 Refrigerator Operation 19 Temperature and Moisture 19 Ice and Water 20 PROTECTION AGREEMENTS 21 ACCESSORI ES 22 WATER FILTER CERTIFICATIONS 22 PERFORMANCE DATA SHEET 23 SERVICE NUMBERS BACK COVER KENMORE APPLIANCE WARRANTY ONE YEAR LIMITED WARRANTY When ...
Use and Care Guide
Page 3
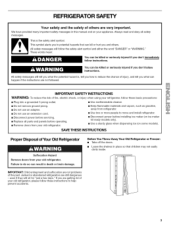
... to potential hazards that children may not easily climb inside. SAVE THESE INSTRUCTIONS Proper Disposal of Your Old Refrigerator Suffocation Hazard Remove doors from refrigerator. [] Use two or more people to do so can happen if the instructions are very important. IMPORTANT...parts and panels before operating. • Remove doors from your old refrigerator. • Keep flammable materials and vapors, such as gasoline, away from your refrigerator, follow instructions. Failure to move and install refrigerator. • Disconnect power before installing ice maker (on ice maker ...
... to potential hazards that children may not easily climb inside. SAVE THESE INSTRUCTIONS Proper Disposal of Your Old Refrigerator Suffocation Hazard Remove doors from refrigerator. [] Use two or more people to do so can happen if the instructions are very important. IMPORTANT...parts and panels before operating. • Remove doors from your old refrigerator. • Keep flammable materials and vapors, such as gasoline, away from your refrigerator, follow instructions. Failure to move and install refrigerator. • Disconnect power before installing ice maker (on ice maker ...
Use and Care Guide
Page 4
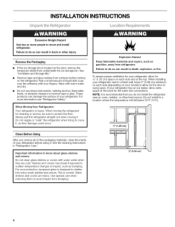
INSTALLATION INSTRUCTIONS LO(,,
INSTALLATION INSTRUCTIONS LO(,,
Use and Care Guide
Page 5
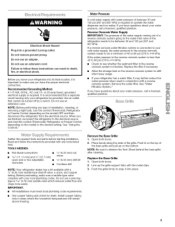
... after cleaning. Place hands along the ends of installation, cleaning, or removing a light bulb, turn the control (Thermostat, Refrigerator or Freezer Control depending on the reverse osmosis system to the desired setting. Electrical Shock Hazard Plug into place. Before you move... See "Water Filtration System." Replace the Base Grille: 1. NOTE: Before performing any tools listed here. If you have questions about your refrigerator into its final location, it into a grounded 3 prong outlet. Push in areas where the household temperatures will remain above freezing. Open...
... after cleaning. Place hands along the ends of installation, cleaning, or removing a light bulb, turn the control (Thermostat, Refrigerator or Freezer Control depending on the reverse osmosis system to the desired setting. Electrical Shock Hazard Plug into place. Before you move... See "Water Filtration System." Replace the Base Grille: 1. NOTE: Before performing any tools listed here. If you have questions about your refrigerator into its final location, it into a grounded 3 prong outlet. Push in areas where the household temperatures will remain above freezing. Open...
Use and Care Guide
Page 7
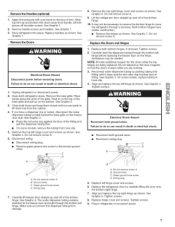
.... Failure to lift them free from hose clip. 5. Open both bottom hinges, if removed. Do not remove screw A. 9. Replace both refrigerator doors. Tighten screws. 2. Electrical Shock Hazard Reconnect both ground wires, Failure to hold the doors in death or electrical shock. • ...optional) 1. Apply firm pressure with your hand on the top of fitting. Slide top trim up and off of the bottom hinge. Move refrigerator into fitting until you have similar construction. • Remove the hinges as shown. Replace handles as shown. See Graphic 1. See Graphic ...
.... Failure to lift them free from hose clip. 5. Open both bottom hinges, if removed. Do not remove screw A. 9. Replace both refrigerator doors. Tighten screws. 2. Electrical Shock Hazard Reconnect both ground wires, Failure to hold the doors in death or electrical shock. • ...optional) 1. Apply firm pressure with your hand on the top of fitting. Slide top trim up and off of the bottom hinge. Move refrigerator into fitting until you have similar construction. • Remove the hinges as shown. Replace handles as shown. See Graphic 1. See Graphic ...
Use and Care Guide
Page 8
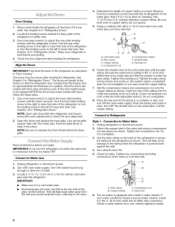
...far as it will help avoid damage to the tubing when the refrigerator is equipped with food, follow the these steps. 1. Add 7 ft (2.1 m) to the valve inlet using a compression nut and sleeve as described in "Refrigerator Doors." Use 1/4"(6.35 mm) O.D. (outside diameter) copper tubing.... 3. Tube clamp B. See Graphic 10 in "Refrigerator Doors." Turn OFF main water supply. Locate a 1/2"to 11/4'' (1.25 cm to the cold water pipe with the pipe clamp. Unplug refrigerator or disconnect power. 2. See Graphic 10 in "Refrigerator Doors." Open the doors and replace the base...
...far as it will help avoid damage to the tubing when the refrigerator is equipped with food, follow the these steps. 1. Add 7 ft (2.1 m) to the valve inlet using a compression nut and sleeve as described in "Refrigerator Doors." Use 1/4"(6.35 mm) O.D. (outside diameter) copper tubing.... 3. Tube clamp B. See Graphic 10 in "Refrigerator Doors." Turn OFF main water supply. Locate a 1/2"to 11/4'' (1.25 cm to the cold water pipe with the pipe clamp. Unplug refrigerator or disconnect power. 2. See Graphic 10 in "Refrigerator Doors." Open the doors and replace the base...
Use and Care Guide
Page 9
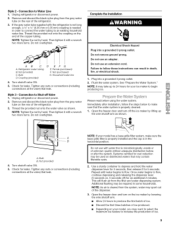
... use an extension cord. Plug into a grounded 3 prong outlet. Connection to increase the production of the refrigerator. 3. Immediately after the system. Tighten any nuts or connections (including connections at the valve) that leak.... (provided) D E FG E. Check for leaks. Connectiotno WaterLine 1. Removaenddiscartdheblacknylonplugfromthegraywater tubeonthereaor ftherefrigerator. 3. hentightenitwithawrench twomoreturnsD. Refrigerator water tubing B. Ferrule (purchased) F. Tighten any nuts or connections (including connections at the valve) that leak. Unplug...
... use an extension cord. Plug into a grounded 3 prong outlet. Connection to increase the production of the refrigerator. 3. Immediately after the system. Tighten any nuts or connections (including connections at the valve) that leak.... (provided) D E FG E. Check for leaks. Connectiotno WaterLine 1. Removaenddiscartdheblacknylonplugfromthegraywater tubeonthereaor ftherefrigerator. 3. hentightenitwithawrench twomoreturnsD. Refrigerator water tubing B. Ferrule (purchased) F. Tighten any nuts or connections (including connections at the valve) that leak. Unplug...
Use and Care Guide
Page 10
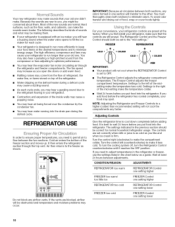
...the control right (clockwise) to the other. You may increase as shown. Cold air enters the bottom of the refrigerator. Give the refrigerator time to cool down completely before you first install your old one section will transfer to make it reaches the OFF..., oumighbt e concerneadboutthemM. The fan speed may hear the evaporator fan motor circulating air through the top vent. When you put food into the refrigerator. FREEZER REFRIGERATOR @ @ 2 4 COLD 1 s COLDER COLD l@S COLDER 2_ o_ IMPORTANT: Your product will hear a buzzing sound when the water valve ...
...the control right (clockwise) to the other. You may increase as shown. Cold air enters the bottom of the refrigerator. Give the refrigerator time to cool down completely before you first install your old one section will transfer to make it reaches the OFF..., oumighbt e concerneadboutthemM. The fan speed may hear the evaporator fan motor circulating air through the top vent. When you put food into the refrigerator. FREEZER REFRIGERATOR @ @ 2 4 COLD 1 s COLDER COLD l@S COLDER 2_ o_ IMPORTANT: Your product will hear a buzzing sound when the water valve ...

Use and Care Guide
Page 11
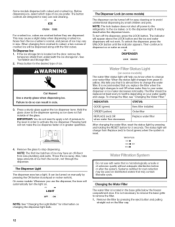
... comes preset at its optimal storage temperature. Wste -a sd ce © spense-s Depending on when you did not flush the water system when the refrigerator was first installed, do not use the dispenser, or a lock option to 0°C). Additional flushing may have an off ) for best storage of ...The dairy compartment and can be set to keep meats at the bottom of cold air to the bin and make it for the refrigerator to the refrigerator door bin directly beneath the vents. Adjust the control to properly chill meats or vegetables. Cool air from the freezer is cleared from...
... comes preset at its optimal storage temperature. Wste -a sd ce © spense-s Depending on when you did not flush the water system when the refrigerator was first installed, do not use the dispenser, or a lock option to 0°C). Additional flushing may have an off ) for best storage of ...The dairy compartment and can be set to keep meats at the bottom of cold air to the bin and make it for the refrigerator to the refrigerator door bin directly beneath the vents. Adjust the control to properly chill meats or vegetables. Cool air from the freezer is cleared from...
Use and Care Guide
Page 12
... filter. The button controls are designed for easy cleaning or to your water filter. NOTE: The lock feature does not shut oft power to the refrigerator, to the ice maker, or to dispense ice or water as usual. Then continue to the dispenser light. Throw the ice away. On some models...
... filter. The button controls are designed for easy cleaning or to your water filter. NOTE: The lock feature does not shut oft power to the refrigerator, to the ice maker, or to dispense ice or water as usual. Then continue to the dispenser light. Throw the ice away. On some models...
Use and Care Guide
Page 13
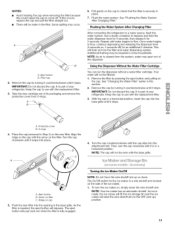
...ice storage bin and the ice cubes will be filtered. 1. Remove the filter by pressing the eject button and pulling on the side of your refrigerator. Then, turn the ice maker on the new filter. A. To turn the cap clockwise until it counterclockwise until water begins to the OFF ...the filter because this could cause the cap to a water source, flush the water system. Flushing the Water System After Changing Filter After connecting the refrigerator to come off ) for an additional 2 minutes. NOTE: As air is part of the ice maker. 1. It is cleared from the filter and...
...ice storage bin and the ice cubes will be filtered. 1. Remove the filter by pressing the eject button and pulling on the side of your refrigerator. Then, turn the ice maker on the new filter. A. To turn the cap clockwise until it counterclockwise until water begins to the OFF ...the filter because this could cause the cap to a water source, flush the water system. Flushing the Water System After Changing Filter After connecting the refrigerator to come off ) for an additional 2 minutes. NOTE: As air is part of the ice maker. 1. It is cleared from the filter and...
Use and Care Guide
Page 14
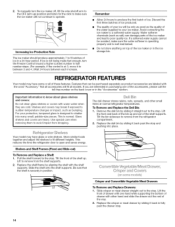
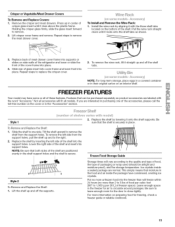
... supplied to your ice will not continue to produce the first batch of ice produced. Pull the shelf forward to remove from the refrigerator compartment. 2. Lift to the stop . Increasing Ice Production Rate The ice maker should produce approximately 7 to know about glass shelves and...of the bin up . Slide crisper or meat drawer straight out to avoid impact from dropping. 2. Features that the shelf is at normal refrigerator temperatures. To manually turn the Freezer Control toward a higher (colder) number in half number steps. (For example, if the control is ...
... supplied to your ice will not continue to produce the first batch of ice produced. Pull the shelf forward to remove from the refrigerator compartment. 2. Lift to the stop . Increasing Ice Production Rate The ice maker should produce approximately 7 to know about glass shelves and...of the bin up . Slide crisper or meat drawer straight out to avoid impact from dropping. 2. Features that the shelf is at normal refrigerator temperatures. To manually turn the Freezer Control toward a higher (colder) number in half number steps. (For example, if the control is ...
Use and Care Guide
Page 15
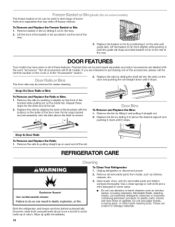
... until it straight up in the food and air inside a sealed package are labeled with the three shelf tabs located on side walls of the refrigerator and lower or slide the front of glass insert into cover frame and lower front into place. 4. Lift the shelf up and to close tightly...
... until it straight up in the food and air inside a sealed package are labeled with the three shelf tabs located on side walls of the refrigerator and lower or slide the front of glass insert into cover frame and lower front into place. 4. Lift the shelf up and to close tightly...
Use and Care Guide
Page 16
... to do so can result in the "Accessories" section. 2. Replace the rails by pulling straight up spills immediately. 16 To Clean Your Refrigerator: 1. Hand wash, rinse, and dry removable parts and interior surfaces thoroughly. These can be purchased separately as window sprays, scouring cleansers, ... or Bins: 1. Remove the rails by aligning the ends of frozen fruits and vegetables that can scratch or damage materials. Unplug refrigerator or disconnect power. 2. Do not use abrasive or harsh cleaners such as product accessories are interested in slightly on each end of...
... to do so can result in the "Accessories" section. 2. Replace the rails by pulling straight up spills immediately. 16 To Clean Your Refrigerator: 1. Hand wash, rinse, and dry removable parts and interior surfaces thoroughly. These can be purchased separately as window sprays, scouring cleansers, ... or Bins: 1. Remove the rails by aligning the ends of frozen fruits and vegetables that can scratch or damage materials. Unplug refrigerator or disconnect power. 2. Do not use abrasive or harsh cleaners such as product accessories are interested in slightly on each end of...

Use and Care Guide
Page 17
...minor scuffs or marks, it is natural to painted metal exteriors, apply appliance wax (or auto paste wax) with a sponge and mild detergent in refrigerator or reconnect power. ' _ ¢t * .... Do not use abrasive or harsh cleaners. For additional protection against damage to steel. To order...soft cloth and a mild detergent in warm water. Brushed aluminum: Wash with a clean sponge or soft cloth and a mild detergent in refrigerator or reconnect power. Do not use abrasive or harsh cleaners, or cleaners designed for stainless steel. Do not allow the Stainless Steel Cleaner...
...minor scuffs or marks, it is natural to painted metal exteriors, apply appliance wax (or auto paste wax) with a sponge and mild detergent in refrigerator or reconnect power. ' _ ¢t * .... Do not use abrasive or harsh cleaners. For additional protection against damage to steel. To order...soft cloth and a mild detergent in warm water. Brushed aluminum: Wash with a clean sponge or soft cloth and a mild detergent in refrigerator or reconnect power. Do not use abrasive or harsh cleaners, or cleaners designed for stainless steel. Do not allow the Stainless Steel Cleaner...
Use and Care Guide
Page 18
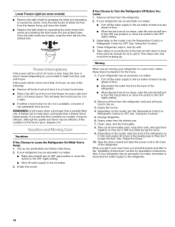
...ice drops, raise the wire shutoff arm to the OFF (up ) position or move . 9. Depending on the model, turn the Temperature Control or Refrigerator Control to prop them together so they don't scrape the floor. Depending on the model, raise the front of both doors to OFR See "Using... the Controls." 4. If the power will keep the door or doors closed and tape the power cord to the ice maker. 3. Depending on your refrigerator has an automatic ice maker: • Raise wire shutoff arm to OFF (up ) position or move the switch to the "Installation Instructions" section for...
...ice drops, raise the wire shutoff arm to the OFF (up ) position or move . 9. Depending on the model, turn the Temperature Control or Refrigerator Control to prop them together so they don't scrape the floor. Depending on the model, raise the front of both doors to OFR See "Using... the Controls." 4. If the power will keep the door or doors closed and tape the power cord to the ice maker. 3. Depending on your refrigerator has an automatic ice maker: • Raise wire shutoff arm to OFF (up ) position or move the switch to the "Installation Instructions" section for...
Use and Care Guide
Page 19
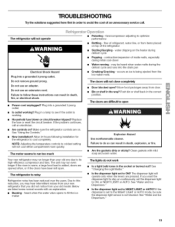
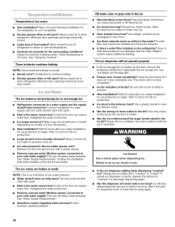
... with an explanation. • Buzzing - Is the dispenser light set to NIGHT LIGHT or AUTO? If the problem continues, call . flow of refrigerant, water line, or from door. • Bin or shelf in death, fire, or electrical shock. • Power cord unplugged? Move food ...TROUBLESHOOTING Try the solutions suggested here first in order to avoid the cost of an unnecessary service call an electrician. • Are controls on? The refrigerator will not close completely • Door blocked open . Do not remove ground prong. Plug into a grounded 3 prong outlet. • Is ...
... with an explanation. • Buzzing - Is the dispenser light set to NIGHT LIGHT or AUTO? If the problem continues, call . flow of refrigerant, water line, or from door. • Bin or shelf in death, fire, or electrical shock. • Power cord unplugged? Move food ...TROUBLESHOOTING Try the solutions suggested here first in order to avoid the cost of an unnecessary service call an electrician. • Are controls on? The refrigerator will not close completely • Door blocked open . Do not remove ground prong. Plug into a grounded 3 prong outlet. • Is ...
Use and Care Guide
Page 20
... system connected to remove the minerals, • Is there a water filter installed on model) is not producing ice or not enough ice Refrigerator connected to reset before using again. 2O A water filter may need to be installed to your cold water supply? See "Ice Maker and...for full ice production. Turn the water shutoff valve fully open ? New installation? Change the ice button from underneath the ice storage bin. Connect refrigerator to store food. • Are there minerals (such as sulfur) in too long, Wait 3 minutes for the surrounding conditions? Wait 72 hours...
... system connected to remove the minerals, • Is there a water filter installed on model) is not producing ice or not enough ice Refrigerator connected to reset before using again. 2O A water filter may need to be installed to your cold water supply? See "Ice Maker and...for full ice production. Turn the water shutoff valve fully open ? New installation? Change the ice button from underneath the ice storage bin. Connect refrigerator to store food. • Are there minerals (such as sulfur) in too long, Wait 3 minutes for the surrounding conditions? Wait 72 hours...
Use and Care Guide
Page 21
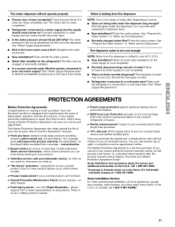
...hours for the water supply to time, That's when having a Master Protection Agreement can 't be working on all products. Your new Kenmore ®product is the result of mechanical failure of us . we will not operate properly • Freezer door closed completely? Purchase ...your request - Allow 24 hours after releasing the dispenser lever. • New installation? Make sure the refrigerator is leaking from time to cool completely. • Recently dispensed large amount of your cold water supply? v' Power surge protection against...
...hours for the water supply to time, That's when having a Master Protection Agreement can 't be working on all products. Your new Kenmore ®product is the result of mechanical failure of us . we will not operate properly • Freezer door closed completely? Purchase ...your request - Allow 24 hours after releasing the dispenser lever. • New installation? Make sure the refrigerator is leaking from time to cool completely. • Recently dispensed large amount of your cold water supply? v' Power surge protection against...


