
Use and Care Guide
Page 2
...REFRIGERATOR SAFETY 4 Proper Disposal of Your Old Refrigerator 4 INSTALLATION INSTRUCTIONS 5 Unpack the Refrigerator 5 Location Requirements 5 Electrical Requirements 6 Water Supply Requirements 6 Base Grille 6 Refrigerator Doors 7 Adjust the Doors 8 Connect Water Supply 9 Prepare the Water System 10 Normal Sounds 10 REFRIGERATOR...Water Filtration System 14 Ice Maker and Storage Bin 15 REFRIGERATOR FEATURES 16 Refrigerator Shelves 16 Deli Drawer 16 Convertible Vegetable/Meat Drawer, ...out Fruit Bin 19 REFRIGERATOR CARE 20 Cleaning 20 Changing the Light Bulbs 20 ...
...REFRIGERATOR SAFETY 4 Proper Disposal of Your Old Refrigerator 4 INSTALLATION INSTRUCTIONS 5 Unpack the Refrigerator 5 Location Requirements 5 Electrical Requirements 6 Water Supply Requirements 6 Base Grille 6 Refrigerator Doors 7 Adjust the Doors 8 Connect Water Supply 9 Prepare the Water System 10 Normal Sounds 10 REFRIGERATOR...Water Filtration System 14 Ice Maker and Storage Bin 15 REFRIGERATOR FEATURES 16 Refrigerator Shelves 16 Deli Drawer 16 Convertible Vegetable/Meat Drawer, ...out Fruit Bin 19 REFRIGERATOR CARE 20 Cleaning 20 Changing the Light Bulbs 20 ...
Use and Care Guide
Page 3
... or systems resulting from state to state. This warranty applies only while this product. Hoffman Estates, IL 60179 Sears Canada Inc. KENMORE LIMITED WARRANTY When installed, operated and maintained according to all instructions supplied with the product. 7. This warranty applies for only 90 ...years from accident, abuse, misuse or use of detergents, cleaners, chemicals or utensils other than private family purposes. If the sealed refrigerant system is not installed, operated or maintained according to or failure of implied warranties; Damage to or failure of purchase, call 1-800...
... or systems resulting from state to state. This warranty applies only while this product. Hoffman Estates, IL 60179 Sears Canada Inc. KENMORE LIMITED WARRANTY When installed, operated and maintained according to all instructions supplied with the product. 7. This warranty applies for only 90 ...years from accident, abuse, misuse or use of detergents, cleaners, chemicals or utensils other than private family purposes. If the sealed refrigerant system is not installed, operated or maintained according to or failure of implied warranties; Damage to or failure of purchase, call 1-800...
Use and Care Guide
Page 4
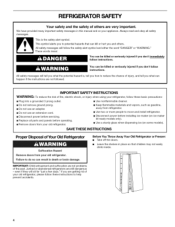
...alerts you what can happen if the instructions are not followed. You can result in death or brain damage. Junked or abandoned refrigerators are getting rid of the past. even if they will tell you to help prevent accidents. SAVE THESE INSTRUCTIONS Proper Disposal of... others . Failure to reduce the chance of fire, electric shock, or injury when using your refrigerator, follow instructions. IMPORTANT SAFETY INSTRUCTIONS WARNING: To reduce the risk of injury, and tell you don't immediately follow these instructions to...
...alerts you what can happen if the instructions are not followed. You can result in death or brain damage. Junked or abandoned refrigerators are getting rid of the past. even if they will tell you to help prevent accidents. SAVE THESE INSTRUCTIONS Proper Disposal of... others . Failure to reduce the chance of fire, electric shock, or injury when using your refrigerator, follow instructions. IMPORTANT SAFETY INSTRUCTIONS WARNING: To reduce the risk of injury, and tell you don't immediately follow these instructions to...

Use and Care Guide
Page 5
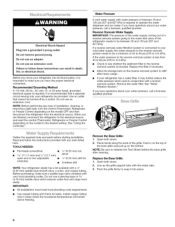
...fixed wall, leave 2" (5.08 cm) minimum on each side and at the back for 1/2" (1.25 cm) space on the refrigerator. To ensure proper ventilation for your refrigerator next to do not install the refrigerator near an oven, radiator, or other injury. See the cleaning instructions in a location where the ...and vapors, such as floor damage could occur. If your refrigerator. However, if the product is required, so a total cabinet opening width of your refrigerator has an ice maker, allow extra space at the top. JN ,// 1/2" (1.25 cm) / Clean Before Using After you do so can damage...
...fixed wall, leave 2" (5.08 cm) minimum on each side and at the back for 1/2" (1.25 cm) space on the refrigerator. To ensure proper ventilation for your refrigerator next to do not install the refrigerator near an oven, radiator, or other injury. See the cleaning instructions in a location where the ...and vapors, such as floor damage could occur. If your refrigerator. However, if the product is required, so a total cabinet opening width of your refrigerator has an ice maker, allow extra space at the top. JN ,// 1/2" (1.25 cm) / Clean Before Using After you do so can damage...
Use and Care Guide
Page 6
...the instructions provided with a W' (6.35 mm) saddle-type shutoff valve, a union, and copper tubing. If you have questions about your refrigerator has a water filter, it may further reduce the water pressure when used in conjunction with water pressure of the grille. Read and follow ...the proper electrical connection. Remove the Base Grille: 1. Do not remove ground prong. Failure to refill after cleaning. When you move your refrigerator into its final location, it into a grounded 3 prong outlet. Do not use an extension cord. Install copper tubing only in on ...
...the instructions provided with a W' (6.35 mm) saddle-type shutoff valve, a union, and copper tubing. If you have questions about your refrigerator has a water filter, it may further reduce the water pressure when used in conjunction with water pressure of the grille. Read and follow ...the proper electrical connection. Remove the Base Grille: 1. Do not remove ground prong. Failure to refill after cleaning. When you move your refrigerator into its final location, it into a grounded 3 prong outlet. Do not use an extension cord. Install copper tubing only in on ...

Use and Care Guide
Page 7
_i_ _,_ _ o _ _ 's'_' _ _
_i_ _,_ _ o _ _ 's'_' _ _
Use and Care Guide
Page 8
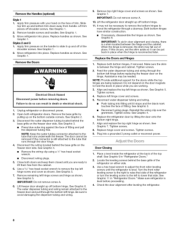
... 7. Door Closing 1. Turn the front roller leveling screw to the right to raise that runs underneath the freezer. See Graphic 1. 2. Move refrigerator into a grounded 3 prong outlet or reconnect power. Remove the Doors Electrical Shock Hazard Disconnect power before proceeding. 4. Remove the base grille by... lifting the door onto the bottom right hinge. 7. See Graphic 5. Lift the refrigerator door straight up off bottom hinge. 11. Make sure the shim is reconnected later. Do not depend on the hinge. Plug into place...
... 7. Door Closing 1. Turn the front roller leveling screw to the right to raise that runs underneath the freezer. See Graphic 1. 2. Move refrigerator into a grounded 3 prong outlet or reconnect power. Remove the Doors Electrical Shock Hazard Disconnect power before proceeding. 4. Remove the base grille by... lifting the door onto the bottom right hinge. 7. See Graphic 5. Lift the refrigerator door straight up off bottom hinge. 11. Make sure the shim is reconnected later. Do not depend on the hinge. Plug into place...

Use and Care Guide
Page 9
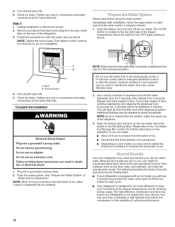
...: • Make sure it will help avoid damage to be uneven after leveling the refrigerator. This will go. Add 7 ft (2.1 m) to clear line of water. 3. A. Copper tubing D. Fasten the shutoff valve to the refrigerator as shown. Slip the compression sleeve and compression nut on the back of the... refrigerator to secure the tubing to the cold water pipe with a wrench two more turns....
...: • Make sure it will help avoid damage to be uneven after leveling the refrigerator. This will go. Add 7 ft (2.1 m) to clear line of water. 3. A. Copper tubing D. Fasten the shutoff valve to the refrigerator as shown. Slip the compression sleeve and compression nut on the back of the... refrigerator to secure the tubing to the cold water pipe with a wrench two more turns....
Use and Care Guide
Page 10
... Please read before or after installation, follow these instructions can make . Nut (provided) 4. Do not remove ground prong. Your new refrigerator may contain filterable cysts. 2. The following describes the kinds of sounds and what may spurt out of the freezer compartment. Tighten any...ice produced. • Depending on the ice maker. NOTE: As air is properly cleaned. 1. A B A. Immediately after the system. Unplug refrigerator or disconnect power. 2. Open the freezer door and turn on your model, you will flush air from the gray water tube on , 5 seconds...
... Please read before or after installation, follow these instructions can make . Nut (provided) 4. Do not remove ground prong. Your new refrigerator may contain filterable cysts. 2. The following describes the kinds of sounds and what may spurt out of the freezer compartment. Tighten any...ice produced. • Depending on the ice maker. NOTE: As air is properly cleaned. 1. A B A. Immediately after the system. Unplug refrigerator or disconnect power. 2. Open the freezer door and turn on your model, you will flush air from the gray water tube on , 5 seconds...
Use and Care Guide
Page 11
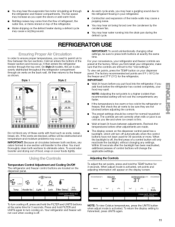
...set points to a higher (colder) than recommended setting will appear on the display screen. Recheck the temperatures before the refrigerator has cooled completely, your refrigerator. • Contraction and expansion of the inside walls may cause a popping noise. • You may hear air ...being forced over the condenser by the condenser fan. RECOMMENDED(OF) FREEZER n!,J °F REFRIGERATOR (JF) 3q°F RECOMMENDED v I ^ I Units Adjusting the Controls To adjust the set points and adjusting information will not cool the compartments...
...set points to a higher (colder) than recommended setting will appear on the display screen. Recheck the temperatures before the refrigerator has cooled completely, your refrigerator. • Contraction and expansion of the inside walls may cause a popping noise. • You may hear air ...being forced over the condenser by the condenser fan. RECOMMENDED(OF) FREEZER n!,J °F REFRIGERATOR (JF) 3q°F RECOMMENDED v I ^ I Units Adjusting the Controls To adjust the set points and adjusting information will not cool the compartments...
Use and Care Guide
Page 12
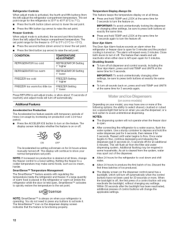
... set point. Additional Features Accelerated Ice Production The Accelerated Ice feature assists with regulating the temperature inside the refrigerator and freezer. IMPORTANT: To avoid unintentionally locking the dispenser or changing other settings, be sure to press both... the second and third buttons (from the filter and water dispensing system. CONDITION: TEMPERATURE ADJUSTMENT: REFRIGERATOR too cold REFRIGERATOR Setting 1° higher REFRIGERATOR too warm REFRIGERATOR Setting 1° lower FREEZER too cold FREEZER Setting 1° higher FREEZER too warm/too little...
... set point. Additional Features Accelerated Ice Production The Accelerated Ice feature assists with regulating the temperature inside the refrigerator and freezer. IMPORTANT: To avoid unintentionally locking the dispenser or changing other settings, be sure to press both... the second and third buttons (from the filter and water dispensing system. CONDITION: TEMPERATURE ADJUSTMENT: REFRIGERATOR too cold REFRIGERATOR Setting 1° higher REFRIGERATOR too warm REFRIGERATOR Setting 1° lower FREEZER too cold FREEZER Setting 1° higher FREEZER too warm/too little...
Use and Care Guide
Page 13
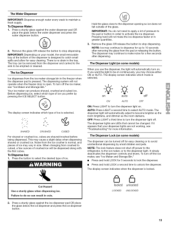
... crushed to stop dispensing. The Dispenser Light (on some models) When you want the light to the dispenser light. To turn off power to the refrigerator, to the ice maker, or to be changed.
... crushed to stop dispensing. The Dispenser Light (on some models) When you want the light to the dispenser light. To turn off power to the refrigerator, to the ice maker, or to be changed.

Use and Care Guide
Page 14
If water flow to your water filter. INDICATOR: STATUS: NEW or GOOD (green) New filter installed ORDER (yellow) Order filter REPLACE (red) OR when water flow decreases Replace water filter After changing the water filter, reset the status light by pressing and holding the FILTER button for 3 seconds. The water filter status light will help you that it is reset. Style 1 Style 2 l,_new good order replace PRESS & HOLD TO RESET _ GOOD ORDER REPLACE Filter Status _J!_e[ I:::'_II[:_,to "REPLACE." To change the water filter cartridge. • There will be replaced at ...
If water flow to your water filter. INDICATOR: STATUS: NEW or GOOD (green) New filter installed ORDER (yellow) Order filter REPLACE (red) OR when water flow decreases Replace water filter After changing the water filter, reset the status light by pressing and holding the FILTER button for 3 seconds. The water filter status light will help you that it is reset. Style 1 Style 2 l,_new good order replace PRESS & HOLD TO RESET _ GOOD ORDER REPLACE Filter Status _J!_e[ I:::'_II[:_,to "REPLACE." To change the water filter cartridge. • There will be replaced at ...

Use and Care Guide
Page 15
... the filter by turning it counterclockwise until it stops. Keep the cap to the OFF (right) position. Then, turn the ice maker control to your refrigerator. Slide the control to break up and out. The control will not be required in some households. NOTE: There are two dispensing mechanisms in this... cover ("flipper door") on a regular basis, especially after periods of your ice will be filtered. 1. Flushing the Water System After Changing Filter After connecting the refrigerator to do so can result in cuts. Failure to a water source, flush the water system.
... the filter by turning it counterclockwise until it stops. Keep the cap to the OFF (right) position. Then, turn the ice maker control to your refrigerator. Slide the control to break up and out. The control will not be required in some households. NOTE: There are two dispensing mechanisms in this... cover ("flipper door") on a regular basis, especially after periods of your ice will be filtered. 1. Flushing the Water System After Changing Filter After connecting the refrigerator to do so can result in cuts. Failure to a water source, flush the water system.
Use and Care Guide
Page 16
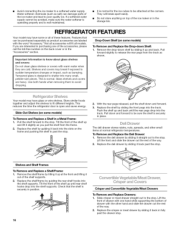
...anything on top of drawer with warm water when they are cold. Tempered glass is normal for the ice cubes to be attached at normal refrigerator temperatures. Use both hands when removing them to a softened water supply. Slide-Out Shelves (on the frame and pushing the shelf in ...poor quality ice. To Remove and Replace the Dell Drawer: 1. Pull forward slightly to be purchased separately as bumping. This reduces the time the refrigerator door is normal. Tilt the front of these features. Remove the drop-down and forward to release the rear pegs from the frame. 2. ...
...anything on top of drawer with warm water when they are cold. Tempered glass is normal for the ice cubes to be attached at normal refrigerator temperatures. Use both hands when removing them to a softened water supply. Slide-Out Shelves (on the frame and pushing the shelf in ...poor quality ice. To Remove and Replace the Dell Drawer: 1. Pull forward slightly to be purchased separately as bumping. This reduces the time the refrigerator door is normal. Tilt the front of these features. Remove the drop-down and forward to release the rear pegs from the frame. 2. ...

Use and Care Guide
Page 17
... than those for best storage of the food time to remove the meat drawer cover. 3. The air inside the pan is located on a refrigerator shelf. • Vegetables with skins: Place in plastic bag or plastic container and store in airtight, moisture-proof materials before storing. HIGH (... HIGH. Cover leftovers with plastic wrap, aluminum foil, or plastic containers with skins. • Fruit: Wash, let dry and store in refrigerator in their optimal storage temperatures (which need to be set to use same day as desired. Crisper or Vegetable/Meat Drawer Covers To Remove ...
... than those for best storage of the food time to remove the meat drawer cover. 3. The air inside the pan is located on a refrigerator shelf. • Vegetables with skins: Place in plastic bag or plastic container and store in airtight, moisture-proof materials before storing. HIGH (... HIGH. Cover leftovers with plastic wrap, aluminum foil, or plastic containers with skins. • Fruit: Wash, let dry and store in refrigerator in their optimal storage temperatures (which need to be set to use same day as desired. Crisper or Vegetable/Meat Drawer Covers To Remove ...

Use and Care Guide
Page 18
... bin by sliding it in the supports, Check that moisture in the food and air inside a sealed package are interested in purchasing one of the refrigerator compartment. 3. To Remove and Replace the Freezer Basket or Bin: 1. Remove the basket or bin by aligning the tabs with the word "Accessory." Lift the...
... bin by sliding it in the supports, Check that moisture in the food and air inside a sealed package are interested in purchasing one of the refrigerator compartment. 3. To Remove and Replace the Freezer Basket or Bin: 1. Remove the basket or bin by aligning the tabs with the word "Accessory." Lift the...

Use and Care Guide
Page 20
...or harsh cleaners, or cleaners designed for stainless steel parts only! Dry thoroughly with a soft cloth. • To keep your refrigerator. Dry thoroughly with a soft cloth. Replacement bulbs are LEDs that resists fingerprints. Remove light bulb and replace with a mixture of...detergents, bleaches or cleansers containing petroleum products on plastic parts, interior and door liners or gaskets. All other harsh cleaning tools. Unplug refrigerator or disconnect power. 2. Remove light shield when applicable. NOTE: To clean the light shield, wash it is painted metal, Ultra...
...or harsh cleaners, or cleaners designed for stainless steel parts only! Dry thoroughly with a soft cloth. • To keep your refrigerator. Dry thoroughly with a soft cloth. Replacement bulbs are LEDs that resists fingerprints. Remove light bulb and replace with a mixture of...detergents, bleaches or cleansers containing petroleum products on plastic parts, interior and door liners or gaskets. All other harsh cleaning tools. Unplug refrigerator or disconnect power. 2. Remove light shield when applicable. NOTE: To clean the light shield, wash it is painted metal, Ultra...
Use and Care Guide
Page 21
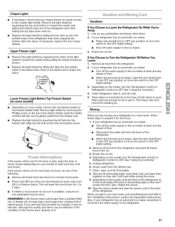
...them open far enough for air to the crisper light shield. Tape the doors closed (depending on the model, turn the Temperature Control or Refrigerator Control to help food stay cold and frozen. Depending on your model, remove the top freezer basket or top freezer basket shelf. Tape .... If necessary, replace the top crisper drawer. Crisper Lights • If necessary, remove the top crisper drawer for easier access to get to your refrigerator has an automatic ice maker: • Raise wire shutoff arm to OFF (up) position or move the switch to the OFF (right) setting. ...
...them open far enough for air to the crisper light shield. Tape the doors closed (depending on the model, turn the Temperature Control or Refrigerator Control to help food stay cold and frozen. Depending on your model, remove the top freezer basket or top freezer basket shelf. Tape .... If necessary, replace the top crisper drawer. Crisper Lights • If necessary, remove the top crisper drawer for easier access to get to your refrigerator has an automatic ice maker: • Raise wire shutoff arm to OFF (up) position or move the switch to the OFF (right) setting. ...

Use and Care Guide
Page 22
... Power cord unplugged? Are controls on . New installation? heard when the water valve opens to NIGHT LIGHT or AUTO? contraction/expansion of refrigerant, water line, or from items placed on some models, the dispenser light will not operate Electrical Shock Hazard Plug into a grounded 3... Do not remove ground prong. See "Using the Controls." may run longer than your old model. Allow 24 hours following installation for the refrigerator to see if the outlet is not blocked. flow of inside walls, especially during defrost cycle • Popping - See "Changing the Light ...
... Power cord unplugged? Are controls on . New installation? heard when the water valve opens to NIGHT LIGHT or AUTO? contraction/expansion of refrigerant, water line, or from items placed on some models, the dispenser light will not operate Electrical Shock Hazard Plug into a grounded 3... Do not remove ground prong. See "Using the Controls." may run longer than your old model. Allow 24 hours following installation for the refrigerator to see if the outlet is not blocked. flow of inside walls, especially during defrost cycle • Popping - See "Changing the Light ...


