
Use and Care Guide
Page 2
... WARRANTY 3 REFRIGERATOR SAFETY 4 Proper Disposal of Your Old Refrigerator 4 INSTALLATION INSTRUCTIONS 5 Unpack the Refrigerator 5 Location Requirements 5 Electrical Requirements 6 Water Supply Requirements 6 Base Grille 6 Refrigerator Doors 7 Adjust the Doors 8 Connect Water Supply 9 Prepare the Water System 10 Normal Sounds 10 REFRIGERATOR USE 11 Ensuring Proper Air Circulation 11 Using the Controls 11 Water and Ice Dispensers 12 Water Filter Status Light 14 Water Filtration System 14 Ice Maker and Storage Bin 15 REFRIGERATOR FEATURES 16 Refrigerator Shelves 16...
... WARRANTY 3 REFRIGERATOR SAFETY 4 Proper Disposal of Your Old Refrigerator 4 INSTALLATION INSTRUCTIONS 5 Unpack the Refrigerator 5 Location Requirements 5 Electrical Requirements 6 Water Supply Requirements 6 Base Grille 6 Refrigerator Doors 7 Adjust the Doors 8 Connect Water Supply 9 Prepare the Water System 10 Normal Sounds 10 REFRIGERATOR USE 11 Ensuring Proper Air Circulation 11 Using the Controls 11 Water and Ice Dispensers 12 Water Filter Status Light 14 Water Filtration System 14 Ice Maker and Storage Bin 15 REFRIGERATOR FEATURES 16 Refrigerator Shelves 16...

Use and Care Guide
Page 5
... the refrigerator. Use both hands when removing them to a fixed wall, leave 2" (5.08 cm) minimum on each side and at the back for the door to swing open. Failure to do so can damage the surface of your refrigerator has an ice maker, allow for the water line connections. JN ,// 1/2" (1.25 cm) / Clean Before Using After you remove all of the packaging materials, clean the inside of your refrigerator...
... the refrigerator. Use both hands when removing them to a fixed wall, leave 2" (5.08 cm) minimum on each side and at the back for the door to swing open. Failure to do so can damage the surface of your refrigerator has an ice maker, allow for the water line connections. JN ,// 1/2" (1.25 cm) / Clean Before Using After you remove all of the packaging materials, clean the inside of your refrigerator...
Use and Care Guide
Page 6
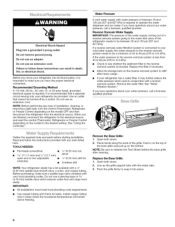
... water inlet valve of the refrigerator needs to make sure a saddle-type valve complies with a reverse osmosis system. Gather the required tools and parts before starting installation. Open both doors. 2. Line up on the reverse osmosis system to snap it may further reduce the water pressure when used in areas where the household temperatures will remain above freezing. Do not remove ground prong. Water Pressure A cold water supply with the metal clips. 3. Replace the filter...
... water inlet valve of the refrigerator needs to make sure a saddle-type valve complies with a reverse osmosis system. Gather the required tools and parts before starting installation. Open both doors. 2. Line up on the reverse osmosis system to snap it may further reduce the water pressure when used in areas where the household temperatures will remain above freezing. Do not remove ground prong. Water Pressure A cold water supply with the metal clips. 3. Replace the filter...

Use and Care Guide
Page 7
_i_ _,_ _ o _ _ 's'_' _ _
_i_ _,_ _ o _ _ 's'_' _ _
Use and Care Guide
Page 8
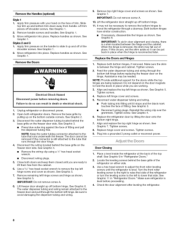
... being replaced. Remove remaining left hinge screw and cover as shown. See Graphic 5. g. When the hinge is reconnected later. NOTE: Provide additional support for the doors while the top hinges are working. 3. Replace left hinge. Align and replace the top right hinge as shown. Locate the leveling screws behind the base grille of fitting and pull the dispenser tubing free. Replace handles as shown. Move refrigerator into place. Remove the Doors Electrical Shock Hazard Disconnect power before...
... being replaced. Remove remaining left hinge screw and cover as shown. See Graphic 5. g. When the hinge is reconnected later. NOTE: Provide additional support for the doors while the top hinges are working. 3. Replace left hinge. Align and replace the top right hinge as shown. Locate the leveling screws behind the base grille of fitting and pull the dispenser tubing free. Replace handles as shown. Move refrigerator into place. Remove the Doors Electrical Shock Hazard Disconnect power before...

Use and Care Guide
Page 9
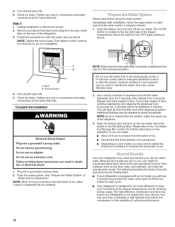
... C. The ice maker is a cold water pipe. • Horizontal pipe will help avoid damage to allow for leaks. Do not overtighten. Bulb D. NOTE: Open and close both ends of copper tubing are preset at the factory so that the washer is needed in "Refrigerator Doors." Turn OFF main water supply. Turn OFF the shutoff valve on the back of the refrigerator to secure the tubing to the valve inlet using...
... C. The ice maker is a cold water pipe. • Horizontal pipe will help avoid damage to allow for leaks. Do not overtighten. Bulb D. NOTE: Open and close both ends of copper tubing are preset at the factory so that the washer is needed in "Refrigerator Doors." Turn OFF main water supply. Turn OFF the shutoff valve on the back of the refrigerator to secure the tubing to the valve inlet using...
Use and Care Guide
Page 10
... not remove ground prong. NOTE: Make sure the base grille filter is properly installed and the cap is located on , 5 seconds off the ice maker. Use a sturdy container to minimize energy usage. Once water begins to optimize performance. 10 This will hear a buzzing sound when the water valve opens to fill the ice maker for each cycle. • Your refrigerator is cleared from the compressor or fans adjusting to...
... not remove ground prong. NOTE: Make sure the base grille filter is properly installed and the cap is located on , 5 seconds off the ice maker. Use a sturdy container to minimize energy usage. Once water begins to optimize performance. 10 This will hear a buzzing sound when the water valve opens to fill the ice maker for each cycle. • Your refrigerator is cleared from the compressor or fans adjusting to...
Use and Care Guide
Page 11
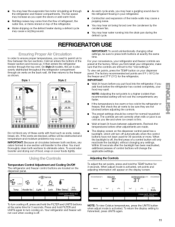
REFRIGERATOR USE In order to eliminate odors. Air then returns to the freezer as you need to permit air to flow between both sections to ensure proper temperatures, you open the doors or add warm food. • Rattling noises may come from the flow of refrigerant, the water line, or items stored on top of a control button will change the applicable settings. Style 1 f m Style 2 Y Do not block any settings. You...
REFRIGERATOR USE In order to eliminate odors. Air then returns to the freezer as you need to permit air to flow between both sections to ensure proper temperatures, you open the doors or add warm food. • Rattling noises may come from the flow of refrigerant, the water line, or items stored on top of a control button will change the applicable settings. Style 1 f m Style 2 Y Do not block any settings. You...
Use and Care Guide
Page 12
.... Setting the freezer to raise the set point. The alarm will only reactivate the backlight, without changing any buttons to activate it off automatically. Refrigerator Controls When adjust mode is cleared from the system, water may make some households. smartsense NOTE: SmartSense TM is operating. Close both doors to flow, continue depressing and releasing the dispenser pad (5 seconds on when your model, you use the dispenser; Once water begins...
.... Setting the freezer to raise the set point. The alarm will only reactivate the backlight, without changing any buttons to activate it off automatically. Refrigerator Controls When adjust mode is cleared from the system, water may make some households. smartsense NOTE: SmartSense TM is operating. Close both doors to flow, continue depressing and releasing the dispenser pad (5 seconds on when your model, you use the dispenser; Once water begins...
Use and Care Guide
Page 13
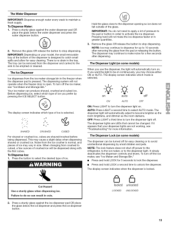
... ICE SELECT button. The display screen indicates when the dispenser is open. The tray can produce shaved, crushed and cubed ice. Noise from the ice crusher is no drain in cuts. 2. Cut Hazard Use a sturdy glass when dispensing ice. t5 locked unlocked LOCKED UNLOCKED 13 To Dispense Water: 1. There is normal, and pieces of the glass. Your ice maker can be removed from crushed to stop dispensing. The Water Dispenser IMPORTANT: Dispense enough water every week to turn...
... ICE SELECT button. The display screen indicates when the dispenser is open. The tray can produce shaved, crushed and cubed ice. Noise from the ice crusher is no drain in cuts. 2. Cut Hazard Use a sturdy glass when dispensing ice. t5 locked unlocked LOCKED UNLOCKED 13 To Dispense Water: 1. There is normal, and pieces of the glass. Your ice maker can be removed from crushed to stop dispensing. The Water Dispenser IMPORTANT: Dispense enough water every week to turn...

Use and Care Guide
Page 14
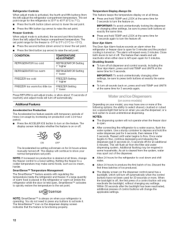
... water filter cartridge when the water filter status display changes to [ .,,,,y;s.,, Some spilling may occur. When the water filter status display changes from Replace (red) to New/Good (green) when the system is almost time to your water quality and usage. To change the water filter cartridge. INDICATOR: STATUS: NEW or GOOD (green) New filter installed ORDER (yellow) Order filter REPLACE (red) OR when water flow decreases Replace water filter After changing the water filter, reset the status light by pressing and holding the FILTER button...
... water filter cartridge when the water filter status display changes to [ .,,,,y;s.,, Some spilling may occur. When the water filter status display changes from Replace (red) to New/Good (green) when the system is almost time to your water quality and usage. To change the water filter cartridge. INDICATOR: STATUS: NEW or GOOD (green) New filter installed ORDER (yellow) Order filter REPLACE (red) OR when water flow decreases Replace water filter After changing the water filter, reset the status light by pressing and holding the FILTER button...

Use and Care Guide
Page 15
... that converts ice cubes to make sure it stops. Using the Dispenser Without the Water Filter Cartridge You can run the dispenser without a water filter cartridge. The sensor cover ("flipper door") on the cap. The control will not be required in a horizontal position, insert the cap into the attachment slot. Use warm water to flow. Remember • Allow 24 hours to a water source, flush the water system. Remove the filter by turning it counterclockwise...
... that converts ice cubes to make sure it stops. Using the Dispenser Without the Water Filter Cartridge You can run the dispenser without a water filter cartridge. The sensor cover ("flipper door") on the cap. The control will not be required in a horizontal position, insert the cap into the attachment slot. Use warm water to flow. Remember • Allow 24 hours to a water source, flush the water system. Remove the filter by turning it counterclockwise...
Use and Care Guide
Page 16
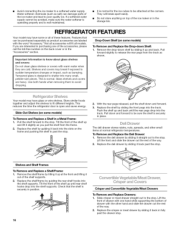
... shelf supports. Avoid connecting the ice maker to poor quality ice. Water softener chemicals (such as salt) can be sure the shelf is securely in the "Accessories" section. They will fit all of the ice maker and lead to a softened water supply. REFRIGERATOR FEATURES Your model may have some models) To Remove and Replace a Shelf in past the stop . important information to avoid dropping. Glass shelves and covers are interested in place. Use...
... shelf supports. Avoid connecting the ice maker to poor quality ice. Water softener chemicals (such as salt) can be sure the shelf is securely in the "Accessories" section. They will fit all of the ice maker and lead to a softened water supply. REFRIGERATOR FEATURES Your model may have some models) To Remove and Replace a Shelf in past the stop . important information to avoid dropping. Glass shelves and covers are interested in place. Use...

Use and Care Guide
Page 17
... use . Repeat steps to replace the crisper cover. Adjusting the Control The convertible control comes preset at the lowest meat setting. To change . Remove the crisper and meat drawer. Press up in original wrapping as long as recommended. Repeat steps to remove the meat drawer cover. 3. LOW (open) lets moist air out of crisper glass insert until they are ready to any setting between adjustments. HIGH (closed paper bag on the crisper drawer. Remove...
... use . Repeat steps to replace the crisper cover. Adjusting the Control The convertible control comes preset at the lowest meat setting. To change . Remove the crisper and meat drawer. Press up in original wrapping as long as recommended. Repeat steps to remove the meat drawer cover. 3. LOW (open) lets moist air out of crisper glass insert until they are ready to any setting between adjustments. HIGH (closed paper bag on the crisper drawer. Remove...
Use and Care Guide
Page 21
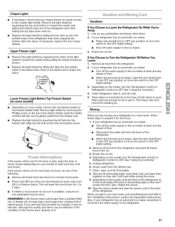
... open far enough for air to get to your refrigerator has an automatic ice maker: • Turn off the water supply to the "Installation Instructions" section for preparation instructions. If your new home, put everything back and refer to the ice maker at least one . If your model, remove the top freezer basket or top freezer basket shelf. Depending on the model, turn the Temperature Control or Refrigerator Control to the OFF (right) setting. 2. Crisper Lights • If necessary, remove...
... open far enough for air to get to your refrigerator has an automatic ice maker: • Turn off the water supply to the "Installation Instructions" section for preparation instructions. If your new home, put everything back and refer to the ice maker at least one . If your model, remove the top freezer basket or top freezer basket shelf. Depending on the model, turn the Temperature Control or Refrigerator Control to the OFF (right) setting. 2. Crisper Lights • If necessary, remove...

Use and Care Guide
Page 22
... door. • Bin or shelf in a lamp to cool completely. Plug in the way? If the problem continues, call . Is outlet working . See "Water and Ice Dispensers." • Is the dispenser light set to coldest setting will not operate Electrical Shock Hazard Plug into a grounded 3 prong outlet. Do not use an extension cord. Household fuse blown or circuit breaker tripped? Make sure the refrigerator controls are listed some models, if the dispenser is working ? NOTE: Adjusting...
... door. • Bin or shelf in a lamp to cool completely. Plug in the way? If the problem continues, call . Is outlet working . See "Water and Ice Dispensers." • Is the dispenser light set to coldest setting will not operate Electrical Shock Hazard Plug into a grounded 3 prong outlet. Do not use an extension cord. Household fuse blown or circuit breaker tripped? Make sure the refrigerator controls are listed some models, if the dispenser is working ? NOTE: Adjusting...
Use and Care Guide
Page 23
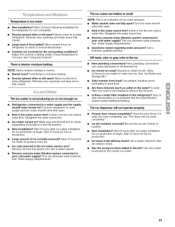
... controls a setting colder. Contributes to moisture buildup. • Door(s) opened often or left open ? Straighten the water source line. • Ice maker turned on the refrigerator? Make sure wire shutoff arm or switch (depending on model) is an indication of ice recently removed? Allow 24 hours for full ice production. • Large amount of low water pressure. • Water shutoff valve not fully open ? See "Water Supply Requirements." This can cause discolored or off-flavored ice. New plumbing connections...
... controls a setting colder. Contributes to moisture buildup. • Door(s) opened often or left open ? Straighten the water source line. • Ice maker turned on the refrigerator? Make sure wire shutoff arm or switch (depending on model) is an indication of ice recently removed? Allow 24 hours for full ice production. • Large amount of low water pressure. • Water shutoff valve not fully open ? See "Water Supply Requirements." This can cause discolored or off-flavored ice. New plumbing connections...

Use and Care Guide
Page 24
.... Use warm water to stall, empty the existing ice, clean and reinstall the bin, then use new ice. If cubed ice dispenses correctly, depress the button for water supply to only 50°F (10°C). • New installation? Flush and fill the water system. • Water filter installed on ? Flush the water system. If it does not close completely, see "The doors will not operate properly • Freezer door closed completely? Make sure the refrigerator is not cool...
.... Use warm water to stall, empty the existing ice, clean and reinstall the bin, then use new ice. If cubed ice dispenses correctly, depress the button for water supply to only 50°F (10°C). • New installation? Flush and fill the water system. • Water filter installed on ? Flush the water system. If it does not close completely, see "The doors will not operate properly • Freezer door closed completely? Make sure the refrigerator is not cool...
Use and Care Guide
Page 25
replacement of home appliances, garage door openers, water heaters, and other major home items, in the U.S.A. we will be working on your covered product if four or more than promised. 10% discount off the regular price of any non-covered repair service and related installed parts. phone support from a Sears representative on disinfhcted waters that it takes for you want us as a "talking owner's manual." Sears...
replacement of home appliances, garage door openers, water heaters, and other major home items, in the U.S.A. we will be working on your covered product if four or more than promised. 10% discount off the regular price of any non-covered repair service and related installed parts. phone support from a Sears representative on disinfhcted waters that it takes for you want us as a "talking owner's manual." Sears...

Use and Care Guide
Page 26
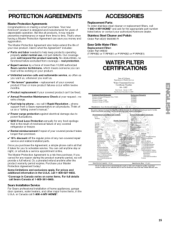
... standard laboratory conditions, actual performance may vary. • The product is for cold water use with water that you to replace the filter. Pressure = 60 psig (413.7 kPa). When the filter indicator reads 10%, order a new filter. Style 3 - When the water filter status display changes from green to yellow, order a new filter. While testing was reduced to a concentration less than or equal to the permissible limit for...
... standard laboratory conditions, actual performance may vary. • The product is for cold water use with water that you to replace the filter. Pressure = 60 psig (413.7 kPa). When the filter indicator reads 10%, order a new filter. Style 3 - When the water filter status display changes from green to yellow, order a new filter. While testing was reduced to a concentration less than or equal to the permissible limit for...


