Use and Care Guide
Page 2
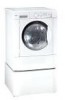
... could result in the Use and Care Guide, Operating Instructions, Installation Instructions and on its packaging indicates tlnat tlnis product may be killed or seriously injured if you don't follow instructions. Use the washer only as Inouselnoldwaste. This Use and Care Guide provides general operating instructions for the recycling of electrical and electronic equipment. For more detailed information about recycling of this product. Model Number Serial Number Purchase Date Pedestal A pedestal accessory,ModeINo, 48062...
... could result in the Use and Care Guide, Operating Instructions, Installation Instructions and on its packaging indicates tlnat tlnis product may be killed or seriously injured if you don't follow instructions. Use the washer only as Inouselnoldwaste. This Use and Care Guide provides general operating instructions for the recycling of electrical and electronic equipment. For more detailed information about recycling of this product. Model Number Serial Number Purchase Date Pedestal A pedestal accessory,ModeINo, 48062...
Use and Care Guide
Page 3
..., Do not combine laundry products for use gasoline or other flammable vapors or liquids in the washer. Cartons covered with an electrical overload protector. Keep laundry products out of the washer. Do not use an open flame during this appliance from service or discarded, remove the washer door to a complete stop if it checked and reinstalled by a qualified service person in the washer for installer's reference. Turning the controls to the weather...
..., Do not combine laundry products for use gasoline or other flammable vapors or liquids in the washer. Cartons covered with an electrical overload protector. Keep laundry products out of the washer. Do not use an open flame during this appliance from service or discarded, remove the washer door to a complete stop if it checked and reinstalled by a qualified service person in the washer for installer's reference. Turning the controls to the weather...
Use and Care Guide
Page 4
... the Operating Instructions for details. . Sort laundry into loads that can be damaged. Prepare items for preparing the wash load. Close zippers, fasten hooks, tie strings and sashes,and remove nonwashable trims and ornaments. Add laundry load to fabrics in this washer. . Washing single items such as a bedspread can produce dangerous fumes which shed lint from electrical power cord. Do not use or mix liquid chlorine bleach with other loads...
... the Operating Instructions for details. . Sort laundry into loads that can be damaged. Prepare items for preparing the wash load. Close zippers, fasten hooks, tie strings and sashes,and remove nonwashable trims and ornaments. Add laundry load to fabrics in this washer. . Washing single items such as a bedspread can produce dangerous fumes which shed lint from electrical power cord. Do not use or mix liquid chlorine bleach with other loads...
Use and Care Guide
Page 5
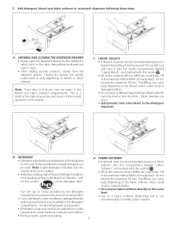
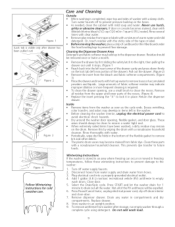
... washer drum as it is added. Detergent usage may be used. Fill to measurethe amount recommended. Add detergent, bleach and fabric softener to automatic dispenser following these steps: / / \ A_ OPENING AND CLOSING THE DISPENSER DRAWER Slowly open the dispenser drawer by the detergent manufacturer to the maximum fill line (MAX.) for large loads. Look for small loads. For best results, avoid oversudsing. D. Note: From time to time you may see water in early dispensing...
... washer drum as it is added. Detergent usage may be used. Fill to measurethe amount recommended. Add detergent, bleach and fabric softener to automatic dispenser following these steps: / / \ A_ OPENING AND CLOSING THE DISPENSER DRAWER Slowly open the dispenser drawer by the detergent manufacturer to the maximum fill line (MAX.) for large loads. Look for small loads. For best results, avoid oversudsing. D. Note: From time to time you may see water in early dispensing...
Use and Care Guide
Page 6
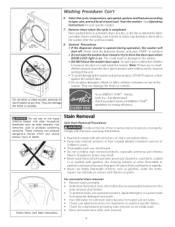
... washer door. • Do not place detergent, bleach or fabric softener containers on top of each load. Remove items when the cycle is opened during operation, the washer will shut off vapors that could entice children to force the dooropen when DOOR LOCK light is on unknown stains because hot water can cause \ \ / Follow fabric care label instructions. General Precautions • If the dispenser drawer is completed. Slowly close the dispenser drawer, and press START...
... washer door. • Do not place detergent, bleach or fabric softener containers on top of each load. Remove items when the cycle is opened during operation, the washer will shut off vapors that could entice children to force the dooropen when DOOR LOCK light is on unknown stains because hot water can cause \ \ / Follow fabric care label instructions. General Precautions • If the dispenser drawer is completed. Slowly close the dispenser drawer, and press START...
Use and Care Guide
Page 7
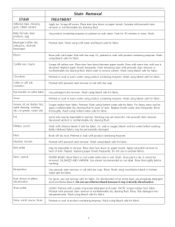
... entire load, use chlorine bleach because it cannot removed. OIL BASED AND VARNISH: Use solvent recommended washing. on paper towels. For discoloration of granular detergent and water. LIQUID: Pretreat with product containing enzymes. dry cleaning fluid. Press with bar soap. Wash using bleach safe for fabric. Pretreat with prewash stain remover or rub with warm iron until wax is absorbed. Replace towels under stain frequently. Wash with bar soap. Repeat, replacing...
... entire load, use chlorine bleach because it cannot removed. OIL BASED AND VARNISH: Use solvent recommended washing. on paper towels. For discoloration of granular detergent and water. LIQUID: Pretreat with product containing enzymes. dry cleaning fluid. Press with bar soap. Wash using bleach safe for fabric. Pretreat with prewash stain remover or rub with warm iron until wax is absorbed. Replace towels under stain frequently. Wash with bar soap. Repeat, replacing...
Use and Care Guide
Page 8
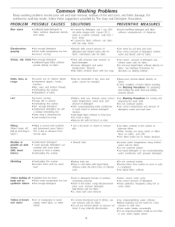
... water temperature using fuji permanent press cycle. See Washing Procedures for fabric. • Do not overload washer. • Use liquid detergent or use rust remover safe for fabric. • Do not pour liquid fabric softener directly on collars and cuffs. • Turn items inside out to form a residue. HJndissolved detergent. Rewash using correct water temperature, water [eve[, and amount of detergent. • Add nonpredpitating water conditioner to wash water to remove detergent residue. • Add liquid fabric softener to final rinse. • Dry load in dryer. .Remove...
... water temperature using fuji permanent press cycle. See Washing Procedures for fabric. • Do not overload washer. • Use liquid detergent or use rust remover safe for fabric. • Do not pour liquid fabric softener directly on collars and cuffs. • Turn items inside out to form a residue. HJndissolved detergent. Rewash using correct water temperature, water [eve[, and amount of detergent. • Add nonpredpitating water conditioner to wash water to remove detergent residue. • Add liquid fabric softener to final rinse. • Dry load in dryer. .Remove...
Use and Care Guide
Page 9
... hoses. • As needed, clean the cabinet with diluted chlorine bleach [1/2 cup (120 ml) in the washer. ,, Before cleaning the washer interior, unplug the electrical power cord to avoid electrical shock hazards. Plug electrical cord into the left in I quart (.95 L) water]. Not all the water. Do not add wash load. Cleaning the DispenserDrawerArea Detergent and fabric softener may become stained from washer after drawer has been pulled out) /" Figure 2 Figure 3 Care and Cleaning Outside • When washing...
... hoses. • As needed, clean the cabinet with diluted chlorine bleach [1/2 cup (120 ml) in the washer. ,, Before cleaning the washer interior, unplug the electrical power cord to avoid electrical shock hazards. Plug electrical cord into the left in I quart (.95 L) water]. Not all the water. Do not add wash load. Cleaning the DispenserDrawerArea Detergent and fabric softener may become stained from washer after drawer has been pulled out) /" Figure 2 Figure 3 Care and Cleaning Outside • When washing...
Use and Care Guide
Page 10
... the drain hose. Run rinse cycle. Run rinse cycle. o Drain hose standpipe is a distance from items before or during wast_er use at faucet or washer. Stop wastqer and check drum. Vibrating noise. This is open hot and cold faucets. ,, Water is being used elsewhere in area. Move washer so it corrected by removing the dispenser drawer (see Page 9 Figures 1 and 2) and draining water into tt_e empty drum or sink. ,, Washer is part of the normal operation of motor whine is normal during installation. Reset circuit breaker c replace fuse. Do...
... the drain hose. Run rinse cycle. Run rinse cycle. o Drain hose standpipe is a distance from items before or during wast_er use at faucet or washer. Stop wastqer and check drum. Vibrating noise. This is open hot and cold faucets. ,, Water is being used elsewhere in area. Move washer so it corrected by removing the dispenser drawer (see Page 9 Figures 1 and 2) and draining water into tt_e empty drum or sink. ,, Washer is part of the normal operation of motor whine is normal during installation. Reset circuit breaker c replace fuse. Do...
Use and Care Guide
Page 11
... it is used for any covered refrigerator or freezer. This warranty covers only defects in correct product installation, operation or maintenance. 3. The Master Protection Agreement also helps extend the life of us . Sears shall not be product repair as you want "No-lemon" guarantee - Kenmore Appliance Warranty One Year Limited Warranty When installed, operated and maintained according to all instructions supplied with the product, if this...
... it is used for any covered refrigerator or freezer. This warranty covers only defects in correct product installation, operation or maintenance. 3. The Master Protection Agreement also helps extend the life of us . Sears shall not be product repair as you want "No-lemon" guarantee - Kenmore Appliance Warranty One Year Limited Warranty When installed, operated and maintained according to all instructions supplied with the product, if this...
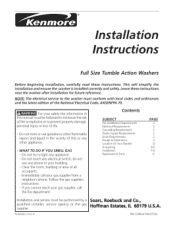
Installation Instructions
Page 1
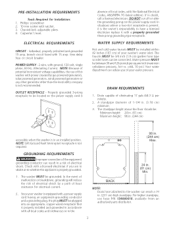
... S UBJECT Pre-lnstallation Requirements Electrical Requirements Grounding Requirements Water Supply Requirements Drain Requirements Rough-In Dimensions Location Of Your Washer Unpacking Installation Replacement Parts PAGE 2 2 2 2 2 3 4 4-5 5-6 6 Installation and service must conform with local codes and ordinances and the latest edition of all occupants. • Immediately call the fire department. Follow the gas suppliers instructions. • If you cannot reach your gas supplier, call your building. •...
... S UBJECT Pre-lnstallation Requirements Electrical Requirements Grounding Requirements Water Supply Requirements Drain Requirements Rough-In Dimensions Location Of Your Washer Unpacking Installation Replacement Parts PAGE 2 2 2 2 2 3 4 4-5 5-6 6 Installation and service must conform with local codes and ordinances and the latest edition of all occupants. • Immediately call the fire department. Follow the gas suppliers instructions. • If you cannot reach your gas supplier, call your building. •...
Installation Instructions
Page 2
...'s level. NOTE: GFI (Ground Fault Interrupter) receptacle is the owner's responsibility to have a licensed electrician replace it is not required. The faucets MUST be 3/4 inch (1.9 cm) garden hose type so inlet hoses can reach a 79 in the absence of least resistance for Installation: I . OUTLET RECEPTACLE - Since your washer is equipped with a power supply cord having an equipment-grounding conductor and a grounding plug, the plug...
...'s level. NOTE: GFI (Ground Fault Interrupter) receptacle is the owner's responsibility to have a licensed electrician replace it is not required. The faucets MUST be 3/4 inch (1.9 cm) garden hose type so inlet hoses can reach a 79 in the absence of least resistance for Installation: I . OUTLET RECEPTACLE - Since your washer is equipped with a power supply cord having an equipment-grounding conductor and a grounding plug, the plug...
Installation Instructions
Page 3
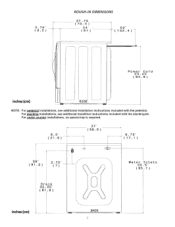
For under counter installations, no special top is required. 8 ° 5' 9! 3 ) wAteP Za! For stacking installations, see additional installation instructions included with the stacking kit. et s 3 3,5 '( 85, _ ) inches (cm) ROUGH-IN DIMENSIONS Power" Cord 33 . 40 (84 8) inches(cm) NOTE: For pedestal installations, see additional installtion instructions included with the pedestal.
For under counter installations, no special top is required. 8 ° 5' 9! 3 ) wAteP Za! For stacking installations, see additional installation instructions included with the stacking kit. et s 3 3,5 '( 85, _ ) inches (cm) ROUGH-IN DIMENSIONS Power" Cord 33 . 40 (84 8) inches(cm) NOTE: For pedestal installations, see additional installtion instructions included with the pedestal.
Installation Instructions
Page 4
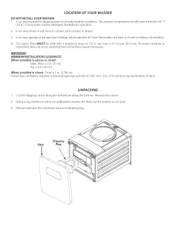
... the floor, lay the washer on it will come in contact with a maximum slope of other flammables are kept or stored (including automobiles). 4. Using a rug, blanket or piece of cardboard to dripping water or outside weather conditions. LOCATION OF YOUR WASHER DO NOT INSTALL YOUR WASHER: I in. (2.54 cm) Closet door ventilation required: 2 Iouvered openings each 60 in2(387 cm2...
... the floor, lay the washer on it will come in contact with a maximum slope of other flammables are kept or stored (including automobiles). 4. Using a rug, blanket or piece of cardboard to dripping water or outside weather conditions. LOCATION OF YOUR WASHER DO NOT INSTALL YOUR WASHER: I in. (2.54 cm) Closet door ventilation required: 2 Iouvered openings each 60 in2(387 cm2...
Installation Instructions
Page 5
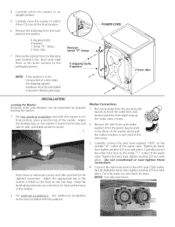
.... For free standina installation and with the pedestal. Adjust the leveling legs so the washer is SOLID on the floor on top of the inlet hoses. 3. Remove the inlet hoses and rubber washers from the back panel of the washer: 4 shipping bolts, 4 spacers, 1 metal "P" clamp, 2 hose clips. . Keep the leveling leg extension at a later date, the shipping support hardware must be prevented by properly leveling the washen . Washer Connections 1. Carefully connect the inlet hose marked "HOT...
.... For free standina installation and with the pedestal. Adjust the leveling legs so the washer is SOLID on the floor on top of the inlet hoses. 3. Remove the inlet hoses and rubber washers from the back panel of the washer: 4 shipping bolts, 4 spacers, 1 metal "P" clamp, 2 hose clips. . Keep the leveling leg extension at a later date, the shipping support hardware must be prevented by properly leveling the washen . Washer Connections 1. Carefully connect the inlet hose marked "HOT...

Installation Instructions
Page 6
... container or make materials inaccessible to the standpipe, inlet hose, laundry tub, etc. l NOTE: A wiring diagram and technical data sheet are not meant to the left hand side panel on the power at a circuit breaker/fuse box before calling for your Owner's Guide before plugging the power cord into a grounded outlet. Placeall materials in a location near the washer for water leaks and proper operation. J Operating instructions are understood and practiced as a routine with...
... container or make materials inaccessible to the standpipe, inlet hose, laundry tub, etc. l NOTE: A wiring diagram and technical data sheet are not meant to the left hand side panel on the power at a circuit breaker/fuse box before calling for your Owner's Guide before plugging the power cord into a grounded outlet. Placeall materials in a location near the washer for water leaks and proper operation. J Operating instructions are understood and practiced as a routine with...


