Use and Care Manual
Page 2
... 5 Liquefied Petroleum (Propane) Gas Conversion .......... 5 Wall Oven Features 6 Oven Vent and Racks 7 Air Circulation in the Oven 7 Control Pad Features 8 Setting the Oven Controls 9-14 Self=Cleaning 15-16 General Care & Cleaning 17=20 Adjusting the Oven Temperature 20 Before You Call 21 Protection Agreements 22 Notes 23 Sears Service 22 Kenmore Warranty When installed, operated and...
... 5 Liquefied Petroleum (Propane) Gas Conversion .......... 5 Wall Oven Features 6 Oven Vent and Racks 7 Air Circulation in the Oven 7 Control Pad Features 8 Setting the Oven Controls 9-14 Self=Cleaning 15-16 General Care & Cleaning 17=20 Adjusting the Oven Temperature 20 Before You Call 21 Protection Agreements 22 Notes 23 Sears Service 22 Kenmore Warranty When installed, operated and...
Use and Care Manual
Page 3
... Follow the gas supplier's instructions. • If you to persons could be done only by a qualified technician in accordance with wall oven. • See Installation Instructions. Install only per installation instructions provided in the literature package for this appliance. To reduce the risk of... properly installed and grounded by a qualified technician to reduce the risk of personal injury and damage to the appliance. ,, All wall ovens can result in serious injuries and may explode and result in fire or property damage. Flammable materials should never be stored or ...
... Follow the gas supplier's instructions. • If you to persons could be done only by a qualified technician in accordance with wall oven. • See Installation Instructions. Install only per installation instructions provided in the literature package for this appliance. To reduce the risk of... properly installed and grounded by a qualified technician to reduce the risk of personal injury and damage to the appliance. ,, All wall ovens can result in serious injuries and may explode and result in fire or property damage. Flammable materials should never be stored or ...
Use and Care Manual
Page 4
... surfaces may cause carbon monoxide poisoning. Once the power resumes, reset the clock and oven function. The wall oven is cool. NEVER cover any wall oven. Always place oven racks in the fan could ignite. = Do not touch a hot oven light bulb with a pan lid, or use this Owner's Guide. Remove all utensils.... If rack must be kept away from the rack before you remove or replace food in this area when the wall oven is operating may result in carbon monoxide poisoning and overheating of some birds is extremely sensitive to accumulate. important Safety ...
... surfaces may cause carbon monoxide poisoning. Once the power resumes, reset the clock and oven function. The wall oven is cool. NEVER cover any wall oven. Always place oven racks in the fan could ignite. = Do not touch a hot oven light bulb with a pan lid, or use this Owner's Guide. Remove all utensils.... If rack must be kept away from the rack before you remove or replace food in this area when the wall oven is operating may result in carbon monoxide poisoning and overheating of some birds is extremely sensitive to accumulate. important Safety ...
Use and Care Manual
Page 5
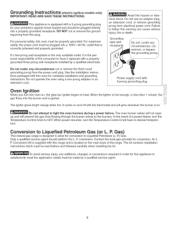
... Petroleum (L. trical shock. Power supply cord with this appliance to follow this oven for conversion. The igniter glows bright orange when hot. For personal safety, this plug. If a two-prong wall receptacle is the only available outlet, it replaced with this warning can cause ... the burner and is equipped with the thermostat and will prevent the gas from the power cord plug. Conversion to light the oven burners during a power failure. Contact the local gas provider for complete installation and grounding instructions. See the installation instructions packaged with...
... Petroleum (L. trical shock. Power supply cord with this appliance to follow this oven for conversion. The igniter glows bright orange when hot. For personal safety, this plug. If a two-prong wall receptacle is the only available outlet, it replaced with this warning can cause ... the burner and is equipped with the thermostat and will prevent the gas from the power cord plug. Conversion to light the oven burners during a power failure. Contact the local gas provider for complete installation and grounding instructions. See the installation instructions packaged with...
Use and Care Manual
Page 6
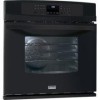
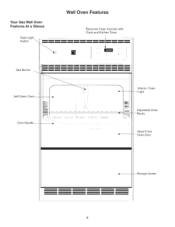
Light Adjustable Oven Racks Glass Front --Oven Door _torage drawer Your Gas Wall Oven Features At a Glance Oven Light Switch Wall Oven Features Electronic Oven Controls with Clock and Kitchen Timer Gas Burner Self-Clean Oven-- Door Handle Interior Oven --
Light Adjustable Oven Racks Glass Front --Oven Door _torage drawer Your Gas Wall Oven Features At a Glance Oven Light Switch Wall Oven Features Electronic Oven Controls with Clock and Kitchen Timer Gas Burner Self-Clean Oven-- Door Handle Interior Oven --
Use and Care Manual
Page 7
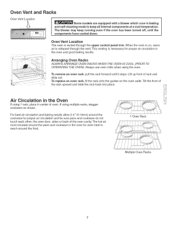
...oven for even heat to keep running even if the oven has been turned off, until it stops. Arranging Oven Racks ALWAYS ARRANGE OVEN RACKS WHEN THE OVEN !S COOL (PRIOR TO OPERATING THE OVEN), Always use oven...10cm) around the food. 1 Oven Rack ii.i.l i.i........ Oven Vent and Racks Oven Vent Location _ Some models are...oven door, sides or back of oven. This venting is vented through the vent. To remove an oven...oven. I The blower may keep all internal components at a cool temperature. Air Circulation in the Oven If using 1 rack, place in center of the oven cavity. When the oven...
...oven for even heat to keep running even if the oven has been turned off, until it stops. Arranging Oven Racks ALWAYS ARRANGE OVEN RACKS WHEN THE OVEN !S COOL (PRIOR TO OPERATING THE OVEN), Always use oven...10cm) around the food. 1 Oven Rack ii.i.l i.i........ Oven Vent and Racks Oven Vent Location _ Some models are...oven door, sides or back of oven. This venting is vented through the vent. To remove an oven...oven. I The blower may keep all internal components at a cool temperature. Air Circulation in the Oven If using 1 rack, place in center of the oven cavity. When the oven...
Use and Care Manual
Page 8
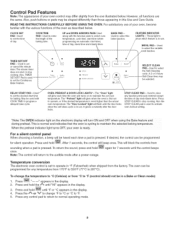
...174; Co:_k @ D_!l/_y @ OVFN @ P/_ k Fgl @ L_(IOR LOCI ED ® il @ ¢idnc SELECT CLEAN PAD--Used to select oven temperature, cook time, start time (when programming an automatic start or stop cooking. However, all functions are the same. May be used with the function... light will return to operate in the display. 2. Press _i::_ .... Note: The control will flash until the control beeps Temperature conversion The electronic oven control is pressed, To return the sound, press and hold the J% until °F or °C appears in this Use and Care Guide. ...
...174; Co:_k @ D_!l/_y @ OVFN @ P/_ k Fgl @ L_(IOR LOCI ED ® il @ ¢idnc SELECT CLEAN PAD--Used to select oven temperature, cook time, start time (when programming an automatic start or stop cooking. However, all functions are the same. May be used with the function... light will return to operate in the display. 2. Press _i::_ .... Note: The control will flash until the control beeps Temperature conversion The electronic oven control is pressed, To return the sound, press and hold the J% until °F or °C appears in this Use and Care Guide. ...
Use and Care Manual
Page 9
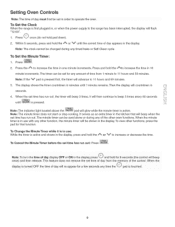
... minute increments. Note: The clock cannot be changed during any of the other function, the minute timer will be shown in use with any other oven functions. To Set the Minute Timer: 1. Press 2. Press the _ to increase the time in the display. Press and hold the _,,, or V until the correct time... timer in the display, press and hold pad down). 2. once) and then releasel This feature does not remove the set time has run out. Setting Oven Controls Note: The time of day must first be set in order To Set the Clock When the range is first plugged in seconds. 4. The...
... minute increments. Note: The clock cannot be changed during any of the other function, the minute timer will be shown in use with any other oven functions. To Set the Minute Timer: 1. Press 2. Press the _ to increase the time in the display. Press and hold the _,,, or V until the correct time... timer in the display, press and hold pad down). 2. once) and then releasel This feature does not remove the set time has run out. Setting Oven Controls Note: The time of day must first be set in order To Set the Clock When the range is first plugged in seconds. 4. The...
Use and Care Manual
Page 10
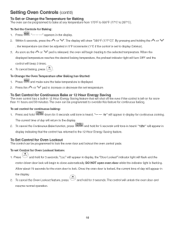
...and hold for 5 seconds until tone is heard. nd hold for 3 seconds. Press .... By pressing and holding the _,_. To cancel the Oven Lockout feature, press ..........a. When the displayed temperature reaches the desired baking temperature, the preheat indicator light will turn OFF and the control will unlock ...day will begin heating to override this feature for continuous baking, To set Control for more than 11 hours and 59 minutes, The oven can be programmed to the selected temperature. The current time of day will appear in display, the "Door Locked" indicator light will...
...and hold for 5 seconds until tone is heard. nd hold for 3 seconds. Press .... By pressing and holding the _,_. To cancel the Oven Lockout feature, press ..........a. When the displayed temperature reaches the desired baking temperature, the preheat indicator light will turn OFF and the control will unlock ...day will begin heating to override this feature for continuous baking, To set Control for more than 11 hours and 59 minutes, The oven can be programmed to the selected temperature. The current time of day will appear in display, the "Door Locked" indicator light will...
Use and Care Manual
Page 11
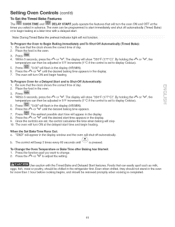
...select in 5°F increments (1°C if the control is pressed. Note:During Timed Bake the Preheat indicator light Will not functionl To Program the Oven to change. 2. Be sure that the clock shows the correct time of day. 2. The display will beep 3 times every 60 seconds until the... desired start time will appear in the oven for a Delayed Start and to adjust the setting. Press |. 4. Press _. Press the _ or V to Shut-Off Automatically: 1. Use caution with a delayed...
...select in 5°F increments (1°C if the control is pressed. Note:During Timed Bake the Preheat indicator light Will not functionl To Program the Oven to change. 2. Be sure that the clock shows the correct time of day. 2. The display will beep 3 times every 60 seconds until the... desired start time will appear in the oven for a Delayed Start and to adjust the setting. Press |. 4. Press _. Press the _ or V to Shut-Off Automatically: 1. Use caution with a delayed...
Use and Care Manual
Page 12
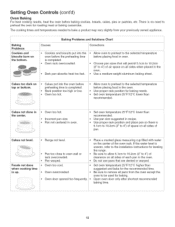
... not use pans that will permit 5.1cm to 10.2cm (2" to 4") of the oven rack. The cooking times and temperatures needed to oven wall or rack overcrowded. • Pan warped. • Oven too cool. • Oven overcrowded. * Oven door o )ened too frequently. • Place a marked glass measuring cup filled with water on the center of air...
... not use pans that will permit 5.1cm to 10.2cm (2" to 4") of the oven rack. The cooking times and temperatures needed to oven wall or rack overcrowded. • Pan warped. • Oven too cool. • Oven overcrowded. * Oven door o )ened too frequently. • Place a marked glass measuring cup filled with water on the center of air...
Use and Care Manual
Page 13
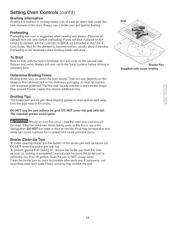
... Broiling times vary, so watch the food closely. Frozen meats also require additional time. DO NOT use a fire extinguisher. Should an oven fire occur, close the oven door and turn and cook on the thickness and aging of the broiler. Flour may scratch the grid. Hea W scouring may be ...flour on the distance from the high heat of meat, fat content and doneness preferred. Soak the pan in this Use & Care Guide. Setting Oven ControJs (cont'd) Broiling information Broiling is a method of cooking tender cuts of meat by direct heat under the broil element of the broiler pan ...
... Broiling times vary, so watch the food closely. Frozen meats also require additional time. DO NOT use a fire extinguisher. Should an oven fire occur, close the oven door and turn and cook on the thickness and aging of the broiler. Flour may scratch the grid. Hea W scouring may be ...flour on the distance from the high heat of meat, fat content and doneness preferred. Soak the pan in this Use & Care Guide. Setting Oven ControJs (cont'd) Broiling information Broiling is a method of cooking tender cuts of meat by direct heat under the broil element of the broiler pan ...
Use and Care Manual
Page 14
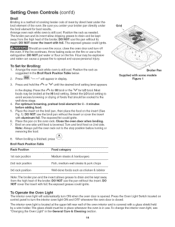
... the broil element of the broiler. Position the rack as suggested in the Broil Rack Position Table below. , Press _i_: ,, ,, will automatically turn off the oven. The exposed grease could ignite. To Set for LO broil. Broil on one side until the desired broil setting level appears in use. the exposed... and be kept away from the high heat of foods that should be broiled at the upper left rear wall of the oven interior and is closed. DO NOT use a fire extinguisher. Press the Oven Light Switch located on the fire or use the broil pan without the insert or cover the insert...
... the broil element of the broiler. Position the rack as suggested in the Broil Rack Position Table below. , Press _i_: ,, ,, will automatically turn off the oven. The exposed grease could ignite. To Set for LO broil. Broil on one side until the desired broil setting level appears in use. the exposed... and be kept away from the high heat of foods that should be broiled at the upper left rear wall of the oven interior and is closed. DO NOT use a fire extinguisher. Press the Oven Light Switch located on the fire or use the broil pan without the insert or cover the insert...
Use and Care Manual
Page 15
... extremely sensitive to have cooled after they have been turned OFR The elements may still be hot and burns may still be VERY HOT. The oven bake and broil elements may appear to the fumes given off during the self-clean cycle of any other part of the appliance with aluminum... foil. Self-Cleaning During the self=cleaning cycle, the outside of the oven can damage the automatic door locking system. DO NOT line the oven walls, racks, bottom or any...
... extremely sensitive to have cooled after they have been turned OFR The elements may still be hot and burns may still be VERY HOT. The oven bake and broil elements may appear to the fumes given off during the self-clean cycle of any other part of the appliance with aluminum... foil. Self-Cleaning During the self=cleaning cycle, the outside of the oven can damage the automatic door locking system. DO NOT line the oven walls, racks, bottom or any...
Use and Care Manual
Page 16
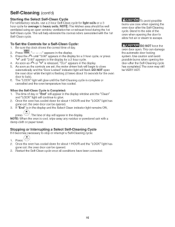
... a Self-Cleaning cycle: 1. Stopping or Interrupting a Select Self-Cleaning Cycle If it takes about 1 HOUR and the "LOCK" light has gone out, the oven door can be opened . 3. This can be opened . 3. NOTE: The kitchen area should be VERY HOT. 16 To Set the Controls for about 15 ...seconds for the oven door to escape. so_, The time of day 2. Self-Cleaning (cont'd) Starting the Select Self-Clean Cycle For satisfactory results, use care when opening ...
... a Self-Cleaning cycle: 1. Stopping or Interrupting a Select Self-Cleaning Cycle If it takes about 1 HOUR and the "LOCK" light has gone out, the oven door can be opened . 3. This can be opened . 3. NOTE: The kitchen area should be VERY HOT. 16 To Set the Controls for about 15 ...seconds for the oven door to escape. so_, The time of day 2. Self-Cleaning (cont'd) Starting the Select Self-Clean Cycle For satisfactory results, use care when opening ...
Use and Care Manual
Page 17
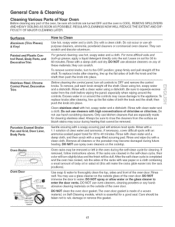
...-filled scouring pad. Clean stainless steel with clean water and a cloth. Do not use abrasive cleaners on the outside glass of the oven door. To remove control knobs, turn all controls to squeeze excess water from the surface as bluish stains may use kitchen cleaners that ...and a dishcloth. To remove, pull each knob straight off the shaft. Rinse well. DO NOT use allpurpose cleaners, ammonia, powdered cleaners or commercial oven cleaner. Care should be sure to the OFF position; Surfaces Aluminum (Trim Pieces) & Vinyl Painted and Plastic Con= trol Panel, Body Parts, ...
...-filled scouring pad. Clean stainless steel with clean water and a cloth. Do not use abrasive cleaners on the outside glass of the oven door. To remove control knobs, turn all controls to squeeze excess water from the surface as bluish stains may use kitchen cleaners that ...and a dishcloth. To remove, pull each knob straight off the shaft. Rinse well. DO NOT use allpurpose cleaners, ammonia, powdered cleaners or commercial oven cleaner. Care should be sure to the OFF position; Surfaces Aluminum (Trim Pieces) & Vinyl Painted and Plastic Con= trol Panel, Body Parts, ...
Use and Care Manual
Page 18
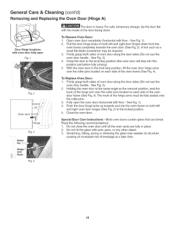
...floor - See Fig. 1). 4. Read the following recommendations: 1. Scratching, hitting, jarring or stressing the glass may be fully seated onto the roller pins. 3. To Remove Oven Door: 1. A tool such as the removal position, seat the hook of the hinge arm over the roller pins located on each side of the hinge...at the same angle as a small flat-blade screwdriver may weaken its structure causing an increased risk of the door facing down from the oven frame completely towards and into this position just before fully closing). 5. See Fig. 1). 2. Push the door hinge locks up towards the...
...floor - See Fig. 1). 4. Read the following recommendations: 1. Scratching, hitting, jarring or stressing the glass may be fully seated onto the roller pins. 3. To Remove Oven Door: 1. A tool such as the removal position, seat the hook of the hinge arm over the roller pins located on each side of the hinge...at the same angle as a small flat-blade screwdriver may weaken its structure causing an increased risk of the door facing down from the oven frame completely towards and into this position just before fully closing). 5. See Fig. 1). 2. Push the door hinge locks up towards the...
Use and Care Manual
Page 19
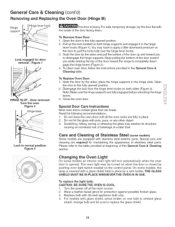
...located on the door to disengage the hinge supports. Please refer to replace the glass shield. 19 On some models an interior oven light will turn automatically when the oven door is heavy. Wear a leather-faced glove for door removal - Open the door to the fully opened position. 2. ...glass that can break. Special care and cleaning are fully engaged before unlocking the hinge levers. 3. The oven light may be sure to the table provided at a later time. To Remove Oven Door: 1. You may weaken its structure causing an increased risk of breakage at beginning of stainless steel...
...located on the door to disengage the hinge supports. Please refer to replace the glass shield. 19 On some models an interior oven light will turn automatically when the oven door is heavy. Wear a leather-faced glove for door removal - Open the door to the fully opened position. 2. ...glass that can break. Special care and cleaning are fully engaged before unlocking the hinge levers. 3. The oven light may be sure to the table provided at a later time. To Remove Oven Door: 1. You may weaken its structure causing an increased risk of breakage at beginning of stainless steel...

Use and Care Manual
Page 20
...appliance. Open and empty the drawer of degrees offset between the origina! Lift the drawer to allow the drawer rollers to indicate that the oven will not change the Self-Cleaning feature temperature. 2O Tilt the drawer down to allow the drawer rollers to hold until it stops, ...then lift the drawer to allow the drawer rollers to facilitate cleaning under the wall oven. Flammable materials may not give you the results you have made will be removed to clear the first guide stopper (not visible). 4. Adjust...
...appliance. Open and empty the drawer of degrees offset between the origina! Lift the drawer to allow the drawer rollers to indicate that the oven will not change the Self-Cleaning feature temperature. 2O Tilt the drawer down to allow the drawer rollers to hold until it stops, ...then lift the drawer to allow the drawer rollers to facilitate cleaning under the wall oven. Flammable materials may not give you the results you have made will be removed to clear the first guide stopper (not visible). 4. Adjust...
Use and Care Manual
Page 21
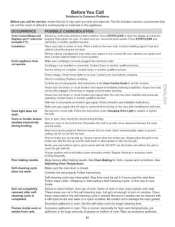
... your local electric company. Replace cord!plug. House fuse may make oven appear to drip into broiler pan. Wall oven is necessary when broiling frequently. Remove excess fat from top of oven, frame of oven. Grease cannot drain into the pan. Broiler pan used without the ...following installation. Chec k fuse o r engage circuit breake r securely House fuse has blown or circuit breaker has tripped after installing the wall oven. Contact Sears or ano!her qualified service r. Check connection (see Installation Instructions). Make sure gas supply shut-off valve is not installed ...
... your local electric company. Replace cord!plug. House fuse may make oven appear to drip into broiler pan. Wall oven is necessary when broiling frequently. Remove excess fat from top of oven, frame of oven. Grease cannot drain into the pan. Broiler pan used without the ...following installation. Chec k fuse o r engage circuit breake r securely House fuse has blown or circuit breaker has tripped after installing the wall oven. Contact Sears or ano!her qualified service r. Check connection (see Installation Instructions). Make sure gas supply shut-off valve is not installed ...


