

Use and Care Guide
Page 1
... and follow all Safety, Assembly, and Use and Care instructions in this Guide before assembling and cooking with this grill. • Failure to follow all irstructions in this Use and Care Guide may lead to fire or e×plosion, which could result in property damage, personal injury or death. • Safety • Parts • Use and Care • Assembly Assembly Questions? Sears, Roebuck and Co., Hoffman...
... and follow all Safety, Assembly, and Use and Care instructions in this Guide before assembling and cooking with this grill. • Failure to follow all irstructions in this Use and Care Guide may lead to fire or e×plosion, which could result in property damage, personal injury or death. • Safety • Parts • Use and Care • Assembly Assembly Questions? Sears, Roebuck and Co., Hoffman...
Use and Care Guide
Page 2
... (such as rotisserie) must conform with local codes, or in any other reproductive harm. 2. Call Grill Service Center For Help And Parts If you smell gas: 1. Model Number Serial Number Date Purchased Seeratinglabel on grill for future reference. This product contains chemicals, including lead and lead compounds, known to the State of local codes, with LP (propane) gas and the regulator/valve assembly supplied. Do not use only...
... (such as rotisserie) must conform with local codes, or in any other reproductive harm. 2. Call Grill Service Center For Help And Parts If you smell gas: 1. Model Number Serial Number Date Purchased Seeratinglabel on grill for future reference. This product contains chemicals, including lead and lead compounds, known to the State of local codes, with LP (propane) gas and the regulator/valve assembly supplied. Do not use only...
Use and Care Guide
Page 3
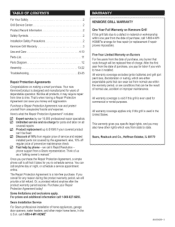
... Symbols Installation Safety Precautions Kenmore Grill Warranty Use and Care Parts List Parts Diagram Assembly Troubleshooting 2 2 2 2 2 3 4-10 11 12 13-22 23-25 Repair Protection Agreements Congratulations on all that rusts through wilt be fixed [] Discount of 10% from the date of service and related installed parts not covered by phone -we will provide a full refund. That's when having a Repair Protection Agreement can call is a risk-free purchase...
... Symbols Installation Safety Precautions Kenmore Grill Warranty Use and Care Parts List Parts Diagram Assembly Troubleshooting 2 2 2 2 2 3 4-10 11 12 13-22 23-25 Repair Protection Agreements Congratulations on all that rusts through wilt be fixed [] Discount of 10% from the date of service and related installed parts not covered by phone -we will provide a full refund. That's when having a Repair Protection Agreement can call is a risk-free purchase...
Use and Care Guide
Page 4
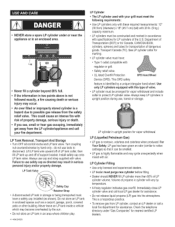
.... Install safety cap onto LP tank valve. See LP cylinder collar for marking. • LP cylinder valve must be arranged for vapor withdrawal and include collar to protect LP cylinder valve. Turn coupling nut counterclockwise by a unique triangular hand wheel. do not use tools to use cap and strap supplied with specifications for LP cylinders of propane in upright position during use, transit or storage. For Your Safety, LP gas has...
.... Install safety cap onto LP tank valve. See LP cylinder collar for marking. • LP cylinder valve must be arranged for vapor withdrawal and include collar to protect LP cylinder valve. Turn coupling nut counterclockwise by a unique triangular hand wheel. do not use tools to use cap and strap supplied with specifications for LP cylinders of propane in upright position during use, transit or storage. For Your Safety, LP gas has...

Use and Care Guide
Page 5
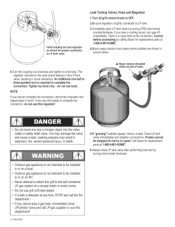
.... Contact an LP gas supplier or your empty LP tank through an exchange service. A Do not use , transit or storage. •Leak test new and exchanged LP tanks BEFORE connecting to be leak tested outdoors in upright position during leak test. *Do not use a POL transport plug (plastic part with valve. Connecting Regulator To The LP Tank 1.LP tank must be repeated each time LP tank is exchanged or...
.... Contact an LP gas supplier or your empty LP tank through an exchange service. A Do not use , transit or storage. •Leak test new and exchanged LP tanks BEFORE connecting to be leak tested outdoors in upright position during leak test. *Do not use a POL transport plug (plastic part with valve. Connecting Regulator To The LP Tank 1.LP tank must be repeated each time LP tank is exchanged or...
Use and Care Guide
Page 6
... tighten to LP tank valve. NOTE: If you hear a rushing sound, turn is not intended to repair. Call Sears for replacement parts at the connection. A Never remove threaded orifice at end of a camper trailer or motor home. . Leaking propane may damage the valve and cause a leak. Outdoor gas appliance is not intended to be stopped do not use this grill to LP tank. 3.Completely open LP tank valve by turning...
... tighten to LP tank valve. NOTE: If you hear a rushing sound, turn is not intended to repair. Call Sears for replacement parts at the connection. A Never remove threaded orifice at end of a camper trailer or motor home. . Leaking propane may damage the valve and cause a leak. Outdoor gas appliance is not intended to be stopped do not use this grill to LP tank. 3.Completely open LP tank valve by turning...
Use and Care Guide
Page 7
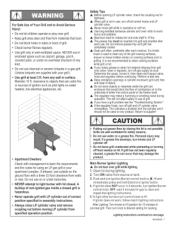
... regulator before moving LP cylinder from specified operation position. Main Burner ignitor Lighting A Do not lean over grill while lighting. 1. A The grease tray must be used to clean any product. Do not remove grease tray until grill has completely cooled. A Keep ventilation openings in assembly instructions. • Always close LP cylinder valve and remove coupling nut before continuing. Grills are supplied with lid closed grill is not possible. Open lid during operation. A buildup of non-ignited gas...
... regulator before moving LP cylinder from specified operation position. Main Burner ignitor Lighting A Do not lean over grill while lighting. 1. A The grease tray must be used to clean any product. Do not remove grease tray until grill has completely cooled. A Keep ventilation openings in assembly instructions. • Always close LP cylinder valve and remove coupling nut before continuing. Grills are supplied with lid closed grill is not possible. Open lid during operation. A buildup of non-ignited gas...
Use and Care Guide
Page 8
... push in the Troubleshooting Section. Use only valve/hose/regulator specified by pushing knob in OFF position. Turn on gas at the factory (and should be wiped away with warm soapy water and wipe dry. CAUTIo. Perform burner flame check on grease deposits may require the use . Turn on gas at LP cylinder. Rinse and allow to OFF position. Light match, place into match holder (hanging from HIGH...
... push in the Troubleshooting Section. Use only valve/hose/regulator specified by pushing knob in OFF position. Turn on gas at the factory (and should be wiped away with warm soapy water and wipe dry. CAUTIo. Perform burner flame check on grease deposits may require the use . Turn on gas at LP cylinder. Rinse and allow to OFF position. Light match, place into match holder (hanging from HIGH...
Use and Care Guide
Page 9
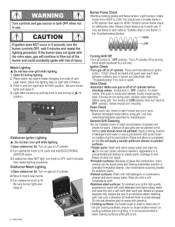
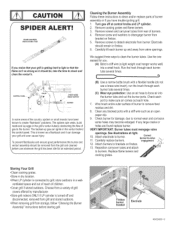
... "Cleaning the Burner Assembly" instructions before starting grill. Turn gas off and disconnected, removed from grill and stored outdoors. •When removing grill from a variety of burner to check and clean the venturi's. Remove screws and carryover tubes from bracket on firebox. 13. Carefully lift each burner tube several times. (C) Wear eye protection: Use an air hose to disengage burner from rear of burner assembly or if you have trouble igniting grill, 1. We suggest...
... "Cleaning the Burner Assembly" instructions before starting grill. Turn gas off and disconnected, removed from grill and stored outdoors. •When removing grill from a variety of burner to check and clean the venturi's. Remove screws and carryover tubes from bracket on firebox. 13. Carefully lift each burner tube several times. (C) Wear eye protection: Use an air hose to disengage burner from rear of burner assembly or if you have trouble igniting grill, 1. We suggest...
Use and Care Guide
Page 10
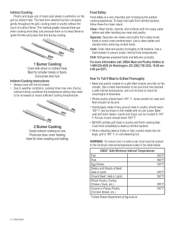
... cooking. 1 Burner Cooking Cook with hot soapy water before and after handling raw meat and poultry. Indirect Cooking Instructions • Always cook with no direct flame to the minimum internal temperatures listed in Washington, DC (202) 720-3333, 10:00 am4:00 pm EST). During cold and windy conditions the temperature setting may vary. Use a thermometer...
... cooking. 1 Burner Cooking Cook with hot soapy water before and after handling raw meat and poultry. Indirect Cooking Instructions • Always cook with no direct flame to the minimum internal temperatures listed in Washington, DC (202) 720-3333, 10:00 am4:00 pm EST). During cold and windy conditions the temperature setting may vary. Use a thermometer...
Use and Care Guide
Page 11
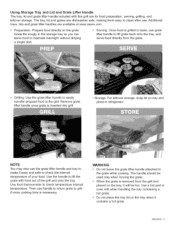
... the tray containing a hot grate. • Do not place the tray lid on the tray, it will be used only when moving the grate. • When the grate is grilled to taste_ use . Serving: Once food is removed from the grate. • Grilling: Use the grate lifter handle to easily transfer prepped food to check temperature internal temperature. Use food thermometer to the grill. Then use the grate...
... the tray containing a hot grate. • Do not place the tray lid on the tray, it will be used only when moving the grate. • When the grate is grilled to taste_ use . Serving: Once food is removed from the grate. • Grilling: Use the grate lifter handle to easily transfer prepped food to check temperature internal temperature. Use food thermometer to the grill. Then use the grate...
Use and Care Guide
Page 12
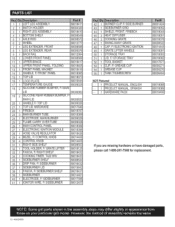
... 1 ELECTRODE, MAIN BURNER 25 2 FLAME CARRY OVER TUBE 80009029 80009028 26 1 MAIN CONTROL PANEL 80018399 27 1 ELECTRONIC IGNITION MODULE 80018396 28 1 HOSE VALVE REGULATOR 80018426 29 4 BEZEL, F/CONTROL KNOB 80014406 3O 4 CONTROL KNOB 80014405 31 1 RIGHT SIDE SHELF 32 1 TOOL HOLDER, F/GRATE LIFTER 33 1 FASCIA, F/RIGHT SHELF 80008553 80018125 80018432 If you are missing hardware or have damaged parts, please call 1-800-241-7548for replacement. 34...
... 1 ELECTRODE, MAIN BURNER 25 2 FLAME CARRY OVER TUBE 80009029 80009028 26 1 MAIN CONTROL PANEL 80018399 27 1 ELECTRONIC IGNITION MODULE 80018396 28 1 HOSE VALVE REGULATOR 80018426 29 4 BEZEL, F/CONTROL KNOB 80014406 3O 4 CONTROL KNOB 80014405 31 1 RIGHT SIDE SHELF 32 1 TOOL HOLDER, F/GRATE LIFTER 33 1 FASCIA, F/RIGHT SHELF 80008553 80018125 80018432 If you are missing hardware or have damaged parts, please call 1-800-241-7548for replacement. 34...

Use and Care Guide
Page 18
Grill Headto Cart [] Standcart upright. [] Thisstep requirestwo peopleto lift and positiongrill head ontocart. [] Carefullylowerthe grill headontothe cart. Makesurethe regulatorhoseis hangingoutsidethecart.Attachwith (4) 1/4-20×1/2"screws, 7ramlock washers and 7ramflat washers. Grill Head X 1/4-20xl/2"screws Qty.4 7mmlock washers Qty.4 7mmflat washers Qty.4 7mmflat washers 7mmlock washers 1/4-20x1/2screws 18,464324009
Grill Headto Cart [] Standcart upright. [] Thisstep requirestwo peopleto lift and positiongrill head ontocart. [] Carefullylowerthe grill headontothe cart. Makesurethe regulatorhoseis hangingoutsidethecart.Attachwith (4) 1/4-20×1/2"screws, 7ramlock washers and 7ramflat washers. Grill Head X 1/4-20xl/2"screws Qty.4 7mmlock washers Qty.4 7mmflat washers Qty.4 7mmflat washers 7mmlock washers 1/4-20x1/2screws 18,464324009

Use and Care Guide
Page 21
...andvalve. Under sideburnershelf,installsideburnerclip to electrodeasshown (D). [] Placegrateontosideburnershelf (E). [] Presscontrolknobontosideburnervalvestem (F). Bezel Sideburner D ® SideburnerValve BurnerClip Sideb Grid Correctly assembled burner-to-valve engagement ControlKnob #8-32X3/8"SS Screw Qty.2 WingNut Qty.1 464324009,21 SideburnVear lveS,ideburnerS, ideburner Bezel, ignitorWire, Control Knob [] Positionvalve behindfasciaand line up holes. [] Insert(1) of the#8-32x3/8"stainlesssteelscrews,butdo notfully tighten. [] Slip bezelunder insertedscrewand positionas shown...
...andvalve. Under sideburnershelf,installsideburnerclip to electrodeasshown (D). [] Placegrateontosideburnershelf (E). [] Presscontrolknobontosideburnervalvestem (F). Bezel Sideburner D ® SideburnerValve BurnerClip Sideb Grid Correctly assembled burner-to-valve engagement ControlKnob #8-32X3/8"SS Screw Qty.2 WingNut Qty.1 464324009,21 SideburnVear lveS,ideburnerS, ideburner Bezel, ignitorWire, Control Knob [] Positionvalve behindfasciaand line up holes. [] Insert(1) of the#8-32x3/8"stainlesssteelscrews,butdo notfully tighten. [] Slip bezelunder insertedscrewand positionas shown...

Use and Care Guide
Page 23
...holesin sides of firebox. Pivot Wire Grate 464324009,23 Oppositeends of heatdiffusersrest on top, SwingAway is installedupside-down. [] Unscrewignitorcapand placeAA batteryinto ignitorslot with positiveend (+)facing outward.Screw ignitorcaponto ignitor. NOTE:Pivotand leg wires,runningside-to...-side,shouldbe underwires runningfront-to-back.If pivotand legwires are on pinsin backof firebox. Heat Diffusers [] Placeheatdiffusersoverburnersbyinsertingtabs into slotsin front of grill lid. Insertendsof SwingAway...
...holesin sides of firebox. Pivot Wire Grate 464324009,23 Oppositeends of heatdiffusersrest on top, SwingAway is installedupside-down. [] Unscrewignitorcapand placeAA batteryinto ignitorslot with positiveend (+)facing outward.Screw ignitorcaponto ignitor. NOTE:Pivotand leg wires,runningside-to...-side,shouldbe underwires runningfront-to-back.If pivotand legwires are on pinsin backof firebox. Heat Diffusers [] Placeheatdiffusersoverburnersbyinsertingtabs into slotsin front of grill lid. Insertendsof SwingAway...

Use and Care Guide
Page 25
... to correctlyLeakTestand performthe Burner Flame Check. See Useand Caresection to grill and regulator. [] PlaceLPtank into hole in bottomshelfwith tank collaropeningfacingto side as shown.Fingertightentank thumbscrewto hold LP tanksecurelyin place. GreaseCup Clip and GreaseCup [] Hanggreasecup clipfrom bottomof fireboxand placegreasecup intogreasecupclip. CAUTION Failureto installgreasecup clip and cup will cause hot greaseto drip from bottom of grill with risk of...
... to correctlyLeakTestand performthe Burner Flame Check. See Useand Caresection to grill and regulator. [] PlaceLPtank into hole in bottomshelfwith tank collaropeningfacingto side as shown.Fingertightentank thumbscrewto hold LP tanksecurelyin place. GreaseCup Clip and GreaseCup [] Hanggreasecup clipfrom bottomof fireboxand placegreasecup intogreasecupclip. CAUTION Failureto installgreasecup clip and cup will cause hot greaseto drip from bottom of grill with risk of...
Use and Care Guide
Page 26
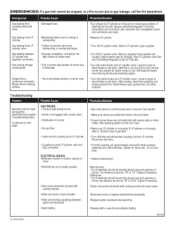
... REVO0 MainBurners: •Tip of electrodeshouldbe pointingtowardgasport openingon burner,the distanceshouldbe 1/8"to blockage. •Toomuchgreasebuildupin burnerarea. •Turnoff gas at LP cylinderor at couplingnutto LP cylinder. • Couplingnut and LP cylindervalve not fully connected. Gasleakingfrom LP cylindervalve. Firecomingthrough controlpanel. do not use tools. • Replaceelectrode(s). Troubleshooting Burner(s)will not light usingignitor. (See ElectronicIgnition Troubleshootingalso) Continuedon next page. ELECTRICALISSUES: •Electrodecrackedor broken...
... REVO0 MainBurners: •Tip of electrodeshouldbe pointingtowardgasport openingon burner,the distanceshouldbe 1/8"to blockage. •Toomuchgreasebuildupin burnerarea. •Turnoff gas at LP cylinderor at couplingnutto LP cylinder. • Couplingnut and LP cylindervalve not fully connected. Gasleakingfrom LP cylindervalve. Firecomingthrough controlpanel. do not use tools. • Replaceelectrode(s). Troubleshooting Burner(s)will not light usingignitor. (See ElectronicIgnition Troubleshootingalso) Continuedon next page. ELECTRICALISSUES: •Electrodecrackedor broken...

Use and Care Guide
Page 27
... OFF,Cleanburnerand/orburnertubes.See burner cleaningsectionof Use and Care. Suddendrop in gas flow or low flame. •Out of grill to engagethe valve.Try a secondLPdealer. Persistentgreasefire. •Greasetrappedbyfood builduparound burnersystem. •Turnknobsto OFF,Turngas off at couplingnut/LPcylinder connection. ,Checkforgas in position and let fire burnout,After grill cools,removeandcleanall parts. Reconnectregulatorand leak-test,Turnon LP cylindervalve,wait 30 secondsand...
... OFF,Cleanburnerand/orburnertubes.See burner cleaningsectionof Use and Care. Suddendrop in gas flow or low flame. •Out of grill to engagethe valve.Try a secondLPdealer. Persistentgreasefire. •Greasetrappedbyfood builduparound burnersystem. •Turnknobsto OFF,Turngas off at couplingnut/LPcylinder connection. ,Checkforgas in position and let fire burnout,After grill cools,removeandcleanall parts. Reconnectregulatorand leak-test,Turnon LP cylindervalve,wait 30 secondsand...

Use and Care Guide
Page 28
... in dark location.Operate ignitionsystemand lookfor arcingbetweenoutputwires and grill frame. •If sparksare observedotherthanfrom burner(s), wire insulationmay be heardfrom spark module. •Outputlead connectionsnot connected. Electronic Ignition SECTIONI Nosparksappearat anyelectrodeswhen controlknobturnedto _" ; no noisecan be heardfrom spark module. ,Battery not installed properly. •Deadbattery. •Buttonassemblynot installedproperly. •Faultyspark module. •Checkbatteryorientation. •Has batterybeen used previously? •...
... in dark location.Operate ignitionsystemand lookfor arcingbetweenoutputwires and grill frame. •If sparksare observedotherthanfrom burner(s), wire insulationmay be heardfrom spark module. •Outputlead connectionsnot connected. Electronic Ignition SECTIONI Nosparksappearat anyelectrodeswhen controlknobturnedto _" ; no noisecan be heardfrom spark module. ,Battery not installed properly. •Deadbattery. •Buttonassemblynot installedproperly. •Faultyspark module. •Checkbatteryorientation. •Has batterybeen used previously? •...
Use and Care Guide
Page 32
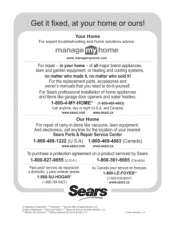
... de commerce / _° Marque ddposde de Sears Brands, LLC © Sears Brands, LLC iiiiiiiiiiiiiiiiiiii For the replacement parts, accessories and iiiiiiiii_i_!i_i_i_i_i_i_oiw_in_ei_r'is_imanuals that you need to do-it ! For repair- and Canada) _i_i_i_i_i_i_i_i_i_i_i_i_i_i_i www.sears.com www.sears.ca iiiiiiiiiiiiiiiiiiii iiiiiiiiiiiiiiiiiiiiiiiiiFiiioiirrepairofcarry-in your home - iiiiiiiiiiiiiiiiiiiiii' iiiiiiiiii Your Home For expert troubleshooting and home solutions advice: alnage ho...
... de commerce / _° Marque ddposde de Sears Brands, LLC © Sears Brands, LLC iiiiiiiiiiiiiiiiiiii For the replacement parts, accessories and iiiiiiiii_i_!i_i_i_i_i_i_oiw_in_ei_r'is_imanuals that you need to do-it ! For repair- and Canada) _i_i_i_i_i_i_i_i_i_i_i_i_i_i_i www.sears.com www.sears.ca iiiiiiiiiiiiiiiiiiii iiiiiiiiiiiiiiiiiiiiiiiiiFiiioiirrepairofcarry-in your home - iiiiiiiiiiiiiiiiiiiiii' iiiiiiiiii Your Home For expert troubleshooting and home solutions advice: alnage ho...


