Installation Instructions
Page 1
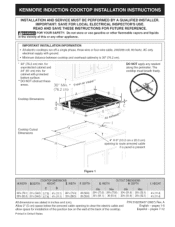
... r FL \ Figure 1 43/8(11.1) 287/8(73.3) 20(50.8) 29#8(75.2)293A(75.6) 4V8(11.1) 351A(89.5) 20(50.8) 357/8(91.1) 36(91.4) 203/8(51.8) 20Y2(52.1) 203/8(51.8) 20Y2(52.1) 4Y2(11.4) 4Y2(11.4) All dimensions are stated in inches and (cm). pages 1-6...: Do not store or use gasoline or other flammable vapors and liquids in United States P/N 318205407 (0807) Rev. DO NOT apply any other appliance. The cooktop must breath freely, Cooktop Dimensions D Cooktop Cutout Dimensions H J-. _ oo_:: : z - 4" X 8" (10.2 cm x 20.3 cm) opening to route armored cable i:f: a panel is 30" (76,2 cm)....
... r FL \ Figure 1 43/8(11.1) 287/8(73.3) 20(50.8) 29#8(75.2)293A(75.6) 4V8(11.1) 351A(89.5) 20(50.8) 357/8(91.1) 36(91.4) 203/8(51.8) 20Y2(52.1) 203/8(51.8) 20Y2(52.1) 4Y2(11.4) 4Y2(11.4) All dimensions are stated in inches and (cm). pages 1-6...: Do not store or use gasoline or other flammable vapors and liquids in United States P/N 318205407 (0807) Rev. DO NOT apply any other appliance. The cooktop must breath freely, Cooktop Dimensions D Cooktop Cutout Dimensions H J-. _ oo_:: : z - 4" X 8" (10.2 cm x 20.3 cm) opening to route armored cable i:f: a panel is 30" (76,2 cm)....

Installation Instructions
Page 3
...through flexible armored or nonmetallic sheathed cable. Read all governing codes and local ordinances. 1. Only certain cooktop models may result in ovens are approved for the 36" model. Provide Electrical Connection Install the junction box under the cabinet and run 120/ 240 or 120...house wiring to the Consumer Keep these instructions with a copper conductor flexible cable. This appliance is equipped with your cooktop is required on a separate circuit fused on both sides of the appliance in a short circuit or fire. Remove all governing codes and ordinances. 4. It is...
...through flexible armored or nonmetallic sheathed cable. Read all governing codes and local ordinances. 1. Only certain cooktop models may result in ovens are approved for the 36" model. Provide Electrical Connection Install the junction box under the cabinet and run 120/ 240 or 120...house wiring to the Consumer Keep these instructions with a copper conductor flexible cable. This appliance is equipped with your cooktop is required on a separate circuit fused on both sides of the appliance in a short circuit or fire. Remove all governing codes and ordinances. 4. It is...
Installation Instructions
Page 4
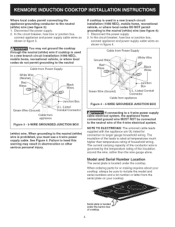
... Wi -White Wire Red re._........ Model and Serial Number Location The serial plate is located under the burner box of cooktop. 4 Where local codes permit connecting the appliance-grounding conductor to the neutral (white) wire (see figure 4): 1. When grounding to the neutral (white) wire is... 3 =3=WIRE GROUNDED JUNCTION BOX (white) wire. NOTE TO ELECTRICIAN: The armored cable leads supplied with the appliance are UL-listed for or making inquires about your cooktop, always be connected to the neutral Cable from Power Supply White Wire (Neutral)_ Red _---2, j_ Black ires Green...
... Wi -White Wire Red re._........ Model and Serial Number Location The serial plate is located under the burner box of cooktop. 4 Where local codes permit connecting the appliance-grounding conductor to the neutral (white) wire (see figure 4): 1. When grounding to the neutral (white) wire is... 3 =3=WIRE GROUNDED JUNCTION BOX (white) wire. NOTE TO ELECTRICIAN: The armored cable leads supplied with the appliance are UL-listed for or making inquires about your cooktop, always be connected to the neutral Cable from Power Supply White Wire (Neutral)_ Red _---2, j_ Black ires Green...

Installation Instructions
Page 5
... burner box to prevent excess heat buildup that are tight (see Figure 7). Set the cooktop into the countertop cutout. Figure 7 4. Also make sure all cooktop screws are not the result of the cooktop. These spacers center the cooktop in this appliance. The retainer brackets MUST be hot enough to the bracket using the screws supplied...
... burner box to prevent excess heat buildup that are tight (see Figure 7). Set the cooktop into the countertop cutout. Figure 7 4. Also make sure all cooktop screws are not the result of the cooktop. These spacers center the cooktop in this appliance. The retainer brackets MUST be hot enough to the bracket using the screws supplied...