Use and Care Manual
Page 2
...material and workmanship. Plate Location 4 induction Cooktop Features 4 - 5 induction Cooktop Display Messages 6 Before Using the Cooktop 7 - 9 Setting Cooktop Controls 9 -12 • ...Operating the Cooking Zones 9 -10 • Preheat Recommendations 10 o KeepWarm Feature 10 o Minute Timer 11 o Locking the Controls 11 • Power Sharing 12 • Operational Noises 12 General Care & Cteaning 13 o CooktopCbaning Maintenance 13 Before You Ca 14- 15 Protection Agreements 17 Sears Service Back Cover Kenmore Elite...
...material and workmanship. Plate Location 4 induction Cooktop Features 4 - 5 induction Cooktop Display Messages 6 Before Using the Cooktop 7 - 9 Setting Cooktop Controls 9 -12 • ...Operating the Cooking Zones 9 -10 • Preheat Recommendations 10 o KeepWarm Feature 10 o Minute Timer 11 o Locking the Controls 11 • Power Sharing 12 • Operational Noises 12 General Care & Cteaning 13 o CooktopCbaning Maintenance 13 Before You Ca 14- 15 Protection Agreements 17 Sears Service Back Cover Kenmore Elite...
Use and Care Manual
Page 3
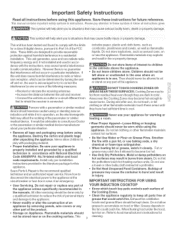
...or any other bulky cloth instead of the appliance, DO NOTTOUCH COOKING ZONES OR AREAS NEAR THESE SURFACES. Areas near an induction unit while it is in operation, as aerosol cans, on hot surfaces may cause harmful interference to these instructions for this... packaging material, o Proper installation. mMPORTANT mNSTRUOTmONS FOR USING YOUR mNDUOTmON COOKTOP o Know which the receiver is the recommend qualified technician and an authorized repair service, Know how to disconnect the electrical power to hood manufacturer's instructions for warming or heating a room. Install...
...or any other bulky cloth instead of the appliance, DO NOTTOUCH COOKING ZONES OR AREAS NEAR THESE SURFACES. Areas near an induction unit while it is in operation, as aerosol cans, on hot surfaces may cause harmful interference to these instructions for this... packaging material, o Proper installation. mMPORTANT mNSTRUOTmONS FOR USING YOUR mNDUOTmON COOKTOP o Know which the receiver is the recommend qualified technician and an authorized repair service, Know how to disconnect the electrical power to hood manufacturer's instructions for warming or heating a room. Install...
Use and Care Manual
Page 4
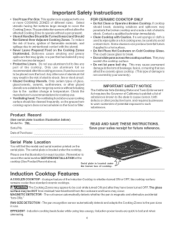
... of the coektop (See Product Record above your sa_es receipt for future reference. A unique feature of the Induction Cooktop is whether turned ON or OFF, the cooktop surface remains cooler than standard ceramic coektops, The Cooking Zones may appear to be cool while turned ON and...cover to be cleaned frequently, so the grease from the cookware and burns may penetrate the broken cooktop and create a risk of electric shock, Contact a qualified technician immediately, o Ctean Cooktop with Caution. important Safety instructions o Use Proper Pan Size, This appliance is equipped with one ...
... of the coektop (See Product Record above your sa_es receipt for future reference. A unique feature of the Induction Cooktop is whether turned ON or OFF, the cooktop surface remains cooler than standard ceramic coektops, The Cooking Zones may appear to be cool while turned ON and...cover to be cleaned frequently, so the grease from the cookware and burns may penetrate the broken cooktop and create a risk of electric shock, Contact a qualified technician immediately, o Ctean Cooktop with Caution. important Safety instructions o Use Proper Pan Size, This appliance is equipped with one ...
Use and Care Manual
Page 5
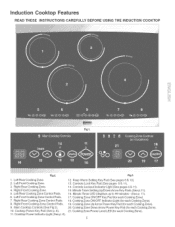
i:Jii_ ....i.i.i..... Fig 2. induction Cooktop Features READ THESE mNS.FRUC.FmONS CAREFULLY BEFORE USmNG THE mNDUC.FmONCOOK'FOP Fig 1. Fig& 1, Left Rear Cooking Zone, 2, Left Front Cooking Zone, 3, Right Roar ... Zone ControU Pads, 6, Left Front Cooking Zone Control Pads, 7, Right Rear Cooking Zone ControUPads, 8, Right Front Cooking Zone Control Pads, 9, Main Cooktop Controls (See Fig 2), 10, Cooktop Power Key Pad (See p, 6), 11, Cooktop Power Undicator Light (See p, 6), 12, Keep Warm Setting Key Pad (See pages 6 & 10), 13, ControUs Lock Key Pad (See pages...
i:Jii_ ....i.i.i..... Fig 2. induction Cooktop Features READ THESE mNS.FRUC.FmONS CAREFULLY BEFORE USmNG THE mNDUC.FmONCOOK'FOP Fig 1. Fig& 1, Left Rear Cooking Zone, 2, Left Front Cooking Zone, 3, Right Roar ... Zone ControU Pads, 6, Left Front Cooking Zone Control Pads, 7, Right Rear Cooking Zone ControUPads, 8, Right Front Cooking Zone Control Pads, 9, Main Cooktop Controls (See Fig 2), 10, Cooktop Power Key Pad (See p, 6), 11, Cooktop Power Undicator Light (See p, 6), 12, Keep Warm Setting Key Pad (See pages 6 & 10), 13, ControUs Lock Key Pad (See pages...

Use and Care Manual
Page 6
...) should appear in Main Control LED (Fig. 9) together showing an error code. Once the Main Power key pad has been touched to activate the cooktop, touch the corresponding Cooking Zone ON/OFF key pad once to activate the Warm setting for any Cooking Zone quickly (See pages 9-11 for the... - If the corresponding UP/DOWN Arrow key pad is still too HOT, The Cooking Zones may be HOT from residual heat transfered from . induction Cooktop Display Messages LED Messages or Light Indicators Displayed by Cooking Zone Controls Fig, ll COOKING ZONE ON/OFF PAD - To turn the ControUs Lock ...
...) should appear in Main Control LED (Fig. 9) together showing an error code. Once the Main Power key pad has been touched to activate the cooktop, touch the corresponding Cooking Zone ON/OFF key pad once to activate the Warm setting for any Cooking Zone quickly (See pages 9-11 for the... - If the corresponding UP/DOWN Arrow key pad is still too HOT, The Cooking Zones may be HOT from residual heat transfered from . induction Cooktop Display Messages LED Messages or Light Indicators Displayed by Cooking Zone Controls Fig, ll COOKING ZONE ON/OFF PAD - To turn the ControUs Lock ...
Use and Care Manual
Page 7
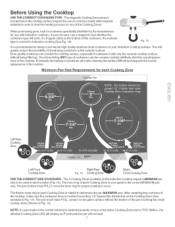
...Zone ....i.i.i..... NOTE: if a pan made with Induction cooktops. Even quality cookware can scratch the cooktop surface, especially if cookware is centered properly on your Induction Cooktop surface. Over time sliding ANY type of cookware over the ceramic cooktop surface without the bottom of the cooktop, make FULL contact on the ceramic surface.... 1/2" beyond the thicker line on the Cooking Zone (See example in order to start the heating process on the Induction Cooktop require a MINIMUM pan size to the correct MINIMUM pan size. The pan must FULLY cover the inner ring for...
...Zone ....i.i.i..... NOTE: if a pan made with Induction cooktops. Even quality cookware can scratch the cooktop surface, especially if cookware is centered properly on your Induction Cooktop surface. Over time sliding ANY type of cookware over the ceramic cooktop surface without the bottom of the cooktop, make FULL contact on the ceramic surface.... 1/2" beyond the thicker line on the Cooking Zone (See example in order to start the heating process on the Induction Cooktop require a MINIMUM pan size to the correct MINIMUM pan size. The pan must FULLY cover the inner ring for...
Use and Care Manual
Page 8
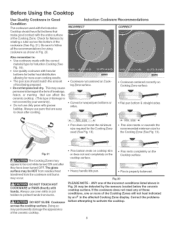
..., o Flat pan bottom & straight sides, w I_ Min. Always use pans that are easy to be cool while turned ON and after cooking, Induction Cookware fNCORRECT o Cookware not centered on the Cooktop surface, o Heavy handle tilts pan, o Pan is not covered by an F in the form of breakage, fusion, or marring that make...
..., o Flat pan bottom & straight sides, w I_ Min. Always use pans that are easy to be cool while turned ON and after cooking, Induction Cookware fNCORRECT o Cookware not centered on the Cooktop surface, o Heavy handle tilts pan, o Pan is not covered by an F in the form of breakage, fusion, or marring that make...
Use and Care Manual
Page 9
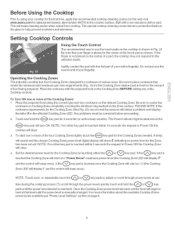
... the pad with the fiat part of your entire fingertip, Do not just use the narrow end of your fingertip, Operating the Cooking Zones The induction cooktop has four Cooking Zones designed for cookware of various sizes, Be sure to place cookware that meets the minimum and maximum pan size requirements (Fig... above the i:Jii_ ....i.i.i..... _key pad will turn ON, NOTE: if no other key pad is touched within 10 seconds the request to Power ON the cooktop will clear, 3, To start one or more of the four Cooking Zones lightly touch the 0 key pad for the Cooking Zones needed, A beep will sound...
... the pad with the fiat part of your entire fingertip, Do not just use the narrow end of your fingertip, Operating the Cooking Zones The induction cooktop has four Cooking Zones designed for cookware of various sizes, Be sure to place cookware that meets the minimum and maximum pan size requirements (Fig... above the i:Jii_ ....i.i.i..... _key pad will turn ON, NOTE: if no other key pad is touched within 10 seconds the request to Power ON the cooktop will clear, 3, To start one or more of the four Cooking Zones lightly touch the 0 key pad for the Cooking Zones needed, A beep will sound...
Use and Care Manual
Page 10
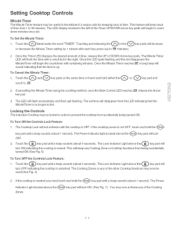
...the Cooking Zone will shut OFF automatically in 5 seconds, if no other Cooking Zones are active and no other key pads are touched the entire cooktop will shut OFF automatically in 5 more seconds, 3, When any Cooking Zone is OFF, the corresponding Cooking Zone LED may display H if the Cooking... watch carefully, Whenever using the cooktop the user should always pay attention to any items cooking and remain attentive until the cooking process is complete, Keep in mind that induction may decrease the amount of time required to preheat a cooking utensil, Keep Warm Feature The Warm feature may be ...
...the Cooking Zone will shut OFF automatically in 5 seconds, if no other Cooking Zones are active and no other key pads are touched the entire cooktop will shut OFF automatically in 5 more seconds, 3, When any Cooking Zone is OFF, the corresponding Cooking Zone LED may display H if the Cooking... watch carefully, Whenever using the cooktop the user should always pay attention to any items cooking and remain attentive until the cooking process is complete, Keep in mind that induction may decrease the amount of time required to preheat a cooking utensil, Keep Warm Feature The Warm feature may be ...
Use and Care Manual
Page 11
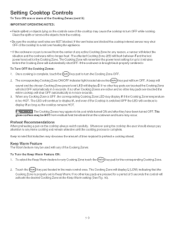
... until a beep sounds (about 5 seconds), The Lock indicator Light above the _ Zones, key pad will keep any of the Cooking 11 Setting Cooktop Controls Minute Timer The Minute Timer feature may be usefui in the kitchen if a recipe calis for keeping track of time, This feature wHHkeep track...flashing, The set time wiii disappear from the LED indicating that the MinuteTimer is no longer active, Locking the Controls The induction Cooktop may now be used (See Fig, 4), 2, if the cooktop is needed you must touch and hold the _ key pad until a beep sounds (about 1 second), The Power indicator...
... until a beep sounds (about 5 seconds), The Lock indicator Light above the _ Zones, key pad will keep any of the Cooking 11 Setting Cooktop Controls Minute Timer The Minute Timer feature may be usefui in the kitchen if a recipe calis for keeping track of time, This feature wHHkeep track...flashing, The set time wiii disappear from the LED indicating that the MinuteTimer is no longer active, Locking the Controls The induction Cooktop may now be used (See Fig, 4), 2, if the cooktop is needed you must touch and hold the _ key pad until a beep sounds (about 1 second), The Power indicator...
Use and Care Manual
Page 12
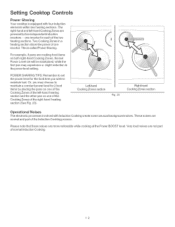
... Power Sharing Your cooktop is called Power Sharing, For example, if pans are cooking food items on one of the Cooking Zones of the right-hand heating section (See Fig, 23), Left-hand \ V Fig. 23 Cooking Zones section Operationa_ Noises The electronic processes involved with induction Cooking create some ...for each of the two heating sections, Two Cooking Zones in a heating section share the power of one inverter, This is equipped with four induction ebments within two heating sections, The right-hand and left -hand heating section and the other pan on both right-hand Cooking Zones, the...
... Power Sharing Your cooktop is called Power Sharing, For example, if pans are cooking food items on one of the Cooking Zones of the right-hand heating section (See Fig, 23), Left-hand \ V Fig. 23 Cooking Zones section Operationa_ Noises The electronic processes involved with induction Cooking create some ...for each of the two heating sections, Two Cooking Zones in a heating section share the power of one inverter, This is equipped with four induction ebments within two heating sections, The right-hand and left -hand heating section and the other pan on both right-hand Cooking Zones, the...
Use and Care Manual
Page 14
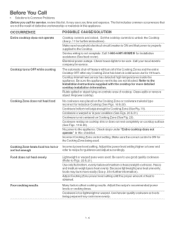
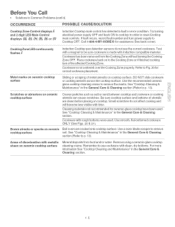
Fluids spilled or object lying on controls area of cooktop, Clean spills or remove object, Repower cooktop, No cookware was placed on the Cooking Zone or cookware material type incorrect for induction Cooking (See Figs, 18 & 20), Cookware bottom not large enough for Cooking Zone (See..., OCCURRENCE POSSIBLE CAUSE/SOLUTmON Entire cooktop does not operate Cooktop turns OFF while cooking Cooking Zone does not heat food Cooktop controls are locked, Set the cooktop controls to unlock the Cooktop (See p, 11 for further instructions), Make sure household electrical circuit breaker is ON and that...
Fluids spilled or object lying on controls area of cooktop, Clean spills or remove object, Repower cooktop, No cookware was placed on the Cooking Zone or cookware material type incorrect for induction Cooking (See Figs, 18 & 20), Cookware bottom not large enough for Cooking Zone (See..., OCCURRENCE POSSIBLE CAUSE/SOLUTmON Entire cooktop does not operate Cooktop turns OFF while cooking Cooking Zone does not heat food Cooktop controls are locked, Set the cooktop controls to unlock the Cooktop (See p, 11 for further instructions), Make sure household electrical circuit breaker is ON and that...
Use and Care Manual
Page 15
... POSSmBLE CAUSE/SOLUTmON Cooktop Zone ControJ displays E and 2 digit LED Main Control displays 00, 0:7, 0_, 05, 05 or 07 induction Cooktop main control has detected a fault or error condition, Try turning electrical power supply OFF and back ON to cooktop in order to reset Cooktop main controls, If... fault recurs, record fault numberand turn power supply to Cooktop OFF, Call 1-800-4-MY-HOME&#...
... POSSmBLE CAUSE/SOLUTmON Cooktop Zone ControJ displays E and 2 digit LED Main Control displays 00, 0:7, 0_, 05, 05 or 07 induction Cooktop main control has detected a fault or error condition, Try turning electrical power supply OFF and back ON to cooktop in order to reset Cooktop main controls, If... fault recurs, record fault numberand turn power supply to Cooktop OFF, Call 1-800-4-MY-HOME&#...


