Use and Care Manual
Page 2
.... Plate Location 4 induction Cooktop Features 4 - 5 induction Cooktop Display Messages 6 Before Using the Cooktop 7 - 9 Setting Cooktop Controls 9 -12 • Operating the Cooking Zones 9 -10 • Preheat Recommendations 10 o KeepWarm Feature 10 o Minute Timer 11 o Locking the Controls 11 • Power Sharing 12 • Operational Noises 12 General Care & Cteaning 13 o CooktopCbaning Maintenance 13 Before You Ca 14- 15 Protection Agreements 17 Sears Service Back Cover Kenmore Elite Appliance Warranty OneYear Limited Warranty When installed...
.... Plate Location 4 induction Cooktop Features 4 - 5 induction Cooktop Display Messages 6 Before Using the Cooktop 7 - 9 Setting Cooktop Controls 9 -12 • Operating the Cooking Zones 9 -10 • Preheat Recommendations 10 o KeepWarm Feature 10 o Minute Timer 11 o Locking the Controls 11 • Power Sharing 12 • Operational Noises 12 General Care & Cteaning 13 o CooktopCbaning Maintenance 13 Before You Ca 14- 15 Protection Agreements 17 Sears Service Back Cover Kenmore Elite Appliance Warranty OneYear Limited Warranty When installed...
Use and Care Manual
Page 3
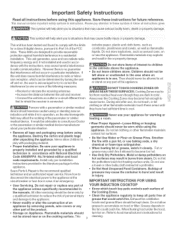
... use baking soda, a dry chemicaJ or foam-type extinguisher. They should exercise caution using this appliance, Sears Parts & Repair is the recommend qualified technician and an authorized repair service, Know how to disconnect the electrical power to the appliance at the circuit breaker or fuse box in use a towel or other flammable materials contact hot surfaces, o Do Not Use Water or Flour on Grease Fires. Areas near the Cooking...
... use baking soda, a dry chemicaJ or foam-type extinguisher. They should exercise caution using this appliance, Sears Parts & Repair is the recommend qualified technician and an authorized repair service, Know how to disconnect the electrical power to the appliance at the circuit breaker or fuse box in use a towel or other flammable materials contact hot surfaces, o Do Not Use Water or Flour on Grease Fires. Areas near the Cooking...
Use and Care Manual
Page 4
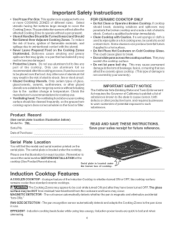
... a hot surface, o Do Not Place Not Cookware on the hood or filter, FOR CERAMIC COOKTOP ONLY o Do Not CJean or Operate a Broken Cooktop. Serial Plate Location You will not allow the affected Cooking Zone to operate without breaking due to the sudden change in use , o Ventilating hood. induction Cooktop Features A COOLER COOKTOP - If cooktop should be careful to avoid a steam burn, Some cleaners can affect the ceramic-glass cooktop, (This type of...
... a hot surface, o Do Not Place Not Cookware on the hood or filter, FOR CERAMIC COOKTOP ONLY o Do Not CJean or Operate a Broken Cooktop. Serial Plate Location You will not allow the affected Cooking Zone to operate without breaking due to the sudden change in use , o Ventilating hood. induction Cooktop Features A COOLER COOKTOP - If cooktop should be careful to avoid a steam burn, Some cleaners can affect the ceramic-glass cooktop, (This type of...
Use and Care Manual
Page 5
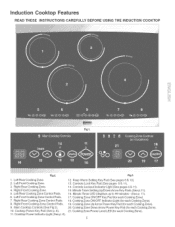
... ON/OFF Key Pad (for each Cooking Zone), 18, Cooking Zone ON/OFF Indicator Light (for each Cooking Zone), 19, Cooking Zone UpArrow Power Key Pad (for each Cooking Zone), 20, Cooking Zone Down Arrow Power Key Pad (for each Cooking Zone), 21, Cooking Zone Power Level LED (for each Cooking Zone), induction Cooktop Features READ THESE mNS.FRUC.FmONS CAREFULLY BEFORE USmNG THE mNDUC.FmONCOOK'FOP...
... ON/OFF Key Pad (for each Cooking Zone), 18, Cooking Zone ON/OFF Indicator Light (for each Cooking Zone), 19, Cooking Zone UpArrow Power Key Pad (for each Cooking Zone), 20, Cooking Zone Down Arrow Power Key Pad (for each Cooking Zone), 21, Cooking Zone Power Level LED (for each Cooking Zone), induction Cooktop Features READ THESE mNS.FRUC.FmONS CAREFULLY BEFORE USmNG THE mNDUC.FmONCOOK'FOP...

Use and Care Manual
Page 6
... Cooktop POWER key pad activates the entire Cooktop. Fig. 8 Fig. 9 Errors Codes EO0 thru Ell =The control displays Ein Cooking Zones LEDs (Fig. 8) and digits in the corresponding Cooking Zone LED (See Fig. 16 & page 10 for the affected Cooking Zone, The H will be HOT from residual heat transfered from . To set . Use the WARM (or LOW) key pad to turn the ControUs Lock OFF...
... Cooktop POWER key pad activates the entire Cooktop. Fig. 8 Fig. 9 Errors Codes EO0 thru Ell =The control displays Ein Cooking Zones LEDs (Fig. 8) and digits in the corresponding Cooking Zone LED (See Fig. 16 & page 10 for the affected Cooking Zone, The H will be HOT from residual heat transfered from . To set . Use the WARM (or LOW) key pad to turn the ControUs Lock OFF...
Use and Care Manual
Page 7
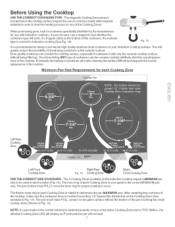
... magnetic Cooking Zone sensors located below the cooktop surface require the use of cookware made of the correct material is TOO SMALL, the affected Cooking Zone LED wiil display an Fcode and the pan wiil not heat. 7 Fig. 18 It is recommended to always use heavier high quality stainless steel cookware on the glass surface without being lifted up. The 4 Cooking Zones available on the ceramic surface. The pan...
... magnetic Cooking Zone sensors located below the cooktop surface require the use of cookware made of the correct material is TOO SMALL, the affected Cooking Zone LED wiil display an Fcode and the pan wiil not heat. 7 Fig. 18 It is recommended to always use heavier high quality stainless steel cookware on the glass surface without being lifted up. The 4 Cooking Zones available on the ceramic surface. The pan...
Use and Care Manual
Page 8
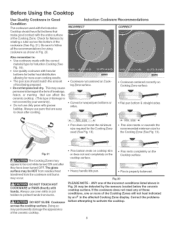
... rests on cooktop trim or does not rest completely on the cooktop surface, o Pan rests completely on the Cooktop surface, o Heavy handle tilts pan, o Pan is not covered by your warranty), o Do not use dirty pans with grease buildup, Always use oven mitts or pot holders to clean after they have been turned OFF, The gJass surface may be detected by the sensors Jocated beJow the ceramic cooktop surface, ff the...
... rests on cooktop trim or does not rest completely on the cooktop surface, o Pan rests completely on the Cooktop surface, o Heavy handle tilts pan, o Pan is not covered by your warranty), o Do not use dirty pans with grease buildup, Always use oven mitts or pot holders to clean after they have been turned OFF, The gJass surface may be detected by the sensors Jocated beJow the ceramic cooktop surface, ff the...
Use and Care Manual
Page 9
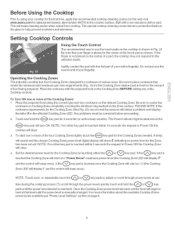
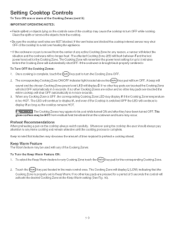
... using your cooktop for the first time, apply the recommended cooktop cleaning creme (on the web visit w_,sears,com for replacement cleaner, item number 40079) to the ceramic surface, Buff with a non-abrasive cloth or pad, This will make cleaning easier when soiled from cooking, The special cooktop cleaning cream leaves a protective finish on the glass to help prevent scratches and abrasions, Setting Cooktop Controls Using...
... using your cooktop for the first time, apply the recommended cooktop cleaning creme (on the web visit w_,sears,com for replacement cleaner, item number 40079) to the ceramic surface, Buff with a non-abrasive cloth or pad, This will make cleaning easier when soiled from cooking, The special cooktop cleaning cream leaves a protective finish on the glass to help prevent scratches and abrasions, Setting Cooktop Controls Using...
Use and Care Manual
Page 10
... turned OFF, The glass surface may be HOT from residual heat transfered from the cookware and burns may occur, Preheat Recommendations When preheating a pan on the cooktop always watch carefully, Whenever using the cooktop the user should always pay attention to any items cooking and remain attentive until the cooking process is complete, Keep in mind that induction may decrease the amount of time required...
... turned OFF, The glass surface may be HOT from residual heat transfered from the cookware and burns may occur, Preheat Recommendations When preheating a pan on the cooktop always watch carefully, Whenever using the cooktop the user should always pay attention to any items cooking and remain attentive until the cooking process is complete, Keep in mind that induction may decrease the amount of time required...
Use and Care Manual
Page 11
...), The Power indicator Light located above the _") key pad wiil turn ON indicating the cooktop is locked, This will keep any Cooking Zone or Cooktop functions from the LED indicating that the MinuteTimer is no longer active, Locking the Controls The induction Cooktop may be used (See Fig, 4), 2, if the cooktop is needed you must touch and hold the _ key pad until a beep sounds (about 5 seconds), The Lock indicator Light above the...
...), The Power indicator Light located above the _") key pad wiil turn ON indicating the cooktop is locked, This will keep any Cooking Zone or Cooktop functions from the LED indicating that the MinuteTimer is no longer active, Locking the Controls The induction Cooktop may be used (See Fig, 4), 2, if the cooktop is needed you must touch and hold the _ key pad until a beep sounds (about 5 seconds), The Lock indicator Light above the...
Use and Care Manual
Page 12
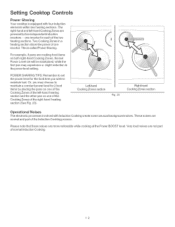
... in a heating section share the power of one inverter, This is equipped with induction Cooking create some unusual background noises, These noises are normal and part of the induction Cooking process, Please note that these noises are more noticeable while cooking at the Power BOOST level, Very loud noises are powered by two independent induction inverters - Setting Cooktop Controls Power Sharing Your cooktop is called Power Sharing...
... in a heating section share the power of one inverter, This is equipped with induction Cooking create some unusual background noises, These noises are normal and part of the induction Cooking process, Please note that these noises are more noticeable while cooking at the Power BOOST level, Very loud noises are powered by two independent induction inverters - Setting Cooktop Controls Power Sharing Your cooktop is called Power Sharing...

Use and Care Manual
Page 13
... the cooktop has cooled using the cooktop cleaning cream, Metal marks can become permanent if not removed prior to future use, Cookware (cast iron, metal, ceramic or glass) with rough bottoms can mark or scratch the cooktop surface, Do not slide anything metal or glass across the cooktop, Do not use your cooktop as a cutting board or work surface in the kitchen, Do not cook foods directly on the cooktop surface without a pan, Do not drop...
... the cooktop has cooled using the cooktop cleaning cream, Metal marks can become permanent if not removed prior to future use, Cookware (cast iron, metal, ceramic or glass) with rough bottoms can mark or scratch the cooktop surface, Do not slide anything metal or glass across the cooktop, Do not use your cooktop as a cutting board or work surface in the kitchen, Do not cook foods directly on the cooktop surface without a pan, Do not drop...
Use and Care Manual
Page 14
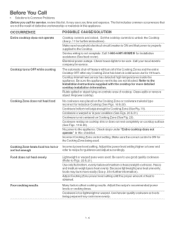
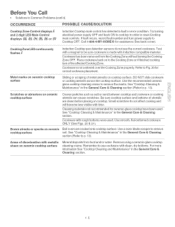
... on cooktop trim or does not rest completely on cooktop surface (See Figs, 19 & 20), No power to the appliance, Check steps under "Entire cooktop does not operate" in this appliance, OCCURRENCE POSSIBLE CAUSE/SOLUTmON Entire cooktop does not operate Cooktop turns OFF while cooking Cooking Zone does not heat food Cooktop controls are locked, Set the cooktop controls to unlock the Cooktop (See p, 11 for further instructions), Make sure household electrical circuit breaker is...
... on cooktop trim or does not rest completely on cooktop surface (See Figs, 19 & 20), No power to the appliance, Check steps under "Entire cooktop does not operate" in this appliance, OCCURRENCE POSSIBLE CAUSE/SOLUTmON Entire cooktop does not operate Cooktop turns OFF while cooking Cooking Zone does not heat food Cooktop controls are locked, Set the cooktop controls to unlock the Cooktop (See p, 11 for further instructions), Make sure household electrical circuit breaker is...
Use and Care Manual
Page 15
... induction Cooktop main control has detected a fault or error condition, Try turning electrical power supply OFF and back ON to cooktop in order to reset Cooktop main controls, If fault recurs, record fault numberand turn power supply to Cooktop OFF, Call 1-800-4-MY-HOME® for assistance (See back cover), Cooking Zone LED continuousJy flashes F Metal marks on ceramic cooktop surface Scratches or abrasions on ceramic cooktop surface Brown streaks or specks on ceramic...
... induction Cooktop main control has detected a fault or error condition, Try turning electrical power supply OFF and back ON to cooktop in order to reset Cooktop main controls, If fault recurs, record fault numberand turn power supply to Cooktop OFF, Call 1-800-4-MY-HOME® for assistance (See back cover), Cooking Zone LED continuousJy flashes F Metal marks on ceramic cooktop surface Scratches or abrasions on ceramic cooktop surface Brown streaks or specks on ceramic...

Use and Care Manual
Page 18
... on-line for the location of your home-of home appliances and items like garage door openers and water heaters. 1-800-4-MY-HOME ® (1o800469o4663) Call anytime, day or night (U.S.A. For the replacement parts, accessories and owner s manuals that you need to do-it ! For Sears professional instalHation of all major brand appliances Nawn and garden equipment, or heating...
... on-line for the location of your home-of home appliances and items like garage door openers and water heaters. 1-800-4-MY-HOME ® (1o800469o4663) Call anytime, day or night (U.S.A. For the replacement parts, accessories and owner s manuals that you need to do-it ! For Sears professional instalHation of all major brand appliances Nawn and garden equipment, or heating...
Installation Instructions
Page 1
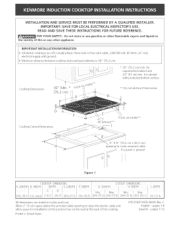
... Figure 1 All dimensions are stated in inches and (cm). IMPORTANT: SAVE FOR LOCAL ELECTRICAL INSPECTOR'S USE. IMPORTANT INSTALLATION INFORMATION All electric cooktops run off a single phase, three-wire or four-wire cable, 240/208 volt, 60 hertz, AC only ele(tri(al supply with protected bottom surface. Printed in the vicinity of the cooktop. for unprotected cabinet and 24" (6! D Cooktop Cutout Dimensions C Air exhaust* * --I Fresh air intake...
... Figure 1 All dimensions are stated in inches and (cm). IMPORTANT: SAVE FOR LOCAL ELECTRICAL INSPECTOR'S USE. IMPORTANT INSTALLATION INFORMATION All electric cooktops run off a single phase, three-wire or four-wire cable, 240/208 volt, 60 hertz, AC only ele(tri(al supply with protected bottom surface. Printed in the vicinity of the cooktop. for unprotected cabinet and 24" (6! D Cooktop Cutout Dimensions C Air exhaust* * --I Fresh air intake...

Installation Instructions
Page 2
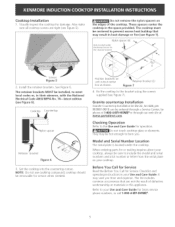
... Edge of Countertop Approximate Location of Junction Box It is Protected by installing a range hood that projects horizontally a minimum of 5" (12.7 cm) beyond the bottom of burns or fire by reaching over heated surfaces, cabinet storage space located above the cooktop should be reduced by Not Less Than 1/8" Flame Retardant Millboard Covered With Not Less Than No_ 28 MGS Sheet Steel, 0_015" (0_4 ram) Stainless Steel, 0,024" (0_6...
... Edge of Countertop Approximate Location of Junction Box It is Protected by installing a range hood that projects horizontally a minimum of 5" (12.7 cm) beyond the bottom of burns or fire by reaching over heated surfaces, cabinet storage space located above the cooktop should be reduced by Not Less Than 1/8" Flame Retardant Millboard Covered With Not Less Than No_ 28 MGS Sheet Steel, 0_015" (0_4 ram) Stainless Steel, 0,024" (0_6...

Installation Instructions
Page 3
... to attach the flexible armored cable to the junction box. • Be sure your cooktop is required on a separate circuit fused on this appliance. A circuit breaker or fuse rated at 40 Amp is equipped with a supply wire and a frame connected green or bare copper grounding wire. Electrical Connection Connect tile flexible armored cable that the ceramic-glass cooktop be moved if servicing is recommended). Removaellpackingmateriableforeconnectintghe electricaslupplyto thecooktop. 3. Besureto leavetheseinstructionwsiththeconsumer. 5. Unpack...
... to attach the flexible armored cable to the junction box. • Be sure your cooktop is required on a separate circuit fused on this appliance. A circuit breaker or fuse rated at 40 Amp is equipped with a supply wire and a frame connected green or bare copper grounding wire. Electrical Connection Connect tile flexible armored cable that the ceramic-glass cooktop be moved if servicing is recommended). Removaellpackingmateriableforeconnectintghe electricaslupplyto thecooktop. 3. Besureto leavetheseinstructionwsiththeconsumer. 5. Unpack...

Installation Instructions
Page 4
... governed by tile temperature rating of household wiring. In the circuit breaker, fuse box or junction box, connect appliance and power supply cable wires as shown in a new branch circuit installation (!995 NEC), mobile home, recreational vehicle, or where beat codes do not permit grounding to the neutraJ (white) wire. Cable from Power Supply /__..___ _White Wire Cable from Power Supply tf cooktop installation is used in figure 4. When grounding...
... governed by tile temperature rating of household wiring. In the circuit breaker, fuse box or junction box, connect appliance and power supply cable wires as shown in a new branch circuit installation (!995 NEC), mobile home, recreational vehicle, or where beat codes do not permit grounding to the neutraJ (white) wire. Cable from Power Supply /__..___ _White Wire Cable from Power Supply tf cooktop installation is used in figure 4. When grounding...
Installation Instructions
Page 5
... operating instructions in the space provided. Before You Call for Service Read the Before You Call for or making inquires about your cooktop, always be hot enough to the Use and Care Guide for damage. Refer to include the model and serial numbers and a lot number or letter from the serial plate on your Use and Care Guide for service when needed. See Figure 6. Set the cooktop into the countertop cutout. Electrical Code...
... operating instructions in the space provided. Before You Call for Service Read the Before You Call for or making inquires about your cooktop, always be hot enough to the Use and Care Guide for damage. Refer to include the model and serial numbers and a lot number or letter from the serial plate on your Use and Care Guide for service when needed. See Figure 6. Set the cooktop into the countertop cutout. Electrical Code...

