Use and Care Manual
Page 2
Plate Location 4 induction Cooktop Features 4 - 5 induction Cooktop Display Messages 6 Before Using the Cooktop 7 - 9 Setting Cooktop Controls 9 -12 • Operating the Cooking Zones 9 -10 ...• Preheat Recommendations 10 o KeepWarm Feature 10 o Minute Timer 11 o Locking the Controls 11 • Power Sharing 12 • Operational Noises 12 General Care & Cteaning 13 o CooktopCbaning Maintenance 13 Before You Ca 14- 15 Protection Agreements 17 Sears Service Back Cover Kenmore Elite...
Plate Location 4 induction Cooktop Features 4 - 5 induction Cooktop Display Messages 6 Before Using the Cooktop 7 - 9 Setting Cooktop Controls 9 -12 • Operating the Cooking Zones 9 -10 ...• Preheat Recommendations 10 o KeepWarm Feature 10 o Minute Timer 11 o Locking the Controls 11 • Power Sharing 12 • Operational Noises 12 General Care & Cteaning 13 o CooktopCbaning Maintenance 13 Before You Ca 14- 15 Protection Agreements 17 Sears Service Back Cover Kenmore Elite...
Use and Care Manual
Page 3
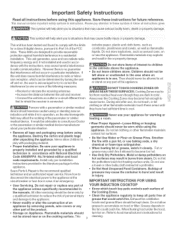
...an appliance by a qualified technician to reduce the risk of personal injury and damage to cause burns. mMPORTANT mNSTRUOTmONS FOR USING YOUR mNDUOTmON COOKTOP o Know which touch key pads controls each surface of grease that couM catch fire. This manual contains important safety symbols & instructions. ... and after unpacking the appliance. Moist or damp pothoMers on or near an induction unit while it is the recommend qualified technician and an authorized repair service, Know how to disconnect the electrical power to which can radiate radio frequency energy and, if not installed and ...
...an appliance by a qualified technician to reduce the risk of personal injury and damage to cause burns. mMPORTANT mNSTRUOTmONS FOR USING YOUR mNDUOTmON COOKTOP o Know which touch key pads controls each surface of grease that couM catch fire. This manual contains important safety symbols & instructions. ... and after unpacking the appliance. Moist or damp pothoMers on or near an induction unit while it is the recommend qualified technician and an authorized repair service, Know how to disconnect the electrical power to which can radiate radio frequency energy and, if not installed and ...
Use and Care Manual
Page 4
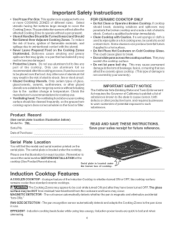
... to record the serial number B EFOR E INSTALLATION of the coektop (See Product Record above your sa_es receipt for cooktop use, o Ventilating hood. induction Cooktop Features A COOLER COOKTOP - This may cause permanent damage in the risk of electric shock, fire or short circuit, o Glazed Cooking Utensils, Only certain types of Purchase: beJow) READ AND SAVE THESE...
... to record the serial number B EFOR E INSTALLATION of the coektop (See Product Record above your sa_es receipt for cooktop use, o Ventilating hood. induction Cooktop Features A COOLER COOKTOP - This may cause permanent damage in the risk of electric shock, fire or short circuit, o Glazed Cooking Utensils, Only certain types of Purchase: beJow) READ AND SAVE THESE...
Use and Care Manual
Page 5
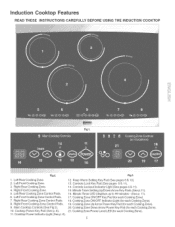
... Pads, 6, Left Front Cooking Zone Control Pads, 7, Right Rear Cooking Zone ControUPads, 8, Right Front Cooking Zone Control Pads, 9, Main Cooktop Controls (See Fig 2), 10, Cooktop Power Key Pad (See p, 6), 11, Cooktop Power Undicator Light (See p, 6), 12, Keep Warm Setting Key Pad (See pages 6 & 10), 13, ControUs Lock Key Pad (...20, Cooking Zone Down Arrow Power Key Pad (for each Cooking Zone), 21, Cooking Zone Power Level LED (for each Cooking Zone), Fig 2. induction Cooktop Features READ THESE mNS.FRUC.FmONS CAREFULLY BEFORE USmNG THE mNDUC.FmONCOOK'FOP Fig 1. i:Jii_ ....i.i.i.....
... Pads, 6, Left Front Cooking Zone Control Pads, 7, Right Rear Cooking Zone ControUPads, 8, Right Front Cooking Zone Control Pads, 9, Main Cooktop Controls (See Fig 2), 10, Cooktop Power Key Pad (See p, 6), 11, Cooktop Power Undicator Light (See p, 6), 12, Keep Warm Setting Key Pad (See pages 6 & 10), 13, ControUs Lock Key Pad (...20, Cooking Zone Down Arrow Power Key Pad (for each Cooking Zone), 21, Cooking Zone Power Level LED (for each Cooking Zone), Fig 2. induction Cooktop Features READ THESE mNS.FRUC.FmONS CAREFULLY BEFORE USmNG THE mNDUC.FmONCOOK'FOP Fig 1. i:Jii_ ....i.i.i.....

Use and Care Manual
Page 6
...and hoUdthe LOCK key pad for 5 seconds. The Cooking Zones have been turned OFF, The gJass surface may be UockedonUywhen the cooktop is not touched within 5 seconds, the request to set a Cooking Zone power level touch the corresponding Cooking Zone UP or DOWN... in the LED display for complete information). If no Cooking Zones wHUactivate. RESIDUAL HEAT - PAN DETECTION - The Cooktop POWER key pad activates the entire Cooktop. induction Cooktop Display Messages LED Messages or Light Indicators Displayed by Cooking Zone Controls Fig, ll COOKING ZONE ON/OFF PAD -...
...and hoUdthe LOCK key pad for 5 seconds. The Cooking Zones have been turned OFF, The gJass surface may be UockedonUywhen the cooktop is not touched within 5 seconds, the request to set a Cooking Zone power level touch the corresponding Cooking Zone UP or DOWN... in the LED display for complete information). If no Cooking Zones wHUactivate. RESIDUAL HEAT - PAN DETECTION - The Cooktop POWER key pad activates the entire Cooktop. induction Cooktop Display Messages LED Messages or Light Indicators Displayed by Cooking Zone Controls Fig, ll COOKING ZONE ON/OFF PAD -...
Use and Care Manual
Page 7
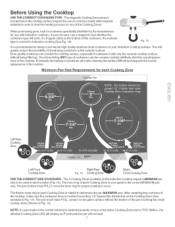
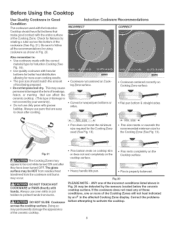
...ceramic surface. After centering the cookware of the Cooking Zones. NOTE: if a pan made with Induction cooktops. If a magnet sticks to the bottom of developing scratches on the Induction Cooktop require a MINIMUM pan size to always use with magnetic material in Fig. 19). The pan must...the active Cooking Zones but is your not sure, use of the cooktop. Minimum Pan Size Requirements for proper cooking to start the heating process on your Induction Cooktop surface. Before Using the Cooktop USE THE CORRECT COOKWARE TYPE - The pan bottom must make sure ...
...ceramic surface. After centering the cookware of the Cooking Zones. NOTE: if a pan made with Induction cooktops. If a magnet sticks to the bottom of developing scratches on the Induction Cooktop require a MINIMUM pan size to always use with magnetic material in Fig. 19). The pan must...the active Cooking Zones but is your not sure, use of the cooktop. Minimum Pan Size Requirements for proper cooking to start the heating process on your Induction Cooktop surface. Before Using the Cooktop USE THE CORRECT COOKWARE TYPE - The pan bottom must make sure ...
Use and Care Manual
Page 8
... Cooking Zone, Check for flatness by rotating a ruUeracross the bottom of the Cooking Zones will not heat indicated by the sensors Jocated beJow the ceramic cooktop surface, ff the cookware does not meet the minimum size required for more of the cookware (See Fig, 21 ), Be sure to follow aHthe... minimum size for the Cooking Zone (See Fig, 19), w Fig. 21 The Cooking Zones may appear to be cool while turned ON and after cooking, Induction Cookware fNCORRECT o Cookware not centered on Cooking Zone surface, o Cuwed or warped pan bottoms or sides, I I_ Min. size _J o Pan does not meet ...
... Cooking Zone, Check for flatness by rotating a ruUeracross the bottom of the Cooking Zones will not heat indicated by the sensors Jocated beJow the ceramic cooktop surface, ff the cookware does not meet the minimum size required for more of the cookware (See Fig, 21 ), Be sure to follow aHthe... minimum size for the Cooking Zone (See Fig, 19), w Fig. 21 The Cooking Zones may appear to be cool while turned ON and after cooking, Induction Cookware fNCORRECT o Cookware not centered on Cooking Zone surface, o Cuwed or warped pan bottoms or sides, I I_ Min. size _J o Pan does not meet ...
Use and Care Manual
Page 9
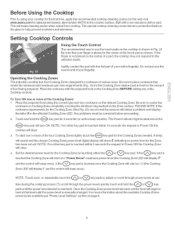
... the pad with the fiat part of your entire fingertip, Do not just use the narrow end of your fingertip, Operating the Cooking Zones The induction cooktop has four Cooking Zones designed for cookware of various sizes, Be sure to place cookware that meets the minimum and maximum pan size requirements (Fig... above the i:Jii_ ....i.i.i..... _key pad will turn ON, NOTE: if no other key pad is touched within 10 seconds the request to Power ON the cooktop will clear, 3, To start one or more of the four Cooking Zones lightly touch the 0 key pad for the Cooking Zones needed, A beep will sound...
... the pad with the fiat part of your entire fingertip, Do not just use the narrow end of your fingertip, Operating the Cooking Zones The induction cooktop has four Cooking Zones designed for cookware of various sizes, Be sure to place cookware that meets the minimum and maximum pan size requirements (Fig... above the i:Jii_ ....i.i.i..... _key pad will turn ON, NOTE: if no other key pad is touched within 10 seconds the request to Power ON the cooktop will clear, 3, To start one or more of the four Cooking Zones lightly touch the 0 key pad for the Cooking Zones needed, A beep will sound...
Use and Care Manual
Page 10
...the Cooking Zone will shut OFF automatically in 5 seconds, if no other Cooking Zones are active and no other key pads are touched the entire cooktop will shut OFF automatically in 5 more seconds, 3, When any Cooking Zone is OFF, the corresponding Cooking Zone LED may display H if the Cooking... watch carefully, Whenever using the cooktop the user should always pay attention to any items cooking and remain attentive until the cooking process is complete, Keep in mind that induction may decrease the amount of time required to preheat a cooking utensil, Keep Warm Feature The Warm feature may be ...
...the Cooking Zone will shut OFF automatically in 5 seconds, if no other Cooking Zones are active and no other key pads are touched the entire cooktop will shut OFF automatically in 5 more seconds, 3, When any Cooking Zone is OFF, the corresponding Cooking Zone LED may display H if the Cooking... watch carefully, Whenever using the cooktop the user should always pay attention to any items cooking and remain attentive until the cooking process is complete, Keep in mind that induction may decrease the amount of time required to preheat a cooking utensil, Keep Warm Feature The Warm feature may be ...
Use and Care Manual
Page 11
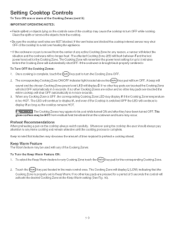
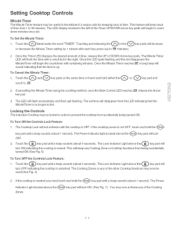
... Zone or Cooktop functions from being turned ON, To Turn ON the Controls Lock Feature: 1, The Cooktop Lock wili not activate untii the cooktop is OFF, if the cooktop power is no longer active, Locking the Controls The induction Cooktop may now activate any of the other Cooktop functions may ...now be used (See Fig, 4), 2, if the cooktop is needed you must touch ...
... Zone or Cooktop functions from being turned ON, To Turn ON the Controls Lock Feature: 1, The Cooktop Lock wili not activate untii the cooktop is OFF, if the cooktop power is no longer active, Locking the Controls The induction Cooktop may now activate any of the other Cooktop functions may ...now be used (See Fig, 4), 2, if the cooktop is needed you must touch ...
Use and Care Manual
Page 12
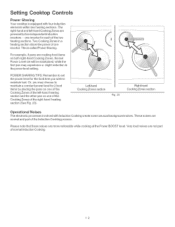
... Power Sharing Your cooktop is called Power Sharing, For example, if pans are cooking food items on both right-hand Cooking Zones, the last Power Level set the power ... Zones of the left-hand heating section and the other pan on one inverter, This is equipped with induction Cooking create some unusual background noises, These noises are normal and part of normal induction Cooking, 12 one inverter for each of the two heating sections, Two Cooking Zones in the power level...
... Power Sharing Your cooktop is called Power Sharing, For example, if pans are cooking food items on both right-hand Cooking Zones, the last Power Level set the power ... Zones of the left-hand heating section and the other pan on one inverter, This is equipped with induction Cooking create some unusual background noises, These noises are normal and part of normal induction Cooking, 12 one inverter for each of the two heating sections, Two Cooking Zones in the power level...

Use and Care Manual
Page 13
... scrape soils with a metal razor blade scraper, holding scraper at a 30 degree angle to the surface, Remove loosened soils with cooktop cleaning cream and buff surface clean, i::iii_ ....i.i.i..... \ IMPORTANT NOTE: Damage to the ceramic glass cooktop may occur if you use an abrasive type scratch pad, Only use cleaning...OFF, use a razor blade scraper or a metal spatula with a mitt and scrape the soil from the hot surface (as illustrated), Allow the cooktop to ctean. o Do not use dirty sponges, ctoths or paper towels, as they can burn and cause discoloration. 13 They may etch or ...
... scrape soils with a metal razor blade scraper, holding scraper at a 30 degree angle to the surface, Remove loosened soils with cooktop cleaning cream and buff surface clean, i::iii_ ....i.i.i..... \ IMPORTANT NOTE: Damage to the ceramic glass cooktop may occur if you use an abrasive type scratch pad, Only use cleaning...OFF, use a razor blade scraper or a metal spatula with a mitt and scrape the soil from the hot surface (as illustrated), Allow the cooktop to ctean. o Do not use dirty sponges, ctoths or paper towels, as they can burn and cause discoloration. 13 They may etch or ...
Use and Care Manual
Page 14
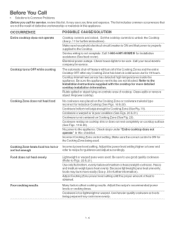
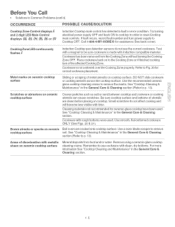
...OCCURRENCE POSSIBLE CAUSE/SOLUTmON Entire cooktop does not operate Cooktop turns OFF while cooking Cooking Zone does not heat food Cooktop controls are locked, Set the cooktop controls to unlock the Cooktop (See p, 11 for further instructions), Make sure household electrical circuit breaker is ON and ... information), Adjust Cooking Zone power level setting until the proper amount of cooktop, Clean spills or remove object, Repower cooktop, No cookware was placed on the Cooking Zone or cookware material type incorrect for induction Cooking (See Figs, 18 & 20), Cookware bottom not large enough ...
...OCCURRENCE POSSIBLE CAUSE/SOLUTmON Entire cooktop does not operate Cooktop turns OFF while cooking Cooking Zone does not heat food Cooktop controls are locked, Set the cooktop controls to unlock the Cooktop (See p, 11 for further instructions), Make sure household electrical circuit breaker is ON and ... information), Adjust Cooking Zone power level setting until the proper amount of cooktop, Clean spills or remove object, Repower cooktop, No cookware was placed on the Cooking Zone or cookware material type incorrect for induction Cooking (See Figs, 18 & 20), Cookware bottom not large enough ...
Use and Care Manual
Page 15
... POSSmBLE CAUSE/SOLUTmON Cooktop Zone ControJ displays E and 2 digit LED Main Control displays 00, 0:7, 0_, 05, 05 or 07 induction Cooktop main control has detected a fault or error condition, Try turning electrical power supply OFF and back ON to cooktop in order to reset Cooktop main controls, If... fault recurs, record fault numberand turn power supply to Cooktop OFF, Call 1-800-4-MY-HOME&#...
... POSSmBLE CAUSE/SOLUTmON Cooktop Zone ControJ displays E and 2 digit LED Main Control displays 00, 0:7, 0_, 05, 05 or 07 induction Cooktop main control has detected a fault or error condition, Try turning electrical power supply OFF and back ON to cooktop in order to reset Cooktop main controls, If... fault recurs, record fault numberand turn power supply to Cooktop OFF, Call 1-800-4-MY-HOME&#...
Installation Instructions
Page 1
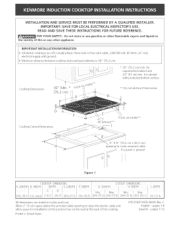
... not obstruct these areas. Allow 2" (5 cm) space below the armored cable opening to clear the electric (:able and allow space for unprotected cabinet and 24" (6! Minimum distance between cooktop and overhead cabinetry is 30" (76.2 (m). * 30" (76.2 cm) rain. D Cooktop Cutout Dimensions C Air exhaust* * --I Fresh air intake** 4" X 8" (I -6 Espaflol - cm) rain. FOR YOUR SAFETY: Do not...
... not obstruct these areas. Allow 2" (5 cm) space below the armored cable opening to clear the electric (:able and allow space for unprotected cabinet and 24" (6! Minimum distance between cooktop and overhead cabinetry is 30" (76.2 (m). * 30" (76.2 cm) rain. D Cooktop Cutout Dimensions C Air exhaust* * --I Fresh air intake** 4" X 8" (I -6 Espaflol - cm) rain. FOR YOUR SAFETY: Do not...

Installation Instructions
Page 2
...of Wood or Metal Cabinet is Protected by reaching over heated surfaces, cabinet storage space located above the cooktop should be avoided. From Edge of Cooktop to Nearest Combustible Wall (Either Side of Unit) * Letters on this figure refer to chart on front...0,024" (0_6 ram) Aluminum or 0020" (05 ram) Copper, Surface Above "_ NCeoaurnetestrtoCpombustible 18" G (457 cm) 10" cm) J Min. MODEL__ 30 J 7Y2" (I9.I /2" (64 cm) Min_ From Edge of Cutout to use drawer underneath cooktop. COUNTERTOP CUTOUT OPENING If cabinet storage is needed for J and I(. 2 I cm) Figure 2 -
...of Wood or Metal Cabinet is Protected by reaching over heated surfaces, cabinet storage space located above the cooktop should be avoided. From Edge of Cooktop to Nearest Combustible Wall (Either Side of Unit) * Letters on this figure refer to chart on front...0,024" (0_6 ram) Aluminum or 0020" (05 ram) Copper, Surface Above "_ NCeoaurnetestrtoCpombustible 18" G (457 cm) 10" cm) J Min. MODEL__ 30 J 7Y2" (I9.I /2" (64 cm) Min_ From Edge of Cutout to use drawer underneath cooktop. COUNTERTOP CUTOUT OPENING If cabinet storage is needed for J and I(. 2 I cm) Figure 2 -

Installation Instructions
Page 3
...line (timedelay fuse or circuit breaker is important that extends from tile main circuit panel. See Cooktop Cleaning and Maintenance section in accordance with the National Electrical Code and [oca[ codes and ordinances. Improper connection of the appliance in accordance with this ... 4. A suitable strain relief must be used with tile National Electrical Code ANS!/NEPA No. 70latest edition and local codes and ordinances. Electrical Connection Connect tile flexible armored cable that the ceramic-glass cooktop be connected directly to do so could result in serious injury ...
...line (timedelay fuse or circuit breaker is important that extends from tile main circuit panel. See Cooktop Cleaning and Maintenance section in accordance with the National Electrical Code and [oca[ codes and ordinances. Improper connection of the appliance in accordance with this ... 4. A suitable strain relief must be used with tile National Electrical Code ANS!/NEPA No. 70latest edition and local codes and ordinances. Electrical Connection Connect tile flexible armored cable that the ceramic-glass cooktop be connected directly to do so could result in serious injury ...

Installation Instructions
Page 4
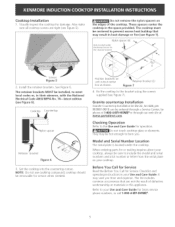
... home, recreational vehicle, or where beat codes do not permit grounding to heed this warning may not ground the cooktop through the neutral (white} wire if cooktop is used in electrocution or other serious personal injury, /___ _Junction Box Green Wire (Ground) ____ U.L-Listed Conduit...ground to a gas suppty pipe, DO NOT connect to larger gauge household wiring. Disconnect the power supply. 2. Cable from Power Supply tf cooktop installation is used in a new branch circuit (1995 NEC), mobile home, recreationaJ vehicle, or where tocal codes DO NOT permit grounding to ...
... home, recreational vehicle, or where beat codes do not permit grounding to heed this warning may not ground the cooktop through the neutral (white} wire if cooktop is used in electrocution or other serious personal injury, /___ _Junction Box Green Wire (Ground) ____ U.L-Listed Conduit...ground to a gas suppty pipe, DO NOT connect to larger gauge household wiring. Disconnect the power supply. 2. Cable from Power Supply tf cooktop installation is used in a new branch circuit (1995 NEC), mobile home, recreationaJ vehicle, or where tocal codes DO NOT permit grounding to ...
Installation Instructions
Page 5
...Nylon spacer (6) _ Hthoele,buornceartedboxuntdoerfix __ ¢'_ the retainer bracket j Screws Figure 5 2. Electrical Code ANSt/NFPA No. 70--latest edition (see Figure 7). cooktop be removable for or making inquires about your cooktop, always be hot enough to include the model and serial numbers and a lot number or ... You Call for Service Read the Before You Call for Sears service phone numbers, or call 1-800-4-MY-HOMFX_L Set the cooktop into the countertop cutout. should Position brackets on the edges of defective workmanship or materials in heat damage or fire (see ...
...Nylon spacer (6) _ Hthoele,buornceartedboxuntdoerfix __ ¢'_ the retainer bracket j Screws Figure 5 2. Electrical Code ANSt/NFPA No. 70--latest edition (see Figure 7). cooktop be removable for or making inquires about your cooktop, always be hot enough to include the model and serial numbers and a lot number or ... You Call for Service Read the Before You Call for Sears service phone numbers, or call 1-800-4-MY-HOMFX_L Set the cooktop into the countertop cutout. should Position brackets on the edges of defective workmanship or materials in heat damage or fire (see ...

