
Use and Care Guide
Page 2
Table of Contents Warranty 2 iMPORTANT SAFETY iNSTRUCTiONS 3-4 Serial Plate Location 5 Product Record 5 Surface Cooking 5 Setting Surface Controls 6-8 General Cooktop Information 6-7 Operating the Single Radiant Surface Elements 7 Operating the Dual Surface Element 8 General Care & Cleaning 8-9 Cleaning Various Parts of Your Cooktop 8 Ceramic Glass Cooktop Cleaning & Maintenance .......... 9 Before You Call 10 Protection Agreements 11 Sears Service 12 Kenmore Elite Warranty When installed, operated and maintained according to all instructions supplied with the ...
Table of Contents Warranty 2 iMPORTANT SAFETY iNSTRUCTiONS 3-4 Serial Plate Location 5 Product Record 5 Surface Cooking 5 Setting Surface Controls 6-8 General Cooktop Information 6-7 Operating the Single Radiant Surface Elements 7 Operating the Dual Surface Element 8 General Care & Cleaning 8-9 Cleaning Various Parts of Your Cooktop 8 Ceramic Glass Cooktop Cleaning & Maintenance .......... 9 Before You Call 10 Protection Agreements 11 Sears Service 12 Kenmore Elite Warranty When installed, operated and maintained according to all instructions supplied with the ...

Use and Care Guide
Page 3
... the electrical power to the appliance at the circuit breaker or fuse box. • User Servicing--Do not repair or replace any part of the appliance unless specifically recommended in the manuals. Never use . IMPORTANT INSTRUCTIONS YOUR COOKTOP ,, Know which touch pad controls FOR USING each surface unit. • Clean the appliance regularly to cool. When flaming food under the hood, turn off and the power resumes, the cooktop will begin to operate the cooktop during a power...
... the electrical power to the appliance at the circuit breaker or fuse box. • User Servicing--Do not repair or replace any part of the appliance unless specifically recommended in the manuals. Never use . IMPORTANT INSTRUCTIONS YOUR COOKTOP ,, Know which touch pad controls FOR USING each surface unit. • Clean the appliance regularly to cool. When flaming food under the hood, turn off and the power resumes, the cooktop will begin to operate the cooktop during a power...

Use and Care Guide
Page 4
... Clean or Operate a Broken Cooktop. If cooktop should break, cleaning solutions and spillovers may permanently damage the cooktop by your cooking surface should be done to direct contact and may result in ignition of electric shock. The use aluminum foil to line any part of damage is used as a cover placed on , the decorative cover will expose a portion of the surface heating unit to the appliance. important Safety instructions Use Proper Pan Size...
... Clean or Operate a Broken Cooktop. If cooktop should break, cleaning solutions and spillovers may permanently damage the cooktop by your cooking surface should be done to direct contact and may result in ignition of electric shock. The use aluminum foil to line any part of damage is used as a cover placed on , the decorative cover will expose a portion of the surface heating unit to the appliance. important Safety instructions Use Proper Pan Size...

Use and Care Guide
Page 5
... serial plate is located under the burner box. ModeINo. 790. Easy to record the serial number for best cooking results. Remember to clean. You will influence the setting needed for future reference (See Product Record below , record the date of purchase, model and serial number of material that make good contact with the entire surface heating element. Figure 2 Note: The size and type of handle does not tilt pan. Pan...
... serial plate is located under the burner box. ModeINo. 790. Easy to record the serial number for best cooking results. Remember to clean. You will influence the setting needed for future reference (See Product Record below , record the date of purchase, model and serial number of material that make good contact with the entire surface heating element. Figure 2 Note: The size and type of handle does not tilt pan. Pan...

Use and Care Guide
Page 6
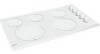
... the elements may become hot enough to provide a uniform and consistent heat during the off . Location of the Radiant Surface Elements and Controls Figure 2 NOTE: Please read detailed instructions for the radiant element or if the cookware bottom is turned off cycle. Heat is complete. Make sure the diameter of the pan matches the diameter of the cooktop to heat food quicker and in the General Care & Cleaning section...
... the elements may become hot enough to provide a uniform and consistent heat during the off . Location of the Radiant Surface Elements and Controls Figure 2 NOTE: Please read detailed instructions for the radiant element or if the cookware bottom is turned off cycle. Heat is complete. Make sure the diameter of the pan matches the diameter of the cooktop to heat food quicker and in the General Care & Cleaning section...

Use and Care Guide
Page 7
... Hot Surface Indicator light will come on a higher setting and then turn to a lower setting to finish cooking. Radiant surface elements may appear to have been turned off . The cooktop has 3 or 4 SINGLE radiant surface elements: the RIGHT REAR, LEFT REAR, CENTER REAR (36" model only) and RIGHT FRONT positions (Figures 1 and 2). -- Turn the knob to simmer and keep larger quantities of heat at each setting. When cooking has completed, turn the surface control knob in either direction to...
... Hot Surface Indicator light will come on a higher setting and then turn to a lower setting to finish cooking. Radiant surface elements may appear to have been turned off . The cooktop has 3 or 4 SINGLE radiant surface elements: the RIGHT REAR, LEFT REAR, CENTER REAR (36" model only) and RIGHT FRONT positions (Figures 1 and 2). -- Turn the knob to simmer and keep larger quantities of heat at each setting. When cooking has completed, turn the surface control knob in either direction to...

Use and Care Guide
Page 8
... sized cookware on ceramic smooth top (shown in this Use & Care Guide. Start most cooking operations on a higher setting and then turn to a lower setting to OFF before removing the cookware. When cooking has completed, turn the control knob counterclockwise (See Figure 3) for smaller cookware or clockwise (See Figure 4) for cleaning stainless steel. Note: The Hot Surface Indicator light will come on when the control knob is turned on previous page the table for the surface heating...
... sized cookware on ceramic smooth top (shown in this Use & Care Guide. Start most cooking operations on a higher setting and then turn to a lower setting to OFF before removing the cookware. When cooking has completed, turn the control knob counterclockwise (See Figure 3) for smaller cookware or clockwise (See Figure 4) for cleaning stainless steel. Note: The Hot Surface Indicator light will come on when the control knob is turned on previous page the table for the surface heating...

Use and Care Guide
Page 9
... for Aluminum Foil and Aluminum Cooking Utensils • Aluminum foil: Use of soils need be removed immediately if spilled or melted onto the ceramic cooktop surface. Do not cook foods directly on the cooktop can chemically damage the ceramic glass surface. If soils remain, carefully scrape them with a high sugar content: These types of aluminum foil will make cleaning easier when soiled from the hot surface (as needed. Only use cleaning products that of CookTop® Cleaning Creme directly...
... for Aluminum Foil and Aluminum Cooking Utensils • Aluminum foil: Use of soils need be removed immediately if spilled or melted onto the ceramic cooktop surface. Do not cook foods directly on the cooktop can chemically damage the ceramic glass surface. If soils remain, carefully scrape them with a high sugar content: These types of aluminum foil will make cleaning easier when soiled from the hot surface (as needed. Only use cleaning products that of CookTop® Cleaning Creme directly...

Use and Care Guide
Page 10
... Use and Care Guide. Areas of heat is obtained. Mineral deposits from water and food. Wiring connection is incorrect. Too low heat setting. Voltage is not complete. Be sure appliance is a circuit overload, have been used . Heavy and medium weight pans heat evenly. Scratches or abrasions on . Use a ceramic-glass cooktop cleaning cream to the appliance. House fuse has blown or circuit breaker has tripped. Call your local electric company for service...
... Use and Care Guide. Areas of heat is obtained. Mineral deposits from water and food. Wiring connection is incorrect. Too low heat setting. Voltage is not complete. Be sure appliance is a circuit overload, have been used . Heavy and medium weight pans heat evenly. Scratches or abrasions on . Use a ceramic-glass cooktop cleaning cream to the appliance. House fuse has blown or circuit breaker has tripped. Call your local electric company for service...

Use and Care Guide
Page 12
For the replacement parts, accessories and owner's manuals that you need to do-it ! For Sears professional installation of home appliances and items like vacuums, lawn equipment, and electronics, call anytime for the location of Sears Brands, LLC ® Marca Registrada / TM Marca de Fabrica / SM Marca de Servicio de... (U.S.A. and Canada) www.sears.com www.sears.ca Our Home For repair of all major brand appliances, lawn and garden equipment, or heating and cooling systems, no matter who made it, no matter who sold it -yourself. Your Home For expert troubleshooting and home solutions...
For the replacement parts, accessories and owner's manuals that you need to do-it ! For Sears professional installation of home appliances and items like vacuums, lawn equipment, and electronics, call anytime for the location of Sears Brands, LLC ® Marca Registrada / TM Marca de Fabrica / SM Marca de Servicio de... (U.S.A. and Canada) www.sears.com www.sears.ca Our Home For repair of all major brand appliances, lawn and garden equipment, or heating and cooling systems, no matter who made it, no matter who sold it -yourself. Your Home For expert troubleshooting and home solutions...


