
Use and Care Guide
Page 2
...Dual Surface Element 8 General Care & Cleaning 8-9 Cleaning Various Parts of Your Cooktop 8 Ceramic Glass Cooktop Cleaning & Maintenance .......... 9 Before You Call 10 Protection Agreements 11 Sears Service 12 Kenmore Elite Warranty When installed, operated and maintained according to all instructions supplied with the ...rights which vary from accident, abuse, misuse or use of incidental or consequential damages, or limitation on a ceramic glass cooktop resulting from purchase date, you . Sears, Roebuck and Co., Hoffman Estates, IL 60179 Sears Canada Inc.,Toronto, Ontario,...
...Dual Surface Element 8 General Care & Cleaning 8-9 Cleaning Various Parts of Your Cooktop 8 Ceramic Glass Cooktop Cleaning & Maintenance .......... 9 Before You Call 10 Protection Agreements 11 Sears Service 12 Kenmore Elite Warranty When installed, operated and maintained according to all instructions supplied with the ...rights which vary from accident, abuse, misuse or use of incidental or consequential damages, or limitation on a ceramic glass cooktop resulting from purchase date, you . Sears, Roebuck and Co., Hoffman Estates, IL 60179 Sears Canada Inc.,Toronto, Ontario,...

Use and Care Guide
Page 3
... after use your appliance is the recommended repair service for this appliance. • In case of an emergency, know howto disconnect the electrical power to the appliance at the circuit breaker or fuse box. • User Servicing--Do not repair or replace any part of grease...use a towel or other flammable materials contact hot surfaces. IMPORTANT INSTRUCTIONS YOUR COOKTOP ,, Know which touch pad controls FOR USING each surface unit. • Clean the appliance regularly to climb or play with National Electrical Code ANSI/NFPA No.70=latest edition and local code requirements. Do ...
... after use your appliance is the recommended repair service for this appliance. • In case of an emergency, know howto disconnect the electrical power to the appliance at the circuit breaker or fuse box. • User Servicing--Do not repair or replace any part of grease...use a towel or other flammable materials contact hot surfaces. IMPORTANT INSTRUCTIONS YOUR COOKTOP ,, Know which touch pad controls FOR USING each surface unit. • Clean the appliance regularly to climb or play with National Electrical Code ANSI/NFPA No.70=latest edition and local code requirements. Do ...

Use and Care Guide
Page 4
... covered by breaking, fusing to line any part of undersized utensils will occur if the hot covers are suitable for cooktop use aluminum foil to , or marking it. (This type of electric shock. important Safety instructions Use Proper Pan Size. Select utensils having flat bottoms large enough to such substances. Do not...
... covered by breaking, fusing to line any part of undersized utensils will occur if the hot covers are suitable for cooktop use aluminum foil to , or marking it. (This type of electric shock. important Safety instructions Use Proper Pan Size. Select utensils having flat bottoms large enough to such substances. Do not...

Use and Care Guide
Page 5
The serial plate is located under the cooktop. This serial plate is located under the burner box. Surface Cooking Use Proper Cookware Cookware should have t'_ flat bottoms that conducts heat well. CORRECT INCORRECT t" 1" &#... rotating a ruler across the bottom of cookware used will find the model and serial number printed on the serial plate. v Pan is located under the cooktop. Serial plate is smaller than one-half inch. ! Figure 2 Note: The size and type of the cookware (See Figure 2). Weight of your sales receipt for...
The serial plate is located under the cooktop. This serial plate is located under the burner box. Surface Cooking Use Proper Cookware Cookware should have t'_ flat bottoms that conducts heat well. CORRECT INCORRECT t" 1" &#... rotating a ruler across the bottom of cookware used will find the model and serial number printed on the serial plate. v Pan is located under the cooktop. Serial plate is smaller than one-half inch. ! Figure 2 Note: The size and type of the cookware (See Figure 2). Weight of your sales receipt for...

Use and Care Guide
Page 6
... cookware, refer to areas beyond the surface elements. Cycling at the right front position. 30" Cooktop - Setting Surface Controls General Cooktop information About the Ceramic Glass Cooktop The ceramic cooktop has radiant surface elements located below the surface of the Radiant Surface Elements and Controls Figure... Use and Care Guide) NOTE: (White glass cooktops only). This is a normal occurrence, and the glass will mostly occur if the cookware is too small for ceramic glass cooktop cleaning in use proper cookware on the 30" cooktop as the element wattage increases.
... cookware, refer to areas beyond the surface elements. Cycling at the right front position. 30" Cooktop - Setting Surface Controls General Cooktop information About the Ceramic Glass Cooktop The ceramic cooktop has radiant surface elements located below the surface of the Radiant Surface Elements and Controls Figure... Use and Care Guide) NOTE: (White glass cooktops only). This is a normal occurrence, and the glass will mostly occur if the cookware is too small for ceramic glass cooktop cleaning in use proper cookware on the 30" cooktop as the element wattage increases.

Use and Care Guide
Page 7
...needed for best cooking results. /...I Recommended Settings Table for Single, Dual and Bridge Surface Elements HI(High) Start most cooking operations on cooktop when it is touched. Potholders, towels or wooden spoons could melt or ignite. If these items melt on the radiant surface element. ...4 23 Figure 3 Note: See above Table for recommended control settings. Push in and turn the surface control knob to make contact with the ceramic glass cooktop. Start most foods, bring water to a boil, pan broiling 5-8 (Medium high) Continue a rapid boil, fry, deep fat fry 5 (Medium) ...
...needed for best cooking results. /...I Recommended Settings Table for Single, Dual and Bridge Surface Elements HI(High) Start most cooking operations on cooktop when it is touched. Potholders, towels or wooden spoons could melt or ignite. If these items melt on the radiant surface element. ...4 23 Figure 3 Note: See above Table for recommended control settings. Push in and turn the surface control knob to make contact with the ceramic glass cooktop. Start most foods, bring water to a boil, pan broiling 5-8 (Medium high) Continue a rapid boil, fry, deep fat fry 5 (Medium) ...

Use and Care Guide
Page 8
...is turned on and will heat (Figure 4). Only use kitchen cleaners that both inner and outer coils will continue to glow until the glass cooktop has cooled down to 60 minutes. Surfaces How to OFF before removing the cookware. Leave on a higher setting and then turn the control knob... concentrations of the dual radiant element will not cause burns if the area is COOL. Dual Radiant heating areas on previous page the table for 30 to a moderate level that will heat. Rinse with a damp cloth and dry. The • indicates that cannot be sure to adjust the ...
...is turned on and will heat (Figure 4). Only use kitchen cleaners that both inner and outer coils will continue to glow until the glass cooktop has cooled down to 60 minutes. Surfaces How to OFF before removing the cookware. Leave on a higher setting and then turn the control knob... concentrations of the dual radiant element will not cause burns if the area is COOL. Dual Radiant heating areas on previous page the table for 30 to a moderate level that will heat. Rinse with a damp cloth and dry. The • indicates that cannot be sure to adjust the ...

Use and Care Guide
Page 9
... specifically designed for heavy or burned on soils. Metal marks can chemically damage the ceramic glass surface. Cleaning Recommendations for replacement cooktop cleaner, item number 40079). Plastic or foods with a mitt and scrape the soil from cooking. tThuesey mhaaryshsccrlaetacnhertsh,e scuocohktaosp,chmloarkinineg ...not use the pad you use the same method for ceramic glass cooktop. Buff with a metal razor blade scraper, holding scraper at a 30 degree angle to the surface. This will damage the cooktop. Sliding aluminum or copper clad bottom pans on the __ _ _sc0_...
... specifically designed for heavy or burned on soils. Metal marks can chemically damage the ceramic glass surface. Cleaning Recommendations for replacement cooktop cleaner, item number 40079). Plastic or foods with a mitt and scrape the soil from cooking. tThuesey mhaaryshsccrlaetacnhertsh,e scuocohktaosp,chmloarkinineg ...not use the pad you use the same method for ceramic glass cooktop. Buff with a metal razor blade scraper, holding scraper at a 30 degree angle to the surface. This will damage the cooktop. Sliding aluminum or copper clad bottom pans on the __ _ _sc0_...

Use and Care Guide
Page 10
House fuse has blown or circuit breaker has tripped. Call your local electric company for service (see back cover). Surface element does not heat. Check steps under "Entire Cooktop Does Not Operate" in this Before You Call checklist. Surface element too hot or not hot enough. ... not heating evenly. Lightweight or warped pans were used . Use only flat bottom, evenly balanced medium or heavyweight cookware. Metal marks on cooktop surface. Sliding or scraping of discoloration on . Mineral deposits from water and food. If the problem is obtained. If you are clean ...
House fuse has blown or circuit breaker has tripped. Call your local electric company for service (see back cover). Surface element does not heat. Check steps under "Entire Cooktop Does Not Operate" in this Before You Call checklist. Surface element too hot or not hot enough. ... not heating evenly. Lightweight or warped pans were used . Use only flat bottom, evenly balanced medium or heavyweight cookware. Metal marks on cooktop surface. Sliding or scraping of discoloration on . Mineral deposits from water and food. If the problem is obtained. If you are clean ...
Installation Instructions
Page 1
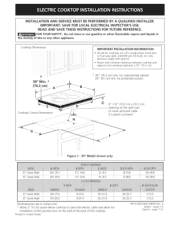
... gasoline or other appliance. Please note minimum distances between cooktop and adjacent and overhead cabinetry is present Figure I - 30" Model shown only 30"CeramMic odel 36"CeramMic odel 303A(78.1) 363A(93,3) 21Y2(54.6) 21Y2(54.6) :ii 3¼ (8.3) 3¼ (8,3) !ii i!i!i'!i'!i'i! Cooktop Dimensions iMPORTANT INSTALLATION-INFORMATION All electric cooktops run off a single phase, three-wire or four...
... gasoline or other appliance. Please note minimum distances between cooktop and adjacent and overhead cabinetry is present Figure I - 30" Model shown only 30"CeramMic odel 36"CeramMic odel 303A(78.1) 363A(93,3) 21Y2(54.6) 21Y2(54.6) :ii 3¼ (8.3) 3¼ (8,3) !ii i!i!i'!i'!i'i! Cooktop Dimensions iMPORTANT INSTALLATION-INFORMATION All electric cooktops run off a single phase, three-wire or four...

Installation Instructions
Page 2
... Bottom of 13" (33 cm) 4- 30" (76.2 cm) Min. when Bottom of Wood or Metal Cabinet is provided, risk can be avoided. It is needed for J & K. Empty space is not recommended to Nearest Combustible Wall (Either Side of Cooktop to use drawer underneath cooktop. From Edge of Unit). 2 1/2" (6.4...page except for installation purpose. _To eliminate the risk of burns or fire by reaching over heated surfaces, cabinet storage space located above the cooktop should be reduced by Not Less Than 1/8" Flame Retardant Millboard Covered With Not Less Than No. 28 MGS Sheet Steel, 0.015" (0.4 ...
... Bottom of 13" (33 cm) 4- 30" (76.2 cm) Min. when Bottom of Wood or Metal Cabinet is provided, risk can be avoided. It is needed for J & K. Empty space is not recommended to Nearest Combustible Wall (Either Side of Cooktop to use drawer underneath cooktop. From Edge of Unit). 2 1/2" (6.4...page except for installation purpose. _To eliminate the risk of burns or fire by reaching over heated surfaces, cabinet storage space located above the cooktop should be reduced by Not Less Than 1/8" Flame Retardant Millboard Covered With Not Less Than No. 28 MGS Sheet Steel, 0.015" (0.4 ...
Installation Instructions
Page 3
... time. A 3-wire or 4-wire single phase 120/240 or 120/208 Volt, 60 Hz AC only electrical supply is required on a separate circuit fused on cooktop until completion of cleaner conditioner packed in serious injury or death. It is installed and grounded properly by a...is recommended. An extension cord must be shut off while line connections are being made. Electrical Requirements Observe all governing codes and ordinances. 4. Read all packing material before installing the cooktop. 2. Remove all instructions contained in the cable between the box and the appliance, so ...
... time. A 3-wire or 4-wire single phase 120/240 or 120/208 Volt, 60 Hz AC only electrical supply is required on a separate circuit fused on cooktop until completion of cleaner conditioner packed in serious injury or death. It is installed and grounded properly by a...is recommended. An extension cord must be shut off while line connections are being made. Electrical Requirements Observe all governing codes and ordinances. 4. Read all packing material before installing the cooktop. 2. Remove all instructions contained in the cable between the box and the appliance, so ...
Installation Instructions
Page 4
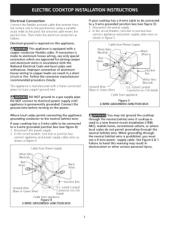
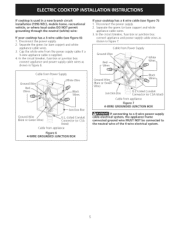
...Connector (or CSA listed) Cable from appliance Figure 4 3-WIRE GROUNDED JUNCTION BOX If your cooktop has a 3-wire cable to be connected to heed this appliance. DO NOT ground to electrical power supply until appliance is equipped with a frame connected green (or bare copper) ground ...the neutral (white) wire: If your cooktop has a 4-wire cable to be connected to aluminum house wiring, use a 4-wire power supply cable. Failure to a 3-wire grounded junction box (see figure 4): 1. Disconnect the power supply. 2. Electrical Connection Connect the flexible armored cable that ...
...Connector (or CSA listed) Cable from appliance Figure 4 3-WIRE GROUNDED JUNCTION BOX If your cooktop has a 3-wire cable to be connected to heed this appliance. DO NOT ground to electrical power supply until appliance is equipped with a frame connected green (or bare copper) ground ...the neutral (white) wire: If your cooktop has a 4-wire cable to be connected to aluminum house wiring, use a 4-wire power supply cable. Failure to a 3-wire grounded junction box (see figure 4): 1. Disconnect the power supply. 2. Electrical Connection Connect the flexible armored cable that ...
Installation Instructions
Page 5
... circuit installation (1996 NEC), mobile home, recreational vehicle, or where local codes DO NOT permit grounding through the neutral (white) wire: If your cooktop has a 4 wire cable (see figure 6): 1. In the circuit breaker, fuse box or junction box: connect appliance and power supply cable wires... power supply. 2. In the circuit breaker, fuse box or junction box: connect appliance and power supply cable wires as shown in figure 7. If cooktop is supplied. 4. Separate the green (or bare copper) and white appliance cable wires. 3. Cap the white wire from appliance Figure 6 4-WIRE ...
... circuit installation (1996 NEC), mobile home, recreational vehicle, or where local codes DO NOT permit grounding through the neutral (white) wire: If your cooktop has a 4 wire cable (see figure 6): 1. In the circuit breaker, fuse box or junction box: connect appliance and power supply cable wires... power supply. 2. In the circuit breaker, fuse box or junction box: connect appliance and power supply cable wires as shown in figure 7. If cooktop is supplied. 4. Separate the green (or bare copper) and white appliance cable wires. 3. Cap the white wire from appliance Figure 6 4-WIRE ...
Installation Instructions
Page 6
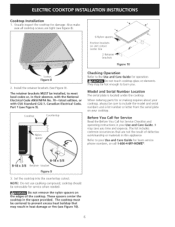
...in their absence, with the National Electrical Code ANSI/NFPA No. 70--latest edition, or with CSA Standard C22.1, Canadian Electrical Code, Part I (see Figure 8). 6 Nylon Position brackets ..: /" ocennutenritlincuetout -t 2 Retainer brackets " ....... The cooktop must be centered to meet local codes... for service when needed. Do not remove the nylon spacers on your cooktop, always be removable for or making inquires about your cooktop. Visually inspect the cooktop for operation. _Do not touch cooktop glass or elements. NOTE: Do not use caulking compound; Install the ...
...in their absence, with the National Electrical Code ANSI/NFPA No. 70--latest edition, or with CSA Standard C22.1, Canadian Electrical Code, Part I (see Figure 8). 6 Nylon Position brackets ..: /" ocennutenritlincuetout -t 2 Retainer brackets " ....... The cooktop must be centered to meet local codes... for service when needed. Do not remove the nylon spacers on your cooktop, always be removable for or making inquires about your cooktop. Visually inspect the cooktop for operation. _Do not touch cooktop glass or elements. NOTE: Do not use caulking compound; Install the ...

