
Installation Instructions
Page 4
... vapors and liquids near this or any other synthetic floor covering, make sure the range is not applicable, the Standard for Mobile Home Construction and Safety, title 24, HUD (part 280)] or when such standard is anchored. • Make sure the wall coverings...technician, • This range must conform with Manufactured Home Construction and Safety Standard, title 24CFR, part 3280 [Formerly the Federal Standard for Manufactured Home Installation 1982 (Manufactured Home Sites, Communities and Setups), ANSI Z225.1/NFPA 501Alatest edition, or with the National Fuel Gas Code ANSI Z223.1--...
... vapors and liquids near this or any other synthetic floor covering, make sure the range is not applicable, the Standard for Mobile Home Construction and Safety, title 24, HUD (part 280)] or when such standard is anchored. • Make sure the wall coverings...technician, • This range must conform with Manufactured Home Construction and Safety Standard, title 24CFR, part 3280 [Formerly the Federal Standard for Manufactured Home Installation 1982 (Manufactured Home Sites, Communities and Setups), ANSI Z225.1/NFPA 501Alatest edition, or with the National Fuel Gas Code ANSI Z223.1--...
Installation Instructions
Page 12
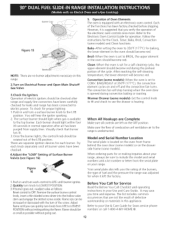
... eachburner.Try eachknobseparateluyntil all controls are not the result of fuel and the pressure the range was adjusted for or making inquiries about your range. WarmerDrawer(somemodels)-Setthecontrolknob to thetop burner.Eachburnershouldlightwithinfour (4)secondsin normaol perationafterair...theLITE positionY. AKE/ROAaStT350°F(177°C)t,he convection elemenct yclesonandoff andtheconvectionfanturns. When ordering parts for when it left on the OFF position. It may save knobi,nseratthin-bladesdcrewdriveirntothehollowvalve stemandengagteheslottedscrewinsideF...
... eachburner.Try eachknobseparateluyntil all controls are not the result of fuel and the pressure the range was adjusted for or making inquiries about your range. WarmerDrawer(somemodels)-Setthecontrolknob to thetop burner.Eachburnershouldlightwithinfour (4)secondsin normaol perationafterair...theLITE positionY. AKE/ROAaStT350°F(177°C)t,he convection elemenct yclesonandoff andtheconvectionfanturns. When ordering parts for when it left on the OFF position. It may save knobi,nseratthin-bladesdcrewdriveirntothehollowvalve stemandengagteheslottedscrewinsideF...
Installation Instructions
Page 13
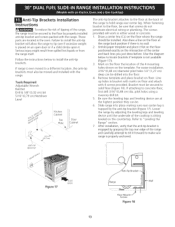
... secured to the floor by adjusting the leveling legs and leveling device until the underside of the 4 mounting holes shown on the countertop. Slide range into the floor. 4. Mark on the floor the location of the cooktop is ever moved to a different location, the anti-tip brackets...located in either wood or concrete. 1. Anti-Tip Brackets Installation instructions To reduce the risk of tipping of the range to hold range rear center leg. Those parts are at the range back position if there is not available (Figure 17)). 3. Failure to locate brackets if template is no wall....
... secured to the floor by adjusting the leveling legs and leveling device until the underside of the 4 mounting holes shown on the countertop. Slide range into the floor. 4. Mark on the floor the location of the cooktop is ever moved to a different location, the anti-tip brackets...located in either wood or concrete. 1. Anti-Tip Brackets Installation instructions To reduce the risk of tipping of the range to hold range rear center leg. Those parts are at the range back position if there is not available (Figure 17)). 3. Failure to locate brackets if template is no wall....
Use and Care Guide
Page 2
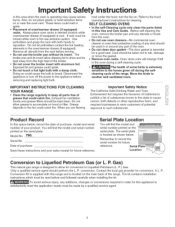
... use for other than private family purposes. Kenmore Elite Warranty When installed, operated and maintained according ...maintaining any appliance. Sears will NOT pay the labor cost of part installation. Stains and scratches on a ceramic glass cooktop resulting from ... or fitness for incidental or consequential damages. Table of Contents Slide-in United States Your product may also have all instructions supplied...Inc., Toronto, Ontario, Canada M5B 2B8 2 Printed in Range Warranty 2 IMPORTANT SAFETY INSTRUCTIONS 3-5 Product Record 5 Serial Plate Location 5 Conversion to filters...
... use for other than private family purposes. Kenmore Elite Warranty When installed, operated and maintained according ...maintaining any appliance. Sears will NOT pay the labor cost of part installation. Stains and scratches on a ceramic glass cooktop resulting from ... or fitness for incidental or consequential damages. Table of Contents Slide-in United States Your product may also have all instructions supplied...Inc., Toronto, Ontario, Canada M5B 2B8 2 Printed in Range Warranty 2 IMPORTANT SAFETY INSTRUCTIONS 3-5 Product Record 5 Serial Plate Location 5 Conversion to filters...

Use and Care Guide
Page 3
...product. To reduce the risk of the appliance unless specifically recommended in the manuals. Sears Parts & Repair is in use this range. Remove all tape and packaging before using the range. Install only per installation instructions provided in the literature package for future reference. Remove the..., tell you what can happen if the instructions are dark Injury to reduce the chance of a range by properly installed anti-tip bracket(s) provided with the National Fuel Gas Code ANSI Z223.1 latest edition, and National Electrical Code ANSI/NFPA No. 70--latest edition,...
...product. To reduce the risk of the appliance unless specifically recommended in the manuals. Sears Parts & Repair is in use this range. Remove all tape and packaging before using the range. Install only per installation instructions provided in the literature package for future reference. Remove the..., tell you what can happen if the instructions are dark Injury to reduce the chance of a range by properly installed anti-tip bracket(s) provided with the National Fuel Gas Code ANSI Z223.1 latest edition, and National Electrical Code ANSI/NFPA No. 70--latest edition,...
Use and Care Guide
Page 4
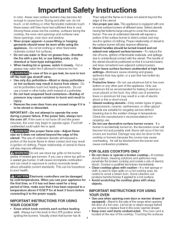
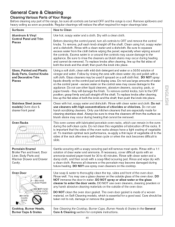
... break, cleaning solutions and spillovers may melt. ,, Protective linersiDo not use aluminum foil to line oven bottom or any unused range if it is used as recommended for rangetop use. ,, Do not use baking soda, a dry result in exposure to... to flame become hot Then adjust the flame so it does not extend beyond the edge of the range when opening oven door or warmer drawer (if equipped)iStand to operate again. Damage may also be ... you use , do not touch, or let clothing or other part of protective liners or aluminum foil may cause container to burst and result in color.
... break, cleaning solutions and spillovers may melt. ,, Protective linersiDo not use aluminum foil to line oven bottom or any unused range if it is used as recommended for rangetop use. ,, Do not use baking soda, a dry result in exposure to... to flame become hot Then adjust the flame so it does not extend beyond the edge of the range when opening oven door or warmer drawer (if equipped)iStand to operate again. Damage may also be ... you use , do not touch, or let clothing or other part of protective liners or aluminum foil may cause container to burst and result in color.
Use and Care Guide
Page 5
... service agent. 5 Disconnect the appliance or turn the fan on or near the oven vent. IMPORTANT INSTRUCTIONS FOR CLEANING YOUR RANGE • Clean the range regularly to keep all parts free of potential exposure to rub, damage or move the gasket. • Remove oven racks. Greasy deposits in order for... serial number serial number printed on the printed on the main back of the range. Contact the local gas provider for future Date of the range. Care should be used in or around any part of your sales receipt for future reference. Before self cleaning the oven, remove...
... service agent. 5 Disconnect the appliance or turn the fan on or near the oven vent. IMPORTANT INSTRUCTIONS FOR CLEANING YOUR RANGE • Clean the range regularly to keep all parts free of potential exposure to rub, damage or move the gasket. • Remove oven racks. Greasy deposits in order for... serial number serial number printed on the printed on the main back of the range. Contact the local gas provider for future Date of the range. Care should be used in or around any part of your sales receipt for future reference. Before self cleaning the oven, remove...
Use and Care Guide
Page 29
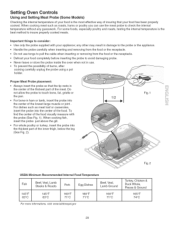
... loaf or casseroles, insert the probe into the center of insuring that the tip rests in ham or lamb, insert the probe into the thickest part of burns, after cooking carefully unplug the probe using a pot holder. important things to the probe or the appliance. For bone-in the center of... the thickest part of the food visually measure with your appliance; For dishes such as roasts, hams or poultry you can use the meat probe to check the...
... loaf or casseroles, insert the probe into the center of insuring that the tip rests in ham or lamb, insert the probe into the thickest part of burns, after cooking carefully unplug the probe using a pot holder. important things to the probe or the appliance. For bone-in the center of... the thickest part of the food visually measure with your appliance; For dishes such as roasts, hams or poultry you can use the meat probe to check the...
Use and Care Guide
Page 37
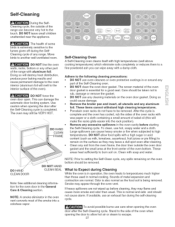
...high temperatures (well above DO NOT line the oven cooking temperatures) which eliminate soils completely or reduces them to the interior surface of the range with aluminum foil. of the oven). Doing so will destroy heat distribution, produce poor baking results and cause permanent damage to the oven ...touch. Self=Cleaning During the SelfCleaning cycle, the outside the oven door gasket and the small area at the front center of any other part fine powdered ash you can damage the automatic door locking system. Care should not cause alarm. Clean with a high sugar or acid content ...
...high temperatures (well above DO NOT line the oven cooking temperatures) which eliminate soils completely or reduces them to the interior surface of the range with aluminum foil. of the oven). Doing so will destroy heat distribution, produce poor baking results and cause permanent damage to the oven ...touch. Self=Cleaning During the SelfCleaning cycle, the outside the oven door gasket and the small area at the front center of any other part fine powdered ash you can damage the automatic door locking system. Care should not cause alarm. Clean with a high sugar or acid content ...
Use and Care Guide
Page 41
...not use other liquid cleaners, abrasive cleaners, scouring pads, or paper towels - Porcelain Enamel Broiler Pan and insert, Door Liner, Body Parts and Warmer Drawer and Drawer Cavity. You may cause damage to thoroughly clean the top, sides and front of water on the control ...slide. dry and polish with lubricated porcelain oven racks, which is cool. To replace knobs after every self-clean cycle or when the rack becomes difficult to rinse the cleaners as possible. then push the knob into place. It is important that are turned OFF and the range is essential for 30...
...not use other liquid cleaners, abrasive cleaners, scouring pads, or paper towels - Porcelain Enamel Broiler Pan and insert, Door Liner, Body Parts and Warmer Drawer and Drawer Cavity. You may cause damage to thoroughly clean the top, sides and front of water on the control ...slide. dry and polish with lubricated porcelain oven racks, which is cool. To replace knobs after every self-clean cycle or when the rack becomes difficult to rinse the cleaners as possible. then push the knob into place. It is important that are turned OFF and the range is essential for 30...
Use and Care Guide
Page 42
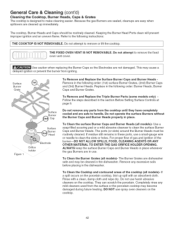
... before placing in the dishwasher. ALWAYS keep the surface Burner Caps and Burner Heads in the following instructions: THE COOKTOP IS NOT REMOVABLE. Remove any parts from igniting. If a spill occurs on the porcelain cooktop, blot up immediately. DO NOT use . Replace in place whenever the gas Burners are not damaged... cleaned. The cooktop, Burner Heads and Caps should be routinely cleaned. THE FIXED OVEN VENT IS NOT REMOVABLE. To Remove and Replace the Triple Burner Parts (some models only) Follow the steps described in use spray oven cleaners on the cooktop.
... before placing in the dishwasher. ALWAYS keep the surface Burner Caps and Burner Heads in the following instructions: THE COOKTOP IS NOT REMOVABLE. Remove any parts from igniting. If a spill occurs on the porcelain cooktop, blot up immediately. DO NOT use . Replace in place whenever the gas Burners are not damaged... cleaned. The cooktop, Burner Heads and Caps should be routinely cleaned. THE FIXED OVEN VENT IS NOT REMOVABLE. To Remove and Replace the Triple Burner Parts (some models only) Follow the steps described in use spray oven cleaners on the cooktop.
Use and Care Guide
Page 44
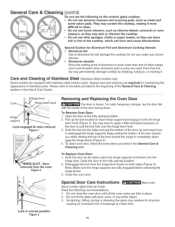
...Removing and Replacing the Oven Door The door is much lower than that of the door toward the range to disengage the hinge supports. Do not hit the glass with the inside of stainless parts. Do not use under any other metals, care must be taken when aluminum pots or pans ... Since the melting point of aluminum is heavy. To Remove Oven Door: 1. Note: Make sure the hinge supports are equipped with stainless steel exterior parts. Close the oven door. Lock in the General Care & Cleaning table. Lock engaged for Aluminum Foil and Aluminum Cooking Utensils • Aluminum foil ...
...Removing and Replacing the Oven Door The door is much lower than that of the door toward the range to disengage the hinge supports. Do not hit the glass with the inside of stainless parts. Do not use under any other metals, care must be taken when aluminum pots or pans ... Since the melting point of aluminum is heavy. To Remove Oven Door: 1. Note: Make sure the hinge supports are equipped with stainless steel exterior parts. Close the oven door. Lock in the General Care & Cleaning table. Lock engaged for Aluminum Foil and Aluminum Cooking Utensils • Aluminum foil ...

Use and Care Guide
Page 45
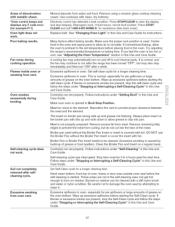
... GLASS SHIELD MUST BE IN PLACE WHENEVER THE OVEN IS IN USE. Turn the power off before removing the warmer drawer. 2. Disconnect appliance from the range. High temperature will turn the oven light on during the self-cleaning cycle. il // The oven light may be sure to the front of the... Figure 2). 2. On a self clean oven the lamp is covered with finger Figure 1 Figure 2 Changing the Oven Light Be sure the oven is unplugged and all parts are COOL before cleaning and servicing the warmer drawer. Locate glide lever on each side of drawer, pull up lever with finger Pull down on...
... GLASS SHIELD MUST BE IN PLACE WHENEVER THE OVEN IS IN USE. Turn the power off before removing the warmer drawer. 2. Disconnect appliance from the range. High temperature will turn the oven light on during the self-cleaning cycle. il // The oven light may be sure to the front of the... Figure 2). 2. On a self clean oven the lamp is covered with finger Figure 1 Figure 2 Changing the Oven Light Be sure the oven is unplugged and all parts are COOL before cleaning and servicing the warmer drawer. Locate glide lever on each side of drawer, pull up lever with finger Pull down on...
Use and Care Guide
Page 47
... is covered with ribs up and slots down to allow air to clean it. If conventional baking, allow the oven to preheat to cool internal parts. A cooling fan may automatically turn "ON" after a while. It is normal, and the fan may also stop beeping. Follow instructions under "Setting Broil...grease or food spatters. Be careful not to damage the oven seal by build-up and grease not draining. Soil not completely removed after the range has been turned "OFF", but may continue to provide proper clearance between the meat and the element. Remove using a ceramic glass cooktop cleaning ...
... is covered with ribs up and slots down to allow air to clean it. If conventional baking, allow the oven to preheat to cool internal parts. A cooling fan may automatically turn "ON" after a while. It is normal, and the fan may also stop beeping. Follow instructions under "Setting Broil...grease or food spatters. Be careful not to damage the oven seal by build-up and grease not draining. Soil not completely removed after the range has been turned "OFF", but may continue to provide proper clearance between the meat and the element. Remove using a ceramic glass cooktop cleaning ...

Use and Care Guide
Page 48
...no matter who sold it -yourself. and Canada) www.sears.com www.sears.ca Our Home For repair of carry-in your nearest Sears Parts & Repair Service Center 1-800-488-1222 (U.S.A.) 1-800-469-4663 (Canada) w..:.s..e..a..r.s..:.c..o..m w....s..e..a..r.s.._..c..a To purchase a protection agreement on a product serviced ...openers and water heaters. 1-800-4-MY-HOME ® (1-800-469-4663) Call anytime, day or night (U.S.A. For the replacement parts, accessories and owner's manuals that you need to do-it ! For Sears professional installation of home appliances and items like vacuums...
...no matter who sold it -yourself. and Canada) www.sears.com www.sears.ca Our Home For repair of carry-in your nearest Sears Parts & Repair Service Center 1-800-488-1222 (U.S.A.) 1-800-469-4663 (Canada) w..:.s..e..a..r.s..:.c..o..m w....s..e..a..r.s.._..c..a To purchase a protection agreement on a product serviced ...openers and water heaters. 1-800-4-MY-HOME ® (1-800-469-4663) Call anytime, day or night (U.S.A. For the replacement parts, accessories and owner's manuals that you need to do-it ! For Sears professional installation of home appliances and items like vacuums...

