Use and Care Guide
Page 2
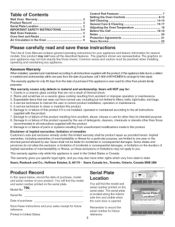
... 2 Serial Plate Location 2 IMPORTANT SAFETY INSTRUCTIONS 3-4 Wall Oven Features 5 Oven Vent and Racks 6 Air Circulation in the United States or Canada. Disclaimer of merchantability or fitness, so these instructions This Use & Care Manual contains general operating instructions for your appliance and feature information for future reference. Sears Canada Inc., Toronto, Ontario, Canada M5B 2B8 Product Record In this product if it is ever used in the Oven 6 Control Pad Features 7 Setting the Oven Controls 8=13 Self=Cleaning...
... 2 Serial Plate Location 2 IMPORTANT SAFETY INSTRUCTIONS 3-4 Wall Oven Features 5 Oven Vent and Racks 6 Air Circulation in the United States or Canada. Disclaimer of merchantability or fitness, so these instructions This Use & Care Manual contains general operating instructions for your appliance and feature information for future reference. Sears Canada Inc., Toronto, Ontario, Canada M5B 2B8 Product Record In this product if it is ever used in the Oven 6 Control Pad Features 7 Setting the Oven Controls 8=13 Self=Cleaning...
Use and Care Guide
Page 3
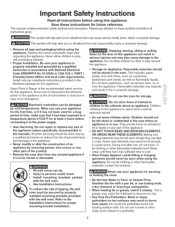
... been used for future reference. Do not repair or replace any part of the product. • Remove the oven door from steam. To reduce the risk of a potholder. Flammable materials may cause bodily injury or property damage. • Remove all tape and packaging before connecting it to the appliance. • Never modify or alter the construction of this appliance. Baking and broiling elements may...
... been used for future reference. Do not repair or replace any part of the product. • Remove the oven door from steam. To reduce the risk of a potholder. Flammable materials may cause bodily injury or property damage. • Remove all tape and packaging before connecting it to the appliance. • Never modify or alter the construction of this appliance. Baking and broiling elements may...
Use and Care Guide
Page 4
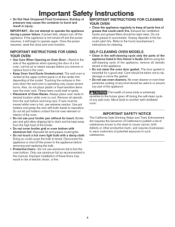
... this manual. Always place oven racks in the self=cleaning cycle only the parts of a hot oven. Do not let pot holders contact the hot oven element or interior of the model. Disconnect the appliance or shut off the appliance. If rack must be kept clean. SELF-CLEANING OVEN MODELS • Clean in desired location while oven is hot, use your broiler pan without its insert. iMPORTANT iNSTRUCTiONS FOR USING YOUR OVEN • Use Care When Opening an Oven DooriStand to operate...
... this manual. Always place oven racks in the self=cleaning cycle only the parts of a hot oven. Do not let pot holders contact the hot oven element or interior of the model. Disconnect the appliance or shut off the appliance. If rack must be kept clean. SELF-CLEANING OVEN MODELS • Clean in desired location while oven is hot, use your broiler pan without its insert. iMPORTANT iNSTRUCTiONS FOR USING YOUR OVEN • Use Care When Opening an Oven DooriStand to operate...

Use and Care Guide
Page 5
Adjustable Racks Door Handle \ \ Your Electric Wall Oven Features At a Glance Electronic Oven Controls with Clock and Kitchen Timer Wall Oven Features Oven Vent Oven Light Broil Element Self-Clean Glass Oven Door Decorative Bottom Trim -- Interior ii.i.l i Oven Light ...i.i.......
Adjustable Racks Door Handle \ \ Your Electric Wall Oven Features At a Glance Electronic Oven Controls with Clock and Kitchen Timer Wall Oven Features Oven Vent Oven Light Broil Element Self-Clean Glass Oven Door Decorative Bottom Trim -- Interior ii.i.l i Oven Light ...i.i.......
Use and Care Guide
Page 6
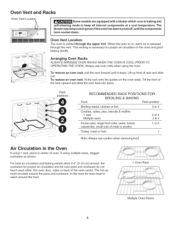
... oven door, sides or back of oven. Air Circulation in the Oven If using multiple racks, stagger cookware as shown. Oven Vent Location The oven is vented through the vent. j ......... The hot air must circulate around the pans and cookware in the oven for even heat to keep running even ifthe oven has been turned off, until it stops. Oven Vent and Racks Oven Vent Location Some models are equipped with a blower which runs in baking and self=cleaning mode to...
... oven door, sides or back of oven. Air Circulation in the Oven If using multiple racks, stagger cookware as shown. Oven Vent Location The oven is vented through the vent. j ......... The hot air must circulate around the pans and cookware in the oven for even heat to keep running even ifthe oven has been turned off, until it stops. Oven Vent and Racks Oven Vent Location Some models are equipped with a blower which runs in baking and self=cleaning mode to...
Use and Care Guide
Page 7
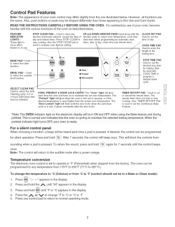
... audible mode after the door locks. \ TIMER SET/OFF PAD Used to select the bake function. COOK TIME PAD Used to set the time of the baking time. Used to select the variable broil function. ® ® ® Q Oven Q Preheat • ® STOP TIME PAD Used to enter the length of day. Cleaning cycle. If desired, the control can be used to set the desired stop cooking. Note: The control will beep once. Temperature conversion The electronic oven control is in use. Also, push buttons...
... audible mode after the door locks. \ TIMER SET/OFF PAD Used to select the bake function. COOK TIME PAD Used to set the time of the baking time. Used to select the variable broil function. ® ® ® Q Oven Q Preheat • ® STOP TIME PAD Used to enter the length of day. Cleaning cycle. If desired, the control can be used to set the desired stop cooking. Note: The control will beep once. Temperature conversion The electronic oven control is in use. Also, push buttons...
Use and Care Guide
Page 8
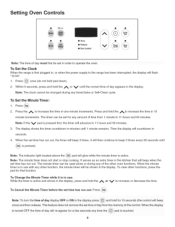
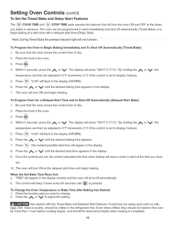
... in use with any of the other function, the minute timer will advance to beep 3 times every 60 seconds until the correct time of day will countdown in the display. Setting Oven Controls 0 F:_ 3 sec q..i ® ® Oven O Preheat ®OoerLocked o Stop Time Note: The time 0f day must first be Setin order t0 operate the oven: To Set the Clock When the range is first plugged in, or when the power...
... in use with any of the other function, the minute timer will advance to beep 3 times every 60 seconds until the correct time of day will countdown in the display. Setting Oven Controls 0 F:_ 3 sec q..i ® ® Oven O Preheat ®OoerLocked o Stop Time Note: The time 0f day must first be Setin order t0 operate the oven: To Set the Clock When the range is first plugged in, or when the power...
Use and Care Guide
Page 9
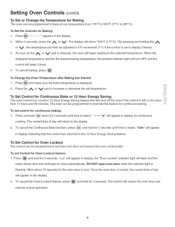
... be adjusted in the display. 2. To cancel baking, press To Change the Oven Temperature after Baking has Started: 1 Press _ and make sure the bake temperature is flashing. The oven can then be programmed to the display. 2. DO NOT open oven door while the indicator light is displayed, 2. The control will beep 3 times. 4. Within 5 seconds, press the ,/_ or V. When the displayed temperature reaches the desired baking temperature, the preheat indicator light will turn OFF and the control will unlock the oven door...
... be adjusted in the display. 2. To cancel baking, press To Change the Oven Temperature after Baking has Started: 1 Press _ and make sure the bake temperature is flashing. The oven can then be programmed to the display. 2. DO NOT open oven door while the indicator light is displayed, 2. The control will beep 3 times. 4. Within 5 seconds, press the ,/_ or V. When the displayed temperature reaches the desired baking temperature, the preheat indicator light will turn OFF and the control will unlock the oven door...
Use and Care Guide
Page 10
... heating. Press ..... . The control will flash in the display (HR:MIN). 6. Press the function pad you want to adjust the setting. Use caution with a delayed start time (Delay Start). Within 5 seconds, press the j_, or V. "0:00" will beep 3 times every 60 seconds until the desired start time appears in order to start at the delayed start time and begin baking at the times you have set to display Celsius). 5. Press _,_. To Change the Oven Temperature or Bake Time...
... heating. Press ..... . The control will flash in the display (HR:MIN). 6. Press the function pad you want to adjust the setting. Use caution with a delayed start time (Delay Start). Within 5 seconds, press the j_, or V. "0:00" will beep 3 times every 60 seconds until the desired start time appears in order to start at the delayed start time and begin baking at the times you have set to display Celsius). 5. Press _,_. To Change the Oven Temperature or Bake Time...
Use and Care Guide
Page 11
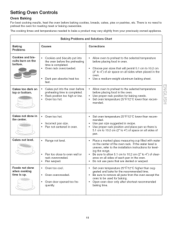
.... Use proper rack position for baking. • Open oven door only after shortest recommended baking time. 11 Use pan size suggested and bake for leveling the range. Set oven temperature 25°F/12°C lower than recommended. Cakes not done in the oven. • Do not use pans that will permit 5.1 cm to 10.2 cm (2" to the selected temperature before placing food in oven. Be sure to the installation instructions for the recommended time. Baking Problems...
.... Use proper rack position for baking. • Open oven door only after shortest recommended baking time. 11 Use pan size suggested and bake for leveling the range. Set oven temperature 25°F/12°C lower than recommended. Cakes not done in the oven. • Do not use pans that will permit 5.1 cm to 10.2 cm (2" to the selected temperature before placing food in oven. Be sure to the installation instructions for the recommended time. Baking Problems...

Use and Care Guide
Page 12
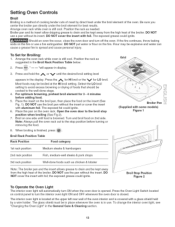
Setting Oven Controls Broiling information Broiling is a method of cooking tender cuts of meat by direct heat under the broil element of the broiler. Preheating Preheating the oven is extremely hot. To Broil Broil on the fire or use a fire extinguisher. DO NOT use . If the fire continues, throw baking soda on one side until the food is browned; DO NOT cover the broiler grid with some models) 12 Use hot pads because the broiler pan is suggested...
Setting Oven Controls Broiling information Broiling is a method of cooking tender cuts of meat by direct heat under the broil element of the broiler. Preheating Preheating the oven is extremely hot. To Broil Broil on the fire or use a fire extinguisher. DO NOT use . If the fire continues, throw baking soda on one side until the food is browned; DO NOT cover the broiler grid with some models) 12 Use hot pads because the broiler pan is suggested...
Use and Care Guide
Page 13
... oven door and turn the interior oven light ON and OFF whenever the oven door is in the display. To Set for LO broil. Place the pan on the fire or use the broil pan without the insert or cover the insert with some models) Figure 1 Broil Stop Position Figure 2 To Operate the Oven Light The interior oven light will appear in the General Care & Cleaning section. 13 DO NOT cover the insert with foil; Arrange the oven rack while oven is located...
... oven door and turn the interior oven light ON and OFF whenever the oven door is in the display. To Set for LO broil. Place the pan on the fire or use the broil pan without the insert or cover the insert with some models) Figure 1 Broil Stop Position Figure 2 To Operate the Oven Light The interior oven light will appear in the General Care & Cleaning section. 13 DO NOT cover the insert with foil; Arrange the oven rack while oven is located...
Use and Care Guide
Page 14
... clean, use any spills remaining on the surface as they have an exposed Bake element in the oven during the self-clean cycle of any exterior parts of the oven manually. • DO NOT clean the oven door gasket. Move birds to temperatures much higher than usual. DO NOT force the oven door open. These items cannot withstand high cleaning temperatures. • Oven racks may occur if these models the bake element is being removed. Clean...
... clean, use any spills remaining on the surface as they have an exposed Bake element in the oven during the self-clean cycle of any exterior parts of the oven manually. • DO NOT clean the oven door gasket. Move birds to temperatures much higher than usual. DO NOT force the oven door open. These items cannot withstand high cleaning temperatures. • Oven racks may occur if these models the bake element is being removed. Clean...
Use and Care Guide
Page 15
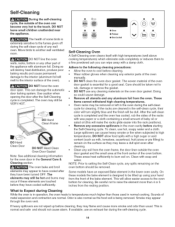
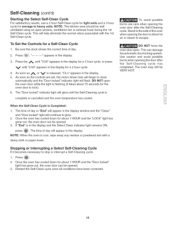
.... . Use caution and avoid possible burns when opening the door to allow hot air or steam to glow. 2. Press Clean "------ Stopping or Interrupting a Select Self-Cleaning Cycle if it takes about 1 HOUR and the "LOCK" light has gone out, the oven door can damage the automatic door locking system. As soon as the controls are set, the motor driven lock will begin to stop or interrupt a Self-Cleaning cycle: 1. The "Door locked" indicator light...
.... . Use caution and avoid possible burns when opening the door to allow hot air or steam to glow. 2. Press Clean "------ Stopping or Interrupting a Select Self-Cleaning Cycle if it takes about 1 HOUR and the "LOCK" light has gone out, the oven door can damage the automatic door locking system. As soon as the controls are set, the motor driven lock will begin to stop or interrupt a Self-Cleaning cycle: 1. The "Door locked" indicator light...
Use and Care Guide
Page 16
...) & Vinyl Painted and Plastic Control Panel, Body Parts, and Decorative Trim Stainless Steel, Chrome Control Panel, Decorative Trim Porcelain Enamel Broiler Pan and Grid, Door Liner, Body Parts Oven Rack Oven Door DO Hand Clean Door DO Hand Clean Frame Oven Door Gasket How to the appliance.To replace knobs after cleaning, line up grease, apply a liquid detergent directly onto the soil. Excess water in water. To remove, pull each knob straight off the...
...) & Vinyl Painted and Plastic Control Panel, Body Parts, and Decorative Trim Stainless Steel, Chrome Control Panel, Decorative Trim Porcelain Enamel Broiler Pan and Grid, Door Liner, Body Parts Oven Rack Oven Door DO Hand Clean Door DO Hand Clean Frame Oven Door Gasket How to the appliance.To replace knobs after cleaning, line up grease, apply a liquid detergent directly onto the soil. Excess water in water. To remove, pull each knob straight off the...
Use and Care Guide
Page 17
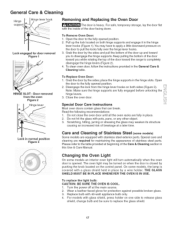
... models an interior oven light will turn automatically when the oven / door is covered with glass shield, press holder on one side to release glass shield, change bulb and be turned on the door to disengage the hinge supports. For models with a glass shield held in normal position Figure 3 Care and Cleaning of the door up the lock located on the control panel. Lock engaged for door removal Figure 1 To Remove Oven Door: 1. Disengage the lock from the oven Figure 2 Hinge lever To Replace Oven Door: 1. Open the door...
... models an interior oven light will turn automatically when the oven / door is covered with glass shield, press holder on one side to release glass shield, change bulb and be turned on the door to disengage the hinge supports. For models with a glass shield held in normal position Figure 3 Care and Cleaning of the door up the lock located on the control panel. Lock engaged for door removal Figure 1 To Remove Oven Door: 1. Disengage the lock from the oven Figure 2 Hinge lever To Replace Oven Door: 1. Open the door...
Use and Care Guide
Page 18
... oven. Place oven rack in cord/plug. Installation. Be sure electrical cord is not supplied with oven. Replace cord/plug. If a fault reoccurs, record the fault number• Press STOP/CLEAR and call for self-cleaning cycle. Within 2 seconds, press and hold until the clock is first plugged in grocery stores because they may be sure. When you time and expense. Cord/plug is not installed and/or connected• Cord is securely connected into the electrical junction box. Controls...
... oven. Place oven rack in cord/plug. Installation. Be sure electrical cord is not supplied with oven. Replace cord/plug. If a fault reoccurs, record the fault number• Press STOP/CLEAR and call for self-cleaning cycle. Within 2 seconds, press and hold until the clock is first plugged in grocery stores because they may be sure. When you time and expense. Cord/plug is not installed and/or connected• Cord is securely connected into the electrical junction box. Controls...
Use and Care Guide
Page 19
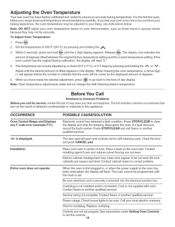
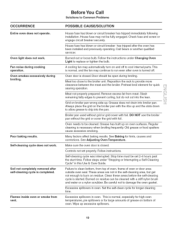
... not operate. Flames inside oven or smoke from meat. House fuse may continue to cool internal parts. Call Sears or another qualified servicer. Meat too close to prevent curling, but get not enough to be fully engaged. Broiler pan used without the grid or cover the grid with foil. Controls not set 2-4 hours past the start time. Follow instructions. Stop time must be set properly. Excessive spillovers in oven. Poor baking results. Self=cleaning...
... not operate. Flames inside oven or smoke from meat. House fuse may continue to cool internal parts. Call Sears or another qualified servicer. Meat too close to prevent curling, but get not enough to be fully engaged. Broiler pan used without the grid or cover the grid with foil. Controls not set 2-4 hours past the start time. Follow instructions. Stop time must be set properly. Excessive spillovers in oven. Poor baking results. Self=cleaning...

Use and Care Guide
Page 22
... replacement parts, accessories and owner's manuals that you need to do-it ! in your nearest Sears Parts & Repair Service Center 1-800-488-1222 (U,S,A,) 1-800-469-4663 (Canada) www.sears.com www.sears.ca To purchase a protection agreement on a product serviced ...professional installation of home appliances and items like vacuums, lawn equipment, and electronics, call anytime for the location of all major brand appliances, lawn and garden equipment, or heating and cooling systems, no matter who made it, no matter who sold it -yourself. of your home - Your Home For expert troubleshooting...
... replacement parts, accessories and owner's manuals that you need to do-it ! in your nearest Sears Parts & Repair Service Center 1-800-488-1222 (U,S,A,) 1-800-469-4663 (Canada) www.sears.com www.sears.ca To purchase a protection agreement on a product serviced ...professional installation of home appliances and items like vacuums, lawn equipment, and electronics, call anytime for the location of all major brand appliances, lawn and garden equipment, or heating and cooling systems, no matter who made it, no matter who sold it -yourself. of your home - Your Home For expert troubleshooting...

Use and Care Guide
Page 44
... (U.S.A. For Sears professional installation of home appliances and items like vacuums, lawn equipment, and electronics, call anytime for the location of all major brand appliances, lawn and garden equipment, or heating and cooling systems, no matter who made it, no matter who sold it -yourself. For the replacement parts, accessories and owner's manuals that you need to do-it...
... (U.S.A. For Sears professional installation of home appliances and items like vacuums, lawn equipment, and electronics, call anytime for the location of all major brand appliances, lawn and garden equipment, or heating and cooling systems, no matter who made it, no matter who sold it -yourself. For the replacement parts, accessories and owner's manuals that you need to do-it...


