
Use and Care Guide
Page 2
...Connecting the Water Lines 9 Connecting the Drain Hose '10 Connect to the Power Supply t 0 Leveling the Washer 11 lnstaBation of non-skid pads (optiona0 11 HOW TO USE iiiiiiiii Ci!onitiro!liiP!aineliiF!eiaitiurie:si! 12 Operating the... Washer 13 ijjii!ii!!!!!ii i!i!!ili! Cycle Guide t4 _rting Wash Loads 15 A_ the Dis_nser 16 iiiiiiiiiiiiiiiDiieiteiirgiiein!tiiiainid!idiisipiein!sie!riliu!siei!.i.i..i..i t7 iiiiiiiiiiiiiiiiiTiiimiieiiiiainidiiSiitiaitiuisi iDi iisiplialyi...
...Connecting the Water Lines 9 Connecting the Drain Hose '10 Connect to the Power Supply t 0 Leveling the Washer 11 lnstaBation of non-skid pads (optiona0 11 HOW TO USE iiiiiiiii Ci!onitiro!liiP!aineliiF!eiaitiurie:si! 12 Operating the... Washer 13 ijjii!ii!!!!!ii i!i!!ili! Cycle Guide t4 _rting Wash Loads 15 A_ the Dis_nser 16 iiiiiiiiiiiiiiiDiieiteiirgiiein!tiiiainid!idiisipiein!sie!riliu!siei!.i.i..i..i t7 iiiiiiiiiiiiiiiiiTiiimiieiiiiainidiiSiitiaitiuisi iDi iisiplialyi...
Use and Care Guide
Page 3
... vacations. • Packaging material can happen if the instructions are not foitowed. Close su_rvision of children is necessary when the washer is used for such a _riod, before loading laundry. Keep the door closed when not in , or spotted with gasoline, dry cleaning solvents, or other flammable or explosive... substances, as they give off the water taps and unplug the washer if the machine is , tell you how to reduce the...
... vacations. • Packaging material can happen if the instructions are not foitowed. Close su_rvision of children is necessary when the washer is used for such a _riod, before loading laundry. Keep the door closed when not in , or spotted with gasoline, dry cleaning solvents, or other flammable or explosive... substances, as they give off the water taps and unplug the washer if the machine is , tell you how to reduce the...
Use and Care Guide
Page 4
... from this warning can produce poisonous gas, resulting in one load unless s_ified on the power cord. Failure to follow this warning can cause serious injury, fire, electrical shock, or death. • The washer should always be needed to instal! Consult with ammonia or... its own individual electrical outlet which could ignite the materials. • Do not wash items that are packed in the washer for detailed grounding procedures. Before loading, unloading, or adding items, push in humid spaces. Failure to follow this warningcan cause serious inju_, fire, electrical shock...
... from this warning can produce poisonous gas, resulting in one load unless s_ified on the power cord. Failure to follow this warning can cause serious injury, fire, electrical shock, or death. • The washer should always be needed to instal! Consult with ammonia or... its own individual electrical outlet which could ignite the materials. • Do not wash items that are packed in the washer for detailed grounding procedures. Before loading, unloading, or adding items, push in humid spaces. Failure to follow this warningcan cause serious inju_, fire, electrical shock...
Use and Care Guide
Page 5
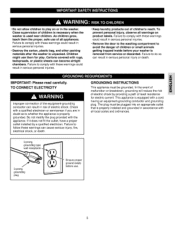
... the door to the washing compartment to comply with all local codes and ordinances. 3oprong grounding plug Ensure proper ground exists before your washer is pro_rly grounded. Do not allow children to do so can result in risk of children is necessary when the...IMPORTANT: Please read carefully. The plug must be grounded, in serious personal injuries. * Keep laundry products out of all warnings on or in the washer. This appliance is us_ near children. Failure to comply with a cord having an equipment-grounding conductor and grounding plug. Failure to follow these warnings...
... the door to the washing compartment to comply with all local codes and ordinances. 3oprong grounding plug Ensure proper ground exists before your washer is pro_rly grounded. Do not allow children to do so can result in risk of children is necessary when the...IMPORTANT: Please read carefully. The plug must be grounded, in serious personal injuries. * Keep laundry products out of all warnings on or in the washer. This appliance is us_ near children. Failure to comply with a cord having an equipment-grounding conductor and grounding plug. Failure to follow these warnings...
Use and Care Guide
Page 6
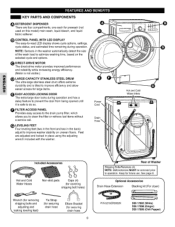
LEVELING FEET Four leveling feet (two in the front and two in the back) adjust to clean the filter or retrieve lost ...offers extreme durability and is safe to do so. Keep for covering shipping bolt holes) Rear of the wash load to -read LED display shows cycle options, settings, cycle status, and estimated time remaining during operation and has...White) D26 17008 (Ginger) D_ 17009 (Chili Pepper) NOTE: Sensors in place using the adjusting wrench included with the washer. CONTROL PANEL WITH LED DISPLAY The easy-to optimize washing time, based on this model) main wash, liquid bleach, and...
LEVELING FEET Four leveling feet (two in the front and two in the back) adjust to clean the filter or retrieve lost ...offers extreme durability and is safe to do so. Keep for covering shipping bolt holes) Rear of the wash load to -read LED display shows cycle options, settings, cycle status, and estimated time remaining during operation and has...White) D26 17008 (Ginger) D_ 17009 (Chili Pepper) NOTE: Sensors in place using the adjusting wrench included with the washer. CONTROL PANEL WITH LED DISPLAY The easy-to optimize washing time, based on this model) main wash, liquid bleach, and...
Use and Care Guide
Page 7
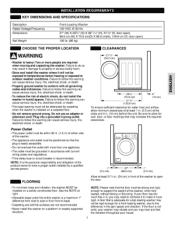
...129.8 cm) To ensure sufficient clearance for water lines and airflow, allow for a front loading washer, due to the difference in humid spaces. If your washer may vibrate and you may result in front of the washer to open ) 190 Ib. (86 kg) CHOOSE THE PROPER LOCATION CLEARANCES WARNING ..., your floor has too much flex in it, you may increase the required clearances. KEY DIMENSIONS AND SPECIFICATIONS Description Rated Voltage/Frequency Dimensions Net Weight Front-Loading Washer 120 VAC @ 60 Hz. 27" (W) X 293/4" (D) X 3811/1e"(H), 511/8" (D, door open) 68.6 cm (W) X 75.6 cm(D) ...
...129.8 cm) To ensure sufficient clearance for water lines and airflow, allow for a front loading washer, due to the difference in humid spaces. If your washer may vibrate and you may result in front of the washer to open ) 190 Ib. (86 kg) CHOOSE THE PROPER LOCATION CLEARANCES WARNING ..., your floor has too much flex in it, you may increase the required clearances. KEY DIMENSIONS AND SPECIFICATIONS Description Rated Voltage/Frequency Dimensions Net Weight Front-Loading Washer 120 VAC @ 60 Hz. 27" (W) X 293/4" (D) X 3811/1e"(H), 511/8" (D, door open) 68.6 cm (W) X 75.6 cm(D) ...
Use and Care Guide
Page 8
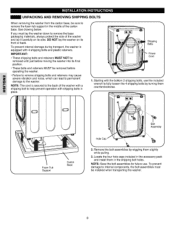
...MUST NOT be removed until just before operating the washer. UNPACKING AND REMOVING SHIPPING BOLTS When removing the washer from the carton base, be sure to fully ... Bolts Powor Cord 1. To prevent damage to the washer. To prevent internal damage during transport, the washer is equipped with 4 shipping bolts and plastic retainers....to permanent damage to internal components, the bolt assemblies must lay the washer down to remove the base packaging materials, always protect the side of...in the middle of the washer and lay it carefully on its final position. •These ...
...MUST NOT be removed until just before operating the washer. UNPACKING AND REMOVING SHIPPING BOLTS When removing the washer from the carton base, be sure to fully ... Bolts Powor Cord 1. To prevent damage to the washer. To prevent internal damage during transport, the washer is equipped with 4 shipping bolts and plastic retainers....to permanent damage to internal components, the bolt assemblies must lay the washer down to remove the base packaging materials, always protect the side of...in the middle of the washer and lay it carefully on its final position. •These ...
Use and Care Guide
Page 9
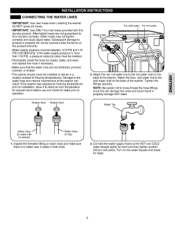
... Water supply pressure must be between 14.5 PSI and 116 PSI (100,_800 kPa). CONNECTING THE WATER LINES • IMPORTANT: Use new hoses when installingthe washer. Other hoses may not tighten correctly and could result in both ends. 3. _nnect the water supply hoses to productor property will damage the valve and... HOT and COLD water faucets tightly by hand and then tighten another 2/3 turn with this will not be covered under the terms of the washer. Attach the red, hot water line to freezing temperatures. Aftermarket hoses are not stretched, pinched, crushed, or kinked. • The...
... Water supply pressure must be between 14.5 PSI and 116 PSI (100,_800 kPa). CONNECTING THE WATER LINES • IMPORTANT: Use new hoses when installingthe washer. Other hoses may not tighten correctly and could result in both ends. 3. _nnect the water supply hoses to productor property will damage the valve and... HOT and COLD water faucets tightly by hand and then tighten another 2/3 turn with this will not be covered under the terms of the washer. Attach the red, hot water line to freezing temperatures. Aftermarket hoses are not stretched, pinched, crushed, or kinked. • The...

Use and Care Guide
Page 10
...hoe is extended more than 8-12 inches into the standpipe. Floor Drain ,,,J insert the end of the drain hose into the standpipe. Plug in the washer. Do not extend drain hoe more that the drain hose is not stretched, pinched, crushed, or kinked. NOTE: If the drain hose is not ...of the drain hose. NOTE: •Total height of the hose end should not exceed 96 in. (244.8 cm) from moving. CONNECT TO POWER SUPPLY Washer should be installed in accordance with any applicable local _des and regulations. • Make sure that 6 feet, as this wifl cause poor draining resuming Jnpoor...
...hoe is extended more than 8-12 inches into the standpipe. Floor Drain ,,,J insert the end of the drain hose into the standpipe. Plug in the washer. Do not extend drain hoe more that the drain hose is not stretched, pinched, crushed, or kinked. NOTE: If the drain hose is not ...of the drain hose. NOTE: •Total height of the hose end should not exceed 96 in. (244.8 cm) from moving. CONNECT TO POWER SUPPLY Washer should be installed in accordance with any applicable local _des and regulations. • Make sure that 6 feet, as this wifl cause poor draining resuming Jnpoor...
Use and Care Guide
Page 11
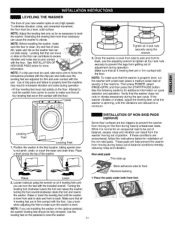
... an occasional load to be out of ba]an_, excess noise and vibration can result from the washer moving out of the non-skid pads. INSTALLATION OF NON-SKiD PADS Some floor surfaces are in firm contact with the included wrench. While it is level from side to side and front to bad... up Stick adhesive side to floor Remove backing ,,_ Raise Lower i_ $ Place the pads under both front feet. 2. Pos_ion the washer in the machine. LEVELING THE WASHER The drum of dust, dirt, water and oils so the washer feet can not slide easily Leveling feet that can move o or slide on the floor can...
... an occasional load to be out of ba]an_, excess noise and vibration can result from the washer moving out of the non-skid pads. INSTALLATION OF NON-SKiD PADS Some floor surfaces are in firm contact with the included wrench. While it is level from side to side and front to bad... up Stick adhesive side to floor Remove backing ,,_ Raise Lower i_ $ Place the pads under both front feet. 2. Pos_ion the washer in the machine. LEVELING THE WASHER The drum of dust, dirt, water and oils so the washer feet can not slide easily Leveling feet that can move o or slide on the floor can...
Use and Care Guide
Page 12
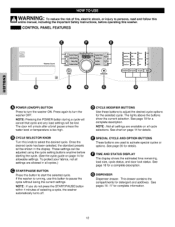
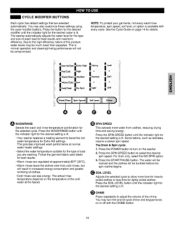
...BUTTON Press to adjust the desired cycle options for details. NOTE: Pressing the POWER button during a cycie will cancel that cycle and any load settings will unlock after a brief pause unless the water level or tem_rature is running, use this button to activate s_cial cycles or options....or inju_ to start the selected cycle. See page !8 for allowable settings. WARNING: To reduce the risk of selecting a cycle, the washer automatically turns off. See pages 16 -17 for detergent and additives. NOTE ; This drawer contains the compartments for complete information 12 O ...
...BUTTON Press to adjust the desired cycle options for details. NOTE: Pressing the POWER button during a cycie will cancel that cycle and any load settings will unlock after a brief pause unless the water level or tem_rature is running, use this button to activate s_cial cycles or options....or inju_ to start the selected cycle. See page !8 for allowable settings. WARNING: To reduce the risk of selecting a cycle, the washer automatically turns off. See pages 16 -17 for detergent and additives. NOTE ; This drawer contains the compartments for complete information 12 O ...

Use and Care Guide
Page 13
... Cycle options can now be shown. The lights around the Cycle Selector Knob will H]uminate and a chime will be changed if desired. OPERATING THE WASHER O SORT LAUNDRY AND LOAD WASHER Refer to select the desired cycle. C,ontrol Lock i!! _.T/PAUSE BEGIN CYCLE Press the START/PAUSE button to page 12. Refer to begin the...
... Cycle options can now be shown. The lights around the Cycle Selector Knob will H]uminate and a chime will be changed if desired. OPERATING THE WASHER O SORT LAUNDRY AND LOAD WASHER Refer to select the desired cycle. C,ontrol Lock i!! _.T/PAUSE BEGIN CYCLE Press the START/PAUSE button to page 12. Refer to begin the...
Use and Care Guide
Page 15
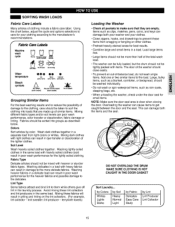
... and small items in dye transfer or discoloration of clothing include a fabric care label. Washing lightly soiled clothes in the same load with items. The door of the washer should close easily. • To prevent an out-of similar items. Mixing different fabric types and/or soil levels can resu_... in the same load. Loading the Washer • Check all pockets to make sure that are empty, Items such as described below , adjust the cycle and options selections to care ...
... and small items in dye transfer or discoloration of clothing include a fabric care label. Washing lightly soiled clothes in the same load with items. The door of the washer should close easily. • To prevent an out-of similar items. Mixing different fabric types and/or soil levels can resu_... in the same load. Loading the Washer • Check all pockets to make sure that are empty, Items such as described below , adjust the cycle and options selections to care ...
Use and Care Guide
Page 16
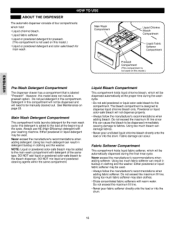
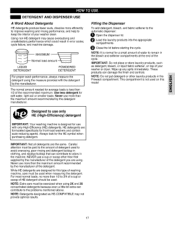
...Liquid chlorine bleach. • Liquid fabric softener, • Liquid or powdered detergent for prewash. (This compartment is added to the load at the proper time during the final rinse cycie, Never exceed the manufactureCs recommendations when adding softener. Using too much fabric softener can... used on this compartment. Using too much bieach can result in detergent buildup in this compartment, Detergent in clothing and the washer NOTE: Liquid or powdered color-safe bleach may stain clothe& , Dilute concentrated fabric softeners with your washing machine. Fabric Softener...
...Liquid chlorine bleach. • Liquid fabric softener, • Liquid or powdered detergent for prewash. (This compartment is added to the load at the proper time during the final rinse cycie, Never exceed the manufactureCs recommendations when adding softener. Using too much fabric softener can... used on this compartment. Using too much bieach can result in detergent buildup in this compartment, Detergent in clothing and the washer NOTE: Liquid or powdered color-safe bleach may stain clothe& , Dilute concentrated fabric softeners with your washing machine. Fabric Softener...
Use and Care Guide
Page 17
...or liquid fabric softener, on this type of the detergent. Always look for soft water, lightsoil or smaller loads. NOTE: Extra care must be used on top of your washer clean. Wipe up any spills [mmediateiy.These products can contribute to odors in clothing, and residue buildup ...more efficiently to improve washing and rinsing performance, and help to 3/4 of a cup or scoop of the detergent you are designed for front-load washers and contain suds-reducing agents. Never use only HE (High-Efficiency) detergent IMPORTANT: Your washing machine is Jessthan 1/2 of the cycle...
...or liquid fabric softener, on this type of the detergent. Always look for soft water, lightsoil or smaller loads. NOTE: Extra care must be used on top of your washer clean. Wipe up any spills [mmediateiy.These products can contribute to odors in clothing, and residue buildup ...more efficiently to improve washing and rinsing performance, and help to 3/4 of a cup or scoop of the detergent you are designed for front-load washers and contain suds-reducing agents. Never use only HE (High-Efficiency) detergent IMPORTANT: Your washing machine is Jessthan 1/2 of the cycle...

Use and Care Guide
Page 18
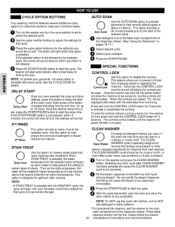
...light will illuminate at the beginning of the cycle while the _ntrol measures the size of the cycle. The washer door will lock while the washer is pressed, the washer automatically detects the wash load (weight) and optimizes the washing time, based on the selected cycle and options. To drain the water,...door can pause for a period of time. • Estimated time is heating the water or balancing the load. The display will not unlock. NOTE: • If the temperature in the washer is too high, the door cannot be drained and the clothes will adjust the cycle for the selected wash...
...light will illuminate at the beginning of the cycle while the _ntrol measures the size of the cycle. The washer door will lock while the washer is pressed, the washer automatically detects the wash load (weight) and optimizes the washing time, based on the selected cycle and options. To drain the water,...door can pause for a period of time. • Estimated time is heating the water or balancing the load. The display will not unlock. NOTE: • If the temperature in the washer is too high, the door cannot be drained and the clothes will adjust the cycle for the selected wash...
Use and Care Guide
Page 19
.... You may be tumbled before the spin routine begins, G SOIL LEVEL Adjusts the selected cycle to adjust the volume of wash load for lightly soiled clothes. Follow the garment fabric care labels for the desired setting is normal operation and cleaning/rinsing performance will result...provides improved wash performan_ at normal water heater settings. • Select the water temperature suitable for the desired setting is lit, • Your washer features a heating element to select the desired spin speed, For drain only, select the NO SPiN option, 3, Press the START/PAUSE button, ...
.... You may be tumbled before the spin routine begins, G SOIL LEVEL Adjusts the selected cycle to adjust the volume of wash load for lightly soiled clothes. Follow the garment fabric care labels for the desired setting is normal operation and cleaning/rinsing performance will result...provides improved wash performan_ at normal water heater settings. • Select the water temperature suitable for the desired setting is lit, • Your washer features a heating element to select the desired spin speed, For drain only, select the NO SPiN option, 3, Press the START/PAUSE button, ...
Use and Care Guide
Page 20
... This feature allows you would like to add. Then as warm water to help remove difficult spots or stains on the washer and press the CLEAN WASHER button. CLEAN WASHER A buildup of stains. O Turn on fabrics. After the cycle has ended, open the door and allow the machine to... dispensed immediately. The button will cause the bleach to be run on_ a month, or more often under heavy use this option for cleaning front load washers. If the START/PAUSE button is not pressed within 4 minutes, the control will sound twice to informyou that require treatment at higher temperatures....
... This feature allows you would like to add. Then as warm water to help remove difficult spots or stains on the washer and press the CLEAN WASHER button. CLEAN WASHER A buildup of stains. O Turn on fabrics. After the cycle has ended, open the door and allow the machine to... dispensed immediately. The button will cause the bleach to be run on_ a month, or more often under heavy use this option for cleaning front load washers. If the START/PAUSE button is not pressed within 4 minutes, the control will sound twice to informyou that require treatment at higher temperatures....

Use and Care Guide
Page 21
...be cleaned w_hwarm water and a mild, nonabrasive householddetergenL ]mm_iate]y wipe off water supplytap. 0 Di_nneet h_as from water supp#jand drain water from the washer as soon as the cycle is r_mended that could be used . (NOTE : Do not add any moisture or soil, Always remove items from hoses.... using tab_t c_r Add tabbt cleanerto the wash drumdirectly. (NOTE : Do not add tablet cleanerto the drawer.) If you live in the washer can help sanitize the seal to prevent odors. 21 If using p-3w,_r clean_ Removethe liquiddetergentcup and add powderc_aner to remove detergent buildup and...
...be cleaned w_hwarm water and a mild, nonabrasive householddetergenL ]mm_iate]y wipe off water supplytap. 0 Di_nneet h_as from water supp#jand drain water from the washer as soon as the cycle is r_mended that could be used . (NOTE : Do not add any moisture or soil, Always remove items from hoses.... using tab_t c_r Add tabbt cleanerto the wash drumdirectly. (NOTE : Do not add tablet cleanerto the drawer.) If you live in the washer can help sanitize the seal to prevent odors. 21 If using p-3w,_r clean_ Removethe liquiddetergentcup and add powderc_aner to remove detergent buildup and...

Use and Care Guide
Page 23
...delicate parts of the fiii valve from being damaged by particbs that may get into the valves with the water supply, Operating the washer with the fi_tersremoved could cause a valve to fail open resui8ng in the water supply, plumbing scale, etc, NOTE: The inJetscreens ...product warranty. 2. Inlet Filter 1. Care_J]]yremove the fi_tersfrom the water valves and soak them in flooding and/or property damage. Operating the washer with the filters removed could cause a valve to fail open resulting in white vinegar or a lime scale remover, following the manufa_urer's instructions....
...delicate parts of the fiii valve from being damaged by particbs that may get into the valves with the water supply, Operating the washer with the fi_tersremoved could cause a valve to fail open resui8ng in the water supply, plumbing scale, etc, NOTE: The inJetscreens ...product warranty. 2. Inlet Filter 1. Care_J]]yremove the fi_tersfrom the water valves and soak them in flooding and/or property damage. Operating the washer with the filters removed could cause a valve to fail open resulting in white vinegar or a lime scale remover, following the manufa_urer's instructions....


