
Use and Care Guide
Page 6
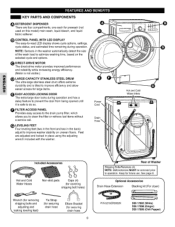
...from being opened until it is tilted to improve efficiency and allow easier access for covering shipping bolt holes) Rear of the wash load to operation. Optional Accessories Drain Hose Extension Stacking kit (For dryer) Wrench (for removing shipping bolts and adjusting and Tie Strap ... _curing drain hose Elbow Bract_et (for future use. _e page 8. LEVELING FEET Four leveling feet (two in the front and two in the washer automatically detect the size of Washer Shipping Bolts/Retainers (4) NOTE: Bolts/retainers MUST be removed prior to optimize washing time, based on this model) ...
...from being opened until it is tilted to improve efficiency and allow easier access for covering shipping bolt holes) Rear of the wash load to operation. Optional Accessories Drain Hose Extension Stacking kit (For dryer) Wrench (for removing shipping bolts and adjusting and Tie Strap ... _curing drain hose Elbow Bract_et (for future use. _e page 8. LEVELING FEET Four leveling feet (two in the front and two in the washer automatically detect the size of Washer Shipping Bolts/Retainers (4) NOTE: Bolts/retainers MUST be removed prior to optimize washing time, based on this model) ...
Use and Care Guide
Page 11
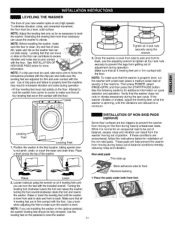
...feet must rest solidly on the floor during the spin cycie, ff the washer vibrates or shakes, adjust the leveling feet, while the washer is properly level, run the washer with a test load: place a medium-sized load of the washer.. _q This side up Stick adhesive side to prevent the legs from corner..... Make sure that all four iock nuts securely to floor Remove backing ,,_ Raise Lower i_ $ Place the pads under both front feet. 2. NOTE: Before installing the washer,make sure the leveling feet are in the machine. NOTE: If a drip pan must be used, take extra care to...
...feet must rest solidly on the floor during the spin cycie, ff the washer vibrates or shakes, adjust the leveling feet, while the washer is properly level, run the washer with a test load: place a medium-sized load of the washer.. _q This side up Stick adhesive side to prevent the legs from corner..... Make sure that all four iock nuts securely to floor Remove backing ,,_ Raise Lower i_ $ Place the pads under both front feet. 2. NOTE: Before installing the washer,make sure the leveling feet are in the machine. NOTE: If a drip pan must be used, take extra care to...
Use and Care Guide
Page 12
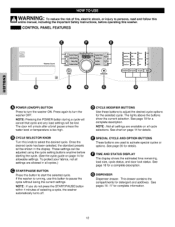
.... NOTE: Pressing the POWER button during a cycie will cancel that cycle and any load settings will unlock after a brief pause unless the water level or tem_rature is running, use this knob to turn the washer OFF. This drawer contains the compartments for a complete description. CONTROL PANEL FEATURES ®...for details. TIME AND STATUS DISPLAY The display shows the estimated time remaining, load size, cycle status, and door lock status. See chart on all cycles.) START/PAUSE BU_ON Press this washer. Once the desired cycle has been selected, the standard presets will be ...
.... NOTE: Pressing the POWER button during a cycie will cancel that cycle and any load settings will unlock after a brief pause unless the water level or tem_rature is running, use this knob to turn the washer OFF. This drawer contains the compartments for a complete description. CONTROL PANEL FEATURES ®...for details. TIME AND STATUS DISPLAY The display shows the estimated time remaining, load size, cycle status, and door lock status. See chart on all cycles.) START/PAUSE BU_ON Press this washer. Once the desired cycle has been selected, the standard presets will be ...

Use and Care Guide
Page 18
...cycle progress, and door lock status. Once the size has been determined, the control will not be displayed until the washer has cooled. , If the water level is locked. ijjii!ii!!!!!ii i!i!!ili! Several external factors (load size, room temperature, incoming water temperature, etc,) also... affect the length of the load. iiiiiiiiiiiiiiiiiiiiiii!iiiii!i iiii!i!ili!ii!iiii ...
...cycle progress, and door lock status. Once the size has been determined, the control will not be displayed until the washer has cooled. , If the water level is locked. ijjii!ii!!!!!ii i!i!!ili! Several external factors (load size, room temperature, incoming water temperature, etc,) also... affect the length of the load. iiiiiiiiiiiiiiiiiiiiiii!iiiii!i iiii!i!ili!ii!iiii ...
Use and Care Guide
Page 19
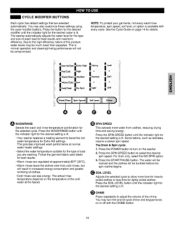
... cycle, Press the WASH/RINSE button until the indicator light for the desired value is lit, The washer automatically adjusts the water level for the type and size of wash load for best results and maximum efficiency. You may turn on the temperature of the cold water at approximately... the cycle modifier buttons, Press the button for the desired modifier until the indicator light for the desired setting is lit, • Your washer features a heating element to boom the hot water temperature for Extra Hot settings, This provides improved wash performan_ at normal water heater settings. ...
... cycle, Press the WASH/RINSE button until the indicator light for the desired value is lit, The washer automatically adjusts the water level for the type and size of wash load for best results and maximum efficiency. You may turn on the temperature of the cold water at approximately... the cycle modifier buttons, Press the button for the desired modifier until the indicator light for the desired setting is lit, • Your washer features a heating element to boom the hot water temperature for Extra Hot settings, This provides improved wash performan_ at normal water heater settings. ...


