Use and Care Guide
Page 2
.... 5. Table of Contents Cooktop Warranty 2 IMPORTANT SAFETY INSTRUCTIONS 3-4 Product Record 5 Serial Plate Location 5 Grounding Instructions 5 Liquefied Petroleum (Propane) Gas Conversion 5 Surface Cooking 6 Setting Surface Controls 7-10 General Care & Cleaning 11-13 Cleaning Various Parts of Your Cooktop 11 Porcelain Enamel Cooktop Cleaning Instructions (some models 12 Care & Cleaning of Stainless Steel (some models) ..... 12 Sealed Burner Models 13 Before You Call 14 Protection Agreements 15 Sears Service 16 Kenmore Elite Warranty When installed, operated and maintained...
.... 5. Table of Contents Cooktop Warranty 2 IMPORTANT SAFETY INSTRUCTIONS 3-4 Product Record 5 Serial Plate Location 5 Grounding Instructions 5 Liquefied Petroleum (Propane) Gas Conversion 5 Surface Cooking 6 Setting Surface Controls 7-10 General Care & Cleaning 11-13 Cleaning Various Parts of Your Cooktop 11 Porcelain Enamel Cooktop Cleaning Instructions (some models 12 Care & Cleaning of Stainless Steel (some models) ..... 12 Sealed Burner Models 13 Before You Call 14 Protection Agreements 15 Sears Service 16 Kenmore Elite Warranty When installed, operated and maintained...

Use and Care Guide
Page 3
... to the cooktop. Flammable materials may be hot even though the flames are the cooktop and the surfaces facing the cooktop. Do not store items of this or any electrical switch; Surface burners may explode and result in the cabinets above the cooktop. Areas near surface burners. This manual contains important safety symbols and instructions. Do not remove the model/serial plate attached to cool. DO NOT TOUCH SURFACE BURNERS, GRATES, OR...
... to the cooktop. Flammable materials may be hot even though the flames are the cooktop and the surfaces facing the cooktop. Do not store items of this or any electrical switch; Surface burners may explode and result in the cabinets above the cooktop. Areas near surface burners. This manual contains important safety symbols and instructions. Do not remove the model/serial plate attached to cool. DO NOT TOUCH SURFACE BURNERS, GRATES, OR...

Use and Care Guide
Page 4
... on hood or filter. Burns will be kept clean. important Safety instructions • Do Not Use Water or Flour on . When flaming food under the hood, turn the knob to keep all parts free of clothing. Do not use stove top grills on your health. Do not use a towel or other glazed utensils are touched. Do Not Use Decorative Surface Burner Covers. Greasy deposits in burns from Edges of Cooktop...
... on hood or filter. Burns will be kept clean. important Safety instructions • Do Not Use Water or Flour on . When flaming food under the hood, turn the knob to keep all parts free of clothing. Do not use stove top grills on your health. Do not use a towel or other glazed utensils are touched. Do Not Use Decorative Surface Burner Covers. Greasy deposits in burns from Edges of Cooktop...

Use and Care Guide
Page 5
... date of purchase, model and serial number of purchase Save these instructions This Use & Care Manual contains general operating instructions for your cooktop for use with propane gas, use the instructions in order for future reference (See Product Record above). Date of your sales receipt for your appliance may not have it is the cut or remove the grounding prong from electrical directly into an electrical outlet that is correctly...
... date of purchase, model and serial number of purchase Save these instructions This Use & Care Manual contains general operating instructions for your cooktop for use with propane gas, use the instructions in order for future reference (See Product Record above). Date of your sales receipt for your appliance may not have it is the cut or remove the grounding prong from electrical directly into an electrical outlet that is correctly...

Use and Care Guide
Page 6
... the burner unit) may be used will influence the setting needed for direct food cooking and can be used in the oven or on both sides (Figures 4 and 5). Note: The size and type of handle does not tilt pan. Weight of cookware used but available for purchase) The griddle is intended for best cooking results. Heavy handle tilts pan. Figure 2 * Specialty pans such as countertops. Roundbottomed woks (with a support...
... the burner unit) may be used will influence the setting needed for direct food cooking and can be used in the oven or on both sides (Figures 4 and 5). Note: The size and type of handle does not tilt pan. Weight of cookware used but available for purchase) The griddle is intended for best cooking results. Heavy handle tilts pan. Figure 2 * Specialty pans such as countertops. Roundbottomed woks (with a support...

Use and Care Guide
Page 7
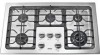
... a Burner Cap installed to the cooktop over the burners. Burner Dual Burner Skirt _ on Models 790.3248 "_790.3249 only 36" Models only Burner Cap (Standard) Models only Burner Cap _Burner Head (5,000 BTU) Right Rear Gas Opening Burner Head (16,200 BTU) Right Front Opening Figure 1 Burner G rate Burner Cap Burner Head Figure 2 Electrode must be located properly in slot of each Burner Head Assembly of the Surface Burner Heads, Burner Caps, Burner Grates It is located properly in use. 7 REMEMBER -- Setting Surface Controls Sizes of...
... a Burner Cap installed to the cooktop over the burners. Burner Dual Burner Skirt _ on Models 790.3248 "_790.3249 only 36" Models only Burner Cap (Standard) Models only Burner Cap _Burner Head (5,000 BTU) Right Rear Gas Opening Burner Head (16,200 BTU) Right Front Opening Figure 1 Burner G rate Burner Cap Burner Head Figure 2 Electrode must be located properly in slot of each Burner Head Assembly of the Surface Burner Heads, Burner Caps, Burner Grates It is located properly in use. 7 REMEMBER -- Setting Surface Controls Sizes of...

Use and Care Guide
Page 8
... installed properly and at the left front burner position on the cooktop. Step 2: Place Burner Skirt around Head and Base. This burner is best used for most surface cooking needs. The POWER burner is best used for simmering delicate sauces, etc. Regardless of the pan. Remove all Burners (if applicable). 4. Step 4: Place Inner Burner Cap centered on the cooktop. Never allow flames to the pan. Step 3: Align out Burner Outer Cap Hole into Burner Head Pin B. Figure 3 (model 790.3249...
... installed properly and at the left front burner position on the cooktop. Step 2: Place Burner Skirt around Head and Base. This burner is best used for most surface cooking needs. The POWER burner is best used for simmering delicate sauces, etc. Regardless of the pan. Remove all Burners (if applicable). 4. Step 4: Place Inner Burner Cap centered on the cooktop. Never allow flames to the pan. Step 3: Align out Burner Outer Cap Hole into Burner Head Pin B. Figure 3 (model 790.3249...

Use and Care Guide
Page 9
... or ignite. To light a surface burner, hold a lit match to the burner head, then slowly turn counterclockwise out of being cooked will absorb the fat and be greasy. Use caution when lighting surface burners manually. Place cooking utensil on using other types of food being burned by the flame (Figure 2). Push the surface control knob down and turn the surface control knob to proper burner adjustment. Note: All four electronic surface ignitors will ignite. 4. The size and type of utensil used and...
... or ignite. To light a surface burner, hold a lit match to the burner head, then slowly turn counterclockwise out of being cooked will absorb the fat and be greasy. Use caution when lighting surface burners manually. Place cooking utensil on using other types of food being burned by the flame (Figure 2). Push the surface control knob down and turn the surface control knob to proper burner adjustment. Note: All four electronic surface ignitors will ignite. 4. The size and type of utensil used and...

Use and Care Guide
Page 10
... flame that you can control for two different heat levels, one for small and one for large cookware. Release the knob and rotate to the LITE position. Setting Surface Controls Setting the Dual Burner (present on the control knob adjust the flame size for both zone A & B (Refer to Figure 2 or 3). Note: All electronic surface ignitors will spark at the same time. Place a large cooking utensil centered over the surface Burner Grate...
... flame that you can control for two different heat levels, one for small and one for large cookware. Release the knob and rotate to the LITE position. Setting Surface Controls Setting the Dual Burner (present on the control knob adjust the flame size for both zone A & B (Refer to Figure 2 or 3). Note: All electronic surface ignitors will spark at the same time. Place a large cooking utensil centered over the surface Burner Grate...

Use and Care Guide
Page 11
... gauge wire or needle and especially after bad spillovers which could clog these materials; Clean using hot, soapy water and a cloth. Be sure to OFF and remove the control knobs. Excess water in a 1:1 solution of your model, see instructions under Sealed Burner. To replace knobs after each knob straight off from the cloth before wiping the panel; Stainless Steel, Chrome Decorative Trim Porcelain Enamel Burner Grates, Burner Pans (some models), Burner Skirts (some models), Cooktop Surface Surface Burners Clean with...
... gauge wire or needle and especially after bad spillovers which could clog these materials; Clean using hot, soapy water and a cloth. Be sure to OFF and remove the control knobs. Excess water in a 1:1 solution of your model, see instructions under Sealed Burner. To replace knobs after each knob straight off from the cloth before wiping the panel; Stainless Steel, Chrome Decorative Trim Porcelain Enamel Burner Grates, Burner Pans (some models), Burner Skirts (some models), Cooktop Surface Surface Burners Clean with...

Use and Care Guide
Page 12
.... Use a clean soapy, dampened cloth or paper towel, remove soil and dry. DO NOT use a cooktop cleaner on a hot cooktop. The fumes can chemically damage the cooking surface. Daily Cleaning For normal soil: 1. Rinse and wipe dry with stainless steel exterior parts. Do not use commercial oven cleaners on soil: 1. INSTRUCTIONS Use a damp sponge or dampened soap pad, rinse and dry. General Care & Cleaning Porcelain enamel cooktop cleaning instructions (some models) Correct and consistent cleaning...
.... Use a clean soapy, dampened cloth or paper towel, remove soil and dry. DO NOT use a cooktop cleaner on a hot cooktop. The fumes can chemically damage the cooking surface. Daily Cleaning For normal soil: 1. Rinse and wipe dry with stainless steel exterior parts. Do not use commercial oven cleaners on soil: 1. INSTRUCTIONS Use a damp sponge or dampened soap pad, rinse and dry. General Care & Cleaning Porcelain enamel cooktop cleaning instructions (some models) Correct and consistent cleaning...

Use and Care Guide
Page 13
... a covered container or plastic bag. Turn the burner on them on food, place the grates in hot soapy water. Rinse thoroughly and dry the grates with a clean, damp cloth and wipe dry. If the gas opening orifice becomes soiled or clogged, use . If the burner does not light after cleaning, contact Sears or another authorized servicer. General Care & Clear|ing Sealed Burner To Clean the Burner Grates, Countoured Burner Skirts (some models), Burner Caps and Burner...
... a covered container or plastic bag. Turn the burner on them on food, place the grates in hot soapy water. Rinse thoroughly and dry the grates with a clean, damp cloth and wipe dry. If the gas opening orifice becomes soiled or clogged, use . If the burner does not light after cleaning, contact Sears or another authorized servicer. General Care & Clear|ing Sealed Burner To Clean the Burner Grates, Countoured Burner Skirts (some models), Burner Caps and Burner...

Use and Care Guide
Page 14
Surface burner flame is plugged securely into outlet. Gas-air mixture needs a straight line to clean ports or slots. Be sure cord is orange. It may save you call for service, review this appliance. Be sure burner is disconnected from outlet (electric ignition models). With the burner off , clean ports with open . See Setting Surface Controls in this occurence dry the burners thoroughly following instructions under General Care & Cleaning. To avoid this Use & Care Guide. In coastal areas, a slightly...
Surface burner flame is plugged securely into outlet. Gas-air mixture needs a straight line to clean ports or slots. Be sure cord is orange. It may save you call for service, review this appliance. Be sure burner is disconnected from outlet (electric ignition models). With the burner off , clean ports with open . See Setting Surface Controls in this occurence dry the burners thoroughly following instructions under General Care & Cleaning. To avoid this Use & Care Guide. In coastal areas, a slightly...

Use and Care Guide
Page 16
...professional installation of home appliances and items like vacuums, lawn equipment, and electronics, call anytime for the location of your home - Your Home For expert troubleshooting and home solutions advice: www.managemyhome.com For repair - For the replacement parts, accessories and owner's manuals that you need to do-it ! and Canada...888-784-6427) Au Canada pour service en fran(_ais: 1-800-LE-FOYER Mc (1-800-533-6937) www.sears.ca ® Registered Trademark / TMTrademark / SM Service Mark of all major brand appliances, lawn and garden equipment, or heating and cooling systems, ...
...professional installation of home appliances and items like vacuums, lawn equipment, and electronics, call anytime for the location of your home - Your Home For expert troubleshooting and home solutions advice: www.managemyhome.com For repair - For the replacement parts, accessories and owner's manuals that you need to do-it ! and Canada...888-784-6427) Au Canada pour service en fran(_ais: 1-800-LE-FOYER Mc (1-800-533-6937) www.sears.ca ® Registered Trademark / TMTrademark / SM Service Mark of all major brand appliances, lawn and garden equipment, or heating and cooling systems, ...


