

Installation Instructions
Page 1
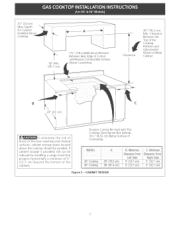
...use any other appliance. -- mnstaiiation and service must be performed by a qualified installer, service agency or the gas supplier, Gas Cooktop Dimensions 21/2" Gas Cooktop Cutout Dimensions (6,4 cm) Q ,u Figure 1 30" GasCooktop 36" GasCooktop 30 (76.2) 36 (91.4) 21sA552) 2134 (55.2) 4_/4(10.8) 4_/4(10.8) 27 (68.6) 33_/(484,5) I9 (48.3)... 19 (48.3) 30" Gas Cooktop 36" GasCooktop 27_/4(69.2) 28_/2(72.4) 34_A(87) 19Vs(48,6) 19Vs(48.6) A[[ dimensions are enclosed in United States 318201465 (0510...
...use any other appliance. -- mnstaiiation and service must be performed by a qualified installer, service agency or the gas supplier, Gas Cooktop Dimensions 21/2" Gas Cooktop Cutout Dimensions (6,4 cm) Q ,u Figure 1 30" GasCooktop 36" GasCooktop 30 (76.2) 36 (91.4) 21sA552) 2134 (55.2) 4_/4(10.8) 4_/4(10.8) 27 (68.6) 33_/(484,5) I9 (48.3)... 19 (48.3) 30" Gas Cooktop 36" GasCooktop 27_/4(69.2) 28_/2(72.4) 34_A(87) 19Vs(48,6) 19Vs(48.6) A[[ dimensions are enclosed in United States 318201465 (0510...

Installation Instructions
Page 2
.... Use caution when lighting burners manually. • Do not store items of interest to the cooktop must conform with local codes or, in the absence of local codes, with the National Fuel Gas Code ANSI Z223.1/NFPA 54 in the United States, or in Canada, with the Canadian Fuel...the Canadian EJectricat Code, CSA C22.1 Part 1. • The burners can be shut off whiJe gas Jine connections are certain safety precautions you should be hazardous. • Do not store or use of the cooktop without adequate ventilation (.an be avoided. • Adjust surface burner flame size so it carefully. ...
.... Use caution when lighting burners manually. • Do not store items of interest to the cooktop must conform with local codes or, in the absence of local codes, with the National Fuel Gas Code ANSI Z223.1/NFPA 54 in the United States, or in Canada, with the Canadian Fuel...the Canadian EJectricat Code, CSA C22.1 Part 1. • The burners can be shut off whiJe gas Jine connections are certain safety precautions you should be hazardous. • Do not store or use of the cooktop without adequate ventilation (.an be avoided. • Adjust surface burner flame size so it carefully. ...
Installation Instructions
Page 3
... cm) lY2" (3.8 cm)Minimum Distance Between Rear Edge of burns or fire from reaching over heated surfaces, cabinet storage space located above the cooktop should be reduced by installing a range hood that projects horizontally a minimum of 5" (I 2.7 cm) beyond the bottom of Cou ntertop. Clearance ... the risk of Cutout and Nearest Combustible Surface Above Countertop. Clearance 30" (76.2 cm) Min. Drawers Cannot Be Used with This Cooktop Since Burner Box Extends 3Vs2" (8.02 cm) Below Surface of the cabinets. CABINET DESIGN Figure 2 - If cabinet storage is provided, risk...
... cm) lY2" (3.8 cm)Minimum Distance Between Rear Edge of burns or fire from reaching over heated surfaces, cabinet storage space located above the cooktop should be reduced by installing a range hood that projects horizontally a minimum of 5" (I 2.7 cm) beyond the bottom of Cou ntertop. Clearance ... the risk of Cutout and Nearest Combustible Surface Above Countertop. Clearance 30" (76.2 cm) Min. Drawers Cannot Be Used with This Cooktop Since Burner Box Extends 3Vs2" (8.02 cm) Below Surface of the cabinets. CABINET DESIGN Figure 2 - If cabinet storage is provided, risk...

Installation Instructions
Page 4
tion) Union UFnlaioren /A 120V/60Hz Grounded Outlet Pressure Regulator ÷ 4" (10.2 cm) € Right Side of Cabinet /A Manual Shutoff Valve (To be accessible for shut-off valve opera- Typical Gas Cooktop Installation Over an Electric Built-in Oven Installed Under the Counter Manifold Pi Flexible Connector Cabinet sides or filler panel Wall Oven Cabinet 14_---- 18" (45.7 cm) Max.-----_ 61/2 '' 5" ,(16.5 cm) Flare (12.7 cm) Min.
tion) Union UFnlaioren /A 120V/60Hz Grounded Outlet Pressure Regulator ÷ 4" (10.2 cm) € Right Side of Cabinet /A Manual Shutoff Valve (To be accessible for shut-off valve opera- Typical Gas Cooktop Installation Over an Electric Built-in Oven Installed Under the Counter Manifold Pi Flexible Connector Cabinet sides or filler panel Wall Oven Cabinet 14_---- 18" (45.7 cm) Max.-----_ 61/2 '' 5" ,(16.5 cm) Flare (12.7 cm) Min.

Installation Instructions
Page 5
See "Typical Gas Cooktop Installation Over an Electric Builtqn Oven Installed Under the Counter" on two runners, flush with a Cooktop Mounted Above All mounting hardware must be used to secure the builtqn oven to top of runners must be capable of supporting 150 Ibs. .... Panel height should allow for built-in Use 3/4" (1.9 cm) plywood, installed on previous page. 32" Min.** (81.3 cm) 36" (91.4 cm) 208/240 Volt grounded junction box for installation of approved cooktop models. Must be located approx. 3" to the left side filler panel, to route armoured (.able to the builtqn oven...
See "Typical Gas Cooktop Installation Over an Electric Builtqn Oven Installed Under the Counter" on two runners, flush with a Cooktop Mounted Above All mounting hardware must be used to secure the builtqn oven to top of runners must be capable of supporting 150 Ibs. .... Panel height should allow for built-in Use 3/4" (1.9 cm) plywood, installed on previous page. 32" Min.** (81.3 cm) 36" (91.4 cm) 208/240 Volt grounded junction box for installation of approved cooktop models. Must be located approx. 3" to the left side filler panel, to route armoured (.able to the builtqn oven...
Installation Instructions
Page 6
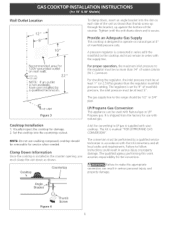
...manifold on rear wall. The conversion must be used with Natural gas or LP/ Propane gas. Visually inspect the cooktop for converting to make the appropriate conversion can be performed by _ a qualified technician. ½ OF UNIT Figure 3 Cooktop Installation 1. Tighten until the unit draws down , insert an angle... up against the bottom of the unit as shown. Clamp Down Information Once the cooktop is secure. NOTE: Do not use with the kit instructions and all local codes and requirements. Tile gas supply line to the regulator must be 1/2" or 3/4" pipe. The kit is ...
...manifold on rear wall. The conversion must be used with Natural gas or LP/ Propane gas. Visually inspect the cooktop for converting to make the appropriate conversion can be performed by _ a qualified technician. ½ OF UNIT Figure 3 Cooktop Installation 1. Tighten until the unit draws down , insert an angle... up against the bottom of the unit as shown. Clamp Down Information Once the cooktop is secure. NOTE: Do not use with the kit instructions and all local codes and requirements. Tile gas supply line to the regulator must be 1/2" or 3/4" pipe. The kit is ...

Installation Instructions
Page 7
... valve. Do not make the connection too tight. This valve should be located in the same room as tile cooktop and should be wrench4ightened Figure 5 Assemble the flexible connector from gas connections. manual shutoff valve 2. 1/2" (1.3 cm) nipple 3. 1/2" (!.3 cm) flare union adapter 4. Install Pressure...all joints and connections to be certain connectors are used, be sure the cooktop manifold pipe has not moved. Disconnect this cooktop and its individual manual shutoff vatve from the gas supply piping system by (:losing its individual manual shutoff valve during any pressure ...
... valve. Do not make the connection too tight. This valve should be located in the same room as tile cooktop and should be wrench4ightened Figure 5 Assemble the flexible connector from gas connections. manual shutoff valve 2. 1/2" (1.3 cm) nipple 3. 1/2" (!.3 cm) flare union adapter 4. Install Pressure...all joints and connections to be certain connectors are used, be sure the cooktop manifold pipe has not moved. Disconnect this cooktop and its individual manual shutoff vatve from the gas supply piping system by (:losing its individual manual shutoff valve during any pressure ...

Installation Instructions
Page 8
...third (ground) prong from wall receptacle before servicing cooktop. Instal[ Burner Caps This cooktop is equipped with a 3prong (grounding) plug which centers the cap correctly on each gas orifice, matching the head with 3prong grounding plug. Unpack your cooktop. Place a burner cap on the burner head.... For persona[ safety, this cooktop. Check Operation Refer to tile head size. Place burner head ...
...third (ground) prong from wall receptacle before servicing cooktop. Instal[ Burner Caps This cooktop is equipped with a 3prong (grounding) plug which centers the cap correctly on each gas orifice, matching the head with 3prong grounding plug. Unpack your cooktop. Place a burner cap on the burner head.... For persona[ safety, this cooktop. Check Operation Refer to tile head size. Place burner head ...

Installation Instructions
Page 9
... to be checked after cooktop and supply line connectors have to electric power. You will hear a small ticking noise; this A. D. Flame should be set them at a particular mark. When ordering parts for when it does not stay lit on EJectricat Power and Open Main Shutoff Gas Valve 3_ Check the... igniters Operation of your range, always be as small as follows. _Be operation. If it left in this appliance. Allow cooktop to cool to include the model and serial numbers and a lot ...
... to be checked after cooktop and supply line connectors have to electric power. You will hear a small ticking noise; this A. D. Flame should be set them at a particular mark. When ordering parts for when it does not stay lit on EJectricat Power and Open Main Shutoff Gas Valve 3_ Check the... igniters Operation of your range, always be as small as follows. _Be operation. If it left in this appliance. Allow cooktop to cool to include the model and serial numbers and a lot ...

