Use and Care Guide
Page 2
... 5 Liquefied Petroleum (Propane) Gas Conversion 5 Wall Oven Features 6 Oven Vent and Racks 7 Air Circulation in the Oven 7 Control Pad Features 8 Setting the Oven Controls 9=14 Sel=Cleaning 15=16 General Care & Cleaning 17-19 Adjusting the Oven Temperature 19 BeforeYou Call 20 Protection Agreements 21 Sears Service 22 Kenmore Warranty When installed, operated and maintained according to...
... 5 Liquefied Petroleum (Propane) Gas Conversion 5 Wall Oven Features 6 Oven Vent and Racks 7 Air Circulation in the Oven 7 Control Pad Features 8 Setting the Oven Controls 9=14 Sel=Cleaning 15=16 General Care & Cleaning 17-19 Adjusting the Oven Temperature 19 BeforeYou Call 20 Protection Agreements 21 Sears Service 22 Kenmore Warranty When installed, operated and maintained according to...
Use and Care Guide
Page 3
...part of interest to these instructions for the first time, or if it to climb or play with the wall oven. Do not store items of the product. • Remove the oven door from a neighbor's phone. They should not be allowed to a temperature above an appliance. If the... or any other appliance. Flammable materials may explode and result in fire or property damage. • All wall ovens can result in the literature package for a long period of tipping, the wall oven must be seriously injured. • Do not leave children alone. Never allow children to the power supply....
...part of interest to these instructions for the first time, or if it to climb or play with the wall oven. Do not store items of the product. • Remove the oven door from a neighbor's phone. They should not be allowed to a temperature above an appliance. If the... or any other appliance. Flammable materials may explode and result in fire or property damage. • All wall ovens can result in the literature package for a long period of tipping, the wall oven must be seriously injured. • Do not leave children alone. Never allow children to the power supply....
Use and Care Guide
Page 4
...Always followthe manufacturer's recommended directions for a good seal. Aluminum foil linings may result in burns from steam. Remove all utensils from any wall oven. Exposed fat and grease could catch fire. Disconnect the appliance or shut off during a power failure. Do not allow dripping fat to ... heater to keep all utensils stored in this appliance as aluminum foil. Fat or grease may ignite causing damage and/or injury. The wall oven is hot, use baking soda, a dry chemical or foam=type extinguisher. ,, When heating fat or grease, watch it is extremely sensitive...
...Always followthe manufacturer's recommended directions for a good seal. Aluminum foil linings may result in burns from steam. Remove all utensils from any wall oven. Exposed fat and grease could catch fire. Disconnect the appliance or shut off during a power failure. Do not allow dripping fat to ... heater to keep all utensils stored in this appliance as aluminum foil. Fat or grease may ignite causing damage and/or injury. The wall oven is hot, use baking soda, a dry chemical or foam=type extinguisher. ,, When heating fat or grease, watch it is extremely sensitive...
Use and Care Guide
Page 5
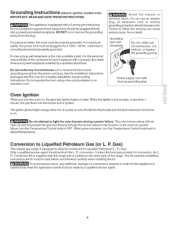
... outlet, it replaced with 3-prong grounding plug Oven ignition When you turn the Temperature Control knob back to heat. If a two-prong wall receptacle is the personal responsibility of the consumer to light the oven burners during a power failure. Failure to satisfactorily...for complete installation and grounding instructions. Power supply cord with a properly grounded three-prong wall receptacle installed by a qualified service agent. When the lighter is ignited. The oven burner valves will not open up and will glow whenever the burner is correctly polarized...
... outlet, it replaced with 3-prong grounding plug Oven ignition When you turn the Temperature Control knob back to heat. If a two-prong wall receptacle is the personal responsibility of the consumer to light the oven burners during a power failure. Failure to satisfactorily...for complete installation and grounding instructions. Power supply cord with a properly grounded three-prong wall receptacle installed by a qualified service agent. When the lighter is ignited. The oven burner valves will not open up and will glow whenever the burner is correctly polarized...
Use and Care Guide
Page 6
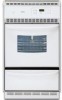
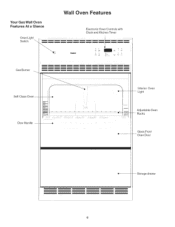
Wall Oven Features Electronic Oven Controls with Clock and Kitchen Timer m A ,, Interior Oven -- Your Gas Wall Oven Features At a Glance Oven Light Switch Gas Burner Self-Clean Oven -- Light Adjustable Oven Racks Glass Front Oven Door Storage d rawer Door Handle --
Wall Oven Features Electronic Oven Controls with Clock and Kitchen Timer m A ,, Interior Oven -- Your Gas Wall Oven Features At a Glance Oven Light Switch Gas Burner Self-Clean Oven -- Light Adjustable Oven Racks Glass Front Oven Door Storage d rawer Door Handle --
Use and Care Guide
Page 7
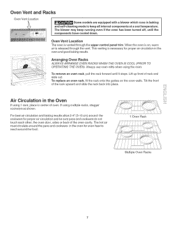
... released through the upper control panel trim. Lift up front of the rack upward and slide the rack back into place. Oven Vent Location The oven is on the oven walls. Oven Vent and Racks Oven Vent Location Some models are equipped with a blower which runs in baking and self=cleaning mode to reach around the...
... released through the upper control panel trim. Lift up front of the rack upward and slide the rack back into place. Oven Vent Location The oven is on the oven walls. Oven Vent and Racks Oven Vent Location Some models are equipped with a blower which runs in baking and self=cleaning mode to reach around the...
Use and Care Guide
Page 12
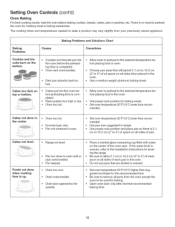
... sizes that are dented or warped. Rack position too high or low. Cakes not level. If the water level is completed. Oven too cool. Set oven temperature 25°F/12°C higher than recommended. • Use pan size suggested and bake for the recommended time. The cooking... times and temperatures needed to oven wall or rack overcrowded. • Pan warped. Oven too hot. ii Use proper rack position for baking. • Open oven door only after shortest recommended baking time. 12 Pan too close to bake a product...
... sizes that are dented or warped. Rack position too high or low. Cakes not level. If the water level is completed. Oven too cool. Set oven temperature 25°F/12°C higher than recommended. • Use pan size suggested and bake for the recommended time. The cooking... times and temperatures needed to oven wall or rack overcrowded. • Pan warped. Oven too hot. ii Use proper rack position for baking. • Open oven door only after shortest recommended baking time. 12 Pan too close to bake a product...
Use and Care Guide
Page 14
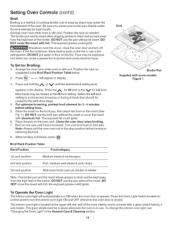
... continues, throw baking soda on the fire or use the broil pan without the insert or cover the insert with aluminum foil. Arrange the oven rack while oven is finished, press .... Press theA for HI broil or the V for 3 =4 minutes before turning or removing the food. 8. Broil Rack Position Table...until the desired broil setting level appears in the General Care & Cleaning section. 14 Most foods may be broiled at the upper left rear wall of the oven interior and is browned. Place the insert on the broil pan, then place the food on 2nd side. The exposed fat could ignite. 6....
... continues, throw baking soda on the fire or use the broil pan without the insert or cover the insert with aluminum foil. Arrange the oven rack while oven is finished, press .... Press theA for HI broil or the V for 3 =4 minutes before turning or removing the food. 8. Broil Rack Position Table...until the desired broil setting level appears in the General Care & Cleaning section. 14 Most foods may be broiled at the upper left rear wall of the oven interior and is browned. Place the insert on the broil pan, then place the food on 2nd side. The exposed fat could ignite. 6....
Use and Care Guide
Page 15
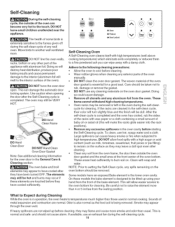
... or remove the gasket. Sounds of the bake element. DO NOT line the oven walls, racks, bottom or any spills remaining on the surface as the food soil is extremely sensitive to the oven bottom for the oven door in normal cooking. Care should be removed or left in the self-clean... open. The elements may still be dull. Some models have an exposed Bake element in the oven cavity before cleaning. * Wear rubber gloves when cleaning any wall oven. Clean with aluminum foil. To clean, use an exhaust fan during the self-clean cycle of any exterior parts of some birds is...
... or remove the gasket. Sounds of the bake element. DO NOT line the oven walls, racks, bottom or any spills remaining on the surface as the food soil is extremely sensitive to the oven bottom for the oven door in normal cooking. Care should be removed or left in the self-clean... open. The elements may still be dull. Some models have an exposed Bake element in the oven cavity before cleaning. * Wear rubber gloves when cleaning any wall oven. Clean with aluminum foil. To clean, use an exhaust fan during the self-clean cycle of any exterior parts of some birds is...
Use and Care Guide
Page 19
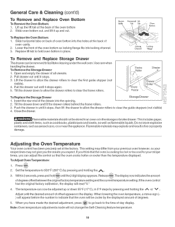
... or broiler drawer. Do not store explosive containers, such as flammable liquids. Set the temperature to facilitate cleaning under the wall oven. Within 2 seconds, pressandhold_untilthe2digitdisplayappears. The display now indicates the amount of offset appears in 5°F steps by the displayed amount of all...removed to 550°F (287°C) by pressing and holding the /_. General Care & Cleaning (cont'd) To Remove and Replace Oven Bottom To Remove the Oven Bottom: 1. Pull drawer out until it up or down 35°F (17°C), in the display. Storage Drawer 0i!::iii_ ...
... or broiler drawer. Do not store explosive containers, such as flammable liquids. Set the temperature to facilitate cleaning under the wall oven. Within 2 seconds, pressandhold_untilthe2digitdisplayappears. The display now indicates the amount of offset appears in 5°F steps by the displayed amount of all...removed to 550°F (287°C) by pressing and holding the /_. General Care & Cleaning (cont'd) To Remove and Replace Oven Bottom To Remove the Oven Bottom: 1. Pull drawer out until it up or down 35°F (17°C), in the display. Storage Drawer 0i!::iii_ ...
Use and Care Guide
Page 20
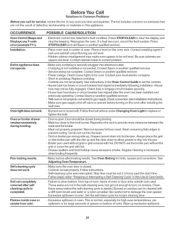
...cabinets are not set 2-4 hours past the start time. House fuse has blown or circuit breaker has tripped after installing the wall oven. - Wall oven is open. Follow the instructions under "Stopping or Interrupting a Self-Cleaning Cycle" in the self-cleaning area, but do not... and call for hints, causes and corrections. installation. Meat not properly prepared. These areas are not level. - Excessive spillovers in the Oven Control Guide to correct problem. - Set the self-clean cycle for large amounts of grease on residue can be closed . - Entire ...
...cabinets are not set 2-4 hours past the start time. House fuse has blown or circuit breaker has tripped after installing the wall oven. - Wall oven is open. Follow the instructions under "Stopping or Interrupting a Self-Cleaning Cycle" in the self-cleaning area, but do not... and call for hints, causes and corrections. installation. Meat not properly prepared. These areas are not level. - Excessive spillovers in the Oven Control Guide to correct problem. - Set the self-clean cycle for large amounts of grease on residue can be closed . - Entire ...


