Owners Manual
Page 2
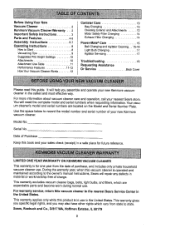
...guide. Before UsingYour New Vacuum Cleaner 2 Kenmore Vacuum Cleaner Warranty Important Safety Instructions ......... For more information about vacuum cleaner care and operation, call your new Kenrnore vacuum cleaner. Model No. During the warranty year, when this vacuum cleaner is operated and maintained...Height Settings ........ 10 Attachments 10 Attachment Use Table 11 Performance Features 11-12 How Your Vacuum Cleaner Works ....... 12 Canister Care 13 Bag Changing 13 Cleaning Exterior and Attachments ..... 13 Motor Safety Filter Changing .......... ...
...guide. Before UsingYour New Vacuum Cleaner 2 Kenmore Vacuum Cleaner Warranty Important Safety Instructions ......... For more information about vacuum cleaner care and operation, call your new Kenrnore vacuum cleaner. Model No. During the warranty year, when this vacuum cleaner is operated and maintained...Height Settings ........ 10 Attachments 10 Attachment Use Table 11 Performance Features 11-12 How Your Vacuum Cleaner Works ....... 12 Canister Care 13 Bag Changing 13 Cleaning Exterior and Attachments ..... 13 Motor Safety Filter Changing .......... ...
Owners Manual
Page 3
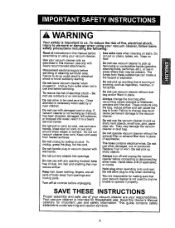
...parts of dust, lint, hair and anything that is burning or smoking, such as cigarettes, matches, or hot ashes. You are your vacuum c eaner, follow basic safety precautions including the follow, ng: Read all instructions in electrical shock or brush suddenly starting. SAVE THESE ... on wet surfaces. Keep hair, loose clothing, fingers, and all controls before unplugging. Do not allow to pick up anything that your vacuum cteaner are responsible for important use with damaged cord or plug. This guide contains safety statements under warning and caution symbols. 3 &, WARNING...
...parts of dust, lint, hair and anything that is burning or smoking, such as cigarettes, matches, or hot ashes. You are your vacuum c eaner, follow basic safety precautions including the follow, ng: Read all instructions in electrical shock or brush suddenly starting. SAVE THESE ... on wet surfaces. Keep hair, loose clothing, fingers, and all controls before unplugging. Do not allow to pick up anything that your vacuum cteaner are responsible for important use with damaged cord or plug. This guide contains safety statements under warning and caution symbols. 3 &, WARNING...
Owners Manual
Page 4
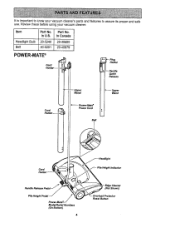
In Canada 20-40600 20-40979 POWER-MATE® Cord _ or "-- Power Cord Belt f Cord Pile Height PedaJP°wer'Mate / Model/Serial Numbers (On Bottom) 4 (Not Shown) =rotector Reset Button It is important to assure its proper and safe use. In U.S. 20-5240 20-5201 Part No. Review these before using your vacuum cleaner's parts and features to know your vacuum cleaner. Item Headlight Bulb Belt Part No. Handle Quick Release Wand Upper Wand Cord Holder-- ,.
In Canada 20-40600 20-40979 POWER-MATE® Cord _ or "-- Power Cord Belt f Cord Pile Height PedaJP°wer'Mate / Model/Serial Numbers (On Bottom) 4 (Not Shown) =rotector Reset Button It is important to assure its proper and safe use. In U.S. 20-5240 20-5201 Part No. Review these before using your vacuum cleaner's parts and features to know your vacuum cleaner. Item Headlight Bulb Belt Part No. Handle Quick Release Wand Upper Wand Cord Holder-- ,.
Owners Manual
Page 6
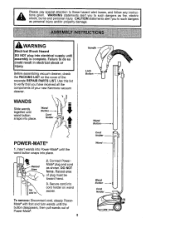
... DO NOT plug into place. Use this list to do so could result in electrical shock or injury, Before assembling vacuum cleaner, check the PACKING LIST on the cover of your new Kenmore vacuum cleaner. WANDS Slide wands together until wand button snaps into electrical supply until the button disappears, then pull wands...
... DO NOT plug into place. Use this list to do so could result in electrical shock or injury, Before assembling vacuum cleaner, check the PACKING LIST on the cover of your new Kenmore vacuum cleaner. WANDS Slide wands together until wand button snaps into electrical supply until the button disappears, then pull wands...

Owners Manual
Page 8
... leave the Power-Mate" running in one way. Attention: Refer to install the proper outlet. Toturn vacuum cleaner on, step on the ON/OFF switch. 7, To turn on the rear of canister to prevent personal injury. If it to items in surrounding area could result. Pull cord out of ...from cord to retract. Some more delicate carpets may occur. 5. NOTE: To reduce the risk of time. Damage to carpet may require that they be vacuumed with the Power-Mate ® agitator turned off, to prevent damage or injury from grip. I FLOOR I CARPE" Hold the plug while rewinding to...
... leave the Power-Mate" running in one way. Attention: Refer to install the proper outlet. Toturn vacuum cleaner on, step on the ON/OFF switch. 7, To turn on the rear of canister to prevent personal injury. If it to items in surrounding area could result. Pull cord out of ...from cord to retract. Some more delicate carpets may occur. 5. NOTE: To reduce the risk of time. Damage to carpet may require that they be vacuumed with the Power-Mate ® agitator turned off, to prevent damage or injury from grip. I FLOOR I CARPE" Hold the plug while rewinding to...
Owners Manual
Page 9
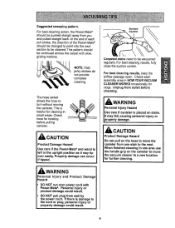
...twisting before checking. Check hose for cleaning in HOWYOURVACUUM CLEANER WORKS occasionally for further cleaning. Suction Control Carpeted stairs need to turn without moving the canister. Check each pull stroke, the direction of the Power-Mate ® should be continued across the carpet with Power-Mate ®. NOTE:... should be pushed straight away from one area use the handle grip on the hose to move the vacuum cleaner to the next. The hose swivel allows the hose to be vacuumed regularly. Unplug from wall by the power cord. If there is left in one stair to a...
...twisting before checking. Check hose for cleaning in HOWYOURVACUUM CLEANER WORKS occasionally for further cleaning. Suction Control Carpeted stairs need to turn without moving the canister. Check each pull stroke, the direction of the Power-Mate ® should be continued across the carpet with Power-Mate ®. NOTE:... should be pushed straight away from one area use the handle grip on the hose to move the vacuum cleaner to the next. The hose swivel allows the hose to be vacuumed regularly. Unplug from wall by the power cord. If there is left in one stair to a...
Owners Manual
Page 10
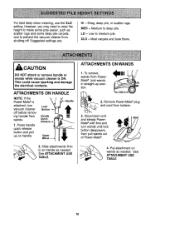
...If the Power-Mate ® is ON. ATTACHMENTS ON WANDS • it 1. LO - CAUTION DO NOT attach or remove handle or wands while vacuum cleaner is attached, turn wands until lock i button disappears, then pull wands out of Power-Mate ®. 4. See ATTACHMENT USE TABLE. 10 ...cord and steady Power- MED - Low to deep pile. This could cause sparking and damage the electrical contacts. Mate ®with foot and turn vacuum cleaner off . ing handle from Power- Slide attachments firm- Quick Release--_ 1. See ATTACHMENT USE TABLE. For best deep down cleaning, use the...
...If the Power-Mate ® is ON. ATTACHMENTS ON WANDS • it 1. LO - CAUTION DO NOT attach or remove handle or wands while vacuum cleaner is attached, turn wands until lock i button disappears, then pull wands out of Power-Mate ®. 4. See ATTACHMENT USE TABLE. 10 ...cord and steady Power- MED - Low to deep pile. This could cause sparking and damage the electrical contacts. Mate ®with foot and turn vacuum cleaner off . ing handle from Power- Slide attachments firm- Quick Release--_ 1. See ATTACHMENT USE TABLE. For best deep down cleaning, use the...
Owners Manual
Page 11
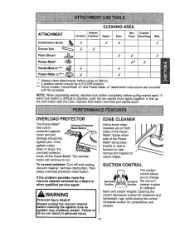
... depress lock button completely before using on both sides of the PowerMate ®along baseboards or next to furniture to change the vacuum Suction Suction cleaner suction for upholsteries and carpets. 11 SUCTION CONTROL The suction control allows you to help remove dirt trapped at ...Mate ® has built-in Overload Protector protection against motor and belt damage should be in FLOOR position. *** Some models; The canister motor will continue to line up the lock button with the products. Opening the control decreases suction for draperies and lightweight rugs, while ...
... depress lock button completely before using on both sides of the PowerMate ®along baseboards or next to furniture to change the vacuum Suction Suction cleaner suction for upholsteries and carpets. 11 SUCTION CONTROL The suction control allows you to help remove dirt trapped at ...Mate ® has built-in Overload Protector protection against motor and belt damage should be in FLOOR position. *** Some models; The canister motor will continue to line up the lock button with the products. Opening the control decreases suction for draperies and lightweight rugs, while ...
Owners Manual
Page 12
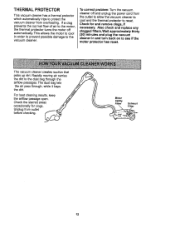
... back on to reset. Check the starred areas occasionally for and remove clogs, if necessary. If a clog prevents the normal flow of air to the vacuum cleaner. Rapidly moving air carries the dirt to the dust bag through , while it traps t i,_" /// the dirt. _/ / For best cleaning results,...lets the air pass through the airflow passages. To correct problem: Turn the vacuum cleaner off automatically. Also check and replace any clogged filters.Wait approximately thirty (30) minutes and plug the vacuum cleaner in order to prevent possible damage to the motor, the thermal protector turns...
... back on to reset. Check the starred areas occasionally for and remove clogs, if necessary. If a clog prevents the normal flow of air to the vacuum cleaner. Rapidly moving air carries the dirt to the dust bag through , while it traps t i,_" /// the dirt. _/ / For best cleaning results,...lets the air pass through the airflow passages. To correct problem: Turn the vacuum cleaner off automatically. Also check and replace any clogged filters.Wait approximately thirty (30) minutes and plug the vacuum cleaner in order to prevent possible damage to the motor, the thermal protector turns...
Owners Manual
Page 13
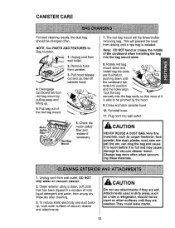
...materials, such as under a refrigerator, should be pinched by pulling away and lifting up , then lift canister hood. 4. Wipe dry after removing bag. Attachments used on vacuum cleaner. 2. CANISTER CARE For best cleaning results, the dust bag should not be used in a solution of mild liquid ...cord from wall outlet. 2. NOTE: See PARTS AND FEATURES for Bag Number. 1. Close and latch canister hood. 10. Pull hood release out and up . 5. Change bag more often when vacuuming these materials. 1. Clean exterior using a clean, soft cloth that none of the cardboard when installing ...
...materials, such as under a refrigerator, should be pinched by pulling away and lifting up , then lift canister hood. 4. Wipe dry after removing bag. Attachments used on vacuum cleaner. 2. CANISTER CARE For best cleaning results, the dust bag should not be used in a solution of mild liquid ...cord from wall outlet. 2. NOTE: See PARTS AND FEATURES for Bag Number. 1. Close and latch canister hood. 10. Pull hood release out and up . 5. Change bag more often when vacuuming these materials. 1. Clean exterior using a clean, soft cloth that none of the cardboard when installing ...
Owners Manual
Page 14
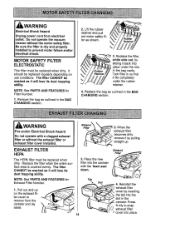
Do not operate the vacuum cleaner without the motor safety filter. NOTE: See PARTS AND FEATURES for Exhaust Filter...Tuck filter in so that it should be replaced when dirty, it fits completely under the ribs in the canister. Place the new filter into place under the rubber retainer. 4. Press firmly to prevent motor failure and/or... electrical shock. IbWARNING Electrical Shock Hazard Unplug power cord from the canister and lay aside. 3. Replace the filter when the entire surface area is dry and properly installed to snap _ ...
Do not operate the vacuum cleaner without the motor safety filter. NOTE: See PARTS AND FEATURES for Exhaust Filter...Tuck filter in so that it should be replaced when dirty, it fits completely under the ribs in the canister. Place the new filter into place under the rubber retainer. 4. Press firmly to prevent motor failure and/or... electrical shock. IbWARNING Electrical Shock Hazard Unplug power cord from the canister and lay aside. 3. Replace the filter when the entire surface area is dry and properly installed to snap _ ...
Owners Manual
Page 15
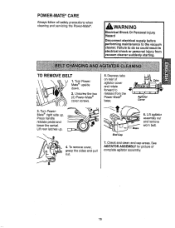
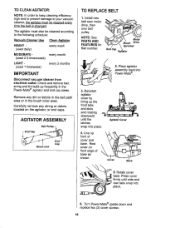
Lift rear latches up . See AGITATOR ASSEMBLY for picture of agitator cover and rotate forward to release from vacuum cleaner suddenly starting. WARNING I Electrical Shock Or Personal Injury Hazard Disconnect electrical supply before performing maintenance to do so could ...Lift agitator assembly out and remove worn belt. Check and clean end cap areas. Press handle release pedal and lower the swivel. Failure to the vacuum cleaner. Tabs Agitator Cover 6. POWER-MATE ®CARE Always follow all safety precautions when cleaning and servicing the Power-Mate ®. TO REMOVE BELT...
Lift rear latches up . See AGITATOR ASSEMBLY for picture of agitator cover and rotate forward to release from vacuum cleaner suddenly starting. WARNING I Electrical Shock Or Personal Injury Hazard Disconnect electrical supply before performing maintenance to do so could ...Lift agitator assembly out and remove worn belt. Check and clean end cap areas. Press handle release pedal and lower the swivel. Failure to the vacuum cleaner. Tabs Agitator Cover 6. POWER-MATE ®CARE Always follow all safety precautions when cleaning and servicing the Power-Mate ®. TO REMOVE BELT...
Owners Manual
Page 16
...place. 6. Reinstall agitator cover by lining up frequently in the brush roller area. The agitator must be cleaned according to the following schedule: Vacuum Cleaner Use Clean Aaitator HEAVY (used daily) every week MODERATE (used 2-3 times/week) every month LIGHT (used 1 time/week) every 2 months IMPORTANT... from electrical outlet. TO CLEAN AGITATOR: NOTE: In order to keep cleaning efficiency high and to prevent damage to your vacuum cleaner, the agitator must also be cleaned every time the belt is chanqed. Rest ,,Lineup cfroovnetr eodnge of cover and base. ...
...place. 6. Reinstall agitator cover by lining up frequently in the brush roller area. The agitator must be cleaned according to the following schedule: Vacuum Cleaner Use Clean Aaitator HEAVY (used daily) every week MODERATE (used 2-3 times/week) every month LIGHT (used 1 time/week) every 2 months IMPORTANT... from electrical outlet. TO CLEAN AGITATOR: NOTE: In order to keep cleaning efficiency high and to prevent damage to your vacuum cleaner, the agitator must also be cleaned every time the belt is chanqed. Rest ,,Lineup cfroovnetr eodnge of cover and base. ...
Owners Manual
Page 17
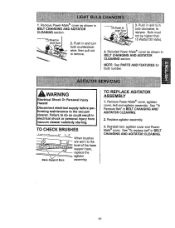
...than 15 Watts(130 Volts). 4. See "To replace belt" in and turn I 3. pull out _Pushlnl-And Turn I bulb clockwise, to the vacuum cleaner. Push in and turn bulb counterclock- Reinstall Power-Mate ® cover as shown in BELT CHANGING AND AGITATOR CLEANING. 2. Failure to do ...CLEANING section. Replace agitator assembly. 3. Push In And Turn 2. Remove Power-Mate ® cover as shown in electrical shock or personal injury from vacuum cleaner suddenly starting, i i TO CHECK BRUSHES ._r l__.are When brushes worn to the level of the base support bars, TO REPLACE AGITATOR...
...than 15 Watts(130 Volts). 4. See "To replace belt" in and turn I 3. pull out _Pushlnl-And Turn I bulb clockwise, to the vacuum cleaner. Push in and turn bulb counterclock- Reinstall Power-Mate ® cover as shown in BELT CHANGING AND AGITATOR CLEANING. 2. Failure to do ...CLEANING section. Replace agitator assembly. 3. Push In And Turn 2. Remove Power-Mate ® cover as shown in electrical shock or personal injury from vacuum cleaner suddenly starting, i i TO CHECK BRUSHES ._r l__.are When brushes worn to the level of the base support bars, TO REPLACE AGITATOR...
Owners Manual
Page 18
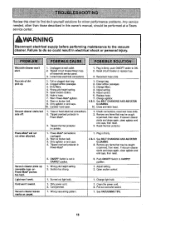
Plug in canister. 1. Adjust setting. 5. Adjust control. 6. Vacuum cleaner starts but cuts off, 1. Tripped thermalprotector in firmly, push ON/OFFswitch to ON. 2. Check connectionsr,econnecthose ends. 2. ...-Mate"agitator. 8. Adjust setting. 2. Light won't work, Cord won 't start. 1. Wrongvacuumingpattern. 1. Canister hood open. 1, Change bag. 2, Clear airflow passages. 3. Reset thermal protector. Power-Mate"wig not run when attached. 1. Vacuum cleaner picks up , 1. Change light bulb. 1. Dirty filters. 4. Removeanyitemsthatmay be caught or jammed,then ...
Plug in canister. 1. Adjust setting. 5. Adjust control. 6. Vacuum cleaner starts but cuts off, 1. Tripped thermalprotector in firmly, push ON/OFFswitch to ON. 2. Check connectionsr,econnecthose ends. 2. ...-Mate"agitator. 8. Adjust setting. 2. Light won't work, Cord won 't start. 1. Wrongvacuumingpattern. 1. Canister hood open. 1, Change bag. 2, Clear airflow passages. 3. Reset thermal protector. Power-Mate"wig not run when attached. 1. Vacuum cleaner picks up , 1. Change light bulb. 1. Dirty filters. 4. Removeanyitemsthatmay be caught or jammed,then ...

Owners Manual
Page 36
For repair - of home appliances and items like vacuums, lawn equipment, and electronics, call or go on-line for the nearest Sears Parts and Repair Center. 1-800-488-1222 Anytime, day or night (U,S.A, only) ...
For repair - of home appliances and items like vacuums, lawn equipment, and electronics, call or go on-line for the nearest Sears Parts and Repair Center. 1-800-488-1222 Anytime, day or night (U,S.A, only) ...


