Use and Care Guide
Page 1
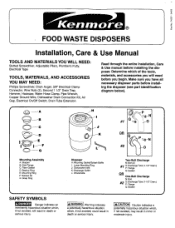
... will need before installing the disposer. f ® FOOD WASTE DISPOSERS Installation, Care & Use Manual TOOLS AND MATERIALS YOU WILL NEED: Slotted Screwdriver, Adjustable Pliers, Plumber's Putty, Electrical Tape TOOLS, MATERIALS, AND ACCESSORIES YOU MAY NEED: Phillips Screwdriver, Drain Auger, 3/8" Electrical Clamp Connector, Wire Nuts (2), Second 1 1/2" Drain Trap, Hammer, Hacksaw, Water Hose Clamp, Pipe Wrench, Copper Ground Wire, Dishwasher Drain Connection Kit, Air Gap, Electrical On/Off Switch, Drain Tube Extension Read through the entire Installation, Care & Use manual before you...
... will need before installing the disposer. f ® FOOD WASTE DISPOSERS Installation, Care & Use Manual TOOLS AND MATERIALS YOU WILL NEED: Slotted Screwdriver, Adjustable Pliers, Plumber's Putty, Electrical Tape TOOLS, MATERIALS, AND ACCESSORIES YOU MAY NEED: Phillips Screwdriver, Drain Auger, 3/8" Electrical Clamp Connector, Wire Nuts (2), Second 1 1/2" Drain Trap, Hammer, Hacksaw, Water Hose Clamp, Pipe Wrench, Copper Ground Wire, Dishwasher Drain Connection Kit, Air Gap, Electrical On/Off Switch, Drain Tube Extension Read through the entire Installation, Care & Use manual before you...

Use and Care Guide
Page 2
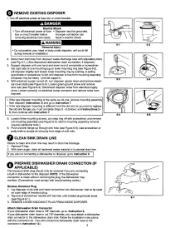
...sink flange. 2. Holding fiber gasket and backup ring in sink to prevent scratching.) Reference Figure 5-1 for part identification. 1. If this is used.) C: Distance from centerline of the discharge outlet to end of discharge tube. Loosen nut (A) at base of sink flange. (If nut is installed.) I sfkyipouahaeraedretpolaIcnisntgrucationnexis7t.ing disposer, go to Instruction 6. Roll 1/4 pound (4 oz.) of any putty or other hand, turn mounting assembly counterclockwise to remove mounting assembly from lower mounting ring. 2, Turn mounting assembly over sink flange. 2. Press sink...
...sink flange. 2. Holding fiber gasket and backup ring in sink to prevent scratching.) Reference Figure 5-1 for part identification. 1. If this is used.) C: Distance from centerline of the discharge outlet to end of discharge tube. Loosen nut (A) at base of sink flange. (If nut is installed.) I sfkyipouahaeraedretpolaIcnisntgrucationnexis7t.ing disposer, go to Instruction 6. Roll 1/4 pound (4 oz.) of any putty or other hand, turn mounting assembly counterclockwise to remove mounting assembly from lower mounting ring. 2, Turn mounting assembly over sink flange. 2. Press sink...
Use and Care Guide
Page 3
... new disposer mounting is 7/8" diameter, go to Instruction 9. 1 J O PARPEPPLIACRAEBLED)ISHWASHER DRAIN CONNECTION (IF The knockout drain plug should only be heavy - Attach Dishwasher Drain Connector If your dishwasher drain hose is different from the old one hand and insert end of wrenchette or screwdriver into dishwasher inlet so tip rests on outer edge of one , remove mounting assembly I the old sink flange) you must complete Steps 5 - 6 (below), and Instructions 2 - | 5, then continue with local plumbing codes.) Remove Knockout Plug 1. Support disposer...
... new disposer mounting is 7/8" diameter, go to Instruction 9. 1 J O PARPEPPLIACRAEBLED)ISHWASHER DRAIN CONNECTION (IF The knockout drain plug should only be heavy - Attach Dishwasher Drain Connector If your dishwasher drain hose is different from the old one hand and insert end of wrenchette or screwdriver into dishwasher inlet so tip rests on outer edge of one , remove mounting assembly I the old sink flange) you must complete Steps 5 - 6 (below), and Instructions 2 - | 5, then continue with local plumbing codes.) Remove Knockout Plug 1. Support disposer...
Use and Care Guide
Page 4
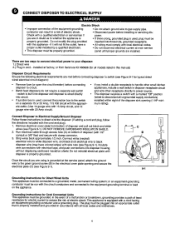
... to handle other small kitchen appliances, include a wall switch in disposer receptacle circuit and wire other receptacle directly to power source. • This disposer requires a switch with electrical tape, and push connections into circuit. installed at the service panel, attach the ground wire to the green ground screw (B) in the electrical cover plate opening (1 HP minimum rating). Batch feed disposers do not require a separate wall switch - or an equipment-greunding...
... to handle other small kitchen appliances, include a wall switch in disposer receptacle circuit and wire other receptacle directly to power source. • This disposer requires a switch with electrical tape, and push connections into circuit. installed at the service panel, attach the ground wire to the green ground screw (B) in the electrical cover plate opening (1 HP minimum rating). Batch feed disposers do not require a separate wall switch - or an equipment-greunding...
Use and Care Guide
Page 5
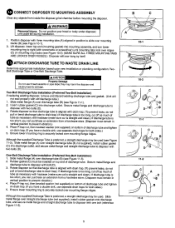
... discharge tube (B, not supplied), install rubber gasket (C) into discharge outlet. cut off as much of discharge tube and tighten on drain trap. (If you have a double sink, use thread sealants or pipe dope; O CONNECT DISPOSERTO MOUNTING ASSEMBLY Clear any objects from a hardware store. (Disposer must remain in vertical position to prevent vibration.) 4. One-Bolt Discharge Tube Installation (Preferred One-Bolt Installation) 1, Slide metal flange (A) over discharge tube (B) (see Figure 10-1). 2. Ensure lower mounting ring...
... discharge tube (B, not supplied), install rubber gasket (C) into discharge outlet. cut off as much of discharge tube and tighten on drain trap. (If you have a double sink, use thread sealants or pipe dope; O CONNECT DISPOSERTO MOUNTING ASSEMBLY Clear any objects from a hardware store. (Disposer must remain in vertical position to prevent vibration.) 4. One-Bolt Discharge Tube Installation (Preferred One-Bolt Installation) 1, Slide metal flange (A) over discharge tube (B) (see Figure 10-1). 2. Ensure lower mounting ring...
Use and Care Guide
Page 6
... have already attached a dishwasher drain connector to your dishwasher drain hose (for drain hose other hot liquids. Using the stopper, fill the sink with local plumbing codes. O, CONNECT DISHWASHER DRAIN (IF APPLICABLE) Connect the dishwasher to the disposer through an air gap (A). (Most dishwasher manufacturers recommend that the discharge water runs through an air gap to prevent backflow and/or dishwasher contamination.) Ensure knockout plug is rated for dishwasher use.) If you are using electric appliances, basic precautions...
... have already attached a dishwasher drain connector to your dishwasher drain hose (for drain hose other hot liquids. Using the stopper, fill the sink with local plumbing codes. O, CONNECT DISHWASHER DRAIN (IF APPLICABLE) Connect the dishwasher to the disposer through an air gap (A). (Most dishwasher manufacturers recommend that the discharge water runs through an air gap to prevent backflow and/or dishwasher contamination.) Ensure knockout plug is rated for dishwasher use.) If you are using electric appliances, basic precautions...
Use and Care Guide
Page 7
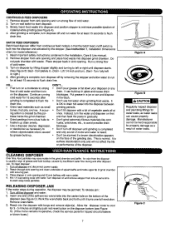
... disposer, 3. CONTINUOUS FEED DISPOSERS 1. A scouring action is usuallya signof grease andfoodbuildup, caused byinsufficienwt aterflow duringandafterdisposer use hot water when grinding food waste. An odorfrom the disposer is created by the particles inside the grind chamber. • Grind peelings from sink opening and place food waste into disposer and position stopper to flush drain Fine. Turnoff disposer and disconnectpowersupply. 2. To release jam: 1. Figure C BATCH FEED DISPOSERS Batch feed disposer differ from sink opening . Do not pack chamber with tongs and remove...
... disposer, 3. CONTINUOUS FEED DISPOSERS 1. A scouring action is usuallya signof grease andfoodbuildup, caused byinsufficienwt aterflow duringandafterdisposer use hot water when grinding food waste. An odorfrom the disposer is created by the particles inside the grind chamber. • Grind peelings from sink opening and place food waste into disposer and position stopper to flush drain Fine. Turnoff disposer and disconnectpowersupply. 2. To release jam: 1. Figure C BATCH FEED DISPOSERS Batch feed disposer differ from sink opening . Do not pack chamber with tongs and remove...

Use and Care Guide
Page 8
... To call for repair service: Call 24 hours a day, 7 days a week 1-800-4-MY-HOME ° (1-800-469-4663) SEARS This warranty applies only while this product is in use in the United States. WARRANTY SERVICE IS AVAILABLE BY SIMPLY CONTACTING THE NEAREST SEARS SERVICE CENTER/DEPARTMENT IN THE UNITED STATES. KENMORE FOOD WASTE DISPOSER WARRANTY Model Model Model Model Model Model Model Model 6010_ One Year Full Warranty 6011_ One Year Full Warranty 6012 _, One...
... To call for repair service: Call 24 hours a day, 7 days a week 1-800-4-MY-HOME ° (1-800-469-4663) SEARS This warranty applies only while this product is in use in the United States. WARRANTY SERVICE IS AVAILABLE BY SIMPLY CONTACTING THE NEAREST SEARS SERVICE CENTER/DEPARTMENT IN THE UNITED STATES. KENMORE FOOD WASTE DISPOSER WARRANTY Model Model Model Model Model Model Model Model 6010_ One Year Full Warranty 6011_ One Year Full Warranty 6012 _, One...


