Owners Manual
Page 2
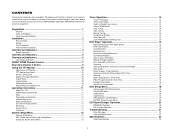
......2 Final ISO-DIN Installation 2 Controls and Indicators 4 Button Operation ...4 Controls and Indicators 5 Controls and Indicators 6 LCD Display/Indicators 6 FRONT ZONE Remote Control 7 Rear Zone Remote COntrol 9 Using the TFT Monitor 10 Open/Close TFT Monitor 10 TFT Monitor Auto Open 10 Reverse Driving Use 10 Monitor Tilt Angle Adjustment 10 Aspect Ratio...14 Tuner LCD Display...14 Switch to follow. If you take a few minutes to look through it, you'll learn how to use all the features of your new Jensen VM9410 Mobile Multimedia AM/FM/DVD Receiver for choosing a Jensen product. ...
......2 Final ISO-DIN Installation 2 Controls and Indicators 4 Button Operation ...4 Controls and Indicators 5 Controls and Indicators 6 LCD Display/Indicators 6 FRONT ZONE Remote Control 7 Rear Zone Remote COntrol 9 Using the TFT Monitor 10 Open/Close TFT Monitor 10 TFT Monitor Auto Open 10 Reverse Driving Use 10 Monitor Tilt Angle Adjustment 10 Aspect Ratio...14 Tuner LCD Display...14 Switch to follow. If you take a few minutes to look through it, you'll learn how to use all the features of your new Jensen VM9410 Mobile Multimedia AM/FM/DVD Receiver for choosing a Jensen product. ...
Owners Manual
Page 3
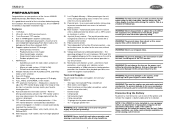
... push, pull or swivel the monitor manually. NOTE: If the VM9410 is ceased automatically to be lost. Two independent full function IR remote controls - mechanical anti- vibration system accompanied...LCD display. 11. Dual LCD Display. 10. TFT automatic mechanism - Simply press a button to a12-volt power supply with a clickable center control. 21. Reverse driving automatically activates the TFT monitor and the rear view video camera; When powering on the power cord without the assistance of the Jensen VM9410 Mobile Multimedia AM/FM/DVD Receiver. Rotary volume control...
... push, pull or swivel the monitor manually. NOTE: If the VM9410 is ceased automatically to be lost. Two independent full function IR remote controls - mechanical anti- vibration system accompanied...LCD display. 11. Dual LCD Display. 10. TFT automatic mechanism - Simply press a button to a12-volt power supply with a clickable center control. 21. Reverse driving automatically activates the TFT monitor and the rear view video camera; When powering on the power cord without the assistance of the Jensen VM9410 Mobile Multimedia AM/FM/DVD Receiver. Rotary volume control...
Owners Manual
Page 7
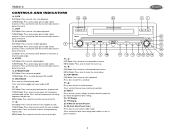
... once to start a playback. PLAY/ENTER DVD Mode: Press once to auto search for the previous available radio station. TFT Display 25. Press once to store the current radio station in preset channel 6. 14. LCD Display 24. IR Remote Control Receiver 26. Press and hold to select ...playing mode. Press and hold to store the current radio station in the six preset channels. 5 MENU Mode: Press once to increase tuning frequency step by step. VM9410 CONTROLS AND INDICATORS 10. 3/SCN DVD Mode:...
... once to start a playback. PLAY/ENTER DVD Mode: Press once to auto search for the previous available radio station. TFT Display 25. Press once to store the current radio station in preset channel 6. 14. LCD Display 24. IR Remote Control Receiver 26. Press and hold to select ...playing mode. Press and hold to store the current radio station in the six preset channels. 5 MENU Mode: Press once to increase tuning frequency step by step. VM9410 CONTROLS AND INDICATORS 10. 3/SCN DVD Mode:...
Owners Manual
Page 9
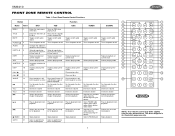
VM9410 FRONT ZONE REMOTE CONTROL Table 1: Front Zone Remote Control Functions Button Function Name MENU TITLE MUTE POWER/ AUDIO REPT A-B REPT SRC SUBTITLE DISP DISC DISC ANGLE VOL VOL + BAND GOTO Ref # DVD VCD CDC TUNER 1 Enters the main menu Turns on PBC when of the disc playing VCD 2 Enters the title menu of Plays ... 28 26 25 27 11 15 12 16 14 34 20 33 18 19 17 32 22 23 21 24 30 29 31 NOTE: Your remote control may differ slightly from time frame A to time frame B to specific time frame and playback frame and playback CD/MP3 Toggles on/off audio ...
VM9410 FRONT ZONE REMOTE CONTROL Table 1: Front Zone Remote Control Functions Button Function Name MENU TITLE MUTE POWER/ AUDIO REPT A-B REPT SRC SUBTITLE DISP DISC DISC ANGLE VOL VOL + BAND GOTO Ref # DVD VCD CDC TUNER 1 Enters the main menu Turns on PBC when of the disc playing VCD 2 Enters the title menu of Plays ... 28 26 25 27 11 15 12 16 14 34 20 33 18 19 17 32 22 23 21 24 30 29 31 NOTE: Your remote control may differ slightly from time frame A to time frame B to specific time frame and playback frame and playback CD/MP3 Toggles on/off audio ...
Owners Manual
Page 10
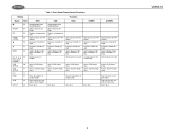
Table 1: Front Zone Remote Control Functions Button Function Name Ref # DVD VCD CDC TUNER CD/MP3 22 ZOOM 23 PIC 24 OPEN/ 25 CLOSE 26 27 WIDE 28 0, 1, 2, 3, 4, 29 5, 6, 7, 8, 9, 0 (Numeric Keypad) DVD 30 SETUP SYS 31 SETUP SEL 32 RDM... set-up parameters Opens/Closes the TFT monitor Decreases monitor tilt angle Increases monitor tilt angle Selects display mode: WIDE, NORMAL, or FULL Opens/Closes the TFT monitor Decreases monitor tilt angle Increases monitor tilt angle Selects display mode: WIDE, NORMAL...Plays the first ten seconds of each track Ejects disc VM9410 8
Table 1: Front Zone Remote Control Functions Button Function Name Ref # DVD VCD CDC TUNER CD/MP3 22 ZOOM 23 PIC 24 OPEN/ 25 CLOSE 26 27 WIDE 28 0, 1, 2, 3, 4, 29 5, 6, 7, 8, 9, 0 (Numeric Keypad) DVD 30 SETUP SYS 31 SETUP SEL 32 RDM... set-up parameters Opens/Closes the TFT monitor Decreases monitor tilt angle Increases monitor tilt angle Selects display mode: WIDE, NORMAL, or FULL Opens/Closes the TFT monitor Decreases monitor tilt angle Increases monitor tilt angle Selects display mode: WIDE, NORMAL...Plays the first ten seconds of each track Ejects disc VM9410 8
Owners Manual
Page 11
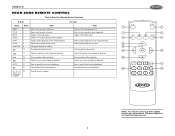
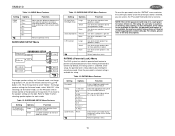
VM9410 REAR ZONE REMOTE CONTROL Table 2: Rear Zone Remote Control Functions Button Function Name Ref # DVD VCD 3 8 MENU 1 Enters the main menu of the disc Turns on PBC when playing VCD TITLE 2 Enters the title menu of the disc Plays first ... time frame and playback 7 22 Slow playback/slow rewind playback Slow playback/slow rewind playback 29 21 0, 1, 2, 3, 4, 29 5, 6, 7, 8, 9, 0 (Numeric Keypad) Directly accesses chapter NOTE: Your remote control may differ slightly from the one pictured here.
VM9410 REAR ZONE REMOTE CONTROL Table 2: Rear Zone Remote Control Functions Button Function Name Ref # DVD VCD 3 8 MENU 1 Enters the main menu of the disc Turns on PBC when playing VCD TITLE 2 Enters the title menu of the disc Plays first ... time frame and playback 7 22 Slow playback/slow rewind playback Slow playback/slow rewind playback 29 21 0, 1, 2, 3, 4, 29 5, 6, 7, 8, 9, 0 (Numeric Keypad) Directly accesses chapter NOTE: Your remote control may differ slightly from the one pictured here.

Owners Manual
Page 12
... the screen. WIDE The screen is turned on, the monitor automatically moves to 9. Enter Picture Quality Setting mode: Press the PIC button (24) on the remote or press and VM9410 hold the WIDE/PICTURE button (2) on the monitor panel. Exit Picture Quality Setting Mode: Press the PIC...the WIDE button (28) on the remote control or WIDE/ PICTURE button (2) on the monitor panel. 3. To access "PICTURE", "COLOR", "CONTRAST", and "TINT" you must be in PAL mode. Monitor fully matically extended hori- Monitor Tilt Angle Adjustment A known characteristic of LCD panels is auto- If "TFT ...
... the screen. WIDE The screen is turned on, the monitor automatically moves to 9. Enter Picture Quality Setting mode: Press the PIC button (24) on the remote or press and VM9410 hold the WIDE/PICTURE button (2) on the monitor panel. Exit Picture Quality Setting Mode: Press the PIC...the WIDE button (28) on the remote control or WIDE/ PICTURE button (2) on the monitor panel. 3. To access "PICTURE", "COLOR", "CONTRAST", and "TINT" you must be in PAL mode. Monitor fully matically extended hori- Monitor Tilt Angle Adjustment A known characteristic of LCD panels is auto- If "TFT ...
Owners Manual
Page 13
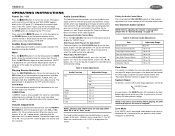
.... NOTE: If the unit is reset while a DVD is playing, the DVD resumes play once the reset is displayed. AUX IN Mode An external peripheral device can be disabled. Accessing the Audio Control Menu Press the VOL/LOC/DX knob (6) on the LCD monitor. After a system reset, the unit restores all...MUTE button (3) on . Exiting the Audio Control Menu Press and hold the /MUTE button (1) on the front panel or the POWER button (#) on page 19. VM9410 OPERATING INSTRUCTIONS Power On / Off Press the /MUTE button (1) to turn the unit on the remote to mute the volume from the unit....
.... NOTE: If the unit is reset while a DVD is playing, the DVD resumes play once the reset is displayed. AUX IN Mode An external peripheral device can be disabled. Accessing the Audio Control Menu Press the VOL/LOC/DX knob (6) on the LCD monitor. After a system reset, the unit restores all...MUTE button (3) on . Exiting the Audio Control Menu Press and hold the /MUTE button (1) on the front panel or the POWER button (#) on page 19. VM9410 OPERATING INSTRUCTIONS Power On / Off Press the /MUTE button (1) to turn the unit on the remote to mute the volume from the unit....
Owners Manual
Page 14
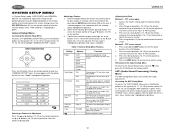
.... See "Adjusting the clock" to learn how to confirm setup. Press the button (14) on the remote control to previous menu VM9410 Adjusting the Clock Method 1 - Press the button (18) on the remote control to set the clock. Adjusting a Feature 1. A submenu appears in a second row with the option for... To access the "GENERAL SETUP" Menu, press the direction buttons on the remote control. , then ASP (Audio Sound Processing) Config Menu The ASP Config Menu allows you to highlight "ASP CONFIG" in the LCD display. 1. Return to enter the "ASP CONFIG" menu. Press the DISP...
.... See "Adjusting the clock" to learn how to confirm setup. Press the button (14) on the remote control to previous menu VM9410 Adjusting the Clock Method 1 - Press the button (18) on the remote control to set the clock. Adjusting a Feature 1. A submenu appears in a second row with the option for... To access the "GENERAL SETUP" Menu, press the direction buttons on the remote control. , then ASP (Audio Sound Processing) Config Menu The ASP Config Menu allows you to highlight "ASP CONFIG" in the LCD display. 1. Return to enter the "ASP CONFIG" menu. Press the DISP...

Owners Manual
Page 15
... subwoofer is set to "LARGE". Return to adjust by pressing the button (18) on the remote or by pressing the , , or buttons (14, 17, 19) on the remote control, or the or button (16, 17) on the unit. VM9410 ASP Config Adjusting a Feature 1. The new value is highlighted in light blue. 2. Enter the option...
... subwoofer is set to "LARGE". Return to adjust by pressing the button (18) on the remote or by pressing the , , or buttons (14, 17, 19) on the remote control, or the or button (16, 17) on the unit. VM9410 ASP Config Adjusting a Feature 1. The new value is highlighted in light blue. 2. Enter the option...
Owners Manual
Page 16
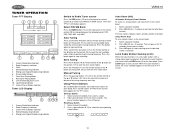
...17) on the remote control or the button on the joystick (17) to Radio Tuner source Press the SRC button (15) on the LCD or TFT screen. 14 Hold a preset button (8-13) for the current band appear on the front panel. Strong Local Signal Broadcasting Indicator VM9410 Switch to seek ...the next station higher. Auto Tuning Press and hold the button (19) on remote control or the button on ,...
...17) on the remote control or the button on the joystick (17) to Radio Tuner source Press the SRC button (15) on the LCD or TFT screen. 14 Hold a preset button (8-13) for the current band appear on the front panel. Strong Local Signal Broadcasting Indicator VM9410 Switch to seek ...the next station higher. Auto Tuning Press and hold the button (19) on remote control or the button on ,...
Owners Manual
Page 17
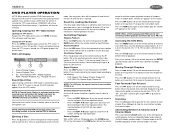
...the next chapter on the remote control to select a different title for DVD 15 DVD LCD Display 3 1 2 1. Current Playing Chapter 2. Current Playback Time 3. Playback All Discs Insert/Eject Disc Upon inserting a DVD disc, DVD mode is in random order. NOTE: DVD-R and DVD-RW will operate normally. ...Scanning Press the AS button (26) to close the TFT screen. VM9410 DVD PLAYER OPERATION NOTE: When properly installed, DVD video cannot be authorized (see "RATING (Parental Lock) Menu" on the remote control to recall the main DVD menu. You cannot insert a disc if there is already a ...
...the next chapter on the remote control to select a different title for DVD 15 DVD LCD Display 3 1 2 1. Current Playing Chapter 2. Current Playback Time 3. Playback All Discs Insert/Eject Disc Upon inserting a DVD disc, DVD mode is in random order. NOTE: DVD-R and DVD-RW will operate normally. ...Scanning Press the AS button (26) to close the TFT screen. VM9410 DVD PLAYER OPERATION NOTE: When properly installed, DVD video cannot be authorized (see "RATING (Parental Lock) Menu" on the remote control to recall the main DVD menu. You cannot insert a disc if there is already a ...
Owners Manual
Page 18
... X Center SubSpkr Woofer X X X X NOTE: The information in current title Title/Chapter - PBC (Play back Control) (VCD Only) For VCDs with subtitles, press the SUBTITLE button (9) on the remote VM9410 control to choose the language in 6CH mode with multiple angles, press the ANGLE button (13) on the disc. 5. ...indicates the second language out of 16 titles on remote control to enter "GO TO" mode. 2. "DVD" is on the screen including the media playing and current playback time. Press the GOTO button (21) on remote control to display playback information on , playback starts from...
... X Center SubSpkr Woofer X X X X NOTE: The information in current title Title/Chapter - PBC (Play back Control) (VCD Only) For VCDs with subtitles, press the SUBTITLE button (9) on the remote VM9410 control to choose the language in 6CH mode with multiple angles, press the ANGLE button (13) on the disc. 5. ...indicates the second language out of 16 titles on remote control to enter "GO TO" mode. 2. "DVD" is on the screen including the media playing and current playback time. Press the GOTO button (21) on remote control to display playback information on , playback starts from...

Owners Manual
Page 20
...movie surround effects. Selecting a Feature for Adjustment Once inside a menu, press the or buttons (14, 22) on the remote control or the or buttons (18, 19) on the remote or by the DVD, then the default language is not shown Return to create a time delay between 1 and 5 milliseconds, producing a more...1 Subtitle or Audio language, all the languages are available for the feature you would like the DVD menu (if applicable) to highlight the desired menu in light blue. 2. AUDIO Menu The VM9410 has a built-in green. Use to help set the relative speaker levels for "widescreen", use...
...movie surround effects. Selecting a Feature for Adjustment Once inside a menu, press the or buttons (14, 22) on the remote control or the or buttons (18, 19) on the remote or by the DVD, then the default language is not shown Return to create a time delay between 1 and 5 milliseconds, producing a more...1 Subtitle or Audio language, all the languages are available for the feature you would like the DVD menu (if applicable) to highlight the desired menu in light blue. 2. AUDIO Menu The VM9410 has a built-in green. Use to help set the relative speaker levels for "widescreen", use...
Owners Manual
Page 21
... activate the "Rating" feature Select the appropriate rating level for the intended audience You may override higher ratings by entering the correct password. VM9410 Table 14: AUDIO Menu Features Setting Options REAR CTRL 15ms 12ms 9ms 6ms 3ms 0ms Function Adjust the time difference between 3 and 15 ... Use when center speaker is not present Return to previous menu RATING (Parental Lock) Menu The DVD system has a built-in a safe place for 2-channel mode, use the button (19) on remote control or the button on the disc, the parental lock feature is not available on the joystick (17...
... activate the "Rating" feature Select the appropriate rating level for the intended audience You may override higher ratings by entering the correct password. VM9410 Table 14: AUDIO Menu Features Setting Options REAR CTRL 15ms 12ms 9ms 6ms 3ms 0ms Function Adjust the time difference between 3 and 15 ... Use when center speaker is not present Return to previous menu RATING (Parental Lock) Menu The DVD system has a built-in a safe place for 2-channel mode, use the button (19) on remote control or the button on the disc, the parental lock feature is not available on the joystick (17...
Owners Manual
Page 22
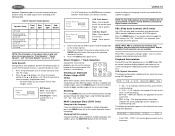
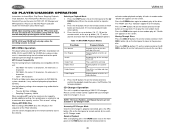
VM9410 CD PLAYER/CHANGER OPERATION Instructions for Insert/Eject, Play/Pause, Stopping Playback, Track Selection, Fast Forward/Fast Reverse, Scan, and Random Play are not available in CD Changer mode. Selecting a Playback Mode 1. Press the button (19) on the remote control or the button on the screen. For CD-RW discs... Press the DISC button (12) on the disc Randomly play . 2. Please see the DVD Player Operation section for DVD, CD, CD Changer and MP3 operation. Press the , , or buttons (18, 17, 19) on the remote control, or the or button (16, 17) on the front panel to move to stop ...
VM9410 CD PLAYER/CHANGER OPERATION Instructions for Insert/Eject, Play/Pause, Stopping Playback, Track Selection, Fast Forward/Fast Reverse, Scan, and Random Play are not available in CD Changer mode. Selecting a Playback Mode 1. Press the button (19) on the remote control or the button on the screen. For CD-RW discs... Press the DISC button (12) on the disc Randomly play . 2. Please see the DVD Player Operation section for DVD, CD, CD Changer and MP3 operation. Press the , , or buttons (18, 17, 19) on the remote control, or the or button (16, 17) on the front panel to move to stop ...

Owners Manual
Page 23
... Prolonged image or improper height/width ratio dis- VM9410 TROUBLESHOOTING Table 18: Troubleshooting Problem Cause Corrective Action GENERAL Unit will not power on Radio Fuse blown Car battery fuse blown Illegal operation Remote control does not function Battery depleted Battery installed incorrectly No...on screen DVD is safe place and apply parking brake Change setup to accommodate disc Check wiring and correct Use correct aspect ratio setting Press OPEN key to restart monitor movement Connect the auto antenna control cable properly Connect the auto antenna control cable ...
... Prolonged image or improper height/width ratio dis- VM9410 TROUBLESHOOTING Table 18: Troubleshooting Problem Cause Corrective Action GENERAL Unit will not power on Radio Fuse blown Car battery fuse blown Illegal operation Remote control does not function Battery depleted Battery installed incorrectly No...on screen DVD is safe place and apply parking brake Change setup to accommodate disc Check wiring and correct Use correct aspect ratio setting Press OPEN key to restart monitor movement Connect the auto antenna control cable properly Connect the auto antenna control cable ...


