
Owners Manual
Page 12
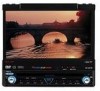
... Monitor swivels back to the unit Monitor swivels back to its original input mode. Continuous Angle Adjustment Press and hold the ( ) or ( ) buttons (18, 19) on , and the monitor is "0" in DVD ...MONITOR Open/Close TFT Monitor Open TFT Monitor Press the OPEN button (1) on the monitor panel. The extension ratio increases toward the right and left sides of the display in AUX or CAMERA mode. Monitor Tilt Angle Adjustment A known characteristic of LCD... button (24) on the remote or press and VM9410 hold the WIDE/PICTURE button (2) on the front panel or press the ( ) button (25) ...
... Monitor swivels back to the unit Monitor swivels back to its original input mode. Continuous Angle Adjustment Press and hold the ( ) or ( ) buttons (18, 19) on , and the monitor is "0" in DVD ...MONITOR Open/Close TFT Monitor Open TFT Monitor Press the OPEN button (1) on the monitor panel. The extension ratio increases toward the right and left sides of the display in AUX or CAMERA mode. Monitor Tilt Angle Adjustment A known characteristic of LCD... button (24) on the remote or press and VM9410 hold the WIDE/PICTURE button (2) on the front panel or press the ( ) button (25) ...
Owners Manual
Page 13
... beep tone cannot be connected to this unit via RCA output and "AUX-IN". Playing Source Selection Press the SRC/P.MODE button (15) on the...DVD output using any speaker, please refer to "Surround Setup" on the front bottom-right corner of a pen to press the RESET button (22) located on page 19. The volume ranges from 1-4 or "off the unit.The monitor is displayed on the LCD monitor. Loudness levels range from "0" to "40". VM9410...the main compartment and the LCD screen displays "BYE-BYE". To install a rear view video camera, connect the video input cable to restore the volume...
... beep tone cannot be connected to this unit via RCA output and "AUX-IN". Playing Source Selection Press the SRC/P.MODE button (15) on the...DVD output using any speaker, please refer to "Surround Setup" on the front bottom-right corner of a pen to press the RESET button (22) located on page 19. The volume ranges from 1-4 or "off the unit.The monitor is displayed on the LCD monitor. Loudness levels range from "0" to "40". VM9410...the main compartment and the LCD screen displays "BYE-BYE". To install a rear view video camera, connect the video input cable to restore the volume...
Owners Manual
Page 25
... - 2kHz, -3dB Monitor Screen Size: 7.0" (Measured diagonally), 16:9 Widescreen • 6.06" (154.1mm) W X 3.42" (87mm) H Screen Type: TFT Liquid Crystal Display (LCD) active matrix Response Time: 30mSec rise time, 50mSec fall time Resolution: • DVD/Composite Video in material ...jensen.com © 2005 Audiovox v.022805 23 VM9410 SPECIFICATIONS CEA Power Ratings Power Output: 13 watts RMS X 4 channels into 4-ohms, all other express warranties or liabilities. Aux input used as source reference Reference Supply Voltage: 14.4VDC DVD/CD Player Compatible Formats: DVD-R, DVD-RW, DVD+R, DVD...
... - 2kHz, -3dB Monitor Screen Size: 7.0" (Measured diagonally), 16:9 Widescreen • 6.06" (154.1mm) W X 3.42" (87mm) H Screen Type: TFT Liquid Crystal Display (LCD) active matrix Response Time: 30mSec rise time, 50mSec fall time Resolution: • DVD/Composite Video in material ...jensen.com © 2005 Audiovox v.022805 23 VM9410 SPECIFICATIONS CEA Power Ratings Power Output: 13 watts RMS X 4 channels into 4-ohms, all other express warranties or liabilities. Aux input used as source reference Reference Supply Voltage: 14.4VDC DVD/CD Player Compatible Formats: DVD-R, DVD-RW, DVD+R, DVD...


