Operation Manual
Page 3
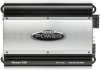
... whether the power can permanently damage your new hard-hitting, speaker-pumping Jensen amplifier. At Jensen, to get the legal stuff out of the way, so please keep reading. Exposure to loud sounds or music can be fair to you will need to be produced in the first place. Warranty Service If your Jensen amplifier should ever require service, you and to install your...
... whether the power can permanently damage your new hard-hitting, speaker-pumping Jensen amplifier. At Jensen, to get the legal stuff out of the way, so please keep reading. Exposure to loud sounds or music can be fair to you will need to be produced in the first place. Warranty Service If your Jensen amplifier should ever require service, you and to install your...
Operation Manual
Page 4
...; 2/ 3 / 4 Channel Mode Switch (Power 760 and 920 only)) Power 900 / 1050 • Mono Subwoofer Amp • Low Pass Filter 40 - 240 Hz (Power 900) • Low Pass Filter 40 - 150 Hz (Power 1050) • Subsonic Filter 10 - 40 Hz, 12dB / octave (Power 900) • Subsonic Filter 15 - 55 Hz, 12dB / octave (Power 1050) • Remote Input Level Control (Remote Bass Control) w/ 5 Meter Interface Cable Specifications Power 400 / 760 / 880 / 920 • Load Impedance: 2 / 4-Ohm • Signal...
...; 2/ 3 / 4 Channel Mode Switch (Power 760 and 920 only)) Power 900 / 1050 • Mono Subwoofer Amp • Low Pass Filter 40 - 240 Hz (Power 900) • Low Pass Filter 40 - 150 Hz (Power 1050) • Subsonic Filter 10 - 40 Hz, 12dB / octave (Power 900) • Subsonic Filter 15 - 55 Hz, 12dB / octave (Power 1050) • Remote Input Level Control (Remote Bass Control) w/ 5 Meter Interface Cable Specifications Power 400 / 760 / 880 / 920 • Load Impedance: 2 / 4-Ohm • Signal...
Operation Manual
Page 5
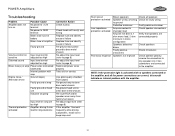
.... Follow the installation instructions carefully, or have the amplifier installed correctly. going to the amplifier or the electrical system. Be sure the mounting location and the drilling of pilot holes will need before starting the installation. right and twice! When selecting a location, remember that your Jensen Power series amp will not operate properly and could become permanently damaged. Routing Wires Proper wiring connections are two...
.... Follow the installation instructions carefully, or have the amplifier installed correctly. going to the amplifier or the electrical system. Be sure the mounting location and the drilling of pilot holes will need before starting the installation. right and twice! When selecting a location, remember that your Jensen Power series amp will not operate properly and could become permanently damaged. Routing Wires Proper wiring connections are two...
Operation Manual
Page 6
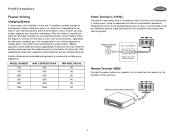
... 5 DN 6 UP i X-BASS BAND SUB-W AS/PS SCAN MONO MODE AUX DISP i EQ MUTE 4 Remote Terminal (REM) Connect the power antenna or amplifier turn-on lead from the positive (+) battery post, using an adequate size fuse or circuit breaker capable of handling the current of your vehicle, you should the main power wire short to the amplifier remote terminal. Depending on the alternator. After upgrading the alternator...
... 5 DN 6 UP i X-BASS BAND SUB-W AS/PS SCAN MONO MODE AUX DISP i EQ MUTE 4 Remote Terminal (REM) Connect the power antenna or amplifier turn-on lead from the positive (+) battery post, using an adequate size fuse or circuit breaker capable of handling the current of your vehicle, you should the main power wire short to the amplifier remote terminal. Depending on the alternator. After upgrading the alternator...
Operation Manual
Page 7
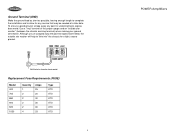
... star washer" (between the chassis and ring terminal) when making your ground connection. Replacement Fuse Requirements (FUSE) Model 400 760 880 900 920 1050 Quantity 1 2 2 2 2 4 Amps 25 20 30 30 30 25 Type ATO ATO ATO ATO ATO ATO 5 POWER Amplifiers To ensure a good ground, scrape away any service that may be needed at a later date. Drill hole in chassis sheet metal...
... star washer" (between the chassis and ring terminal) when making your ground connection. Replacement Fuse Requirements (FUSE) Model 400 760 880 900 920 1050 Quantity 1 2 2 2 2 4 Amps 25 20 30 30 30 25 Type ATO ATO ATO ATO ATO ATO 5 POWER Amplifiers To ensure a good ground, scrape away any service that may be needed at a later date. Drill hole in chassis sheet metal...
Operation Manual
Page 8
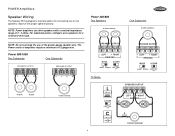
... Subwoofer One Subwoofer SPEAKER OUTPUT SPEAKER OUTPUT -- + + -- + + SPEAKER OUTPUT + LEFT - + RIGHT BRIDGED MODE X-OVER MONO STEREO FULL HPF LPF Tri-Mode SPEAKER OUTPUT + LEFT - + RIGHT BRIDGED MODE X-OVER MONO STEREO FULL HPF LPF 4 ohm 4 ohm 4 ohm nominal L Inductor X-OVER FULL HPF LPF C Capacitor SPEAKER OUTPUT + LEFT - + RIGHT BRIDGED C L 4 ohm nominal 6 Power 400/880 Two Speakers 4 ohm nominal One Subwoofer 4 ohm nominal NOTE: Do not overlook the use of 12-gauge wire. NOTE: Power amplifiers...
... Subwoofer One Subwoofer SPEAKER OUTPUT SPEAKER OUTPUT -- + + -- + + SPEAKER OUTPUT + LEFT - + RIGHT BRIDGED MODE X-OVER MONO STEREO FULL HPF LPF Tri-Mode SPEAKER OUTPUT + LEFT - + RIGHT BRIDGED MODE X-OVER MONO STEREO FULL HPF LPF 4 ohm 4 ohm 4 ohm nominal L Inductor X-OVER FULL HPF LPF C Capacitor SPEAKER OUTPUT + LEFT - + RIGHT BRIDGED C L 4 ohm nominal 6 Power 400/880 Two Speakers 4 ohm nominal One Subwoofer 4 ohm nominal NOTE: Do not overlook the use of 12-gauge wire. NOTE: Power amplifiers...
Operation Manual
Page 9
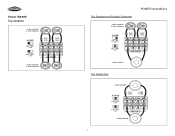
Power 760/920 Four Speakers 4 ohm nominal 2 ohm minimum X-OVER FULL HPF LPF + CH1 + CH3 - + CH2 + CH4 - FULL HPF LPF + BRIDGED - 4 ohm nominal 7 FULL HPF LPF + BRIDGED - 4 ohm nominal 2 ohm minimum Two Speakers and Bridged Subwoofer POWER Amplifiers 4 ohm nominal 2 ohm minimum X-OVER FULL HPF LPF + CH1 + CH3 - + CH2 + CH4 - FULL HPF LPF + BRIDGED - 4 ohm nominal Two Subwoofers 4 ohm nominal X-OVER FULL HPF LPF + CH1 + CH3 - + CH2 + CH4 -
Power 760/920 Four Speakers 4 ohm nominal 2 ohm minimum X-OVER FULL HPF LPF + CH1 + CH3 - + CH2 + CH4 - FULL HPF LPF + BRIDGED - 4 ohm nominal 7 FULL HPF LPF + BRIDGED - 4 ohm nominal 2 ohm minimum Two Speakers and Bridged Subwoofer POWER Amplifiers 4 ohm nominal 2 ohm minimum X-OVER FULL HPF LPF + CH1 + CH3 - + CH2 + CH4 - FULL HPF LPF + BRIDGED - 4 ohm nominal Two Subwoofers 4 ohm nominal X-OVER FULL HPF LPF + CH1 + CH3 - + CH2 + CH4 -
Operation Manual
Page 10
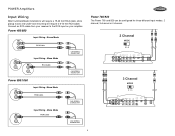
Connect an RCA cable from your receiver to the RCA input on your amplifier. Mono Mode RCA Cable Power 900/1050 Input Wiring - Stereo Mode RCA Cable Input Wiring - Mono Mode RCA Cable CAR STEREO / SOURCE UNIT CAR STEREO / SOURCE UNIT CAR STEREO / SOURCE UNIT CAR STEREO / SOURCE UNIT Power 760/920 The Power 760 and 920 can be configured for three different input modes: 2 channel, 3 channel or 4 channel. 2 Channel MODE 234 LINE INPUT LEVEL BASS EQ HPF LPF X-OVER CH1 CH2 CH3 FULL HPF min max 0dB 12dB 40Hz...
Connect an RCA cable from your receiver to the RCA input on your amplifier. Mono Mode RCA Cable Power 900/1050 Input Wiring - Stereo Mode RCA Cable Input Wiring - Mono Mode RCA Cable CAR STEREO / SOURCE UNIT CAR STEREO / SOURCE UNIT CAR STEREO / SOURCE UNIT CAR STEREO / SOURCE UNIT Power 760/920 The Power 760 and 920 can be configured for three different input modes: 2 channel, 3 channel or 4 channel. 2 Channel MODE 234 LINE INPUT LEVEL BASS EQ HPF LPF X-OVER CH1 CH2 CH3 FULL HPF min max 0dB 12dB 40Hz...
Operation Manual
Page 11
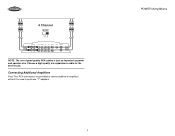
Connecting Additional Amplifiers Pass-Thru RCA connectors are provided to connect additional amplifiers without the need to purchase "Y" adapters. 9 POWER Amplifiers Choose a high quality low capacitance cable for the best results. 4 Channel MODE 234 LINE INPUT LEVEL BASS EQ HPF LPF X-OVER CH1 CH2 CH3 FULL HPF min max 0dB 12dB 40Hz 300Hz 40Hz 300Hz LPF CH4 min max 0dB 12dB 40Hz 300Hz 40Hz 300Hz FULL HPF LPF MODE LINE OUT 234 NOTE: The use of good quality RCA cables is just as important as power and speaker wire.
Connecting Additional Amplifiers Pass-Thru RCA connectors are provided to connect additional amplifiers without the need to purchase "Y" adapters. 9 POWER Amplifiers Choose a high quality low capacitance cable for the best results. 4 Channel MODE 234 LINE INPUT LEVEL BASS EQ HPF LPF X-OVER CH1 CH2 CH3 FULL HPF min max 0dB 12dB 40Hz 300Hz 40Hz 300Hz LPF CH4 min max 0dB 12dB 40Hz 300Hz 40Hz 300Hz FULL HPF LPF MODE LINE OUT 234 NOTE: The use of good quality RCA cables is just as important as power and speaker wire.
Operation Manual
Page 12
... a 2-channel input from 0 to your subwoofer/enclosure combination. Mode Switch Power 400 and 880 The 400 and 880 come equiped with a MONO/STEREO MODE switch. Use STEREO mode when you selected the high pass filter and set the crossover by adjusting the crossover to be driving woofers or subwoofers. Input Level Control (LEVEL) The input LEVEL control matches the output of your subwoofers at 40Hz, which would be configured for bi-amplifying the system. Adjusting the Bass Boost level allows...
... a 2-channel input from 0 to your subwoofer/enclosure combination. Mode Switch Power 400 and 880 The 400 and 880 come equiped with a MONO/STEREO MODE switch. Use STEREO mode when you selected the high pass filter and set the crossover by adjusting the crossover to be driving woofers or subwoofers. Input Level Control (LEVEL) The input LEVEL control matches the output of your subwoofers at 40Hz, which would be configured for bi-amplifying the system. Adjusting the Bass Boost level allows...
Operation Manual
Page 13
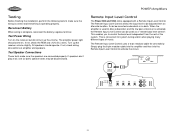
... installation, perform the following tests to make sure the speakers are connected properly. Test Power Wiring Turn on . If speakers don't play at amplifier and speakers. Power Min Max REMOTE CONTROL POWER PROTECT REMOTE CONTROL BASS BOOST SUB SONIC LOW PASS LEVEL OUTPUT INPUT L L 0dB 12dB 10Hz 40Hz 40Hz 300Hz 4V 0.4V R R 11 The amplifier power light should operate. All speakers should come equipped with a Remote Input Level Control. POWER Amplifiers Remote Input Level Control The Power 900 and 1050 come on the receiver, but do not turn up the receiver volume...
... installation, perform the following tests to make sure the speakers are connected properly. Test Power Wiring Turn on . If speakers don't play at amplifier and speakers. Power Min Max REMOTE CONTROL POWER PROTECT REMOTE CONTROL BASS BOOST SUB SONIC LOW PASS LEVEL OUTPUT INPUT L L 0dB 12dB 10Hz 40Hz 40Hz 300Hz 4V 0.4V R R 11 The amplifier power light should operate. All speakers should come equipped with a Remote Input Level Control. POWER Amplifiers Remote Input Level Control The Power 900 and 1050 come on the receiver, but do not turn up the receiver volume...
Operation Manual
Page 14
... protection light is activated with no speakers connected to the amplifier, and all speakers Check for faulty wiring Faulty passive crossover Check speaker connections Verify that speakers are connected properly Check speakers Check crossovers Check speaker polarity; POWER Amplifiers Troubleshooting Problem Amplifier does not turn on Possible Cause No power to +12V terminal No power to REM terminal Blown main fuse at battery Blown fuse at amplifier Faulty ground Volume control too Input level control sensitive adjusted too high Distorted sound Input level control adjusted...
... protection light is activated with no speakers connected to the amplifier, and all speakers Check for faulty wiring Faulty passive crossover Check speaker connections Verify that speakers are connected properly Check speakers Check crossovers Check speaker polarity; POWER Amplifiers Troubleshooting Problem Amplifier does not turn on Possible Cause No power to +12V terminal No power to REM terminal Blown main fuse at battery Blown fuse at amplifier Faulty ground Volume control too Input level control sensitive adjusted too high Distorted sound Input level control adjusted...
Operation Manual
Page 15
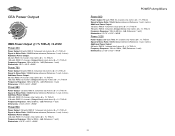
...: 1 watt, 4-ohms) Additional Power Output: 80 watts RMS X 2 channels into 2-ohms @ < 1% THD+N 160 watts RMS X 1 channels (Bridged Mono) into 4-ohms @ < 1% THD+N Frequency Response: 10Hz to 60 kHz, -3dB (Reference: 1 watt) Dimensions: L9.5" x H2.5" x W9.0" Power 760 Power Output: 60 watts RMS X 4 channels into 4-ohms @ < 1% THD+N Signal to Noise Ratio: 100dBA below reference (Reference: 1 watt, 4-ohms) Additional Power Output: 80 watts RMS X 4 channels into 2-ohms @ < 1% THD+N 155 watts RMS X 2 channels (Bridged Stereo) into 4-ohms @ < 1% THD+N Frequency...
...: 1 watt, 4-ohms) Additional Power Output: 80 watts RMS X 2 channels into 2-ohms @ < 1% THD+N 160 watts RMS X 1 channels (Bridged Mono) into 4-ohms @ < 1% THD+N Frequency Response: 10Hz to 60 kHz, -3dB (Reference: 1 watt) Dimensions: L9.5" x H2.5" x W9.0" Power 760 Power Output: 60 watts RMS X 4 channels into 4-ohms @ < 1% THD+N Signal to Noise Ratio: 100dBA below reference (Reference: 1 watt, 4-ohms) Additional Power Output: 80 watts RMS X 4 channels into 2-ohms @ < 1% THD+N 155 watts RMS X 2 channels (Bridged Stereo) into 4-ohms @ < 1% THD+N Frequency...

Operation Manual
Page 16
POWER Amplifiers 14
POWER Amplifiers 14
Operation Manual
Page 44
... exclusions may also have been removed or defaced • Damage resulting from moisture, humidity, excessive temperature, extreme environmental conditions or external natural causes Please review the "Care and Maintenance" section of your Installation and Operation Manual for additional information regarding the proper use , be proven defective in cosmetic, decorative or non-operative structural parts • Costs incurred for...
... exclusions may also have been removed or defaced • Damage resulting from moisture, humidity, excessive temperature, extreme environmental conditions or external natural causes Please review the "Care and Maintenance" section of your Installation and Operation Manual for additional information regarding the proper use , be proven defective in cosmetic, decorative or non-operative structural parts • Costs incurred for...
Operation Manual
Page 48
Audiovox Electronics Corporation Hauppauge, NY 11788 1-800-323-4815 www.jensen.com © 2007 Audiovox v. 012407
Audiovox Electronics Corporation Hauppauge, NY 11788 1-800-323-4815 www.jensen.com © 2007 Audiovox v. 012407


