JVC TK-C215VP4U - CCTV Camera Support and Manuals
Get Help and Manuals for this JVC item
View All Support Options Below
Free JVC TK-C215VP4U manuals!
Problems with JVC TK-C215VP4U?
Ask a Question
Free JVC TK-C215VP4U manuals!
Problems with JVC TK-C215VP4U?
Ask a Question
Popular JVC TK-C215VP4U Manual Pages
Instructions - Page 1

LST0474-001B To user
: Please be sure to keep together with the instruction manual after reading.
DOME CAMERA
TK-C215VP4 TK-C215VP12
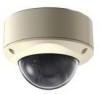
INSTALLATION PRECAUTIONS
To installation contractor
: Be sure to user after reading. Pass the manual to read the followings beforehand for proper installation.
Instructions - Page 5

Retain this information for future reference. TK-C215VP4
LST0509-001A Model No.
Serial No. which is located on the body.
DOME CAMERA
TK-C215VP4
INSTRUCTIONS
For Customer Use:
Enter below the Serial No.
Instructions - Page 6

...isintended to alert the user to the presence of important operating and maintenance (servicing) instructions in the European Union.
Cet appareil numerique de la Class Best conforme ...By disposing of this product, please visit our web page www.jvc-europe.com to obtain information about collection point and recycling of ...SERVICEABLE PARTS INSIDE.REFER SERVICING TO QUALIFIED SERVICE PERSONNEL.
Instructions - Page 8
...power supply only (For Europe).
ⅷ This installation should be made by a qualified service person and should conform to all local codes.
ⅷ This installation shall be in accordance with a high temperature, ... when installing the camera.
ⅷ Do not install the camera near lighting equipment with the National Electrical Code, ANSI/NFPA 70.
ⅷ Any Mention in this manual of Alarm...
Instructions - Page 9
... appliance exhibits a distinct change in installation such as they may touch dangerous voltage points or short out parts that are covered by the operating instructions as this appliance near a swimming ...items may not apply to qualified service personnel under the following the operating instructions. Use a damp cloth for service. 17.When replacement parts are required, be adhered to ...
Instructions - Page 10

..., please read the instruction manual carefully in order to the wall is possible with the employment of their respective companies.
Characteristics
Ⅵ Excellent dust-proof and water-proof performance
With the dust-proof and water-proof structure, it can be installed outdoor directly as follows: TK-C215VP4U/TK-C215VP4E
In this manual, each model number is dark. How...
Instructions - Page 13
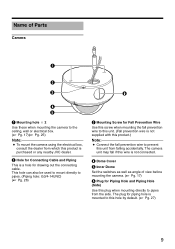
... is a hole for piping hole is purchased or any nearby JVC dealer. Name of view before mounting the camera. (A Pg. 17)
F Plug for Connecting Cable and Piping
This is not connected.
D Dome Cover
E Inner Dome
Set the switches as well as angle of Parts
Camera
A
B
C
F
D E
A Mounting hole ן2
Use these when mounting the...
Instructions - Page 16
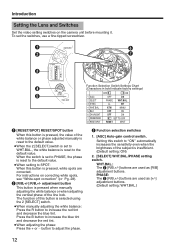
...; When manually adjusting the white balance: Press the R button to SPOT: When this button is insufficient. (Default setting: ON)
2. [SELECT] WHT.BAL./PHASE setting switch. Press the B button to adjust the phase. A
RESET/[SPOT]
F
B
G
B R
C
LL PHASE 1 2 3 4 5 6 7 8
O N2
4 WHT.
C Function selection switches
1. [AGC] Auto-gain control switch. For instructions on the camera unit...
Instructions - Page 17
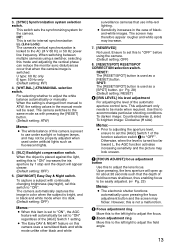
... darken image: Counterclockwise (L side) To brighten image: Clockwise (H side)
Memo:
● Prior to adjusting the aperture level, ensure to set for internal synchronization LL (Line Lock): The camera's vertical synchronization is changed from manual to AONB regardless of the function selection switch C to AOFFB before using a switcher, selecting this to the left /right...
Instructions - Page 18
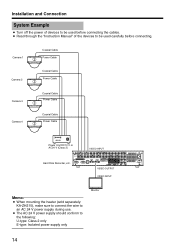
Installation and Connection
System Example
● Turn off the power of devices to be used before connecting the cables. ● Read through the "Instruction Manual" of the devices to the following: U-type: Class 2 only E-type: Isolated power supply only
Monitor
14 Camera 1
Coaxial Cable Power Cable
Camera 2
Coaxial Cable Power Cable
Camera 3
Coaxial Cable Power Cable
Camera 4
...
Instructions - Page 20

... base to the ceiling, or when connecting the cable of the camera unit, pay enough attention to the fall of the dome cover, followed by mounting the camera unit to prevent fogging of each part.
16
step 1
K
step 2
K
step 3
K
step 4
K
step 5
K
step 6
K
step 7
Set the switches (A Pg. 17)
Remove the dome cover, followed by...
Instructions - Page 21
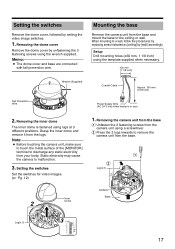
... Before touching the camera unit, make sure to touch the metal surface of the [MONITOR] terminal to a wall, follow the procedures by replacing areas indicated as [ceiling] by setting the video image switches...camera unit from the base
A Unfasten the 2 fastening screws from the
camera unit using the wrench supplied. Setting the switches
Remove the dome cover, followed by [wall] accordingly. Setup...
Instructions - Page 26

Installation and Connection
Adjusting the video image
Upon mounting the camera, adjust the images while checking the actual image.
Adjust the camera in maintaining the performance of this camera.
● As this camera has a wide tilt/rotation range, a part of this camera may cause the camera to malfunction.
● Before adjusting the shooting direction of the camera, ensure that the...
Instructions - Page 28

Mounting the dome cover
1. Installation and Connection
Mounting the inner dome
After setting is not removed from the dome cover. Memo:
● Dirt that it .
2. Cleaning...such as stretching it does not cover the lens.
● When mounting the inner dome, make sure not to the camera.
1. Lug(x 3)
Inner Dome
Note:
● Mount the inner dome such that is complete, mount the inner dome ...
Instructions - Page 30
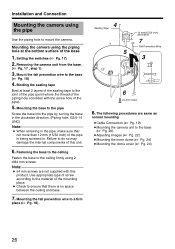
Installation and Connection
Mounting the camera using 2 RM4 mm screws. Removing the camera unit from the base.
(A Pg. 17 , step 1)
3. Use appropriate type of...Tape
5
12 mm(15/32 inch) and below
7
Fall Prevention Wire
3
6
R4 mm screw
8. Setting the switches (A Pg. 17) 2. Mounting the camera using the piping hole at least 2 layers of the sealing tape to the pipe
Screw the base into ...
JVC TK-C215VP4U Reviews
We have not received any reviews for JVC yet.